Just another way to extend the Chuck Jaws

UKworkshop.co.uk

Help Support UKworkshop.co.uk:

This site may earn a commission from merchant affiliate links, including eBay, Amazon, and others.

CHJ

Established Member
Joined
31 Dec 2004
Messages
20,132
Reaction score
79
Location
Cotswolds UK
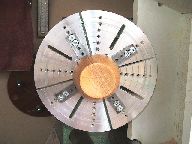
__________Finishing off one of the small pots today, raised the thought
__________that someone may be interested in my solution to extending the Chuck Jaw range.

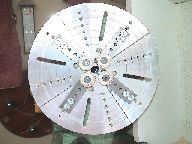
_________ ___ ___ ___ click on images for larger view
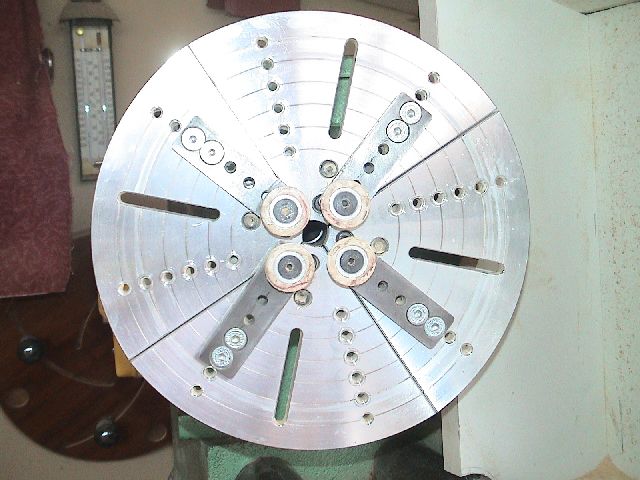
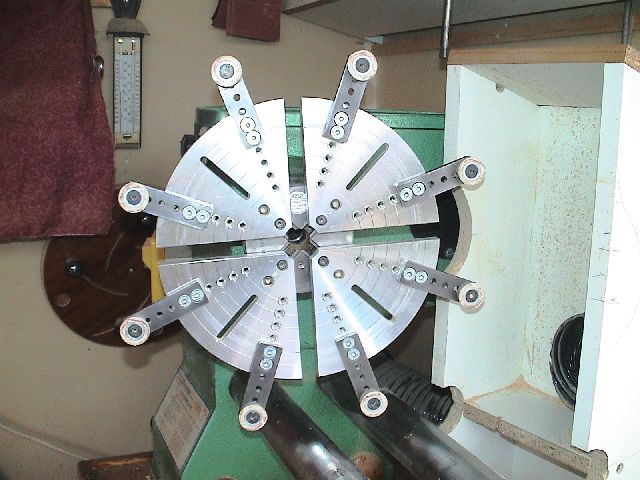
___________Eight 7/8 x 1/4" pieces of steel, 48 Holes, 32 of them tapped 6mm.

__________Not something you would want to poke a finger in, but no worse than a square or natural edge bowl.
 
Blimey Chas,you been watching to much Dr Who. :D
Did you make this yourself,very impressive if so,any chance of making me one :shock:
Paul.J.
 
Only the adaptors are mine, the Cole Jaws are Axminster, would have cost me nearly as much to buy the ally' :cry: says he who once used to order the stuff in the tens of sheets, not that I would have borrowed any of course :roll:

I'm generous Paul, but if you think I am volunteering for drilling and tapping another 48 holes in the near future, lets just say I have a lot of away days this year.

I get most of my metal supplies from GLR in Daventry, make a detour that way now and again whilst visiting Leicestershire.
 
Chas wrote
I'm generous Paul, but if you think I am volunteering for drilling and tapping another 48 holes in the near future, lets just say I have a lot of away days this year.
Sorry Chas,i was just kidding.
How does this actually work.Do you have to make the bowl fit those sizes :?:
Paul.J.
 
Paul.J":zp9a8t6r said:
How does this actually work.Do you have to make the bowl fit those sizes :?:
Paul.J.

The Rubber covered buttons are positioned in the appropriate holes so that the PCD (inner or outer) of the bowl fits within the range of the chuck jaw travel.

Having said that, the Axminster precision chuck is bad in this respect because it has a smaller safe jaw travel compared with say the Nova chuck, this combined with the button diameters can leave you a few mm short of travel at times. I am in the process of turning some differing diameter buttons to overcome this.
 
Paul.J":2wyudpsc said:
Chas.
I am thinking of doing one of these but using ply. :shock:
Do you think this Would be acceptable. :?:
Paul.J.

Ply would be fine, try and get a good quality 13 mm 5ply if possible.
EDIT: Strike reference to MDF it is not strong enough I checked.

If you fit a doubler, say 100mm diam' on the rear you can turn a socket in it to take your chuck dovetail jaws before fixing, then mount the assembly on the chuck to clean up the disc and mark the PCD's for the holes on the lathe.

Then when it is all neat and tidy and chuck jaw fixing holes sorted chop it into four segments. At a minimum fit washers under the jaw fixing screws, I would prefer to see a brass or ally' ferule in the jaw fixing screw holes.

Two choices really re fixing buttons.
1: just plain holes and bolt right through
2: fit pronged tee nuts to the rear face


Edit:, keep RPM below 250-300 Alloy ones are rated at 600 or so.
 
Chas.
Not to sure what you mean,Doubler-pcd,s,-brass ally ferrule :?:
I was going to mark the dia out on ply,segmented into 4,mark holes to fix to chuck,use t-nuts to fix rubber fittings,i was going to use a couple of large tap washers :?:
Or have i got it all wrong :roll:
Paul.J.
 
I have no engineering knowledge, repeat, no engineering knowledge!

But I have a suspicion that the fixing holes in the ply (to secure it to the chuck) may be subject to too much wear for safe use more than a couple of times?

Or have I just made a complete canines evening repast of myself?

Ooops - forgot to say - nice one CHJ - simple but jolly effective.
 
greybeard":2b3jhp3c said:
I have no engineering knowledge, repeat, no engineering knowledge!

But I have a suspicion that the fixing holes in the ply (to secure it to the chuck) may be subject to too much wear for safe use more than a couple of times?

Or have I just made a complete canines evening repast of myself?

Ooops - forgot to say - nice one CHJ - simple but jolly effective.

No greybeard, your reservations are valid, hence my comment about ferule in holes.

I have added an amendment after some tests since posting.
 
Paul.J":1gnifry9 said:
Chas.
Not to sure what you mean,Doubler-pcd,s,-brass ally ferrule :?:
...snip...
Paul.J.

Doubler: another smaller disc on the back to thicken the area taking the fixing hole loads.

PCD: Pitch circle diameter. the circles you can see on the alloy plates, makes it easier to align your button fixing holes.

Ferules: small pieces of tubes with a bore to suit your Jaw fixing bolts, to protect the wood and reduce the crushing effect of the bolts on the wood (should find some suitable in a B&Q Warehouse or model shop.)Epoxy them in.

An alternate would be to make a Longworth Chuck See this Thread

A Google will throw up several versions but this is as good as any for how to mark it out, mine has a doubler on the back with a socket to suit my chuck jaws.

Yet more ideas on the bowl chuck front
 
I sometimes use plywood jaws, BUT:

- You definitely need to use longer screws than the ones that attach your metal jaws. Do not counterbore the hole in the plywood deep enough to use the short screws or there will not be enough material left under the heads to support the load.

- I generally consider them consumeables, like a glue block on a face plate. Rather than attempt to drill holes for buttons I simply turn a recess into the face of the jaws to grip the rim of the workpiece. There must be enough material on the outside of the recess to provide support. I would consider one inch to be the minimum. Any narrower and you risk having the ply delaminate.

- A far better option for mounting the jaws is to use the Oneway flat jaws, which mount on to the chuck in place of profiled jaws. They provide countersunk holes that allow mounting wooden jaw faces from the back, similar to a screwing on a faceplate. They are flat on the back side so they will fit on any chuck that has the same hole spacing for the mounting screws as a Oneway has. I am not sure what that spacing is, but I do know that the Oneway basic and Talon chucks have the same spacing as my Supernova II chuck.

- A plywood doughnut chuck mounted on a faceplate will give a more secure mounting than a plywood 4 jaw chuck and if you make a few different outer plates with different sized holes it should be just as versatile.

- I would not go too big or turn too fast with plywood jaws because all the stress is on that little area around the mounting screws which does not have much material around it to support it.

Good Luck!
Bob
 
Thanks for the input bobham, as you say the jaw fixing is the major 'risk' area, hence my comment about doubler piece and ferules.

You make a valid point about longer screws, I did assume, I know I should not have, that long screws would have been used through the extra thickness. just shows how careful one should be giving advice.

As for the "wood jaws" they are relatively expensive over here for a new starter and are not available for all makes of chuck, one of the problems as you are aware is that the 'safety groove' location and form differs between the makes preventing cross brand use.

Your confirmation that the Oneway, Tallon and Nova have the same location form is useful info.

The Axminster chuck example above for instance has a proud safety ridge on the scroll jaw which makes for difficulty in fitting a flat adaptor.
 
CHJ":10fe0ms7 said:
Your confirmation that the Oneway, Tallon and Nova have the same location form is useful info.

This is an interesting thread.
Between us we ought to compile a chart of which jaws/chucks are interchangeable......
 
NickWelford":l993rbrq said:
CHJ":l993rbrq said:
Your confirmation that the Oneway, Tallon and Nova have the same location form is useful info.

This is an interesting thread.
Between us we ought to compile a chart of which jaws/chucks are interchangeable......

I would have thought so, and annotate reservations relating to restricted use because of lack of 'safety groove' non compliance etc.

I tried to get some info. way back in sept.2005 but did not have much input.
 
That Longworth Chuck looks really useful. I don't have a router and as it isn't something that I probably wouldn't use much it seems silly to go and buy one for just one job. Does anyone have any ideas how to cut those curves accurately some other way. I have a jigsaw but find it really hard to get a good line with it.

Pete
 
Thanks for the help chaps.
I have now made one :shock:
Here it is.What do you think.Is it safe enough to use. :?:
Sorry about the wip piccys but i get that involved that i just carried on.Just missed the marking out.
No1 piccy shows bolts fitted to the steel straps to strenghten the back.


No2 piccy shows the chuck fitted.


No3 piccy shows it on the lathe.


No4 piccy shows brackets closed up using chuck.


No5 piccy shows a pilot hole for the T-Nuts these must be spot on.


No6 piccy shows countersinking for the T-Nuts so they're nice and flush on the back.


No7 piccy shows drilliing holes to tale the T-Nuts.


No8 piccy shows fitting the T-Nuts.


No9 piccy shows the whole chuck on the lathe.


No10 piccy shows the back of the chuck.


No11 piccy shoes some 6mm leather washers that i might try,as the rubbere seems a bit too soft.Any thoughts on this antone.


Most the materials i had lying around just bought some 50mm bolts that cost £2.00,which were cut down to suit.
Used 1/2" birch multi ply,M6 T-Nuts.
Haven't used it yet,but when i sort some decent buttons out i will and let you know.
Paul.J.
 
Looks like you are almost there Paul, as long as you take into account the cautionary comments about the chuck fixing and watch for any 'pulling out' of the fixing holes you should be OK.

On that score do you have room to put a couple of short csk wood screws through your metal strips into the wood? may help spread the forces. There again the extra screw holes may just weaken the ply along the stress line anyway.

On the button front, you may find it an advantage to have some smaller diameter short dowel collars on the bolt stems between the button and your chuck face, thus allowing most bowl rims to sit behind the button top.
 
Thanks Chas.
I did set the 8 fixing bolts back an extra 10mm from the centre to give me that much more strength in the ply.
I let it run for about 10 mins with that scrap piece in and it seemed fine.
Fingers crossed :)
Paul.J.
 
Be prepared to run with the tailstock brought up for support if in doubt.

Even if not actually applying any pressure it will stop the piece falling away from the chuck face until you can stop the machine if the grip loosens.
 

Latest posts

Back
Top