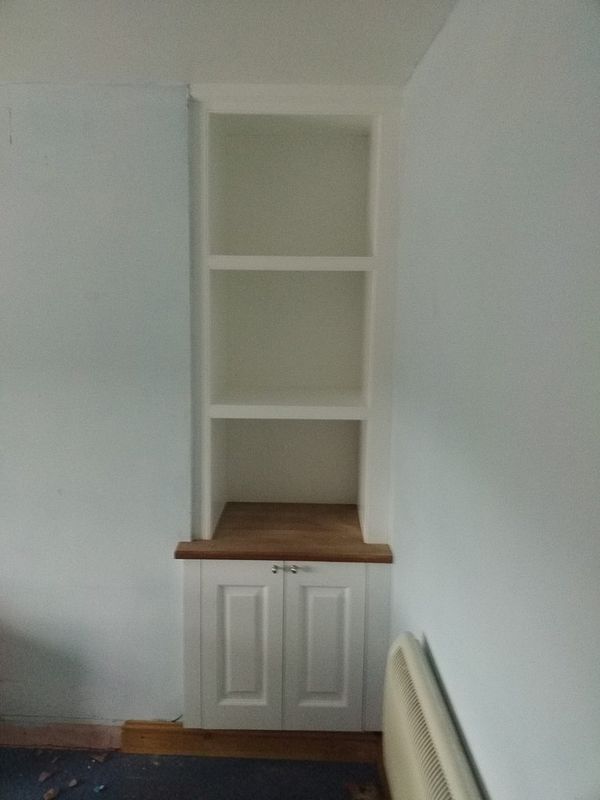
HELP! Pine unit stain gone wrong!

UKworkshop.co.uk

Help Support UKworkshop.co.uk:

This site may earn a commission from merchant affiliate links, including eBay, Amazon, and others.

Alice21

Member
Joined
18 Mar 2017
Messages
13
Reaction score
0
Location
Wales
Hi there :D

I had a lovely new built-in pine alcove unit recently put in and asked my decorator to stain it for me in a medium oak colour I bought. He said it was a cheap make and bought a varnish in a brand he likes. I was not home when he applied the varnish and it wasn't the colour I wanted...it was red! He then tried to sand it back and applied my original stain which was a better colour however the finish and edges were terrible.

My husband has used a palm sander (120 grit and then 240) to try and get rid of the varnish/stain so we can try again however the outcome is blotchy and different shades where the stain has taken (see photo if it attaches) :(

Now this is where I get confused about what we need to do as we're total novices at this! Do I apply a stain/varnish/wax? I want something easy to apply that goes on evenly over the patches and is durable. We also think we'll go darker, maybe a dark oak/walnut.

Any advice you can provide will be much appreciated as I've exhausted Google!! :?
 
Here is the alcove sanded down but still discoloured...what do i do!?
 

Attachments

  • Alcove.jpg
    Alcove.jpg
    170.2 KB
I'm a not really an expert in finishes but the only way I would be able to sort that out would be by painting it, then making a new top in hardwood (probably in oak or elm) to drop over the existing to hide it. I made something similar a couple of weeks ago. It's not finished in the picture and the photo is atrocious, but you get the idea:

IMG_20150803_183642.jpg
[/URL]

If you look around the forum you'll find nicer examples, but it's the only photo I have to hand.

Where about in Wales are you based?

Cheers,

Ed.
 
I don't think there is much you can do here. To get into the edges you're either going to have to take the whole thing apart (unlikely as it's probably glued) or spend a LOT of time using a scraper or similar to get into the tight bits.

I'd guess somone could replace it in near enough the same time? or as suggested - paint it.
 
Thanks both. Painting has crossed my mind but it wouldn't really go with the rest of the furniture..unless I painted it brown. Really wanted to keep it wood looking.
I'm so annoyed with it, it looked lovely before the stain. I'm so very tempted to rip it out, get the carpenter back and tell him to build me another..but I think I'm being slightly irrational (I'm due my first baby Monday..I'm blaming hormones)!!

If I was to attempt to try and make it look more finished than sanded and patchy, would a stain or varnish be better? And would a wood conditioner be needed since I'm no longer on new wood? Or should I try a lacquer thinner on it first to try remove some of the patchiness?

Totally clueless..I've even emailed a local furniture restorer asking for help :-(

PS - I live in South Wales
 
Alice21":3i3s5qew said:
Thanks both. Painting has crossed my mind but it wouldn't really go with the rest of the furniture..unless I painted it brown. Really wanted to keep it wood looking.
I'm so annoyed with it, it looked lovely before the stain. I'm so very tempted to rip it out, get the carpenter back and tell him to build me another..but I think I'm being slightly irrational (I'm due my first baby Monday..I'm blaming hormones)!!

If I was to attempt to try and make it look more finished than sanded and patchy, would a stain or varnish be better? And would a wood conditioner be needed since I'm no longer on new wood? Or should I try a lacquer thinner on it first to try remove some of the patchiness?

Totally clueless..I've even emailed a local furniture restorer asking for help :-(

PS - I live in South Wales

First off, congrats on the Baby! .. secondly .. I don't think you're being irrational as it's a bit of a mess right now :p Thirdly. It's only a bloody cupboard! no one died or got hurt! :D

I'd guess that anything you put on it other than paint (or something as opaque) is only going to emphasize the patchyness. So you really do have to remove it ALL or paint over. No half steps. Even if you try putting on a darker stain, it's going to hilight the patches. Another thing to try would be some low grit steel wool. It will get you a little tighter into the corners and curvy bits.

If you have the option to paint or refit, you may as well take the oppotunity first to apply a darker stain and see just how bad it looks. You may get away with it looking ... rustic? and don't forget you'll be filling it no doubt with all that crap you women fill stuff with (candles we're not allowed to light? :D ), so it'll likely not be as noticable as you might think.
 
That actually made me chuckle...yes I do have candles and other 'woman stuff' to put on it to help hopefully distract the eye :-D

And you're right..no one has died. Im just so disappointed in it and it's keeping me awake at night worrying about it. I'm not normally this irrational or teary..honest!

Maybe I'll try a darker stain, see how that turns out. If that fails then I'll have to paint.

With painting will i have to sand down the unit again or just put a primer on first then buy wood paint? Does wood paint chip or is it pretty durable? As you can imagine I'm now trying childproof my house!
 
If applying the darker stain to test, and you do opt for painting after, I'd give it a quick sand down before priming, so you'll want to try this test on an inconspicuous or easy to sand spot. Trouble is, it's hard to get an idea of what it will look like without staining a resonably sized area.

With the primer, be sure to match it up with what kind of stain/varnish was used (oil or water based). The paint shouldn't chip off easily as long as you match the products so they adhere correctly.
 
I'll add my best wishes for the new baby too.

If you decide to paint, why not get your decorator to do it as it sounds like they're, at least in part, responsible for the mess? Surely they can't cock a paint job up?

One thing that's really bugging me in your picture is the cupboard door...where the top rail meets the left hand stile it looks like there's a big gap. Is this the case or is it just a trick of the camera?
 
Feeling very nervous about staining it again..but not sure it could look any worse than it currently does. Think I'll have to start researching and watching videos on painting over stain. Grrr!

The decorator painted my two living rooms whilst here and done a fab job on the walls, ceilings and skirting etc. I'm so disappointed with the unit though. Not sure I'll get him back to paint it, may try it myself if it's straight forward.

Not sure where on the photo you're looking, i dont think there's any gaps. The door is obviously currently off the hinges and I do have strip lights under each shelf (which have since broke) :-(
 
the dec shouldnt have sanded it he should have stripped it. That said, modern strippers are terrible and old type strippers especially for this job in situ are strictly controlled so rock and hard place comes to mind though I would still have tried some safe paint stripper on it before sanding. You could probably get a better sanded result by using one of those electric sanders with a point that allows sanding into corners. Also using a plentiful supply of abrasive paper instead of letting it clog and become ineffective. What you have in the pic is more of a distressed look in that wood is sanded on the highlights. Staining this will add colour but it still look distressed. If you dont like "distressed" then it all needs sanding perfectly and to do that you'll need to take approx 1mm off the wood surface with a sander - very possible but very very time consuming and you need the right sander and grade of paper etc or you'll be there for ever. Is it fitted or can it be removed in one piece?
 
Sorry, didn't want to add to your woes. I guess what I saw was just a remaining dark line of stain.

What staining products have been used on the unit? It kinda sounds/looks to me like there's been either oil based used over acrylic or vice-versa. Maybe there are strippers(behave! :lol: ) that could take the edge off the contrast in the blotches.

If it were me & I wanted a solid timber look; I'd have the lot out and replaced with lipped oak veneered panels, face frames and perhaps solid doors. I reckon it could be done, fitted and finished for ~£1600 +VAT.

PS. MODS: This isn't me touting for business.

Edit: cross posted with Matt above.
 
I've invested in a palm sander with a pointed extension to use in the corners. I've used 100 grit to 240 grit to try get the stain off and obtain a nice finish but it's not working. I can't get the light pine back or a uniform colour :-(

The unit is built in so furniture restorers won't help either as it can't go to a workshop.

As for products (they're now in shed so I'm taking a guess) a Medium Oak Varnish was put on first which was horrendous and looked red. Not sure of the type of varnish. That was sanded off and a water based Medium Oak Stain was put on. It looked like a rushed messy uneven job so I have tried to sand that off with my new sander and the results are that shown in my OP.

I have looked into strippers but I'm totally lost by what I need. Earlier I bought a sample tin of a darker 'stain and varnish in one' which looks thicker so maybe that will take the edge off and the patchiness won't look so obvious.

Unfortunately with only 6 days to go until baby arrives I'm very short on time and really want to get this unit sorted in some way as I know I'll have no time in the upcoming weeks. Plus I don't want visitors coming over and seeing my living room in such a state! I guess having a new one built is currently out of the question so it's either darker stain or a paint job! :-/
 
Stain soaks in. Water based stain soaks in unevenly. You are wasting your time sanding this in situ with hand tools. Your options are: remove it and rebuild, or paint it to match the decor. I would also not be inhaling sanding dust 6 days before having a baby. Good luck

Don't pay the decorator full whack either!
 
do you know 100% that all the components apart from the back are solid pine? I'm assuming the backboard is veneered? when sanding with 120 grit how long did you sand for until you changed the abrasive paper on the sander?
 
I dont know if it's all 100% pine, I'd imagine not. I believe the back and side linings are possibly veneered.
I sanded until the sandpaper looked like it wasn't really doing anything. I've already gone through 3 packs of sanding pads.
I'll be worrying about this bloody unit again tonight and I'll have to try tackle it again tomorrow >:-(
 
hate to say it but I think you're stuffed with this. If the boards are not solid you wont be able to sand them enough to get them back to a natural colour. If you use a darker stain it will most likely look hideous moreso because you'll be able to see the sanding marks which will be highlighted by the new stain. Previous posters are right - its beyond saving in terms of getting a wood finish so needs painting or start again. Staining highlights whats underneath to enhance it. If underneath is unsightly then the stain will highlight that. DIY stains are the worst type of stains to use - rubbish formula and horrible colours. You could try a safe stripper but thats a nasty messy job and it 90% wont work anyway. You need to reconcile with a painted finish!! lovely farrow and ball colour and eggshell paint. painting is IN, wood is OUT these days :wink:
 
I doubt painting is the way to go. If you really want to try staining then I'd try a wood dye rather than a stain. Staining will just highlight contrasts whereas a dye will even things out slightly better. I'd paint it though ;)
 
My advice would be; knock it back with 240g(dry) then 1000g wet & dry ...wet. Give it two coats of primer/undercoat (denibbing between coats with 2000g wet) and finish with some Farrow & Ball(other paint manufacturers are available ) paint that seems fashionable.

Fitted units look great if they lend a tone to the room, by that I mean the flat boring bits match the arcs and skirting and the details match the furniture (tops & handles)
 
I bought some white undercoat/primer and I bought a wood paint in the same colour as my walls. As the room is cream with darker wood furniture I didn't want the unit to be white etc so I think I'll just put it the same colour as the room to blend it in and then have a wooden top.
I bought a darker varnish for the top and put that on yesterday to see if it would cover the patchiness from the stain and it didn't do too bad a job. So today I've to get the courage to apply the primer to the rest of the wood..it's very nerve wracking for me as I've never painted wood furniture and this is a large piece!

Can I ask what the importance is with the wet sanding? I've never done that before either. Do I need to sand between all coads of primer and paint?
 

Latest posts

Back
Top