You are using an out of date browser. It may not display this or other websites correctly.
You should upgrade or use an alternative browser.
You should upgrade or use an alternative browser.
Guitars
- Thread starter JFC
- Start date


Help Support UKworkshop.co.uk:
This site may earn a commission from merchant affiliate
links, including eBay, Amazon, and others.
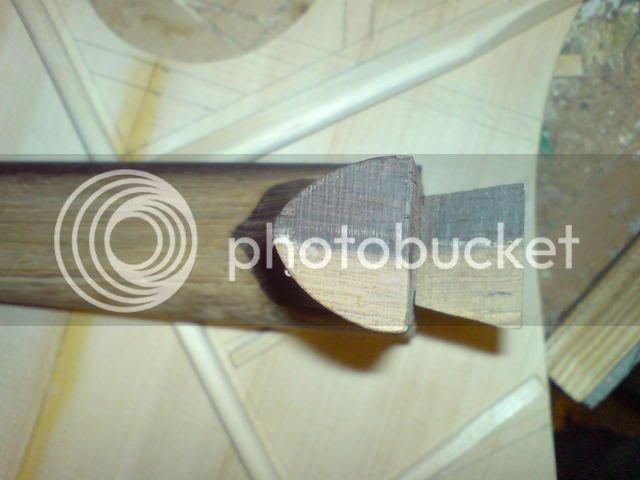
That is kind of the right shape, at this end i.e. the camera end it should be fairly small but at the far end it should be wider. You effectively have a wedge shape or taper in two directions. You also have to undercut the shoulders depending on the curvature of your upper bout - where the sides (ribs) come round and meet the neck/heel. This is not the type of joint that I normally do so I will have to dig out some measurements/dimensions for you.
Would i not be better leaving it as it is rather than making the camera end smaller ? From what i have been reading the only reason i can see would be to make it easier to take apart , or am i missing something again ?
I thought this was going to be easy :shock: I take my hat off to you Sir , this is seriously time consuming detailed work !
If this guitar doesn't sound good i will show you how to take one apart in around 2.5 seconds :lol:
I thought this was going to be easy :shock: I take my hat off to you Sir , this is seriously time consuming detailed work !
If this guitar doesn't sound good i will show you how to take one apart in around 2.5 seconds :lol:
2.5 seconds? Took me 2.34 seconds precisely.
Yes, the reason why the tapered dovetail is used is so that the joint/neck can be removed. I think you are making a Steel String - over the years the pull of steel strings changes the relationship between neck and guitar body - in other words the neck angle changes. To correct this the neck is removed, a little is shaved off key areas before being re-glued.
You could continue with this joint and providing you get a decent fit it should be fine. 15 or 20 years later when the neck needs resetting you may think otherwise. Your decision.
Try getting hold of the Cumpiano book, it really is a very good book and it is pretty cheap to buy.
2.34 seconds is the record to beat then :lol:
If you want the other two blanks for the back i have cut MIGNAL you are welcome to them . I said before this was Wenge i bought from Lesley and waiting for that special project . If you can use them then they are yours .
And no everyone i'm not giving away free Wenge ! :lol:
If you want the other two blanks for the back i have cut MIGNAL you are welcome to them . I said before this was Wenge i bought from Lesley and waiting for that special project . If you can use them then they are yours .
And no everyone i'm not giving away free Wenge ! :lol:
luthier49
Established Member
The steel string guitar is constructed with a tapered dovetail joint. The reason being that the tension of the strings pulls against the back of the neck heel and the best fit possible is required at this point. Of course you don`t have to have a dovetail joint, you can also have a straight mortice and tenon or you can bolt the neck on with machine screws and threaded inserts. The machine screws go through the neck block and thead into the inserts in the neck.
Here`s a link to Stewart Macdonalds web site in the USA that details templates you can buy from them to machine the neck and body dovetail with a router. I have these jigs which I shall be using on my guitar build in progress now.
http://www.stewmac.com/shop/Tools/Speci ... ml#details
My progress so far. Some gorgeous quilted maple back and sides.

Some Spanish Olive wood for the rosette. It`s a twelve segment rosette and here I`m plane the mitres.

Here`s a dry assembly of the rosette. It will be bordered inside and out with black/white/black veneer inlay lines. The segments are the endgrain of the wood.

Here`s a link to Stewart Macdonalds web site in the USA that details templates you can buy from them to machine the neck and body dovetail with a router. I have these jigs which I shall be using on my guitar build in progress now.
http://www.stewmac.com/shop/Tools/Speci ... ml#details
My progress so far. Some gorgeous quilted maple back and sides.
Some Spanish Olive wood for the rosette. It`s a twelve segment rosette and here I`m plane the mitres.
Here`s a dry assembly of the rosette. It will be bordered inside and out with black/white/black veneer inlay lines. The segments are the endgrain of the wood.
andys wood shed
Established Member
- Joined
- 21 Sep 2006
- Messages
- 403
- Reaction score
- 4
JFC":21eqodav said:If this guitar doesn't sound good i will show you how to take one apart in around 2.5 seconds :lol:
Jason,
You could keep it and use it as a paddle for your new boat :lol:
Andy
If i take it apart i'll have a pair of oars :lol:
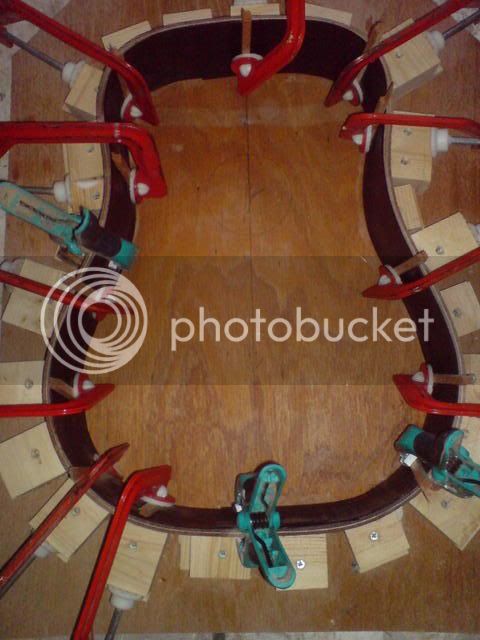
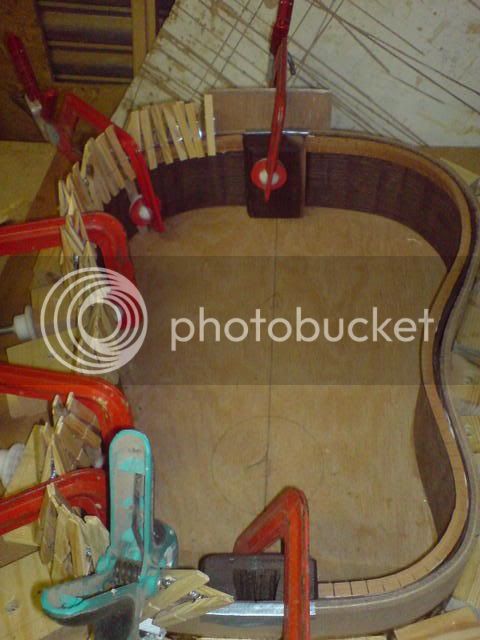
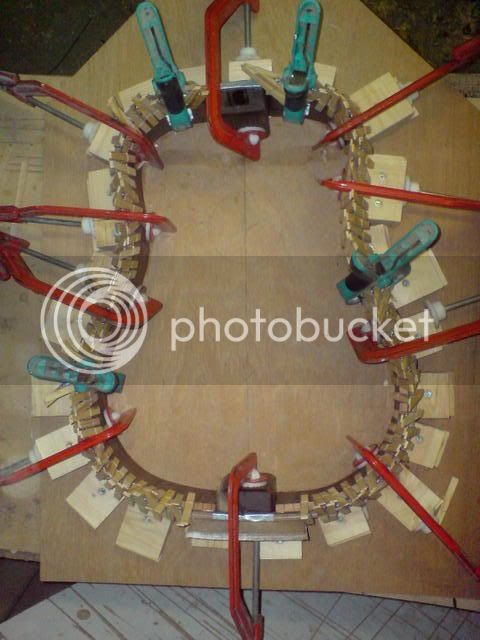
Ok i've made a jig to try and bend the sides :shock:
I screwed and glued blocks around the shape and glued in some bendy ply to give it a smoother shape .
I'm planning to try and steam the wenge into the shape with a wall paper stripper
Question is will it work ??????? Opinions please , keep it nice eh :wink:
dunbarhamlin
Established Member
Don't think a stripper will be up to it - you want to melt the wood, not delaminate it, so need plenty heat and a little steam. Could get lucky, but the unsupported outer faces in the upper and lower bouts could well splinter.
May have better success as a one off using a clothes iron set to kill over a piece of broom handle.
This will work unless your sides are very thick, but is slower, harder to control and more prone to wood failure than a bending iron or heat blanket. (I used this approach for my first mandolin - it worked, but I had an order in for heat blankets and a bending iron that very night)
(Standard disclaimer - this use was probably not anticipated during the product design cycle, and is not the safest way to bend sides - especially if your other half uses the iron berfore you've cleaned it up)
Cheers
Steve
Colin C
Established Member
HI JFC
Well done mate
Its looking very good \/
Well done mate
Its looking very good \
/DomValente
Established Member
Looking good.
Question, can you actually play the guitar :?:
Question, can you actually play the guitar :?:
:lol: To someone that doesn't play i do :lol:
I played double bass in a swing jive band for years and then in a rockabilly band but playing bass on your own can get boring so i started on the guitar . I'm not great but i just love playing . I pick it up most days and play , it chills me out .
I played double bass in a swing jive band for years and then in a rockabilly band but playing bass on your own can get boring so i started on the guitar . I'm not great but i just love playing . I pick it up most days and play , it chills me out .
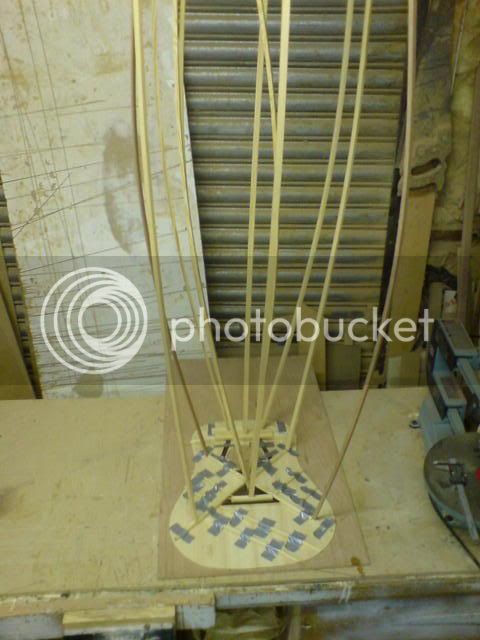
That's a go-bar deck, pretty good but what's with the tape? Just be careful when you remove that stuff otherwise you might be pulling strings of wood off with it.
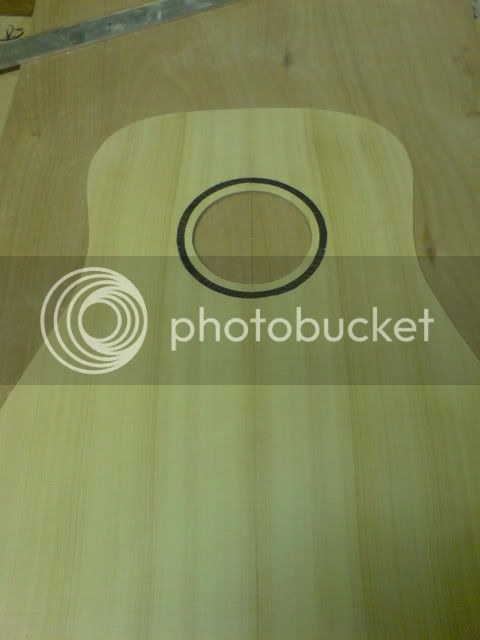
Is that top domed or is it flat?I know it's a flattop guitar but most flattop guitars are domed. . .but then again some flattop guitars are . . .flat.
Is that top domed or is it flat?I know it's a flattop guitar but most flattop guitars are domed. . .but then again some flattop guitars are . . .flat.
The tape was there to hold down while i got the pressure on and to stop slipping . i thought it was a good idea
The top is flat and the plan says 2.5 - 3mm thick , i assume the back needs to be the same thickness ?
What would happen if the back was thicker , say 4-5 mm ?
The top is flat and the plan says 2.5 - 3mm thick , i assume the back needs to be the same thickness ?
What would happen if the back was thicker , say 4-5 mm ?
Lord Nibbo
Established Member
JFC":2955uu5k said:I assume the back needs to be the same thickness ?
What would happen if the back was thicker , say 4-5 mm ?
You could only play heavy rock on it.....
Grab me coat :lol:
Similar threads
- Replies
- 9
- Views
- 967