edge planing

UKworkshop.co.uk

Help Support UKworkshop.co.uk:

This site may earn a commission from merchant affiliate links, including eBay, Amazon, and others.
Jarviser":1quf3ksv said:
However, how darned square does the edge need to be?? If you are just talking about the top edge of drawers, that is achievable by feel, planing to a line and using a try square, like wot we were taught.

Very good reminder. It is awfully easy to get all obsessed with achieving "perfection" where it is not needed nor contributes to the quality of the final product.
 
There's nothing wrong in aiming for perfection. Aim for the stars and you might reach the moon, aim for the north and you might break down at Watford!

Surely as hobbyists, isn't the persuit of perfection that drives us to our next project? Rather than just trying to crank out as many 'it'll-do' projects?
 
Jarviser":17jsjyop said:
If however you are jointing boards, if you put them face to face it matters not a jot if they are even vaguely square if you plane both edges at the same time.

At last, someone other than me who does it the foolproof way. Works first time, every time. Can't go wrong :wink: Not many on here seem to favour this method, which is no doubt why some struggle so much....

Cheers :wink:

Paul
 
Jarviser":qs930qlg said:
The method of putting your fingers under the sole as a fence is surely for those who have a cambered blade, using the plane's position side to side to tune up the angle minutely. With a flat blade it's a bit pointless. I mean they put a handle there to hold onto didn't they?
It's also a good way to lose the skin off your knuckles on the vice jaws when you forget the workpiece is only 3x1 ! (I've done it)
However, how darned square does the edge need to be?? If you are just talking about the top edge of drawers, that is achievable by feel, planing to a line and using a try square, like wot we were taught. If however you are jointing boards, if you put them face to face it matters not a jot if they are even vaguely square if you plane both edges at the same time. Either way a no6 is the minimum length IMHO.
That's my two penn'orth. Back into the teapot for me. zzzzzzzzzz.

Far from pointless I find, it helps keep the plane flat in relation to the surface by avoiding allowing the sole to tilt to either side which won't give you a square edge. It is easy to run knuckles into the vice though Ive done that several times. As to how square things need to be its a case of what the application is surely. For edge laminating square is essential unless you match plane as you suggest which I do sometimes, depending on the work involved. I find it's often easier to plane one piece at a time to a square edge which really isn't difficult to do rather than mess around trying to align two boards.

Cheers Mike
 
ByronBlack":3azr9znp said:
Surely as hobbyists, isn't the persuit of perfection that drives us to our next project? Rather than just trying to crank out as many 'it'll-do' projects?

Oh point taken, and I have tried all sorts of methods of getting the perfect square edge - shooting boards, router jigs, bolt-on side plates. In the end scribing lines both sides and planing down to the line with the plane meant for the job gives the satisfaction of getting to a good edge in just a few strokes of the jointer straight off the saw table.

It's all down to tolerances - i.e. what level of imperfection is tolerable either by the aesthetics (appearance), or the function. If you can see little or no light under the square it is within tolerances for a drawer side, surely, where the height of the side is the key dimension. If you want to produce a table top of rubbed joints then the straightness is the key feature. Parallelism and width is not important, and neither is squareness if you use the method of planing both halves of a joint together.

Perfection is making within tolerance. Take apart the leg joint of a beautiful antique and you will see saw marks and gaps, yet the finished object is perfect. Hand made dovetails are anything but perfect in dimension, yet they have a real beauty of fit and function.

Alf, I like using a no 6 for finish edging even on a workpiece a foot long - it just feels like you have the right tool with the blade set ready for the job. Dead sharp, flat face, set a little coarser than for smoothing, ready to finish what you started with the jack.
 
thanks again guys.
my personal take is that you obviously need a flat face and a square edge for anything you do. but as has been said how square is square.

it is the other edge that causes the problems if you will, and this is a agree a practice of common sense and the expression of getting better at a skill which is greatly undervalued outside these four computer walls.

when making a glued up panel of four pieces recently i did indeed use edge planing of two pieces at a time. now what i should then have done is glue each pair together and then edge plane the resulting tops, so they too matched. in fact i did not i just folded the various pieces after doing the first two, and of course marking them properly ( :? )

however in the case in point i was combining two things, the actual making of some workshop drawers, and cutting and planing for practice some rough lumps of pine which have been hanging around for ages. so i was learning to do more hand sizing and finishing. the hand planed surfaces
are smooth and sleek, and even pretty square which has allowed me to impress myself even if no one else.

i would make the following somewhat whimsical point which is that many manufacturers of power drill these days include levels both horizontal and vertical in the handles, so i am surprised that one of the manufacturers has not done the same with planes :? :lol: :twisted:

anyway this has been an interesting and useful thread for me, and i have definately learnt more about my skills. so far after all the practice, i find i am very happy using the no 6, for softwood.

paul :wink:
 
engineer one":2amw9zkm said:
....you obviously need a flat face and a square edge for anything you do. But as has been said how square is square.
Paul

Being able to dimension a piece of rough sawn timber with a plane, a square and a marking gauge is about the most basic skill that a woodworker needs to acquire. It takes a bit of practice to acquire the skill but once you can do it it stays with you. How square is square you ask? If you are jointing it has to be square enough that the joint has no glaring gaps - for the edge of a drawer side it just has to look acceptable. That's one of the nice things about woodworking - it's not engineering with tree bits.

Scrit
 
mieeowwwwwww :lol:

you are right, but at least this time i am learning one step at a time.
by getting my practice on the planing i am now getting the courage up to
try dovetails again ( :? )

as for engineering with wooden bits, i thought that was what working in mdf or other manufactured boards was all about :twisted:

paul :wink:
 
ByronBlack":1d8l5503 said:
There's nothing wrong in aiming for perfection. Aim for the stars and you might reach the moon, aim for the north and you might break down at Watford!

Surely as hobbyists, isn't the persuit of perfection that drives us to our next project? Rather than just trying to crank out as many 'it'll-do' projects?

Agree here BB, I aim for perfection in the work I do....I know I won't come near it in a month of Sundays, but it's what I go for, however precision as disussed with others on a different thread is relatively easy to do and does go a long way in making the work better than it otherwise might have been.

Paul - I generally shoot board edges the same as you (always have done as it's the way I was taught by an ex-Barnsley maker) and never have any trouble. The method is pretty much foolproof as any slight out of square error is cancelled out. The critical thing tho' is to make sure the boards are shot fractionally concave by the thickness of a very thin bit of paper at the centre - Rob
 
woodbloke":bkb6l4u1 said:
Paul - I generally shoot board edges the same as you (always have done as it's the way I was taught by an ex-Barnsley maker) and never have any trouble. The method is pretty much foolproof as any slight out of square error is cancelled out. The critical thing tho' is to make sure the boards are shot fractionally concave by the thickness of a very thin bit of paper at the centre - Rob
I have and do on occasion joint edges two together, but as Rob suggests you don't want them concave. I prefer to have edge edge slightly concave by a shavings depth or so to pull the ends in tights when gluing up (for an edge laminated panel / top) . This isn't going to be possible if you matchplane is it or is there something I'm missing?

Cheers Mike
 
woodbloke":3fki17e2 said:
Paul - I generally shoot board edges the same as you (always have done as it's the way I was taught by an ex-Barnsley maker) and never have any trouble. The method is pretty much foolproof as any slight out of square error is cancelled out. The critical thing tho' is to make sure the boards are shot fractionally concave by the thickness of a very thin bit of paper at the centre

\:D/ \:D/ That's four of us now - the method might just catch on... :lol:

Cheers :wink:

Paul

PS I agree about the fractional concave bit. A couple of DC's stop shavings followed by one full length usually does the trick.
 
Paul Chapman":9e1475fj said:
PS I agree about the fractional concave bit. A couple of DC's stop shavings followed by one full length usually does the trick.

But doesn't that open up the glue line fractionally in the centre of the join on one side if the two edges aren't square to their respective faces?

Cheers Mike
 
mr":194o7802 said:
Paul Chapman":194o7802 said:
PS I agree about the fractional concave bit. A couple of DC's stop shavings followed by one full length usually does the trick.

But doesn't that open up the glue line fractionally in the centre of the join on one side if the two edges aren't square to their respective faces?

Trust me - it works :wink: The cramps pull up the centre concave bit (and it's only fractional). As for the "squareness", as long as the boards have been jointed together (including the stop shaving bit), even if the angle varies along the length of the board, it will all add up to 180 degrees when they are put together.

Cheers :wink:

Paul

PS before you start the planing, square a pencil line near each end of the boards so that you can put them together in exactly the position they were planed.
 
engineer one":e410un0a said:
As for engineering with wooden bits, I thought that was what working in MDF or other manufactured boards was all about :twisted:
When you are batch manufacturing that's what it turns into - hand adjustment for fit is simply too expensive in terms of time, but when you are doing it for yourself or it's a one off the converse is more true. And the other reason for getting it right with man-made boards is that they're really hard on plane irons!

The comment about having to acquire certain basic skills before moving on to machinery or more complex stuff wasn't meant to be a bitchy remark. Even in a workshop with a full array of machinery it's often quicker and easier to resort to a quick swipe with a hand plane or a small cut with a handsaw to get the fit right - but only if it's a one off - you don't want to be doing that if you are making 50 of the darned things

Oh yes, and I'm aonther one who was taught to make the jointed edge slightly concave and pull it up with the cramps. So five...

Scrit
 
nice feed back again.
scrit i know you were not making "catty " remarks, it is chalk and cheese,
but of course as you say, you need the hand skill to understand better what you can and can't do with the machines. what i have noticed so far as i am learning is that obviosuly i am not producing such fine dust, but boy do i get a gert lot of shavings, even the very thin ones seem to build up with alarming regularity. :?

having relearnt to use the planes i am now slightly more confident about when and where to use them.

of course now i need to practice more with the saws. on that subject mike i noticed your article in the latest gww, so have you finished the box, and have we seen it :roll: more important did you achieve what you wanted.?

another thought, andy king is road testing the new veritas edge planes in the next issue, after his visit to the factory(jammy b****** comes to mind being paid to visit :cry: :twisted: ) will be interesting to see his comments
on its value.

paul :wink:
 
Paul

I've had both the Stanley and Veritas edge planes and been unimpressed with either. Possibly that's because I can achieve the same result, but with a straighter edge, using a jack plane and shooting board. I believe that the Stanley #95 was originally sold as a patternmaker's tool to apply draught to edges, hence the two holes in the "base" to take a tapered slip which will allow off 90° planing, useful if you are patternmaking but rarely used elsewhere.

Scrit
 
Well that seems to have covered everything :lol:
Except nobody has mentioned that a cambered blade is essential for squaring an edge :shock:
i.e. holding plane as per mr mike you can plane to the left a bit or to the right a bit, to take off a tapered shaving to counteract the off-square tilt revealed by your square. Or if the edge is skewed and tilts opposite ways at each end you can plane starting with one edge of the plane and moving over to finish with the other edge and straighten it in one pass (in theory).
Or if square you can plane straight down the middle

Speaking of cambered blades I've been experimenting with sharpening but before I hit on my "scary simple" system I tried some of the crazy sharpening hints which take up about half the posts on this group. I stupidly flattened my old oil-stone which had previously been beautifully hollowed out in both directions. Now it is really difficult to get a curve on my plane blades - which previously came about easily whether I wanted it or not.
Always wanted it however - whats the point of a dead straight plane blade, or a flat stone for that matter?
I'm surprised that you can't buy a ready hollowed out stone, it would be really useful.

cheers
Jacob
 
engineer one":1ynqmgjm said:
on that subject mike i noticed your article in the latest gww, so have you finished the box, and have we seen it :roll: more important did you achieve what you wanted.?
paul :wink:

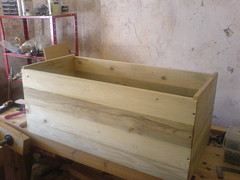
Did you mean this one?
747567234_9eb096b737_m.jpg

As you can see unfinished as yet but the theory is good. The working by eye / feel has worked out quite well. Its not a thing of beauty and never will be but its going to live in the corner and get kicked about so it doesn't need to be. The lid to make yet and the inside needs fitting out - then a lick of paint all round and I can then think about making a better one, not made from fence panels etc- which seems to be the way of these things.
Cheers Mike
 
nice one mike, another tuit i see.

jacob, actually we don't want to go down that route, but cambered blades are something that david charlesworth promotes a lot, and having used one of his, i can see the value.

mind you getting camber is more of a problem.
the flattening of stones though is to do with ensuring that if you do polish the back, then it needs to be flat across its width, so by deifinition does the stone. :?

don't want to go down the sharpening slope here, it is as you say a well travelled route.

scrit, as you will see at the beginning, i was suggesting it might be a help
when starting out to use the edge type plane. i can concede readily that if you are used to and experienced with the more standard planes it becomes a moot point. however for the beginner, whatever is said learning to hand plane is still like 3d chess and aids to success are to be at least looked at and appreciated until you have gained both experience and courage :twisted:

paul :wink:
 
Back
Top