Dovetailed Infill - First Fumblings

UKworkshop.co.uk

Help Support UKworkshop.co.uk:

This site may earn a commission from merchant affiliate links, including eBay, Amazon, and others.
Thanks Jim,

7/16 X 14 .... I wonder where to look for that - I get google whacked when searching online and the only square taps I have ever seen are these I got from the boot sale a few weeks ago

Stanleyandtaps2.jpg


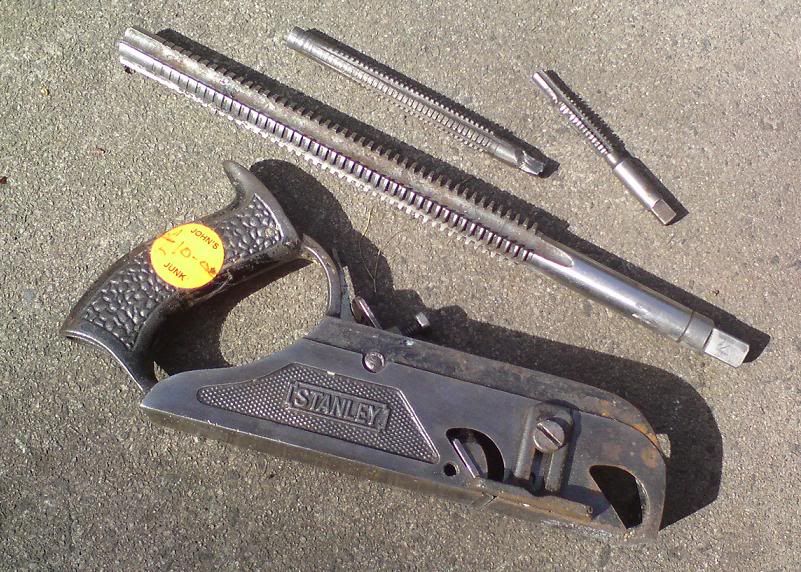
- Ignore the #78, except for scale purposes. These were also the only ones the seller had ever seen and he had been carting them around for ages.
Of course, there is then the problem of finding the corresponding threaded bar. I have vaguely been thinking along the lines of finding a clamp or such, common at boot sales, that I could use as a supply, then try to find the appropriate tap ... (I plan to turn the bolt heads from brass/bronze and square rivet them on so just finding the threaded bar would be ok.) I realise this might be quite a long shot but if possible it would be far the cheapest way.

Along with all the mentioned pivot methods there is also the spring loaded method - and there is even a choice in that: blind holes or holes with shoulders and a narrower through - hole to poke things through to release the cap... so many ideas, so little brain space. :D
 
Richard

Excuse me blundering in here - I'm not an engineer or a blacksmith - but somewhere (probably on here) I've picked up that square section threads as used on vices, clamps etc are also called Acme threads.

And searching for Acme thread taps and dies brings plenty of results. Admittedly this is a bit coarser - 7/16 x 10 tpi:

43686.jpg


but the tap is only £12.49 and the die £15.50 inc postage from these people: http://www.rdgtools.co.uk

(And I'm still feeling a bit guilty for interrupting plane making by provoking a second wave of holdfast making, but also aware that you have made a big crowd of woodworkers a whole lot happier!)
 
Wow, thanks for that Andy - I s'pose 10 tpi would make over tightening harder .... as for die cutting it, I've not heard of it before but as they're selling a die ...?

A mate of mine (who has just been here and I never thought to ask him Grrr...) has been making noises about getting to doing some for someone else, so I might get there yet one way or another (or another)

Jim I'd be very interested in how you get on with that - there's no reason why I shouldn't be doing it myself of course, just a case of getting round to reading the book that starts "Congratulations on choosing the Myford Super Seven .....) and finishes several hundred pages later. :roll:
 
You have a Super 7 and I have my little old ML1.....get thee to thy lathe, brass rod in hand oh great one! :mrgreen:

We shall go a knurling...a knurling...a knurling (pictures Morrismen dancing!) :mrgreen: :mrgreen:


Jim
 
"How did you bend the sides for the coffin smoother?" I (don't) hear you all asking ..... well I'll tell you.

I cut some wooden blocks the same form as the curve I wanted ...

DSC00059.jpg


... and put the assembled blocks and side in the vice and squooze.

DSC00061.jpg


Then re - cut it much further to counter spring - back. Wish I had found some nicer wood to use - this was like spongy cloth and even razor sharp gouges could not persuade bits of it not to disintegrate.
Any doubts I had as to the capabilities of the vice to bend 5mm were soon dispelled - not much effort at all.

I don't think we'd be a patch on the best morris side I saw Jim, one at the Trowbridge festival - rather than dressed in white they were completely in black from head to foot: black top hats, round shades, waistcoats, tights and Doc martins. Instead of the usual piddly sticks, these were armed with pick axe handles (therefore entirely on topic I feel) and had dodgy cockney accents ... " whao dear muvver wot a fool I've bin .... Clunk!" It doesn't get any better (or worse) than that.
 
Thanks Jim - trouble is I now have to make another pair of blocks the right size/shape for holding the sides in the vice to cut the tails. So over - size for bending, right size for holding. Also on the holding blocks I will be able to mark square lines to copy into the tails ...
This coffin shape nonsense really adds extra faffs at every turn, no wonder no one makes them any more; Konrad S. the exception? Anyway, it will be interesting to see how much less work it its once I have all the extra paraffin - alia set up.

I ordered more 18mm wire for holdfasts last week and with it, 6m of : 5mm x 70mm, 6mm x 70mm and 8mm X 80mm. that should keep me out of (in) trouble for a bit. I feel some new files coming on too ...
 
Hi Richard

Isn't is strange how things go together...

Yesterday at the bootfair I forgot to mention...I picked up a nice old wartime book entitled "General Engineering Workshop Practice - A Guide to Principles and Practices of Workshop Procedure". It's really tatty but inside the front cover is a drawing of "a worker in a British munitions factory turning the bases of brass cartridge cases for A.A. shells", so I am looking forward to some wonderful wartime reading.

ANYWAY...I digress...I checked out the index and guess what I find under "A"....Acme Threads...cutting"

So there were two pages which I have scanned as a PDF for you:

CLICKITY CLICK

Which tells you about all you need to know on the subject. I think the previous pages about normal screw cutting may be necessary if you can't work out the basic principles from the Myford handbook....just let me know...I will scan those also.

Let me know what you think...

Cheers mate!

Jim
 
That looks like a very useful bit of reading to have found Jim. Thanks for putting that up. It gives a slightly different perspective to the Amateur Lathe book I have bought.

How that nut is set up for screwcutting on the face plate at the top of page 179 is just a taste of what I've been finding out is possible... in theory I could even mount the lever cap, bore it and thread it; just as soon as I find out how to find square and centre.
If anyone is interested btw, I have another thread going on in the gen/off topic dpt. "about that lathe"
 
All entirely by hand (no milling yet) I've finally cut out and fitted the coffin smoother.

Coffinplane4.jpg


Coffinplane2-1.jpg


I haven't driven the other side completely home in this picture as it is a right pain to get it apart again when they are both on tight - though it was at a stage where it would go on at time of photo.

The line down the middle was what I used to get the tails square to the plane in general. Everything about making curved sides is difficult. A different problem to solve with each operation ... and purely for the look of the thing. Never again! (maybe).
Ah well, this will make the next parallel sided plane seem like a doddle. :-"
 
Hi Richard

Wonderful....!!!! My favourite thread is back at last! Yeh! :mrgreen:

My dear friend...this looks like it has the makings of one superb piece of craftsmanship. Your attention to detail and reluctance to accept anything other than perfection is admirable!

I think it is this sort of thing that differentiates just a tool to do a job from a thing of joy to make you smile each and every time you take a shaving.

Am I correct in my observation that you haven't cut the mouth yet? On the last one you prototyped the creation of the bed by laying it down on top of the soleplate and cold rivetting the two...am I correct? This is so exciting!

I can hardly wait for the next episode. =D> =D> =D>

Jimi
 
Thanks Jim

Sorry this comes in such rare pieces, other things keep getting in the way...

I'm getting much quicker at it though - both marking and cutting. This one has had a lot less of the terror of failure attached to it.
Nope, I haven't cut the mouth yet and yup, I will make a frog plate and rivet it like the last one. Must look for some slim line files at the market tomorrow.
Will try to get photos of the riveting this time. Also, I've got the lever cap to forge once I make a pair of tongs especially for holding such a short, heavy lump.
 
Got he mouth cut out and the frog plate cut, shaped and centre punched ready for drilling.

Plane6.jpg


Plane2-1.jpg


I'm starting to rivet now with no means of taking photos. Maybe I'll leave one till the Camera Woman gets home.

One thing I've learnt about riveting in the last few days is the importance of using a narrow countersinker.
I finally got around to making a down bolt for the new garage door - riveting on the bolt rings. I tried a c/s I had scored at the carboot. A 45 degree one. It was a stretch too far for the rivets and small cracks around all four appeared in the final hammering home. No less strong and functional of course but I'm very glad I learned this lesson on rustic door furniture rather than on a plane.
I'm using my old faithful 60 degree c/s again today.
 
Nice one Richard! The critical bit over! I take it you have tested it with some stock for flatness and angle? (Sorry grandma!) :mrgreen:

Good tip about the countersink...filed for future use!

I have been sorting my tap mountain out today....seems mostly BSF though quite a collection of Whitworth too which is good news. There seems to be three of each size too (1st, 2nd and bottoming) and I have put them in little plastic envelopes with some Camelia oil....unusual for me...organised!

Keep up the good work...this is going to be dynamite

Jim
 
Jimi wrote:(Sorry grandma!)
..Au contraire Jim, I'm far from being past the need of egg sucking lessons;- just made a partial pineapple of the first rivet. Cut it just too long to start with then filed it down too much. #-o Should turn out ok though as the too - little metal is on the side that won't show.
It's a real pain though. If it leaves a circle on the sole, I'll drill it out again.
This makes me anxious to get it done to see if it is ok. So apologies for no wip photos of this bit. (of course if it isn't ok I'll have to do it again anyway... :cry: )

The mouth is still in need of filing to its final size. There will always be some movement while riveting so best to leave the final fit 'til after I'm thinking.
 
Situation rescued.

rivettedfrog3.jpg


Invisible (ish) rivets and re-blued and remarked for the compound filing.


rivettedfrog5.jpg


Invisibleish on top too, though this will be covered by the infill and only impressive to archaeologists.

rivetbefore.jpg


When starting to dome each rivet, I've been having to find anvil blocks of different heights to support the bar stock as it gets shorter. There's no way you can pre dome it just by holding it in the vice jaws.

rivetduring.jpg


I've tried a few different weight hammers and find that a short grip on a 1lb hammer gives me the most control over both power and accuracy.
 
Why bother pre-doming? I've always just slipped a washer over the protruding rivet, placed the sole/washer/rivet assembly on the anvil and bashed the top of the rivet, then just flip the assembly over and bash the other side. Simples.

As regards the countersinking, I also found that out the hard way, so I now use a three square scraper to open the hole at a very shallow angle, four or five turns with a scraper is usually plenty.

Nice work on the curved sides by the way, I've never been brave enough to try one, but it's been on my to do list for about four years, one day...

Cheers
Aled
 
Thanks Aled,
I think the pre doming business is a habit I have got into from blacksmithery - heading nails/bolts/rivets hot. Also I find it easier to judge the length to cut off the rivet when there is only one end to worry about.

Oo! oo!! (puts hand up and sits up really straight) .... What's a three square scraper? I really need something that leaves a smoother finish than the countersink. Conical grinding bits can't be trusted to keep their shape.
 
Richard T":ddw4j5mu said:
Thanks Aled,
I think the pre doming business is a habit I have got into from blacksmithery - heading nails/bolts/rivets hot. Also I find it easier to judge the length to cut off the rivet when there is only one end to worry about.

Oo! oo!! (puts hand up and sits up really straight) .... What's a three square scraper? I really need something that leaves a smoother finish than the countersink. Conical grinding bits can't be trusted to keep their shape.

Would a larger diameter drill bit or reamer do the job?

Lovely work by the way Richard :)
 
Back
Top