DBT85s Workshop - Moved in and now time to fit it out

UKworkshop.co.uk

Help Support UKworkshop.co.uk:

This site may earn a commission from merchant affiliate links, including eBay, Amazon, and others.
DBT85":3fmmkk6t said:
.......I'll note that if I do that it overlaps the 50x50 that's also on the underside of the roof, which means the barge board can't run all the way down unless its spaced out, which it would probably need to be anyway to go over the FE.

I'm not 100% sure what lies underneath, but this is what that detail looks like from the outside. First, my house:

9pGL5dq.jpg


....and secondly, my workshop:

PIWZrkx.jpg
 
Thanks Mike. I appreciate the extra photos!

As suspected the barge comes down over the wall detail so I'll probably chuck another strip of this up there over the 2x2 to then fix the barge to later. No rush at least as its not stopping anything else from proceeding.

Well I'm done for the day. Daddy duties bode.

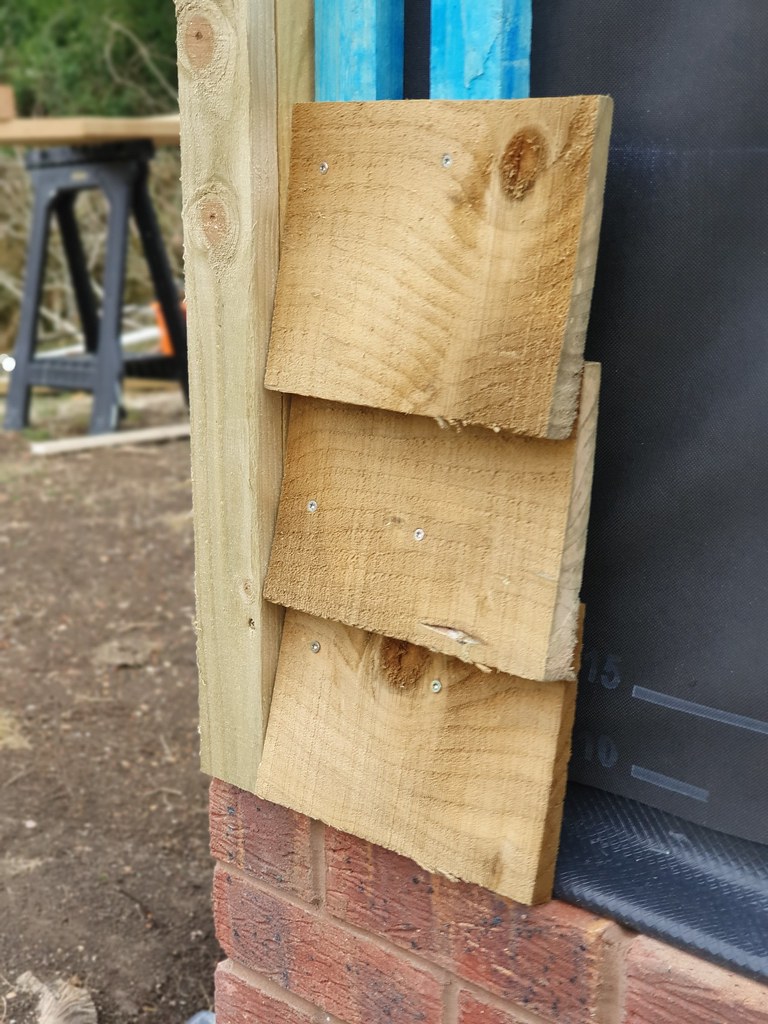
All 4 corner details are now fixed in place with a few screws. I can secure them more while painting them.

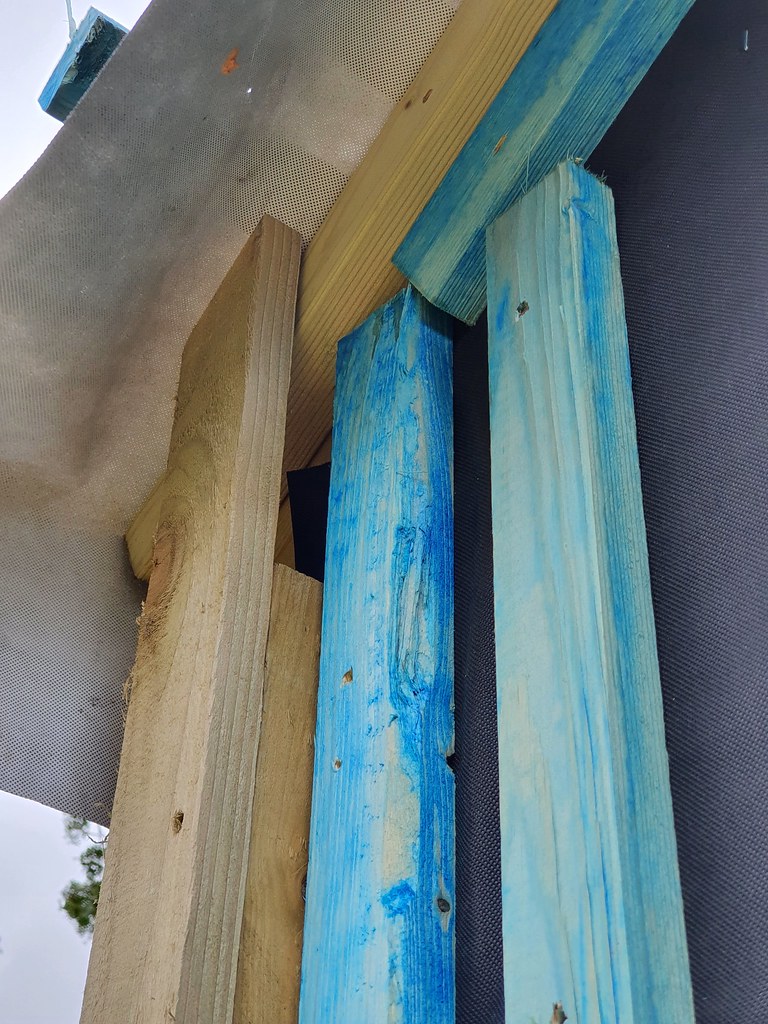
I do need to decide if I want to fill this gap in the support for the corner detail. The gap you'd be able to see would be minimal. You can just about see the support in the next photo. I should do it shouldn't I really.
50072056781_19742425a3_b.jpg


50071491693_5b4735f4d6_b.jpg


I removed my test featheredge and refitted once the corner detail was done to see how it looked. I'm happy with that. The bottom board is just pinned in place poking out a bit, I've not gone to the effort of doing the wedges yet, let alone taking the corner off of the feather edge.
50072056591_71535ee188_b.jpg


Now that I can see where the fascia will end (as I now know where the barge board will come down) I can sort those tomorrow and do the juggling act of trying to work out how high it needs to be to keep my tiles supported properly. I think I'll tape the 3 bits I have together so at least I've a few less things to worry about. Maybe by Monday I can actually start tiling.

I also need to sort out around the door. I see Mike used some 25 by something as the end point for the cladding. Naturally I have some 25x150 here and I'd need 25x175 ish to cover the osb, stud, batten and cladding all around the door.


Mike, incidentally why did you route a cove in the bottom board rather than just taking the corner off with a table saw? I get why it's there, just not why a cove rather than a straight cut.
 
It seems we might have decided on colour. We like the appeal of a stain rather than a paint but the medium oak appears a little too orange for our liking (I say this as a man with a ginger wife!) so after seeing this in the mahogany bedec we're probably going in that direction. Brewers want £250 for a 20l tin which is £50 more than online places. If anyone knows what it's like with a trade account I'd appreciate it.

EDIT: After having another look side by side and on a proper screen rather than a OLED phone with the chroma cranked up, we're now back with Medium Oak :lol:
50074799707_28d643c69f_b.jpg


In other news the electrician can't come for 3 weeks, on the up side that gives me time to basically it all in and ready to do and tested in one day.

Cembrit also got back to me and said that they used to suggest 4 screws per ridge tile but that they are now manufactured with the hole in so now only require the 1 fixing. They've just not updated the materials yet.

A bit of a pain as I now imagine I'll need to get on the ridge with tiles to see how much I need to batten out the ridge if anything.
 
Dumb question I suppose but is there a recommended sealant for those tiles that could be squirted into the hole to plug it up while still on the ground?

Pete
 
Inspector":1fixugh0 said:
Dumb question I suppose but is there a recommended sealant for those tiles that could be squirted into the hole to plug it up while still on the ground?

Pete
That’s where I’d be going as well, small patch of self stick flashing on the inside, maybe a small patch outside as well, then fix with four screws as old system. If you want some flashing to do it, I have lots I can send you more than enough to patch those holes. You’d never see it either.
 
No need to fill it, it gets filled/covered with the screw and rubber washer. So now there will be 1 hole to seal with that washer per tile, rather than the old way of 4 per tile.

Cembrit have changed their mounting guidance but not updated their documentation. I got that direct from Cembrit.
 
Inspector":18ieli8r said:
I misunderstood. I thought it had to have the 4 screws and that hole was redundant.

Pete
Ah, no I thought it was, but after clarification they've just changed how to do it and not bothered to tell anyone.

I've found Marley documentation to be better than Cembrit for basically the exact same product.
 
Little done today and the same will be true for tomorrow. My wifes mum is a currently reluctant American so we had hot dogs and stuff today.

I did finally manage to clean out the workshop so there is no longer a pile of nails and sawdust on everything and the piles of rubbish that were everywhere are all now neatly up one end.

Then I went around the outside and picked up all the rubbish that had fallen by the wayside, bits of foam or insulation and the odd nail before starting on the piles of timber left and sorting them out. Our gardeners brother is taking all the 60x60mm strips of insulation off my hands to do his garage Maskery style so I need to get those sorted for tomorrow. Nice to not have to dispose of it.

I've got until probably Wednesday before I can buy the paint (once my trade account is activated and I can use my 20% off) so I have until then to sort out my fascias, as well as door lining, and anything else that needs to be ready.

One thing I'm not sure on yet is the windows. I have enough material to just board over them as they are still covered in membrane and OSB and putting them in is not at the top of my priority list. Cutting the cladding flush later once I've opened the hole up won't be an issue will it? The battens are all in place around the sides and bottom as you can see in the photos.
 
MikeG.":nmr63a1l said:
Why not just fit the windows?
I don't have them, I don't know how to make frames, I don't know when I'm going to be back at work, I don't know if I've got the money right now, I don't know when I'm going to get around to them.

Priorities are getting a door of some kind on, painting and cladding the walls and roof, painting the inside, laying the floating floor, getting electrics in, etc.

On that basis, I'd rather not have a hole in the cladding and membrane taking the brunt for an indeterminate amount of time when I can easily just clad over the hole and remove it later. I can't think of a reason it would be an issue.

The only things I've ever really made are a wobbly as fork dining table that is cupped to all hell and racks like Melinda Messenger (but it cost me £200 in pine and a few hours and has done its job as an 8ft table that I don't care if the kid draws on), my workbench, the gokart for the kid and now this. I can't just decide to do a door or a window frame and it happens. Conversely you probably can do them in your sleep!
 
MikeG.":o7oflnvn said:
Ah, my mistake. I thought you'd got the choice of a few kicking around the place.
Ah no, I did but they were the ones that were just too wide. They looked good in the mockup but I think one was nigh on 1700 wide.
 
Absolutely sod all done today, but I saw my mum and dad for the first time since the start of March so it was 100% worth it.

Both utterly stunned at what I've done so far.

I did get my dad to bring his small collection of Wagos with him so I could hook up a few emergency panels in the workshop until the electrician comes in 3 weeks. I successfully managed to connect all 3 wires in my flex to the wrong terminals in the plug. I literally have no idea how. I've done enough of them to know and I even remember looking at the plug and seeing the L, E and N markings and still got it wrong.

Naturally the board tripped and my cojones were not fried. My dad laughed his bits off as in another life he was an electrical engineer!

Tomorrow I get fascias cut, fill a few gaps in the OSB and see what else I can be doing. Hoping to have paint in hand by Wednesday.

I think I'll have to hire some kind of tower for the tiling though as all I have are ladders, none of which are technically roof ladders.
 
You don't need roof ladders. You've just built a permanent one in up the roof. However, a tower scaffold at the eaves is absolutely necessary. You'll do much of the roof off it before climbing on the roof to do the high bits. Set your tower up so that the eaves are about shin or knee level when standing on it, if you can.
 
Back
Top