Chair construction

UKworkshop.co.uk

Help Support UKworkshop.co.uk:

This site may earn a commission from merchant affiliate links, including eBay, Amazon, and others.

No skills

Established Member
Joined
6 Feb 2011
Messages
2,559
Reaction score
3
Location
Hanging by my fingertips
Hello

I have a couple of chair questions I hope you can help with. I have a quantity of par beech that's been getting in the way for a long while, I think it's enough to make us a set of 4 dining chairs so I fancy having a go :)
The beech is a bit small in section for the back legs but should be fine if I laminate two pieces together and cut the shape out of that.

So first questions are..
What sort of angle should I be aiming for when making the back rest of a dining chair? As in the reclining angle from the seat upwards.
Seat angle, how much slope from the front of the chair to the back? I think the actual seat will be a foam covered plywood piece - if that makes a difference.
Should the chair taper in width from front to back? This is the one part of building the chair frame that bothers me - angled tenon/mortises - I'll probably cheat and use machines but even still this must be tricky.

That's it for the moment, once I've got some angles sussed I can start drawing up a full sized one on some hardboard.

Cheers!
:)
 
Some of this was touched upon a little while ago,

seating-dimensions-t100323.html

For a dining chair the rake of the back is usually fairly modest, around 5-7 degrees is common and some are even less, you need to be upright and paying attention at the table or you spill gravy down your shirt.

You're right that the seat should taper from front to back, which makes the joinery interesting as you've normally got some compound angled mortice & tenons to deal with. There isn't a massive amount of information online or even published about chair construction, but if you haven't made a chair before then read Jeff Miller's Chairmaking & Design which takes you through from very basic designs to moderately demanding, he really should do a second volume as he leaves off just as the complexity is starting to become intriguing! The woodworking magazines tend to shy away from chairmaking, but one or two good articles have made it past the editors, Garrett Hack did a full build description in Fine Woodworking for a very nice design which, even though simplified, still contains some meaty challenges.

There are a few technically demanding issues which crop up repeatedly with chairs, probably the two key ones are,

-the side rail to back leg joint. This is usually a compound angle and tricky to lay out (or even draw), but it needs to be executed really well as it's the most highly stressed joint that most furniture makers will ever make. In your design this joint needs to take priority over everything else, the back seat rail should definitely play second fiddle when competing for tenon space. A related issue is that the side seat rails are often plumb at the front but angled at the back, which puts you in the odd situation of having to intentionally plane wind into the components!

-the backs bars/splat to back seat rail/crest rail joints. These aren't as highly stressed, but they are pretty visible so need to be gap free. The problem is that by the time you make the back bars you've normally moved beyond the rod/plan and are, in the cabinet maker's phrase, working "to the wood not the paper". Consequently these will all need scribing, which means you're effectively reducing the distance from the crest rail to the seat, there are a few standard tricks to give yourself enough latitude to pull this off. The crest rail can fit into bridle joints on the back legs, which means it can float down to take up any slack in the back bars. The crest rail can be M&T'd into the back legs, but with a tenon that's about 2mm narrower than the mortice so it can float by 2mm, this will give you two, maybe even three, shots at scribing. Or you can fit the back bars into the crest rail with completely bare faced tenons, again this allows the crest rail to "float" and take up the slack.

Good luck!
 
You can simplify things quite a bit if you want. You can have virtually all joints square, no tenons intersecting and still make a chair that has shape and is comfortable.
Instead of having side rails at an angle, joining the back legs to the front, you can have the rails parallel, joining into the front rail. The front rail extends out to the front legs. An upholstered ply seat sits on top and provides the rake, either by having thicker upholstery at the front than at the back, or by having the rails themselves deeper at the front than at the back . My next dining chairs are going to be made like this.

The back rail can be located forward of the legs, between those two parallel side rails so that when you add the back splats, they slope backwards. My existing dining chairs are made like this and I shall do so again.
 
A maker called Michael Fortune has specialised in the type of chair design Steve mentioned,

Michael Fortune Chair 1.jpg


Michael Fortune Chair 2.jpg


Michael Fortune Chair 3.jpg


Michael Fortune Chair 4.jpg


Micahel Fortune Chair 5.jpg


Some of his designs are simple, some are anything but! He did a good article in Fine Woodworking a few years back where he detailed the build of one of his simpler models.
 

Attachments

  • Michael Fortune Chair 1.jpg
    Michael Fortune Chair 1.jpg
    128 KB · Views: 175
  • Michael Fortune Chair 2.jpg
    Michael Fortune Chair 2.jpg
    11.5 KB · Views: 175
  • Michael Fortune Chair 3.jpg
    Michael Fortune Chair 3.jpg
    21 KB · Views: 175
  • Michael Fortune Chair 4.jpg
    Michael Fortune Chair 4.jpg
    40.8 KB · Views: 175
  • Micahel Fortune Chair 5.jpg
    Micahel Fortune Chair 5.jpg
    40.9 KB · Views: 175
Custard

Thank you for all the information, much appreciated.
I need to taylor the design to both my skill and style - easier said than done by the looks of it.

Steve

Thanks, that style is an interesting work around - and obviously a design in its own right.


I've been collecting pictures of what I like, I'm going to go draw up some shapes and see what I think I can make with what I have.

:D
 
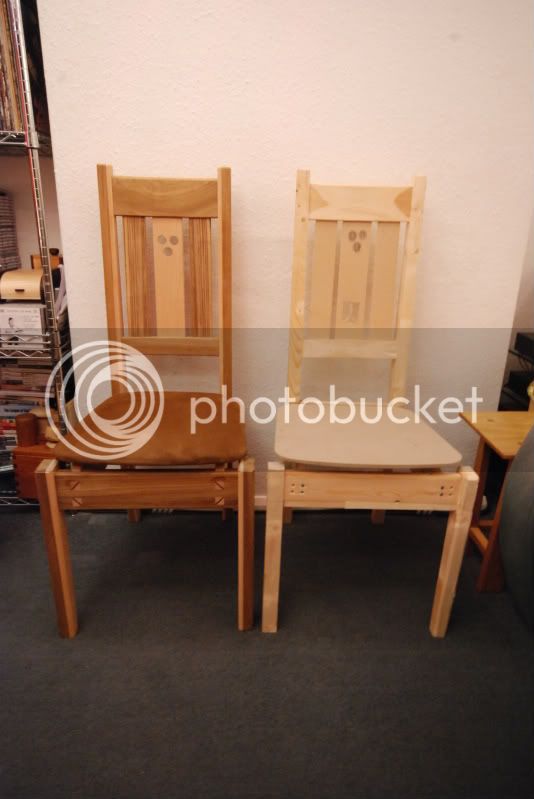
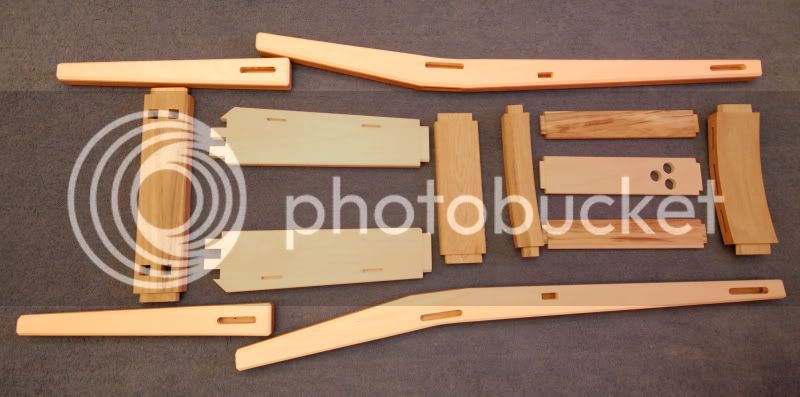
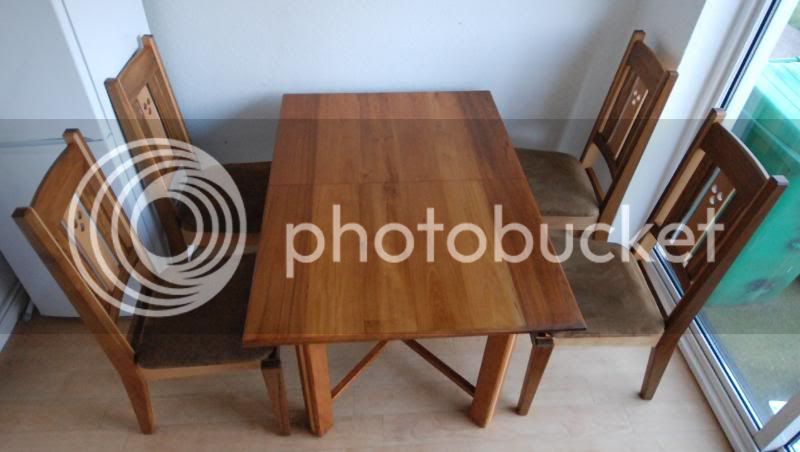
These are my own humble creations.


The components all straight M&T even on the curved back, which it really needs a flat back was very uncomfortable.
The maquette in soft wood was used to refine the seat height and angle and to make the jigs for the mortices.


I originally made 4, but keeping the jigs allowed me to add another 2 a few years later.

Pete
 
Very nice Pete, have you laminated timber to get thickness for the legs?

I know roughly what I want to make now having looked at dozens of pictures of chairs, but if I can get there is another matter. Need to draw it up full sized and see if I have enough timber to do the job, and get familiar with the domino.

I'll try to get a picture of the full sized drawing.
 
Yes I made a table with laminated legs so I used beech to get the thickness I needed.


You need to make a maquette and sit on it to make sure its comfortable for you and Mrs No skills.

Pete
 
Is there a general rule which applies to making angled M&T's, the type found on the side rails of a tapering seat as mentioned above?
I have become mender in chief of a fleet of ikea chairs used in a cafe environment and one thing I notice, apart from the totally rubbish wood, is that the mortise is set square in the leg and the tenon is cut to make the angle. Is that the normal way to do it? A consequence of that approach is that sometimes there isn't much through grain in the tenon which leads to some of the joint failures.
 
There isn't an absolutely hard and fast rule, although generally it's straight tenon and angled mortice. Not only does that make for stronger joinery, but with the equipment available in the average small commercial workshop it's normally a little bit easier to make an angled mortice than an angled tenon. Where there's a serious conflict you'd sometimes dodge the issue with a loose tenon, which gives you the best of both worlds.
 
Don't forget to look at a few actual chairs, very closely.
If possible take them apart whilst no-one is looking.
Often neglected - but looking at things (not mags, web pages etc) should be the first point of reference for most craft stuff - no point in reinventing the wheel.
 
I have spent quite a while looking at different chairs as this project has been drifting round in the vacuum of my mind for a year or so.

Couple of things that I have noticed or have been surprised to see.

How slender the timber that is used in chair building, there's not a lot of wood holding us up off the floor - I'm amazed they don't fall apart more often.

Dowels, I've knocked apart a few different shapes of wooden office chair/commercial chair and they were made with doweled joints and screws.

Quite a lot of dining chairs have straight backs - some have padding to make up for it but a few are just straight timber.

They are often the same width front to back - commercial chairs/office seating again.

So it looks like if you have a m&t built chair with a raked back and tapered from front to back in width AND it's comfortable then you do indeed have a quality chair - irrespective of the style.
 
No skills":tdpcqlui said:
Couple of things that I have noticed or have been surprised to see.

How slender the timber that is used in chair building, there's not a lot of wood holding us up off the floor

Chairs are pretty mobile pieces of furniture, they get shuffled around every time you use them. So much so that chair designers sometimes talk about the "five kilo limit", under five kilos for a dining chair and the user doesn't really notice the weight, over five kilos and they're increasingly awkward to manoeuvre. You might get away with a bit more on an arm chair because the arms usually make it a bit easier to grip and lift.

Like all these things it's just a guideline, but it's a fairly sensible one. I made an elaborate Arts & Crafts style set of dining chairs in Oak that came in at about eight kilos for the armless chairs, they were handsome chairs but they weighed too much and frankly must have been a pig to use because of it.
 
John15":30oemymr said:
Here is a chair making intro from Paul Sellers. You may have to subscribe for the remaining episodes.
https://www.youtube.com/watch?v=FmWlJ7ExNeI

John

I've watched the whole series and would recommend it if you are building chairs, there is a fair bit about marking out that I wouldn't have thought of if I were doing it with no instruction. You can subscribe for one month for £10 and watch the any of the vids and then unsubscribe.
Paddy
 
I had a similar issue about chair design and making and was recommended a copy of 'Chairmaking and Design' by Jeff Miller. ISBN 0854421556

Great book for anyone thinking about making chairs, - particularly the first one!
 

Latest posts

Back
Top