You are using an out of date browser. It may not display this or other websites correctly.
You should upgrade or use an alternative browser.
You should upgrade or use an alternative browser.
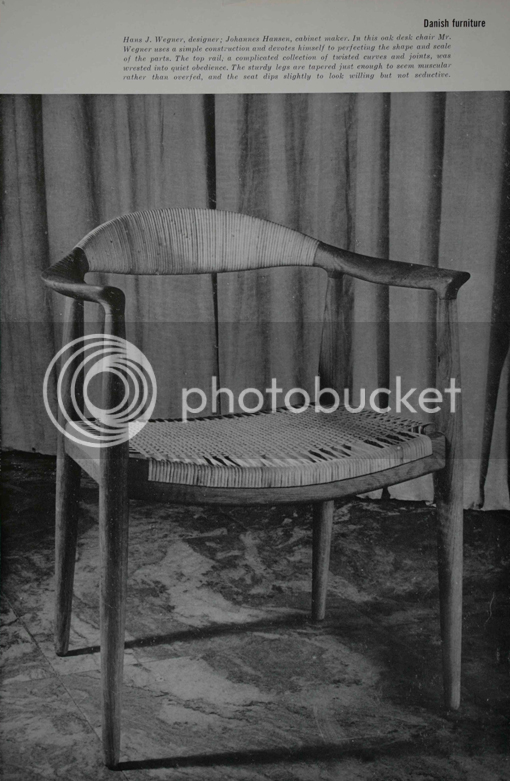
Building Wegner's "The Chair" .
- Thread starter Derek Cohen (Perth Oz)
- Start date


Help Support UKworkshop.co.uk:
This site may earn a commission from merchant affiliate
links, including eBay, Amazon, and others.
custard
Established Member
Fantastic project Derek, a chair, a mid century modern chair, and what's more the exact same chair that's my current screensaver! I've made a few chairs with similar "organic" curves, but never in such a hard timber. More power to your elbow!
Hi Jacob
Many chairs are fashioned that way - the sectioned morticed and tenoned while square, and then rasped or spokeshaved to a curvy shape. That is how Sam Maloof made his chairs (which is a style similar to this Wegner design).
The problem I had was that I could not see how I could connect the rear and front stretchers to the legs at the correct angle. Not only are these stretchers curved in two directions, but they do not enter the legs on the square (as do the side stretchers). This gave me a headache just thinking about it. However, after consuming enough beer, I decided "stuff it, I'll do them later on". Well, I was told that this was the wrong way - which it probably is, but no one showed me how to do it it correctly - and in the end I worked out a hand tools method that seems to be working (touch wood ... I begin the front and rear stretchers tomorrow).
Regards from Perth
Derek
Do the rear legs cant inward on a Wegner chair? If they do, then the side stretcher tenon to back leg mortise is a compound angle problem. If they don't, then nothing is really a compound angle at least by my screwy definition.
The stretchers hitting at a different angle is essentially the same layout problem you have on curved Shaker (or stick) chair back slats. There are several ways of doing it but I lay them out by drawing two circles at the diameter of the legs on a piece of paper, marking each circle right and left. Put a 0* line on each circle at (9:00 o'clock running through 3:00 o'clock and lay out the mortise entry point in degrees from that line, keeping right and left legs as mirror images. Make a pencil tick on each leg and label it "0* line" and "22* line" (or whatever the angle is in degrees) keeping right leg and left leg distinct. Then, put the leg in a V block cradle and run pencil lines from top to bottom based on the pencil ticks you just made. Use the cradle as a story stick and put your measurements on it - where the stretchers hit, etc. Make a tick at mortise tops and bottoms with an awl, all while the legs are in the cradle. The cradle/story stick plus the sheet of paper with the circles, are usually all you need to layout the leg mortises. Of course, you'll need to xfer the basic measurements to the cradle/story stick since you are reproducing a chair you own.
The mortises are chopped at 90* to the face of the leg, but on whatever degree line relative to the 0* line. It's a single angle.
If the back legs have a little rake that only slightly complicates things. Just let me know if the back legs cant inward at the floor.
You can also make a template of card to lay out the degree lines.
I'll scan and send as a PDF of a set of templates, a card template, and a photo of a simple cradle and how it's marked up.
riclepp
Established Member
Hi Derek
Really like what you are doing with the chair, and my hat off to you sir, fantastic work. Looking forward to the rest of the chair wip.
Really like what you are doing with the chair, and my hat off to you sir, fantastic work. Looking forward to the rest of the chair wip.
Lawrence Hill
Member
Hi Derek
Just a thought, but wondered if you had considered cutting the scribed/coped shoulders of the rails then setting in loose tenons which gives you a nice clean shot through the end grain without the risks attendant on undercutting?
You could rout or slot the mortises in the square and if turning use a removable spare tenon to get the thing centred for turning or jigged if rounding by hand.
I have generally 'shot' the face of the joint with a float and file in these situations and then set the turned component to match the radius/arc of the file. (I have even done it with a round plane once but had to deal with a bit of break out despite cramping on a backing guide block).
Nice work by the way.
Regards
Lawrence
Derek Cohen (Perth Oz)
Established Member
Just a thought, but wondered if you had considered cutting the scribed/coped shoulders of the rails then setting in loose tenons which gives you a nice clean shot through the end grain without the risks attendant on undercutting?
Hi Lawrence
I decided at the start to keep to the original design all the way, and that included using the original joinery as well.
I am not sure whether there will be any appreciable weakness as a result of the, hopefully minimal, undercutting at the shoulders. I plan to use epoxy, partly because it has some ability to withstand flex and partly as it is gap-filling.
I had originally thought to use hide glue, however I have been informed that it tends to become brittle more quickly on Jarrah. A cabinet may not be a problem, but all chair legs will flex. Epoxy is repairable.
Any comments and advise here is welcomed.
Regards from Perth
Derek
Derek Cohen (Perth Oz)
Established Member
Do the rear legs cant inward on a Wegner chair? If they do, then the side stretcher tenon to back leg mortise is a compound angle problem. If they don't, then nothing is really a compound angle at least by my screwy definition.
Charles, I am not sure where you came up with a "compound angle problem". I wrote "The front and rear stretchers differ from the side stretchers in that they are compound curves. Still, the process of coping the ends is the same for both, and the only part that is more complicated is getting the mortices lined up".
My understanding of a compound angle is one that integrates two angles. For example, a compound mitre saw will cut a compound angle that may be 45 degrees on the diagonal and 45 degrees on the horizontal.
The only compound angles here are the front and rear stretchers/rails - they curve both outwards and downwards.
See this post for examples of the templates I built: http://www.inthewoodshop.com/Furniture/ ... lates.html
I chose to keep the tenon in line with the stretcher, which likely reflects my lack of experience in building chairs (this is the first). In retrospect I should have angled the tenons and that would have simplified positioning the mortices for the front and rear. I just made it a harder job. Something to learn from ...
Regards from Perth
Derek
Eric The Viking
Established Member
- Joined
- 19 Jan 2010
- Messages
- 6,599
- Reaction score
- 74
Just a quick digression: Episode 3 of The Bridge II (brilliant Danish crime drama that's presently running on BBC-2) featured a Hans Wegner dining set. The chairs were the "Y" (or "wishbone") design. Just thought I should mention it ")
Back on topic,
Derek, I can't see what alternative you might have had to the order of work: You can't cut mortices first, as turning the round "over" them would wreck the sides of the mortices, surely. Did you trim the square ends to match the strike angles (in the vertical plane), so that the mortice would be made vertically downwards in each case? I suspect you did and I didn't pick that up from your description...
... being a bit thick this morning.
E.
Derek Cohen (Perth Oz)
Established Member
Derek, I can't see what alternative you might have had to the order of work: You can't cut mortices first, as turning the round "over" them would wreck the sides of the mortices, surely. Did you trim the square ends to match the strike angles (in the vertical plane), so that the mortice would be made vertically downwards in each case? I suspect you did and I didn't pick that up from your description...
Hi Eric
A number advocated cutting the mortices on the square and then turning the legs. I could see the sense in that, but I was concerned that the Jarrah was too brittle to avoid severe break out around the mortice, even with a filler piece, and then there was the uncertainly I had about the angles for the curved front and rear stretchers. Consequently, I chose the long way around. Someone more experienced would certainly have done it differently.
To get the mortice angle I did match them to the tenons. I described this at the beginning of the most recent report. This seemed to work well. As I said to Charles, the tenons probably should have been square to the legs, however the legs being round do not care.
Regards from Perth
Derek
Do the rear legs cant inward on a Wegner chair? If they do, then the side stretcher tenon to back leg mortise is a compound angle problem. If they don't, then nothing is really a compound angle at least by my screwy definition.
Charles, I am not sure where you came up with a "compound angle problem". I wrote "The front and rear stretchers differ from the side stretchers in that they are compound curves. Still, the process of coping the ends is the same for both, and the only part that is more complicated is getting the mortices lined up".
My understanding of a compound angle is one that integrates two angles. For example, a compound mitre saw will cut a compound angle that may be 45 degrees on the diagonal and 45 degrees on the horizontal.
The only compound angles here are the front and rear stretchers/rails - they curve both outwards and downwards.
See this post for examples of the templates I built: http://www.inthewoodshop.com/Furniture/ ... lates.html
I chose to keep the tenon in line with the stretcher, which likely reflects my lack of experience in building chairs (this is the first). In retrospect I should have angled the tenons and that would have simplified positioning the mortices for the front and rear. I just made it a harder job. Something to learn from ...
Regards from Perth
Derek
I see, the back legs are raked rearward. I don't think you did anything wrong by leaving the tenons straight rather than angling them. That makes for a stronger rail.
Nice work.
Derek Cohen (Perth Oz)
Established Member
The Chair is nearly at a point where I can begin to think of a glue up. Well, that's really getting a little ahead of myself. What I mean to say is that the stretchers are nearly done. Basically, there is one significant (through mortice) and one minor task (rounding the sides) to complete, and then it is ready.
This is where we are ...
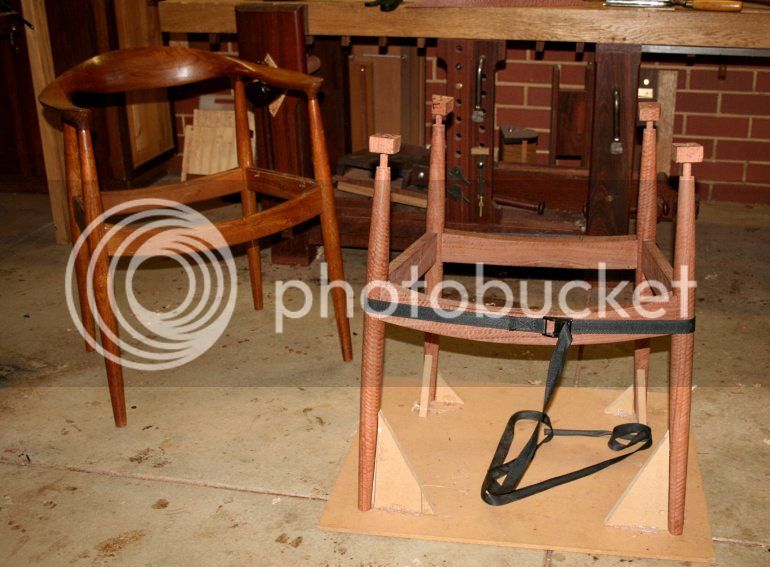
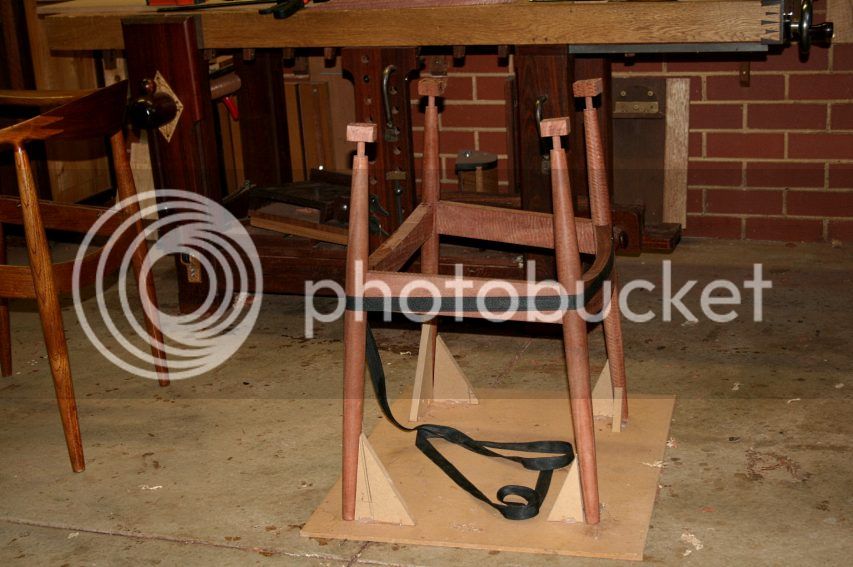
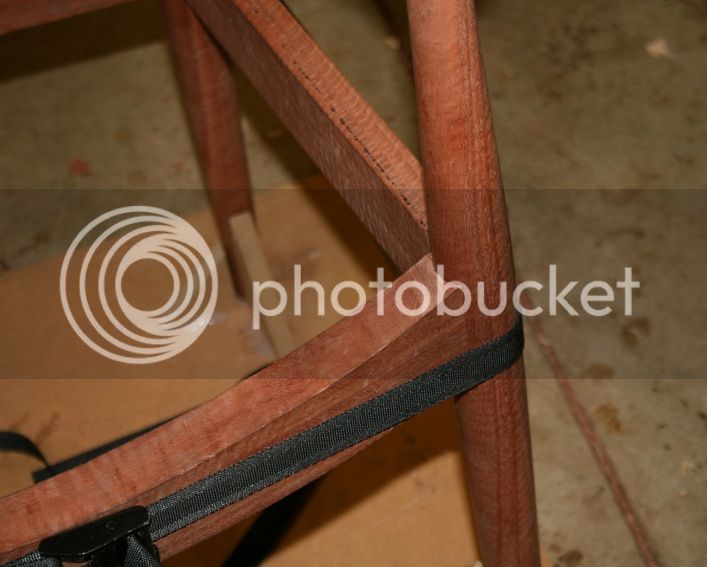
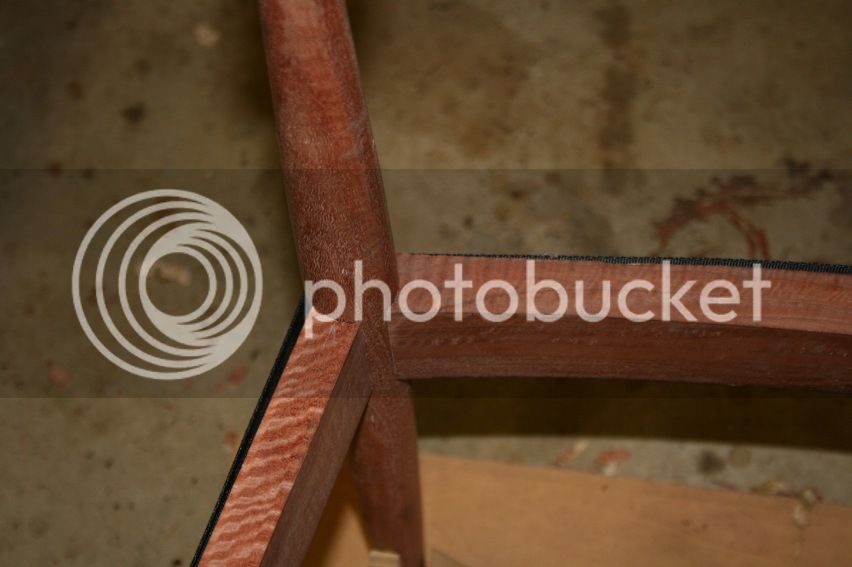
All the coped joints have been fine tuned ..
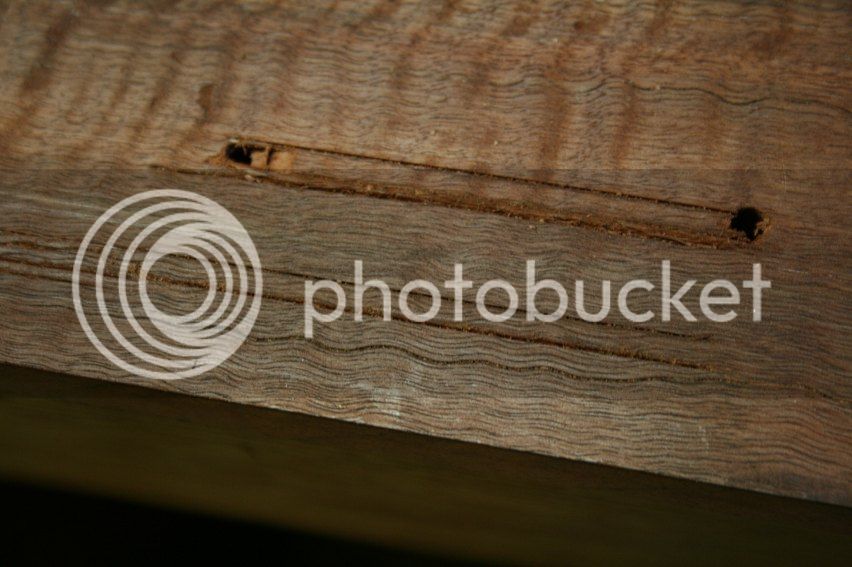
Before the side edges are rounded, a through mortice (I'm not sure what else to call it) needs to be created in each of the stretchers for the Danish Cord seat. The through mortice runs nearly the full length of the stretcher, beginning and ending 30mm ( 1 1/4") from the ends. It will be 3mm (1/8") wide and through the middle of each stretcher.
This is what it will look like ...
Now here is where I could do with your thoughts: how would you create this through mortice with hand tools? Power tool of choice would be a router. That would be an easy process.
My first thought was to saw it out with a coping saw and then clean up the edges with a rasp and file. I practiced on a scrap and decided that this would require too much cleaning up. The saw blade tended to wander with the grain, and the through mortice was too narrow to saw two parallel kerfs.
The other method is to use a mortice chisel. Chisel half-way from each side of the stretcher.
Keep in mind that the front and rear stretchers are compound curves. The side stretchers are straight.
It should be straight forward: score the sides, and chop out the waste. Well, scoring the sides is not straight forward for the compound curves. To begin, a cutting gauge needs to have the appropriate fence to follow a curve. OK, so I can do that.
I practiced on scrap ...
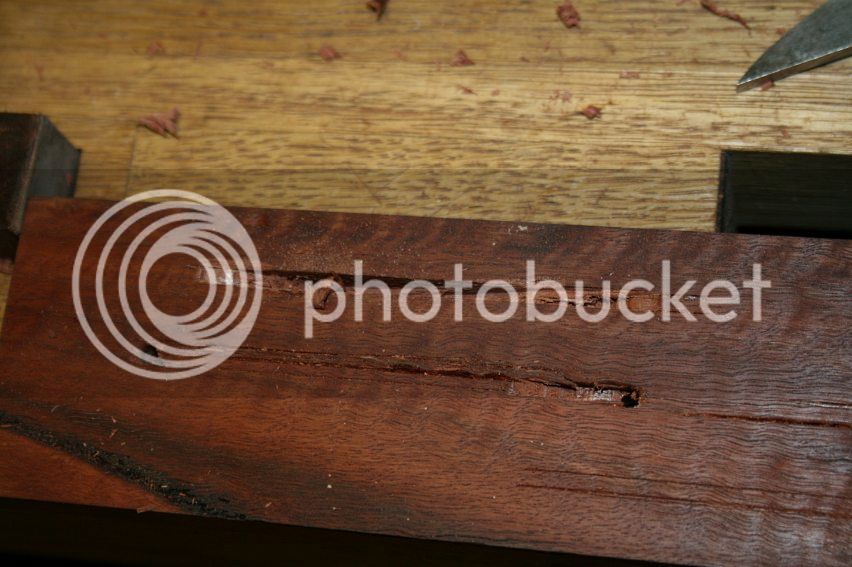
In this wood a single blade cutting gauge was not reliable. Even with initial light passes, the blade wandered with the grain enough that the mortice was in danger of wandering off course or widening. A mortice gauge would be better, but I did not feel like making one with the correct fence specifically for this project.
It occurred to me I could use the Veritas inlay cutter for the Veritas router plane. This has a fence that will follow a curve.
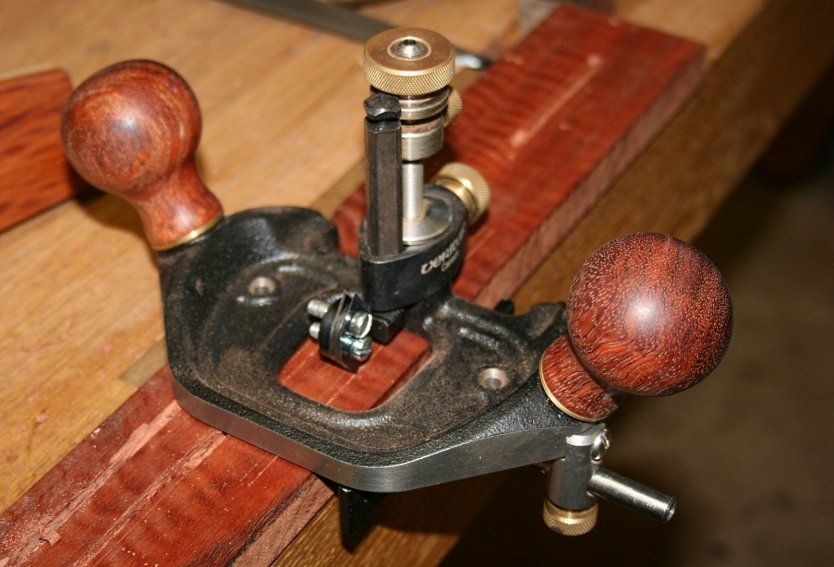
This has twin blades to score a parallel line for inlay ...
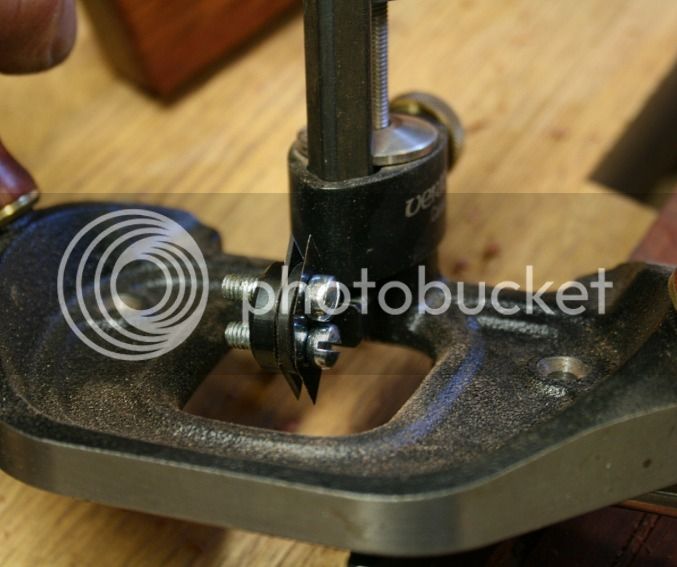
This is the line created (lower example) ..
Chopping out the waste with a 1/8" mortice chisel was OK ....
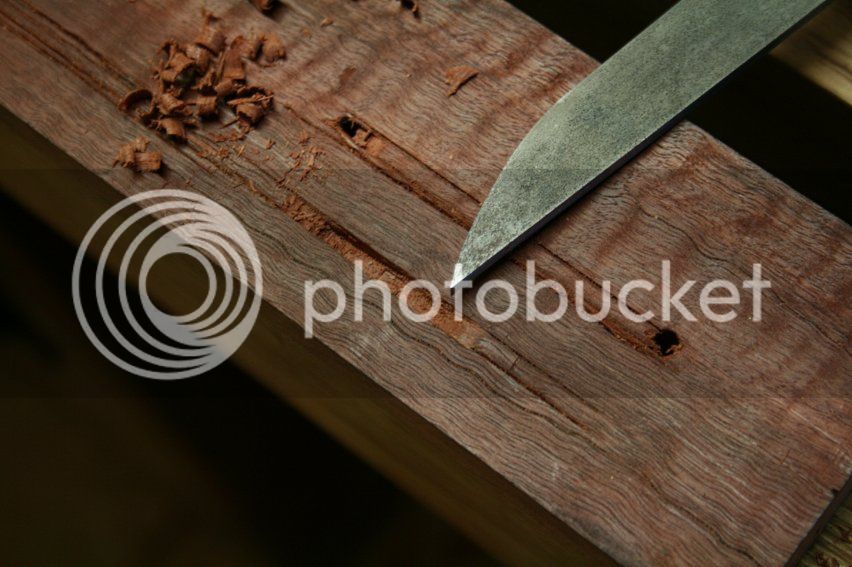
.... however, I can see that this will take time to do.
Anyone have another idea?
Regards from Perth
Derek
This is where we are ...
All the coped joints have been fine tuned ..
Before the side edges are rounded, a through mortice (I'm not sure what else to call it) needs to be created in each of the stretchers for the Danish Cord seat. The through mortice runs nearly the full length of the stretcher, beginning and ending 30mm ( 1 1/4") from the ends. It will be 3mm (1/8") wide and through the middle of each stretcher.
This is what it will look like ...
Now here is where I could do with your thoughts: how would you create this through mortice with hand tools? Power tool of choice would be a router. That would be an easy process.
My first thought was to saw it out with a coping saw and then clean up the edges with a rasp and file. I practiced on a scrap and decided that this would require too much cleaning up. The saw blade tended to wander with the grain, and the through mortice was too narrow to saw two parallel kerfs.
The other method is to use a mortice chisel. Chisel half-way from each side of the stretcher.
Keep in mind that the front and rear stretchers are compound curves. The side stretchers are straight.
It should be straight forward: score the sides, and chop out the waste. Well, scoring the sides is not straight forward for the compound curves. To begin, a cutting gauge needs to have the appropriate fence to follow a curve. OK, so I can do that.
I practiced on scrap ...
In this wood a single blade cutting gauge was not reliable. Even with initial light passes, the blade wandered with the grain enough that the mortice was in danger of wandering off course or widening. A mortice gauge would be better, but I did not feel like making one with the correct fence specifically for this project.
It occurred to me I could use the Veritas inlay cutter for the Veritas router plane. This has a fence that will follow a curve.
This has twin blades to score a parallel line for inlay ...
This is the line created (lower example) ..
Chopping out the waste with a 1/8" mortice chisel was OK ....
.... however, I can see that this will take time to do.
Anyone have another idea?
Regards from Perth
Derek
Coach maker's routers are not uncommon on eBay. There are many variations of design. Some have a straight blade held by a wedge. Others have a cutter which curves out two ways. There are also the Preston types where a double scoring edge is followed by a cutting edge. I will see if I can find some pictures later.
There was even a variant in the 50s / 60s called a Tec Tool, with two cutting edges on a handle.
All of these tools are designed to cut a narrow groove parallel to a curved face.
This is an 'ordinary' router, unfenced:

and its cutter

This sort has a fence - I'm not sure if it has a specific name:

You can see that the fence would follow a curve and the cutter can work either way, according to the grain direction:

And here is the 'modern' alternative:

Again, it has a short curved fence and will cut either way:

but it's not a precision tool and I don't think you would like it.
One last thought - the humble Stanley 71 comes with a fence designed to follow a curve, so might be better than the Veritas, unless that does too.

[Edited to include pictures.]
There was even a variant in the 50s / 60s called a Tec Tool, with two cutting edges on a handle.
All of these tools are designed to cut a narrow groove parallel to a curved face.
This is an 'ordinary' router, unfenced:
and its cutter
This sort has a fence - I'm not sure if it has a specific name:
You can see that the fence would follow a curve and the cutter can work either way, according to the grain direction:
And here is the 'modern' alternative:
Again, it has a short curved fence and will cut either way:
but it's not a precision tool and I don't think you would like it.
One last thought - the humble Stanley 71 comes with a fence designed to follow a curve, so might be better than the Veritas, unless that does too.
[Edited to include pictures.]
Jacob
New Luddism. Awake and resist!
The chair was designed for machine production (I presume) so maybe you just have to use a machine where necessary. If a hand tool only job then make a different chair? On this chair the hand toolery is necessary for the prototype but presumably the design would be modified with an eye to machining.
custard
Established Member
I'm with Pete, cut, remove waste, and re-glue. Unfortunately that will lose 3 or 4mm from the kerf and from shooting the sawn edges, so ideally it would have been allowed for at cutting list stage. Another issue is that the timber selection on the original almost goes out of its way to advertise that it's a single, unmolested piece. The grain on the right hand side runs obliquely across without any "step" from a re-joined kerf. So if you don't have that amount of wood to lose, or the grain on your piece would be disrupted, then I'm with Jacob...use a power router!
xy mosian
Established Member
As I type this it is beginning to sound a bit daft. How about a turning saw with an 1/8" kerf?
xy
xy
Paul Chapman
Established Member
Power tool of choice would be a router. That would be an easy process.
So why not use a powered router - I would. No point in making life difficult just for the sake of it. After all, the originals are made almost entirely using machinery.............
Cheers :wink:
Paul
Derek Cohen (Perth Oz)
Established Member
No power, Paul. We are hand tool users. Must find a hand tool method!
Regards from Perth
Derek
Regards from Perth
Derek
Similar threads
- Replies
- 19
- Views
- 2K
- Replies
- 44
- Views
- 3K
- Replies
- 15
- Views
- 2K
- Replies
- 1
- Views
- 740
- Replies
- 13
- Views
- 1K