Building the Lingerie Chest

UKworkshop.co.uk

Help Support UKworkshop.co.uk:

This site may earn a commission from merchant affiliate links, including eBay, Amazon, and others.
Derek, I have enjoyed your website for a long time. There are a few bits I can't follow but put that down to my deficiency but also the reading/photo quality when transmitted to my iPad.

I admire your designs which seem to me to balance simplicity, elegance and craftsmanship. Sure, I would do some things differently - but that's different, not better.

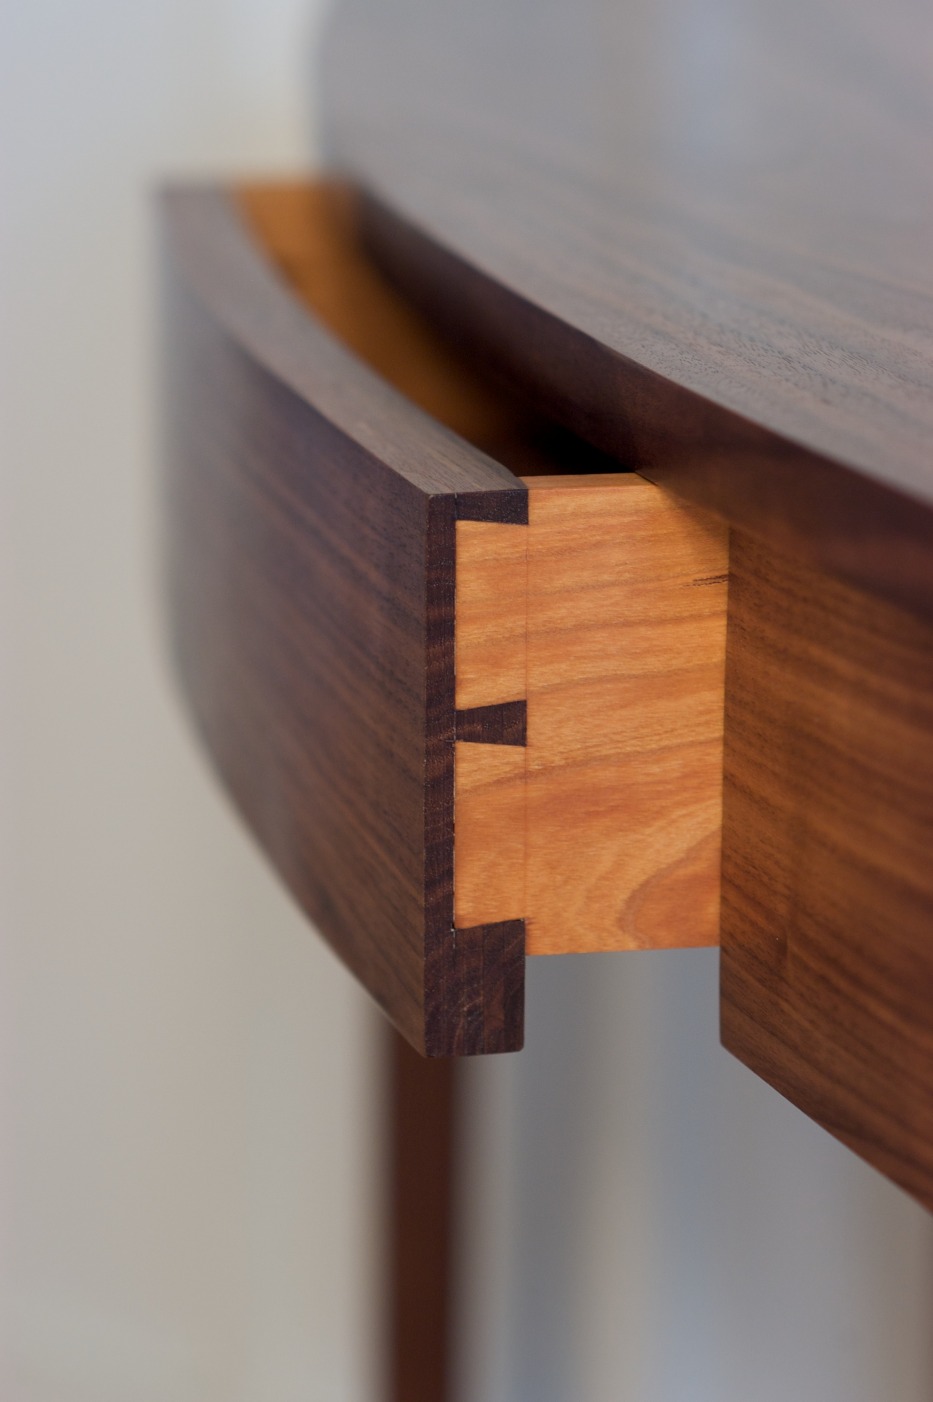
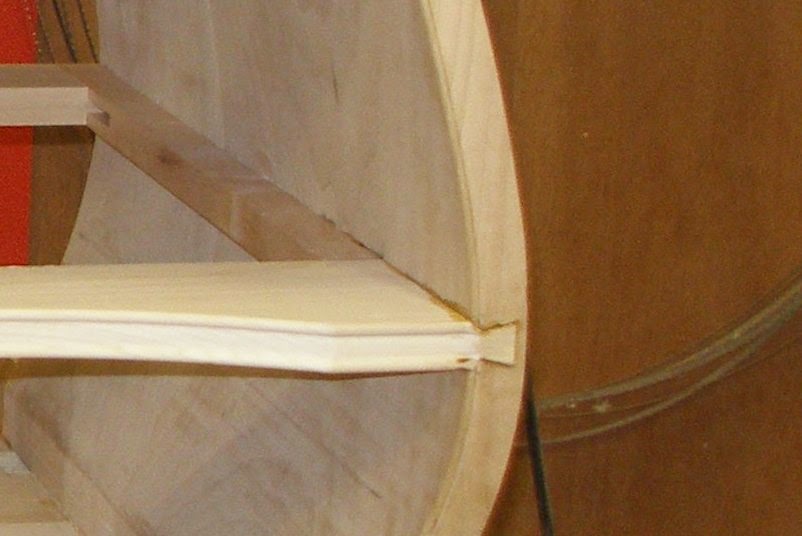
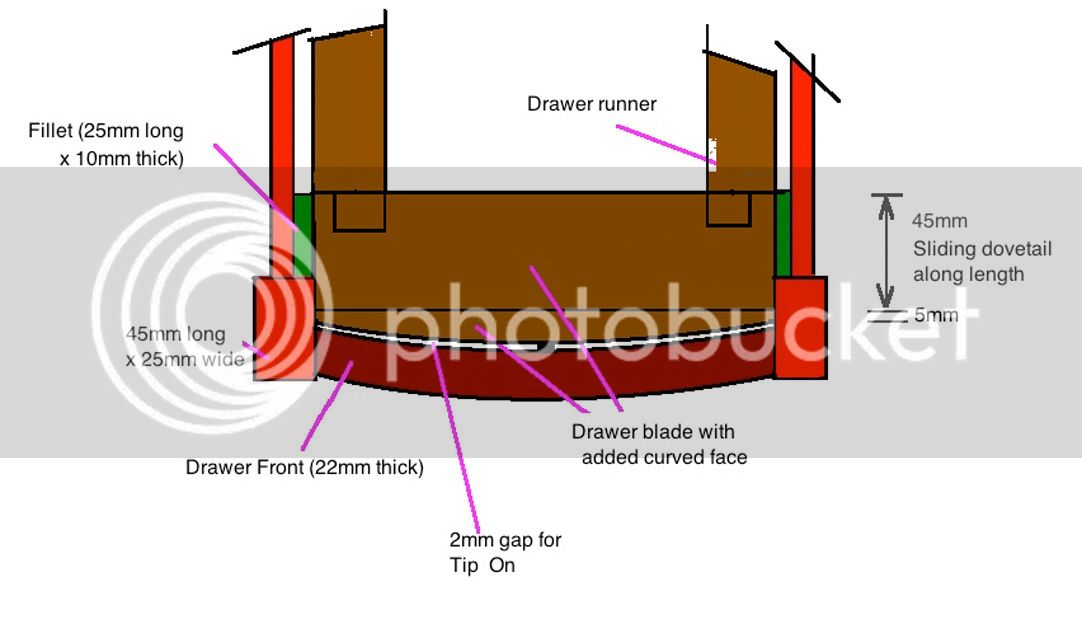
I would like (constructive, helpful) views on one thing you mentioned which I do struggle abut with. You say that the demonstrator works with fractions of a mm and ask if this is excessive. As we all work with this dead medium which still moves, can I suggest that the only time fractions of a mm matter is when the two mating pieces are glued together (eg glued up panels, dovetails, veneer joins) when perhaps that perfection is achieved as much by cramp pressure as by handicraft. Otherwise, and I'm thinking of drawer fit as an obvious example, isn't fraction of a mm obsessive as you ask?
 
Hi Martin

I am not following your last paragraph. Is it a reference to something I wrote and, if so, can you point me to it? Perhaps I am having a senior moment ... well it is Sunday evening here in Oz. :)

Regards from Perth

Derek
 
Derek, my fault. You mention you attended a workshop where a demonstrator was talking about working in fractions of mm and taking all day over a single drawer. I'm only a bodger but I'm questioning whether, working with a medium that moves, fractions of a mm matter that much when it comes to moving parts such as the fitting of a drawer. I accept fractions do matter when it comes to dovetails, panel joints etc but how much of the final exact fit is down to the medium cramp pressure and perhaps even the expansion nature of some glues. I'm not being cynical but genuinely wonder if those cases of drawer fit, door fit even scraping a cove, are times when a fractions of mm mean anything in real life
 
Hi Martin

OK that make sense now! :D

The furniture maker in question works with very high end pieces. My reference (as I recall) was in regard to calculations when resawing wood for drawers. Nevertheless, precision is required for the type of piston-fit drawers he builds for his customers. He does amazingly good work, and is widely known.

0.5mm can make a difference.

I try to work to as close tolerances in the drawers I build as well - just not as good as his. Just as good as I can make. The drawers in this chest will be the type typical of a bombe: they will be coped to fit inside the curved sides. They need to move smoothly as the plan is that they will be ejected (enough) by Blum Tip-On mechanisms to not need external handles.

Regards from Perth

Derek
 
I agree about 0.5mm metering. In fractions of a mm, my mind was thinking of much less, perhaps 0.1 or less
 
Seems it would be possible to mark them while it is assembled, disassemble to cut the joint and then knock it all back together again. Only requires one disassembly before gluing up.

Or, route the slots in place. I'd vote for a blind socket so as not to interrupt the nice flowing lines in the stiles.

Lookin' good!
 
Thanks Charles.

I have worked out a simple method for obtaining accurate sliding dovetails for the drawer blades.

I had originally planned to cut shallow housings first, just enough flat area to register on from the inside, and then mark out and cut the dovetails.

The leg thickness above the panel (for dovetailing) is 10mm (about 3/8"). I estimated that the housing would remove about 1-2mm, and the dovetail will then need to be about 5mm (about 3/16") deep. The angled side faces down, the straight side faces up. Other factors cropped up that made me re-think this.

Firstly, the drawer is similar to this (but fitted to the curved angle of the sides) ...

LingerieChest1_html_75c0172b.jpg


With the legs being 45mm wide, I calculated that I would only have about 20mm (just over 3/4") for the dovetail. Too short.

Consequently I decided to add on a 25mm wide fillet behind the leg/stile to extend this width.

Here is the inside of the chest (the rear rebate has not yet been added - marking needed to come from the assembled case first as it with be a stopped rebate) ...

1_zpspybwd4ch.jpg


What I shall do is clamp a fillet (intended for the front leg/stile) on each side and inside the rear leg/stile, and then mark and saw the dovetails from the rear (the rear was always going to be marked and sawn from outside).

The rebate will be 6mm (1/4") deep, which is also the depth of the dovetail. Once the dovetail is sawn and the waste removed, the clamped filet can be moved and glued behind the front, as planned. This will ensure that both front and back are coplanar.

Both sides are done at the same time.

The drawer blade is made to fit beforehand, and dovetailed. This is made double width (2 x 50mm wide), and then ripped into two pieces - one for the rear and the other for the front.

So, in effect, the front sliding dovetails are fitted from the outside of the rear of the carcase. A shallow housing for the dovetail is also now unnecessary. Altogether a simpler construction that will be easier to plan and make.

What do you think?

Regards from Perth

Derek
 
I gather (or I think I gather) you're going to saw the slots while still in the dry fit. I'm sure it can be done but I probably would have disassembled one last time. No doubt it'll all work out in the end. Carcase strength is a 4+4=5 kind of situation. One slightly loose joint won't spoil the overall strength of the piece. At this point all I would personally be worried about would be cosmetic whoopsies that would be hard to cover - oversawing a line, etc.
 
Hi Charles

All the work is predicated on keeping the front of the chest free from evidence of dovetail sockets on the front legs. The sockets for the front sliding dovetails are to be made from the interior (rear of the leg frame).

The plan is to dissemble one last time to complete the rear rebates, drill the screw holes in the upper panel, and then glue the lot together. As it stands, everything is square - amazingly so for a dry fit.

But parts move, and dovetailing for the drawer blades is vulnerable to movement. I just cannot see how they can be done accurately with the sides apart. All work on the sliding dovetails must take place with the chest glued up.

The strategy is simple ...

Measure the rear drawer blade for a fit, and saw the half dovetails at each end.

Working only at the rear of the chest, mark the dovetails within the rebate on both sees. Now saw/chisel the sliding dovetail in the rear leg and the front fillet at the same time.

When all the sliding dovetails and saw blades have been completed, move the front fillets to the front legs, and complete the sliding dovetail sockets there. The fillet will act as a template for the remaining socket.

As mentioned earlier, the drawer blade at the rear will be double width, so that, when ripped down the centre, the other half will become the drawer blade for the front.

Imagine this is the rear of the chest ..

Dovetail-strategy2_zps7lrguphi.jpg


And this is the strategy ...

Dovetail-strategy_zpsvslnmy4c.jpg


Regards from Perth

Derek
 
Don't know if you'll find this helpful, or even applicable:

http://davidboefffurnituremaker.blogspo ... ourth.html

I certainly do believe that the marking out has to be done during the dry fit with the case square and sitting nice, flat, firm, and level. If there is plenty of room for the saw to work then I suppose you could just go ahead and do the sawing at the same time. I wouldn't do this if it meant sawing or chiseling to a line that was even partially out of sight and without the project sitting in front of me I don't know if that would be the case.
 
Thanks Charles.

I have scoured the Internet for bombe builds, just to see how the blades were installed. David's website was one I explored in detail. He does good work.

One of his images is useful in explaining the situation for those who are not clear about what I am trying to do. The typical cabinet (and bombe) has solid sides ....

P3330004detail.jpg


This means that the sockets must be fitted from each end. There is no choice.

However a frame-and-panel breaks this rule - the frame opens the door for the socket to be formed on the inside of the frame. The only problem is that I have not found anyone doing this, and therefore no example or descriptions of methods for doing so. The method I have outlined is a strategy I have come up with. I am happy to hear other idea, if you have them.

Regards from Perth

Derek
 
Yes. Not to scale, of course. It will be 10mm deep and 25mm wide, and run the full length of the panel. The socket will be cut 6mm deep into the fillet.

One on each side. Saw both the rear frame/leg and the fillet together, then transfer the fillet to the rear of the front frame/leg.

Regards from Perth

Derek
 
I have no experience to contribute but I'm enjoying seeing how the extra complexities pile up when everything is curved!

One thought about a possible source for construction details - is there anything in Roubo's L'art du Menusier that is any help?

The Lost Art Press translation is not out yet but the plates are available. I'm away from proper Internet and bookmarks just now but I think you can find them at the French National Library (BNF) site or at the Hathi Trust.
 
Derek, I honestly wonder if this might not be a good spot for dowel joinery as blasphemous as this might sound to you. Frame and panel, in this iteration, is apparently limiting the depth you can take the sliding dovetails. One can see that the solid-sided bombe form has allowed the maker to go really deep with the blades, maybe a touch too deep but he had options.

Sometimes discretion is the better part of valor. The drawers will provide ample opportunity to show joinery skills.
 
Derek, these sliding dovetails you're planning to cut might lead to a potential problem. I gather your plan is to cut a dovetail housing in both the rear leg and a fillet attached to the inner face of the rear leg, the latter then transferred to a position behind the front leg. How will you slide the dovetail created on the front horizontal drawer divider (blades you're calling it/them) past the existing central fillet attached to the back of the curved panel, see your image below? Is your plan to tilt the runner/kicker and front/back divider (blades) assembly inside the carcase to bypass this fillet, then tilt this assembly level to engage the four dovetails with the matching four dovetail housings? Do you have enough room to do this? If you haven't checked I think I'd do so prior to committing yourself to this construction method.

I'm not fully convinced you'll be reassured of tight join lines at the front because the dovetail housing worked in the applied fillet looks as if it will be some 40 or 45 mm away from the front edge of the cabinet - that's quite a length of unlocked wiggle if the leg decides to warp, or other movement develops somewhere.

I also think Charles makes a suggestion worth considering when he mentioned dowelling the blades to locate them. Maybe you could do this (or similar, stub tenons for instance) for six of the blades, and undertake the more complex sliding dovetail joinery only for one of the middle dividers (blades). I suspect this will provide more than enough strength and rigidity. Slainte.

1_zpspybwd4ch.jpg
 
Hi Richard

The question I have for you is how you would align dowels to ensure (1) a fit (multiple dowels need more precision fitting than any other joint), and (2) how you would ensure that the two sides remain join at the correct angle (since one cannot just dowels and fit the blade/divider with the carcase joined)?

I just cannot see how this can be done.

My reluctance to change at this point is that I think I have found a viable method. I spent a lot of time - and aspirin - trying to find a method of joining the sides via the drawer blades (as I understand, the drawer "divider" is a vertical, not a horizontal member - but you are the lecturer and expert here, and I acknowledge this). Keeping the front of the carcase dovetail-free is one factor; alignment is another.

The fillet is 10mm thick, made in Makore, and will be flexible enough to be clamped inside the rear leg and against the panel. At 10mm it is flush with the inside projection of the leg.

Once the sockets are cut, it can be lifted out, and then fitted to the rear of the front leg, against the panel. Again flush with the front leg projection up from the panel. It will be glued in.

Now the fillet is only 25mm wide. It is intended that the socket be extended another 20mm into the leg to become a stopped sliding dovetail. The sockets in the fillet act as a guide to saw and chisel the extra 20mm. The fillet and the leg will be locked together by the drawer blade.

The depth of the dovetail socket is 6mm. Do you have a concern about this? The dovetail will be a single side (flat side up) and lower side at 1:5 for maximum purchase.

There is not a 45mm gap to the front of the chest. The drawer blade ends 25mm from the end (the space in front taken up by a 22 thick drawer front, 2mm for the Tip On, and a 1mm relief). That is the reason for the 25mm fillet, that is, to add this extra support and effectively turn the front leg into a 45mm bearing surface again.

I think this should make a strong construction. What do you think - does this change your view?

Regards from Perth

Derek
 
Derek, I think the sliding dovetail joinery you propose is sound, especially as I hadn't realised, or forgotten, the drawer fronts overhang the front rails, so the additional fillet behind the front leg makes sense. The main thing that struck me was ensuring you can manoeuvre the assembled drawer runner/kicker and horizontal rails into place around the central vertical fillet backing the panel before committing yourself to the method. The 6 mm depth of the sliding dovetail doesn't cause me concern, assuming the joinery is neatly executed.

Regarding your query about the blades nomenclature, I have most often seen them described as either:
a) dividers, distinguished as needed by the words vertical and horizontal, or
b) called rails for the horizontal parts and dividers for the verticals.
Your term 'blades' is a fairly new descriptor to me. It's just different, and it may be an Americanism, but I don't know for sure.

Dowel joinery in your piece does have its challenges because of the curves as you point out. In the comment I made about Charles' suggestion I was primarily acknowledging it as having merit, although if I was going for this type of construction I'd almost certainly go for a tenon rather than a dowel, precisely because of the alignment challenge you mentioned. There's a bit more 'give' in a mortice and tenon. The position and angle for the mortices could be picked up from an MDF template(s) if working by hand. Using this type of construction also leads to what could be quite a challenging assembly and glue up with nine horizontal parts fitting to four verticals all at once. Using sliding dovetails as you propose does eliminate this challenge because they, hopefully, will slide in easily after the main four parts of the carcass are finally assembled. Slainte.
 
Many thanks Richard. Your detailed thoughts are much appreciated.

Some of the terminology is a result of the confusion caused by the many nomenclatures around the world. I suspect that the USA and the UK use different tems. Oz seems to fall between or on both sides now.

I am very impressed that you could visualise from my description. I would struggle with this :)

I drew up a simple sketch to illustrate this, partly to share with others my convoluted thinking, and partly to help guide me along this route:

Drawer-Plan1a_zpstzzp6xf7.jpg


Plan going forward (as much as a checklist for myself as to communicate with others here who remain awake :) )

1. rebate the back - these are stopped rebates so I need to chisel and use a router plane.

2. glue up the carcase.

3. dimension the two fillet stips (one for each side)

4. dimension the drawer blades (each 83mm wide - ripped on the tablesaw later to create 45mm wide for front, 35mm wide for rear, and 3mm waste from the saw blade).

5. mark and saw the sliding dovetails.

Regards from Perth

Derek
 
Derek.

Now here's a point for discussion.

You mention that you don't like to leave deliberate plane marks on a piece of furniture. I don't like to do that either, but most of my hand finishing had a little undulation on large panels, due to the curved irons I favour.

There's a 'fashion' these days to leave shoulder lines visible on dovetails, to indicate the drawer was a 'piston-fit', and no planing was necessary.

I have a genuine, Georgian chest, which also shows this feature. However, I think that was done because when furniture was made mostly by hand, there wasn't time to fuss about, marking shoulder lines only where material would be removed. Except maybe in high-class work. (Generally, shoulder lines were the only marking that was done. The tails were cut by eye, cutting four sides in one go. I never did cut tails in batches, to be honest, and I didn't leave shoulder lines on view. I would feel lazy, so I took the trouble to mark only where I could remove the lines along with material.

All the shoulder lines prove is that the drawer was a piston-fit, with no planing necessary. I can live with people thinking I planed to fit! :) And I didn't have to explain to a customer when they pointed out the 'scratches'.

It doesn't matter to me now, because my days of leaning over the vice to cut dovetails are gone. Except on rare occasions, I use a jig, for the sake of arthritis. Needless to say, I don't try posh work any more. :)

What say you about shoulder lines Derek?
Regards
John
 

Latest posts

Back
Top