bronze infill planes

UKworkshop.co.uk

Help Support UKworkshop.co.uk:

This site may earn a commission from merchant affiliate links, including eBay, Amazon, and others.

head clansman

Established Member
Joined
7 Jan 2008
Messages
1,562
Reaction score
0
Location
UNITED KINGDOM
Hi all

my workshop exterior is now completed , soon to start fitting machinery to the interior though out the coming year, later into the year i want to start making benches and wall hung tool cabinets , i have a near full set of stanley planes from no 7 - no 3

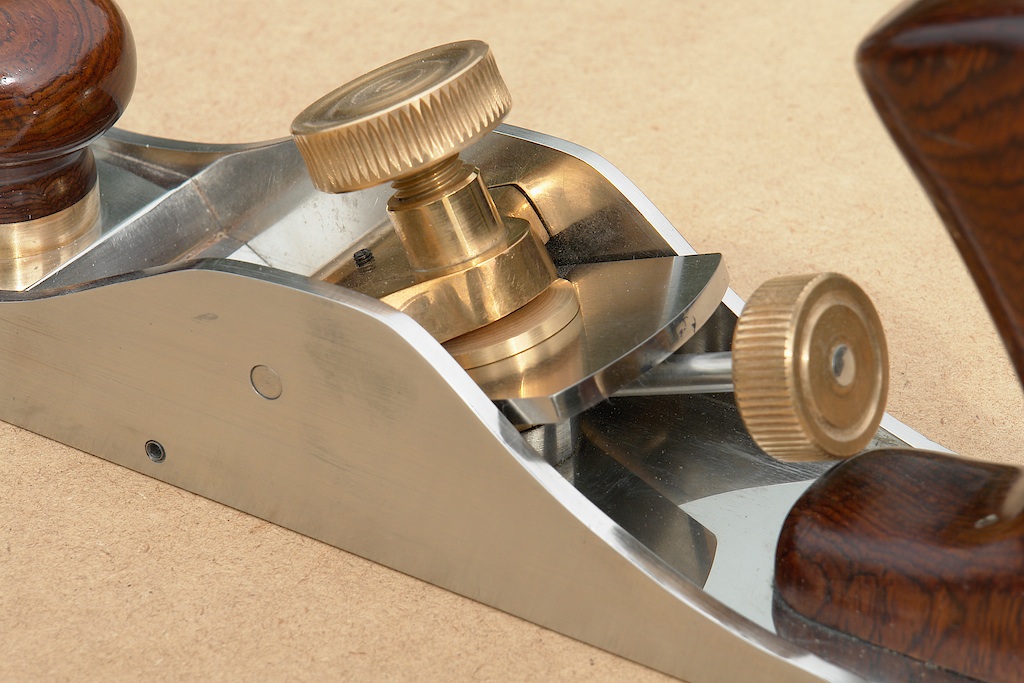
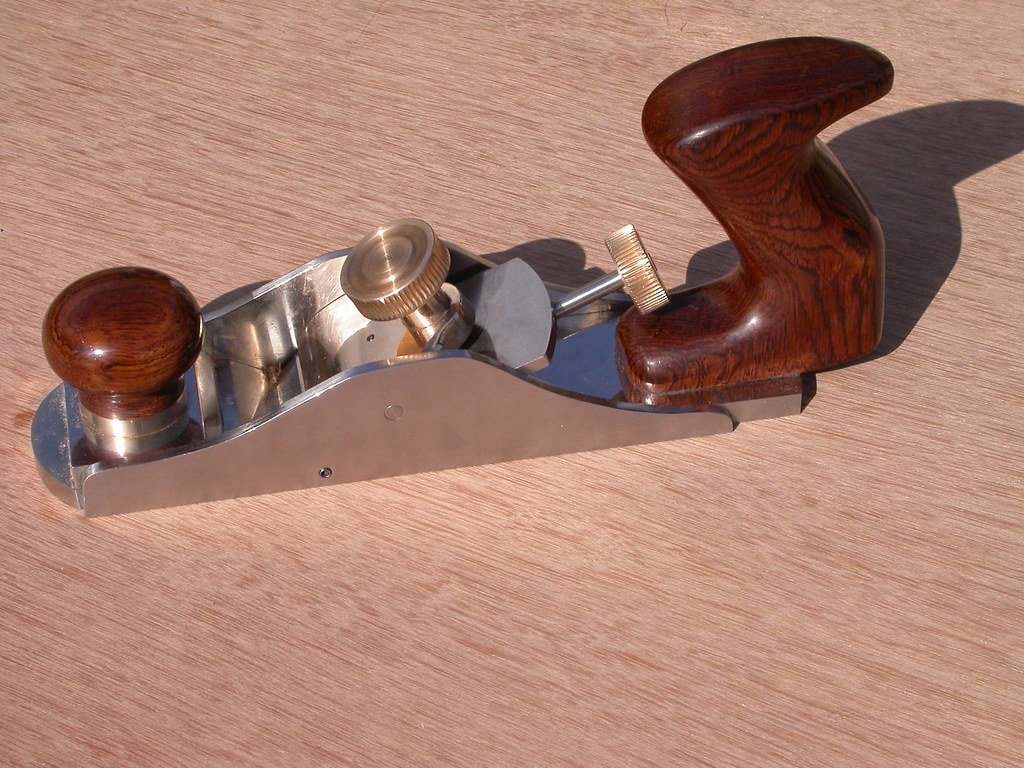
I really fancy making a set of bronze infill styled planes for working hard wood , infill plane have a higher set frog nearer to 50 degrees better for planing hard woods i have managed to get several design of various plan designs & was wondering does anyone know where to buy the the bronze infill body casts from or even the complete kit so i can manufacture the whole thing myself . I have tried a place in bristol he promised twice to send me details and never and a guy in devon who never replied and the st james company in america when there catalogue arrive soaking wet and ripped to sheds never bother ed to send another so i need help .

Any body here made there own planes before , where did you get all the parts from ? Any pointers would be a help thanks in advance . hc
 
Bristol Designs used to sell them, but it looks like you tried them?

I inquired a couple of years ago - they did have a few castings but no partially machined ones - their machinist had retired. I had no facilities to mill the bits so gave up on it.
I think Philly has made one of theirs?
Jim Kingshott's book has some designs - he had his bodies cast in a foundary. His book also covers making dovetailed types.

Rod
 
Since my 'To do' list is down to the last few hundred items, I've been pondering an infill plane project :).

Came across Gerd Fritsche's site the other day. He does kits as well as completed planes, and they look very good (but I stress I have no direct experience of the man or his planes).
 
Clansman

I'm currently working on my third infill plane, and they've all been of the dovetailed variety, which to me is the most traditional method of assembling, and also the most accessible to hobby wood/metalworkers. Having said that, having access to a milling machine does speed things up a fair bit. :wink:

My first plane was based on Karl Holtey's 11-SA, and I wrote about it here https://www.ukworkshop.co.uk/forums/viewtopic.php?t=25988&highlight=11sa

My second was a small shouldeer plane based on one by Konrad Sauer, pics can be found in the recent Secret Santa thread, http://philsville.blogspot.com/search?q=aled+dafis

My third, will be the same as the one I gave to Philly, but this time I'm keeping it! - Philly came really close to recieving just a box of shavings :D I'm getting pretty close to completing it, so I'll post a step by step thread either towards the end of this week, or sometime next week - half term, yipee. :lol: :lol:

If anybody has the contact details of Bristol Designs, can you please forward them to me, as I'd be quite interested in the castings if they still have some.

Cheers

Aled
 
HC
I bought some of Bristol Designs castings. They are indeed rough - if you don't have access to metalworking machinery then you need to look elsewhere.
Ron Brese supplies his planes in kit form - an excellent way to proceed! Ron is a true Gent and the prices are pretty good (£/$ excepted!). I'm actually building Ron a plane at the moment...... :roll:

Hope this helps
Philly :D
 
Hi guys

thanks for your swift responses, there some really nice links here thank you so much , that will point me in the right direction some really nice chisel and marking knifes hmm dribbling at the mouth now , keep the links coming and the pics as well please, all interesting stuff.hc
 
Hi philly

thanks for that, see what you mean about rough castings , hmm a nice little milling machine would be a god send making one of these planes , a future investment without a doubts a future post for one later on . stick to a kit from for now .hc
 
3060455703_1952cd2623_o.jpg


The above plane is obviously not a bronze infill but the technique I used to make it might be easier for any planemaker who, like me is a little wary of trying the dovetail method.

It should be obvious from the photo that I have been smitten by Karl Holtey's masterpieces.
His website showed the sole of his No 98 plane CNC machined to have built in rivets so that the sides can be rivetted in place.

Now I do have a lathe but no milling machine, let alone a CNC one so an alternative method was needed.

I did not take any photos during the process but here is the trick as well as I can remember it.

1. Clamp the sides and sole together and drill through 2BA tapping size.
2 Remove clamps and tap the holes in the soles.
3. Enlarge the side holes with a taper reamer until 5mm diameter at the outside.
4. Fasten the sides and sole together using 2BA socket head cap screws.
5. Make a 2BA thread on the end of a 5mm rod with a die.
6. Remove one capscrew and screw in the rod as tight as possible. I used a purpose built clamp on the rod to exert the maximum torque I could manage but on reflection the rivetting process could even pull tight a loose screw.
7. Saw off the rod a little proud of the side and hammer the rivet to fill up the taper hole.
8. Repeat until all the capscrews have been replaced.

I used stainless steel throughout which was a nightmare to cut, machine, rivet and polish and this is why I used a taper reamer rather than a countersink. I did not think that ss would deform easily enough to fill a countersink.

Of course the idea could be used with any materials. Brass or bronze should easily deform into a countersink hole.

I have since noticed that on his latest plane Karl Holtey is using screw in rivets so I have confidence that my plane won't fall apart.

If I were to make another plane, which I probably will because I am daft enough, I would consider a gauge plate sole (nice and flat from the start) and either gauge plate sides with steel rivets or bronze sides with bronze rivets to make them disappear.

If anyone is tempted to have a go with this method then I would love to hear about it so that I could learn about improvements before I have another go.
 
Hi dave d

nice plane , stainless teel that must have been a pipper to work , but nether the less something to be proud of when finished nice job , interesting the way you joined the sides an sole together , what sort of spacing between each drilled and threaded hole just out of interest.hc
 
Spacing about 25mm if I remember correctly but the more the merrier.
With anything softer than SS they could be done very quickly. Much faster than doing dovetails I would imagine.
 
Dave D":32xjmsrl said:
3060455703_1952cd2623_o.jpg


The above plane is obviously not a bronze infill but the technique I used to make it might be easier for any planemaker who, like me is a little wary of trying the dovetail method.

It should be obvious from the photo that I have been smitten by Karl Holtey's masterpieces.
His website showed the sole of his No 98 plane CNC machined to have built in rivets so that the sides can be rivetted in place.

Now I do have a lathe but no milling machine, let alone a CNC one so an alternative method was needed.

I did not take any photos during the process but here is the trick as well as I can remember it.

1. Clamp the sides and sole together and drill through 2BA tapping size.
2 Remove clamps and tap the holes in the soles.
3. Enlarge the side holes with a taper reamer until 5mm diameter at the outside.
4. Fasten the sides and sole together using 2BA socket head cap screws.
5. Make a 2BA thread on the end of a 5mm rod with a die.
6. Remove one capscrew and screw in the rod as tight as possible. I used a purpose built clamp on the rod to exert the maximum torque I could manage but on reflection the rivetting process could even pull tight a loose screw.
7. Saw off the rod a little proud of the side and hammer the rivet to fill up the taper hole.
8. Repeat until all the capscrews have been replaced.

I used stainless steel throughout which was a nightmare to cut, machine, rivet and polish and this is why I used a taper reamer rather than a countersink. I did not think that ss would deform easily enough to fill a countersink.

Of course the idea could be used with any materials. Brass or bronze should easily deform into a countersink hole.

I have since noticed that on his latest plane Karl Holtey is using screw in rivets so I have confidence that my plane won't fall apart.

If I were to make another plane, which I probably will because I am daft enough, I would consider a gauge plate sole (nice and flat from the start) and either gauge plate sides with steel rivets or bronze sides with bronze rivets to make them disappear.

If anyone is tempted to have a go with this method then I would love to hear about it so that I could learn about improvements before I have another go.

Dave

This looks like a stunning plane, can we please have more pics =D> =D>

I've been considering this assembly method also, and I like the way you went about it. Was there a particular reason you went for 2BA threads as opposed to a metric thread such as M4 or M5? This is how Ron Bresse, goes about it also, and if you search a little on the Sawmillcreek forum, he explains his method on there somewhere.

I take my hat off to you, making that plane in Stainless must have been a real pain. Well Done!! \:D/ \:D/

Edit

Did you make the brass knobs? If so, how did you go about doing the "knurling"?
 
Aled Dafis":2hjij0st said:
This looks like a stunning plane, can we please have more pics

You beat me to it Aled - we need to see more pics of the plane Dave, it looks outstanding... :D

Cheers, Ed
 
Hello Aled

The reason for the 2BA is simply that I had a set of BA taps at the time but no metric ones.
I was pleased to learn that others are also using the technique. I will follow up the Ron Bresse link, Thanks.

The "knurling" was in fact done by flycutting with the tool rotated by the lathe and the work held in a dividing head on a vertical slide.
Since the rotation diameter of the cutting tool was quite small it produced a pointy ended cut on the workpiece.

I am off on holiday tomorrow evening but I will try to post some more pics if I have time.
 
I have one more picture of the plane.
3265565439_edfcdec2e8_b.jpg


If the handle looks big and ungainly its because I have big and ungainly hands.
I actually get blisters between my thumb and forefinger if I use my Stanley No6 for long periods even with a three finger grip. One of the joys of making your own tools is that they can fit your hands perfectly.
If I had any sense of course I would just make a new handle for the Stanley.
 
Back
Top