Back to basics Help required.

UKworkshop.co.uk

Help Support UKworkshop.co.uk:

This site may earn a commission from merchant affiliate links, including eBay, Amazon, and others.

Markymark

Established Member
Joined
7 Oct 2006
Messages
220
Reaction score
0
Location
Devon
Hi

This may seem a little dum but I am having problems cutting small sections of sheet material, such as laminated chip board. Lets assume I want to make a shelf 1m long and 300mm deep. I cut a 1200 x 2400 sheet into sections on the driveway using my circular saw. I usually find that the sides are not exactly the right size and not accurately square. So I move on to my table saw which is a small aluminium table axminster table saw. My problems start as I cannot make my first cut 90 degrees to the other edge as I need to feed the piece though the blade perpendicular to the face edge. The cross cutting fitments on my saw firstly is not accurate enough to feed a large piece through the saw.

OK so I watched some videos and decided the cure was to make a sled, admittedly I was unhappy taking the saw blade guard off to install a sled. Until I started constructing a sled, same problem to make the sled I have to get a square piece over the size of my table saw guides.

I need to be able to cut sheet material up squarely to a chosen edge and I seem not even to be able to do this simple task. Could someone please spell out the basics of woodworking to me as at college they had all the really expensive sliding saw attachments etc which I sadly have not.

Thanks

Mark
 
You just need a pair of edges you know are square to start with. Have you got a big roofing square?

Lay that on one edge then mark the square up, then cut using a homemade guide rail for the CS:

Here

Once you get down to a size small enough it should fit on your saw. Don't take it as read that the boards are square when they turn up, I was watching a video the other day and the guy always cut 1/4 inch off the long side to make sure it was square to the edges.
 
I recently bought a saw with a rail system. It's so accurate for the type of thing you are doing. Provided you mark out the work accurately, just line up the rail with the marks and it will be spot on.

The saw I bought was the Mafell KSS300 with the flexible rail http://www.youtube.com/watch?v=drivbMC8z7o However, I dare say most of the rail saws will be equally accurate.

Cheers :wink:

Paul
 
Mark,

I'm no seasoned woodworker, and in terms of equipment I'm probably the same as you - I have a small table saw I bought from Axminster, with no built-in sled or anything. I also have never had proper training (self-taught) so the techniques I use are things I've seen elsewhere or have made up myself, so I can't vouch for how suitable they are in a commercial capacity.

I made a sled out of mdf (about 600mm square - just enough to ride comfortably on my table saw top), with a hardwood runner that fits in the track that runs parallel to the blade.

I deliberately made it longer than the distance between the blade and the runner, so the first pass actually cut the sled to _exactly_ the length of that distance.

I knew then that one edge was perfectly aligned to the blade, and then attached a hardwood strip along the front of the sled at 90 degrees to the edge that had just been cut with the table saw.

The sled still allows me to keep my riving knife in place (as long as I'm cutting right through wood and not doing rabbits or slots), and my blade guard attaches to my riving knife, so it's also still in place - I just need to raise the blade up to cater for the extra height the sled brings to each cut.

I've used this as my main cutting method for square cross cuts and never had any problems with it.

Hope that's some help.

Cheers

Alan
 
Hi

Chems - No problem with the square I can mark the board square to an edge and clamp a straight edge to the panel and cut it as you say. I just feel when you have a lot to do it is quite fiddly and time consuming. That said I made a cutting guide by screwing a 8' piece of ply to the top of a wider 8' piece of ply ran my circular saw up it and cut the edge off. This now works for cutting my 8 x 4 panels up. I would never use it for finish sizes as the circular saw is a cheapy from Screwfix and the blade angle adjuster is very hit and miss and also moves in use.

Paul - like the idea of the rail system . I could do with one for cutting up to 8' sheet as well as a smaller guide as shown in your video.

Alan - I am still hooked on the idea of the sled. My problem is making the sled square in the first place. Chicken, egg.

Thanks for the feedback so far


Mark
 
hivisvest72":3czkoxbh said:
Mark,
I made a sled out of mdf (about 600mm square - just enough to ride comfortably on my table saw top), with a hardwood runner that fits in the track that runs parallel to the blade.

I deliberately made it longer than the distance between the blade and the runner, so the first pass actually cut the sled to _exactly_ the length of that distance.

I knew then that one edge was perfectly aligned to the blade, and then attached a hardwood strip along the front of the sled at 90 degrees to the edge that had just been cut with the table saw.

The sled still allows me to keep my riving knife in place (as long as I'm cutting right through wood and not doing rabbits or slots), and my blade guard attaches to my riving knife, so it's also still in place - I just need to raise the blade up to cater for the extra height the sled brings to each cut

Alan thanks for this. I am still unsure what you mean. I like the idea of keeping the blade guard in place but unsure how you stop it catching on the hardwood strip?

Mark
 
Mark,

I'm at work at the moment so will take a photo or two tonight when I get home and post them later on. Youi may of course find that your table setup is different to mine, so might not be relevant, but at least you'll see what i mean.

I think the thing that I like about my sled is that once I glued the track guide to the sled, it didn't matter what angle I measured, becaus the first cut was to trim the sled itself down the blade, it guaranteed that it was parallel, I then had to rely on a big metal square to fit the other edge (of course assuming the square is perfectly true). My approach was to use several different squares to measure once it was tacked in place, figuring they couldn't all be wrong!

Cheers

Alan
 
I find my Dewalt rails system perfect for getting larger boards square.

The trick I used was to first ensure the saw blade was running perfectly parallel to the rail, with no horizontal "wobble" whilst the saw moves up the rail. Then take one side off with the saw, don't worry how it's lined up, just one side completely edged then use that as a reference. Then put your rail at a right angle to the cut you just made, and using a large square (I used a large combination square) ensure that the rail is running at perfect right angle to the previous cut by putting the long side of the square against the rail and the other side against your previous straight cut. Then take that edge off. You now have two straight edges at right angles to each other. To cut to width I first marked my width, then placed the saw on the rail and ensured that the kerf of the blade met my mark. Then using a combination square - I place the end/narrow edge of the rule against the back of the rail, and the other end pushed against the the edge of my board (the edge that has been cut straight!) - lock the square in place and make sure that distance between the edge of the board and the edge of the rail is the same all the way up the rail. Then when you take your cut it *should* be parallel to the other side. You can then do the same with the last edge. Tip - if it's a long cut and you don't clamp your rail down (I didn't) I found it best to stop often and check those distances using the square, as it turned out the rubber on the bottom of my dewalt rail held well and I didn't need to make any adjustments.

Using that method I managed to cut MDF into 50cm square sections - right to the mm. Just as well, as I have no room for a table saw!

Charlie
 
Hi Mark
Am I not right in thinking you have my DVDs? If so, watch Workshop Essentials Volume 1 again! The setting gauge I show there is reliable and fast. You can cut as many as you want and they will all be exactly the same width and accurately parallel. Best of all it does not require modifying the machine (like removing guards) and it is dead cheap to make. The most expensive part is the self-adhesive tape measure!

Blow the dust off your DVD collection - Sorted!

Cheers
Steve
 
The simplest solution that I know of is to make a sled using a roofing square or similar to set the sled's stop nearly correct. Then cut a piece of timber using the sled, next check the cut by re cutting on the opposite side of the blade, then adjust the sled's stop if necessary.
 
When you make your sled you are not trying to get the saw kerf at right angles to the fence but the other way around.

So cut your saw kerf but not all the way from front to back, then line the fence closest to you up to the kerf and fix the fence, then it doesn't matter if your board is square or not as your fence is square to the blade.

Does that make sense? Easier to know then to explain.

Mick
 
Total sense thanks. I am just scratching my head over how the saw blade guard fits on the riving knife with the sled in place.

All will be revealed later.

Thanks everyone for your advice.

Mark
 
Couple of ideas:

Chop saw?
With a bit of tinkering even a cheap one can deliver very accurate angles.

Shooting board?
Dead accurate - like minutes of a degree and lengths to the thickness of a shaving. A lot of people don't think these can be used with sheet materials like MDF and laminated chipboard but they work very well indeed.

Both of these can be tested on scrap and finely adjusted by shimming between the fence and the workpiece with paper if necessary for a very accurate result. This eliminates the chicken and egg problem and allows you to make either accurate components or accurate jigs, or indeed both.
 
Markymark":hihlw2jz said:
Total sense thanks. I am just scratching my head over how the saw blade guard fits on the riving knife with the sled in place.

All will be revealed later.

Thanks everyone for your advice.

Mark

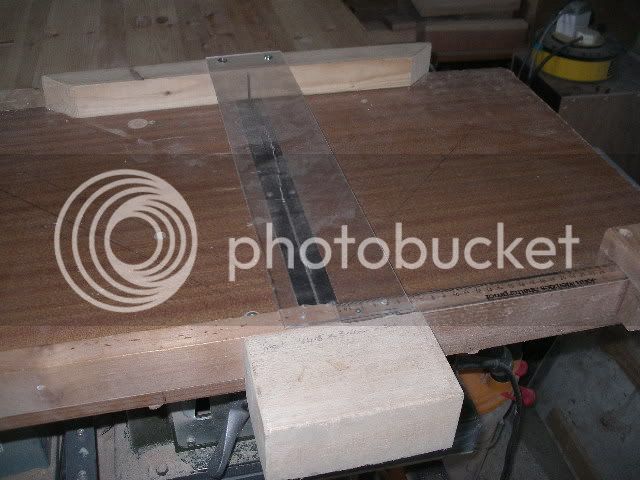
Mark - remove the blade guard, ensure the front and rear "fences" of the sled are higher than the maximum height of your blade, then fit a piece of acrylic from front to back - over the top of the blade. Leave the riving knife in place.

HTH if it makes sense?

I've added a pic to help?

IMGP3141.jpg


Dave
 
Noticed Alan (hivisvest72) mentioned that he used several squares to because they couldn't all be out.

I can't beleive I'm the only person who occasionally checks their squares for true using this process. Get a board with a straight edge, lay the square on it and mark down the edge (I use a knife because the line is finer). Flip the square over and line it up roughly with the mark and then mark a second line. If the two lines aren't parallel the square is off (or you're board doesn't have a straight edge of course).

For extra points measuring the gap betwen the top and bottom of the nearly parallel lines and applying a little triganometry will tell you how much your square is off by. Personally, I'd just bin the square though if you can measure an error.
 
If you do make a sled be careful to guard against the blade exiting from the sled closest to you out of the fence. I now have a sliding table but before that my sled had a block of wood that would encompass the blade and a stop to prevent to sled going too far forward.

Mick
 
Great thanks for all the advise. What would you say the largest distance between the front and rear fence should be? This determines the maximum width of cut.


Mark
 
Probably dictated by the length of your table saw (front to back) and outfeed - ensure that the sled is stable both before and after the cut

Dave
 
Ok.

I made it and thanks to all your advice it went well. The only gripe I have is that the hardwood sleds have a small amount of play in them. It could be because the guide slot is T shaped 10mm x 7mm deep. I made the sleds rectangular then took the corners off to make them fit the profile.

If anyone has any ideas how to make the T profile I would be grateful.

Mark
 
Back
Top