wadkin RAS restoration

UKworkshop.co.uk

Help Support UKworkshop.co.uk:

This site may earn a commission from merchant affiliate links, including eBay, Amazon, and others.

wallace

Established Member
Joined
13 Feb 2011
Messages
2,130
Reaction score
250
Location
county durham
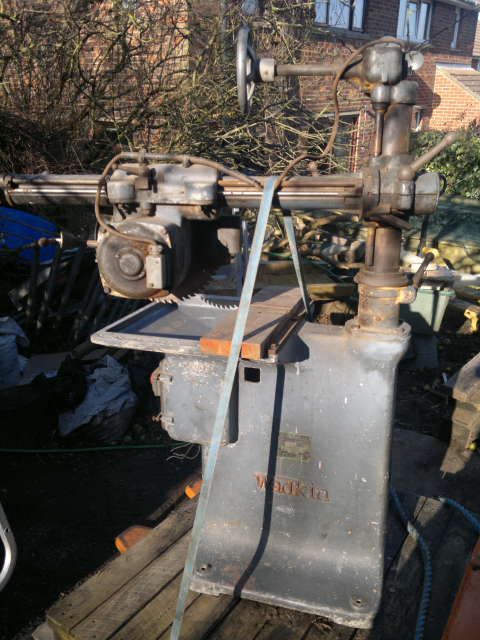
I've been itching to start this since I got it a few weeks ago. I started takeing it to bits today. I always find it amazeing when dismantling wadkin stuff that its 60 year old been left outside and the nuts and bolts come undone as if they were new. Still with clean shiny threads.

190220132701_zpse77b5ac1.jpg


1_zps325c3898.jpg


2_zps6baea323.jpg


3_zps05ca84f0.jpg


One of the guides has a big chunk out of it


11_zps080b7b08.jpg


Its a pitty a new isolator had been installed

14_zps767ef348.jpg


The original switch gear was missing

16_zps6c064d2b.jpg


This is what it should look like

redcontrolbox.jpg


21_zps562b4e63.jpg


22_zps94dc8b36.jpg


25_zpsa06d4764.jpg


24_zpsf9b5108d.jpg


This is the first time I've been able to move a wadkin base by myself, its made from aluminium

19_zps71b41651.jpg
 
This Wadkin stuff always makes me smile, old school - built to last - BMF equipment. An old fella I know used to work in a shop with a wadkin tablesaw (and a few other bits afaik), always talks fondly about it.

Good luck with the restoration.
 
wallace":myv3paa3 said:
This is what it should look like

redcontrolbox.jpg

is this local to you, maybe the current owner could be tempted to let you make a resin mould of it! the original looks so cool.

you could even make up the plates with some carful scanning and printing,

looks like an interesting thread. not that i would expect anything less for you! :lol: (hammer)

adidat

edit: do you own it already??
 
Yes its already mine (homer) That one is on the pillar drill. I think it might have worked for the cover which is missing, but the mechanism is missing asswell which had springs and contacts and ceramic bits. I could just do away with the isolator and pull the plug out.
Mark
 
I spent a good while filling and sanding and going around the raised bits with a dremmel

26_zps524e7204.jpg


27_zpsf9124abe.jpg


And then a coat of primer which helps to highlight any dodgy bits which can be redone

28_zps435b3a40.jpg
 
I thought I'd try something differant with this one, since the raised lettering is in aluminium I spent ages with a dremmel cleaning it up.

31_zpsd0518f65.jpg
 
More progress, I sanded the raised lettering on the base and then taped up and cut round the letters with a new stanley blade.

32_zps997213cd.jpg


I got some paint mixed to and gave it a few coats, I might take the paint back and get them to retard the shine a bit. I prefer the paint with less shine.

33_zps5ac39a78.jpg


34_zps04347fb8.jpg


35_zps44712c70.jpg
 
I spent a few hours makeing things shine

36_zps5c45b14b.jpg


And then turned my attention to the upright tube

37_zps66f4fc52.jpg


Came to bits really easy

38_zps18b2ff1c.jpg


Put the tube on the lathe to clean it up

40_zps4a2bfc1a.jpg
 
mark, when you put it n the lathe to clean it up, do you just use abrasives, or do you take a very light skim cut?
 
I just use fine abrasives or those green scouring pads. I dont want to remove too much because this bit needs to be nice and tight. If a piece is pitted I will use 80grit and work through to 600. Sometimes I will even use the drill and power sand on the lathe.
 
I spent some time cleaning up some of the castings with a flapper disc in the grinder

44_zpsb615d6d3.jpg


This is the gear to raise the saw

43_zps36c3c2d5.jpg


The little hole is where a threaded bar goes which winds the saw up/down. I was surprised that only 2" is threaded with brass. The rest was so packed with sawdust it even had threads in it.

41_zpsc8d5c612.jpg


I then turned my attention to the switch gear.

49_zps9dbbd8b1.jpg


I dont know whether to put it back the way it was or have the big stop button else where.

52_zpsc27a15b3.jpg


The stop button was in the middle of the door and obscures some nice castings.
 
looking good, could you not fit the emergency stop button in the hole above the on/off buttons?

adidat
 
Thats where it was but because of the box that houses it covers quite abit of the writing in the casting so I thought I could position it somewhere else
 
i had realised that, i actually meant do away with the box and have the button fitted to the panel. but im not to sure of the work involved in this! we had a similar machine at college, never really liked using it due to its climb cutting. but it was actually for the bench joinery department so I very rarely used it.

adidat
 
really you want it in the place your hand is near for when the sh@t hits the fan, touch wood this is never a problem.
so if you fit a fence (which you most likely will) why not have it fixed to the back on the left of the saw. or have it wired but lose with some sought of clamp on the back and move it around to suit!

adidat
 
I have done quite a bit recently, Heres the angle increments. I polished it and painted with some red paint. I found traces of red when I cleaned it

55_zps7126ff08.jpg


58_zps6ad9a7f0.jpg


I sprayed nearly all of the cast stuff

59_zps3daa5930.jpg


I couldn't resist putting some bits together

60_zps5b612743.jpg


this is the height adjustment wheel, I tried to take the shaft out but it was well stuck. I would normally put things like this on the lathe to clean

61_zpse3faa759.jpg


62_zps4802dcd6.jpg


63_zpse440a409.jpg


This is the end of the motor, instead of painting it I thought I'd clean the rough casting and try and polish it. It took 4hrs to get it done

64_zps9117dac0.jpg


65_zpse22ac41f.jpg


The bearing in the end is a cheap steel cage modern one, I'll see what its like and replace to something better if its pants.
 
That's coming up wonderfully, I'm genuinely envious of you (though I doubt I could do half as good a job as you have!).

adidat":1qpz9v3o said:
really you want it in the place your hand is near for when the sh@t hits the fan, touch wood this is never a problem.
so if you fit a fence (which you most likely will) why not have it fixed to the back on the left of the saw. or have it wired but lose with some sought of clamp on the back and move it around to suit!

The work ones I used (and subsequently my own small one) had the emergency stop fitted to the bottom of the table, such that you can hit it with your belly/hip/knee...
 
Those dial graduations are super. Better than what are found on a good many so-called precision metalworking lathes.

But not sure about the polished motor............
Just a bit too bling for me.
 
Wallace...has it ever entered your head that you are creating museum quality masterpieces from these old darlings!

For that alone you should be knighted!!

Another brilliant restoration...superbly illustrated with clear, beautiful pictures.

=D> =D> =D>

Jim
 

Latest posts

Back
Top