Victorian chair steps - WIP

UKworkshop.co.uk

Help Support UKworkshop.co.uk:

This site may earn a commission from merchant affiliate links, including eBay, Amazon, and others.
It's great to see this progressing - it's been one of my favourite WIP threads from my time on the forum, what with all the details and no glossing over of mistakes and so on, and so far, it's looking pretty good! I can totally understand the loss of momentum, though - much like the other guys who've commented, I have the same thing... curiously the only projects I've not had that problem with are the ones my girlfriend instigated. Hmm.... ;-)

AndyT":31cj7mxd said:
A simple tip when using these lighter-wight sash cramps - I use plywood pads with a little slot cut in them - the slot fits on the bar just tight enough to not fall off, but can easily move when needed.

Not a bad idea at all! I use little blocks of softwood with double-sided tape stuck to them for much the same thing - they'll stick to the face of the clamp well enough to stay in place, but they're easy to remove if necessary. The tape does do a good job of picking up all kinds of dust and fluff and needs to be replaced periodically, though.
 
Looks lovely I have to say. Really enjoyed reading it. Can't wait to see the finished piece.
 
Thanks again for the kind comments.

With two half-chairs glued up, and the seats screwed on, it's nearly time to fit the hinges.
One of the hardest things with this build has been getting these strange triangle shapes to line up right with each other. With the seat parts fitted it's clear that although one end fits:

IMG_1495.jpg


the other end need a quick adjustment with the plane to bring it into line:

IMG_1496.jpg


With that done, I could stand the chair up and mark for the hinges.

IMG_1489.jpg


I'm concerned that the hinging will need to be spot-on to let the seats meet nicely in both closed and opened positions, but there's no alternative to getting on with it.

I marked around the hinges with a sharp knife, making sure that they were in line with the seat and with the ends of the frame. You have to let the barrel of the hinges stick up above the seat, and hope that nobody's bottom is sensitive enough to notice.

Again, working on these big wedge shaped lumps is awkward, but I managed to clamp them down. Here I have put a bit of scrap wood in the vice, and the chair is clamped onto it, with another piece to clear the under-seat rail. I find the old-style handscrews really useful for this sort of job. I certainly did not want anything slipping while I was cutting out for the hinges.

Fitting the hinges is pretty standard work, and something I quite like doing. I can't imagine using a power router on something like this, especially with the odd angles.

The sharp-screw-in-a-block-of-wood gauge is ideal for marking the depth; it needs to be half the barrel thickness, not just the leaf thickness:

IMG_1491.jpg


I don't think I'm doing anything unusual or original here, but this is what works for me. First cut some safety lines away from the final edges, then cut a series of stop cuts across the grain. I'm being very careful here and stopping well short of the line.

IMG_1498.jpg


Slice those bits off by cutting across the 'feathers:'

IMG_1499.jpg


Pare down towards the line, leaving a bevel:

IMG_1500.jpg


Then pare towards the back of the hinge with horizontal cuts. The bevel lets the chisel start cutting without needing to change the angle of attack. The last cut is with the chisel in the marked line.

Clean out the ends:

IMG_1501.jpg


and then the back:

IMG_1502.jpg


to leave a tidy cut-out:

IMG_1504.jpg


which just fits the hinge nice and snug:

IMG_1505.jpg


The perfect tool to mark for the screws is a Horace Britton multi-tool with a little taper square awl:

IMG_1494.jpg


I am - of course - using steel screws initially while I try all this out. The brass screws are for final assembly only.

With one part fitted, I checked the alignment on the other half and made some slight tweaks to make sure the hinges were in line. This is the other half some time later with the hinges ready for screws:

IMG_1506.jpg


Here is the effect so far, showing the thing itself in the closed position:

IMG_1508.jpg


and doing its party piece:

IMG_1507.jpg


So, it's nearly done. I 'just' need to finish off filling the various holes and inaccuracies, apply my chosen stain to make it all matching dark brown and put some finish on it. Don't hold your breath, but it might be all over by Christmas!
 
Andy, I thought we all agreed finish by Christmas... you are in danger of being early :D Or is this actually your SS??
Very nicely cut hinge mortices, I would never dream of getting a router out for that either. But the depth gauge is very neat - but did you go half the barrel thickness less a little (clearance at mating surfaces)?
I recognise that awl also - nice to see that you use all the vintage tools.
Waiting now to see choice of finish and results... fine work indeed.
 
No skills":1bco5ylo said:
Lovely piece =D> , obviously its a bit heavier than a regular chair but would you say its heavier to the point where you wouldnt use it much?

I'll get back to you on that when it's finished and in use. I do worry a bit that it's going to be more awkward to move around than the ordinary chair it will replace, in what is already rather a crowded room. We'll see!
 
I've started on the finishing.

The first step doesn't have any photos, but I think everyone knows what sanding looks like! I did some. And some more. This thing is full of faces and edges and they all need attention. I also smoothed off the mouldings on the legs and steps.

That filled a couple of hours.

For the finish, I've decided on potassium permanganate, which is a traditional stain for mahogany, still available on ebay. It's a vivid purple colour, but works by oxidising the wood, turning it brown. Instructions in old books seem uniformly vague, so I did some experiments on offcuts. I had no idea how much I would need, and did not want to run out part way through. In the end, I made up a concentrated stock solution of about a tablespoon in about a quarter pint of water. I then diluted this for use 1:1 with water.

IMG_1518.jpg


I didn't interrupt the flow to take any action photos, but here is how it works on an offcut. This is 'before' on a piece which already has some on, alongside some vandyke crystals which I decided against this time:

IMG_1519.jpg


When first brushed on, you can see the purple colour:

IMG_1520.jpg


but three minutes later it has turned brown:

IMG_1522.jpg


Ok, demo out of the way and on to the real thing. Part one:

IMG_1523.jpg


Part two, the seat:

IMG_1524.jpg


Part three:

IMG_1525.jpg


leading, two and a bit hours later, to a place to stop:

IMG_1526.jpg


I'm not a chemist but I think this stuff needs some care in use, so I did wear gloves when putting it on. By the end of the session the sponge pad brush was starting to disintegrate and so was the fibre bristle brush I used for the details.

And for future reference, I now know that one step chair needs about three quarters of a jam jar full - exactly the amount I made up!

When it has all dried off properly I will see if the colour needs any more effort to match it to the same shade; after that I shall be putting on some hard wax oil. Nearly there!
 
Andy, this just gets better - the trad colouring and your research for example. Like Phil I have used it on my feet but never on wood yet... a swimmer you see, and foot problems come with that.
This is really coming together - I wonder if you will give it a little 'ageing' later? The odd dent, burnish of edges etc?
 
I have followed this topic since it started How can you comment on such a well recorded and skilled project as this other than remaks of awe and envy? Your staining has caused me to comment. Is it only used on mahogany? I have been making a sink base for my sons London flat. The existing built in furniture is stained mahogany which his Phillistine decorator over stained with a Ronseal Rosewood and he wants me to try and match. The timber I have used is Ash as I had some left over from a previous project (I tend to use Ash a lot) Work for sons is expected to be done free of charge. I have tried many samples and am now getting close but will the permanganate work on Ash, Love your clean mortices, I assume by hand and what is your main supply for the wood moulding planes?
 
Thanks again for the nice comments!

Photos can be deceptive - I think it already has plenty of odd dings and dents! The wood is very soft and I'm sure it will quickly pick up more when we start climbing on it.

I just tried the permanganate on some ash - it does turn it a nice mid-brown. I'll post a picture when my sample has dried.

The moulding planes are mostly from ebay - I need to sort out storage again and stop the workshop looking quite so much a dumping ground. That might mean I can make shelf space for some that are still lurking in boxes!
 
Specially for Mike - here's the potassium permanganate on some ash. Photo taken with the same settings as before. The right hand end has been done twice. It's a somewhat dead colour - as is the rest of my chair - and could perhaps do with a bit of red on it before the wax oil.

IMG_1527.jpg
 
The PP treatment on ash looks very interesting. I am inclined to test on a few different woods - you seem to get control over degree of effect, and also it looks very natural. I am generally wary of staining, but this looks interesting. My foot supply ran out years ago so will need to source some more (it works by the way :lol: )
And Andy - the pace that step chair is going! Barocca?
 
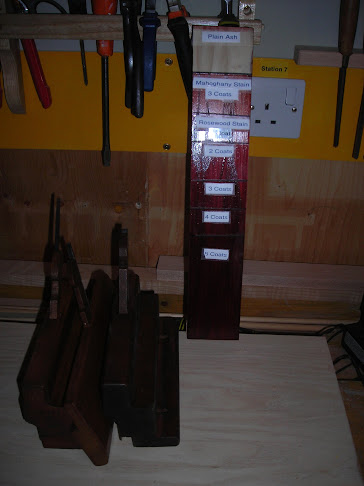
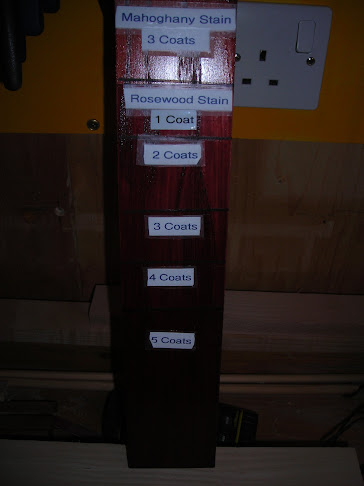
Thanks Andy the information is really interesting and I am truly grateful. I will give it a try, not on the current project as I am looking for a more reddish background. I have included some pics of one of my test samples which is close to the original. I used 3 coats of Rustins Mahogany varnish followed by 5 coats of Rustins Rosewood. I found Rustins to be a more richer colour than the Ronseal. I looked on ebay for the wooden planes and noted that most of them were being sold from Ashington West Sussex who I have bought from before. As this is not far from me and on the way to the timber yard I use I may call in next week. I am looking for a No 2 round moulding plane. Looking forward to viewing the completed chair steps in their final position. In front of a large bookase full of books perhaps or have you a library?

DSCN4863.JPG


DSCN4864.JPG


Not very good pics as they picked up the flash.
 
Hi Andy

Following our telephone conversation I thought it was about time I ventured into the "making things" forum for once and read your thread.

What a great time I had with all those tools in action and fantastic to see a Professor of Tools demonstrating their uses so beautifully!

I am a real fan of these quirky inventions and this one is particularly well executed...right down to the potassium permanganate staining! Hey...you missed a chance there...with the powder you had left over you can do the old trick of grinding it up and making a volcano...bit of glycerine on the top...Guy Fawkes!!! (BTW Douglas...try Lloyds Chemist for the powder).

I am intrigued by that mallet of yours...is that heart/sapwood lignum vitae or laburnum? I can't tell from this distance but suspect the former.

I was almost tempted to enter the world of making something other than tools by your thread...so good was the demonstration...but then I thought better of it and think I will just stick to what I know...it all looks far too complicated mate! :oops:

Some wax and elbow grease now....until you are happy and can't wait to see you balancing on it! :mrgreen:

We simply have to have a demonstration!!

Cheers mate

Jim
 
Back
Top