Lash up.

UKworkshop.co.uk

Help Support UKworkshop.co.uk:

This site may earn a commission from merchant affiliate links, including eBay, Amazon, and others.

squib

Established Member
UKW Supporter
Joined
27 Nov 2009
Messages
458
Reaction score
47
Location
Shrops.
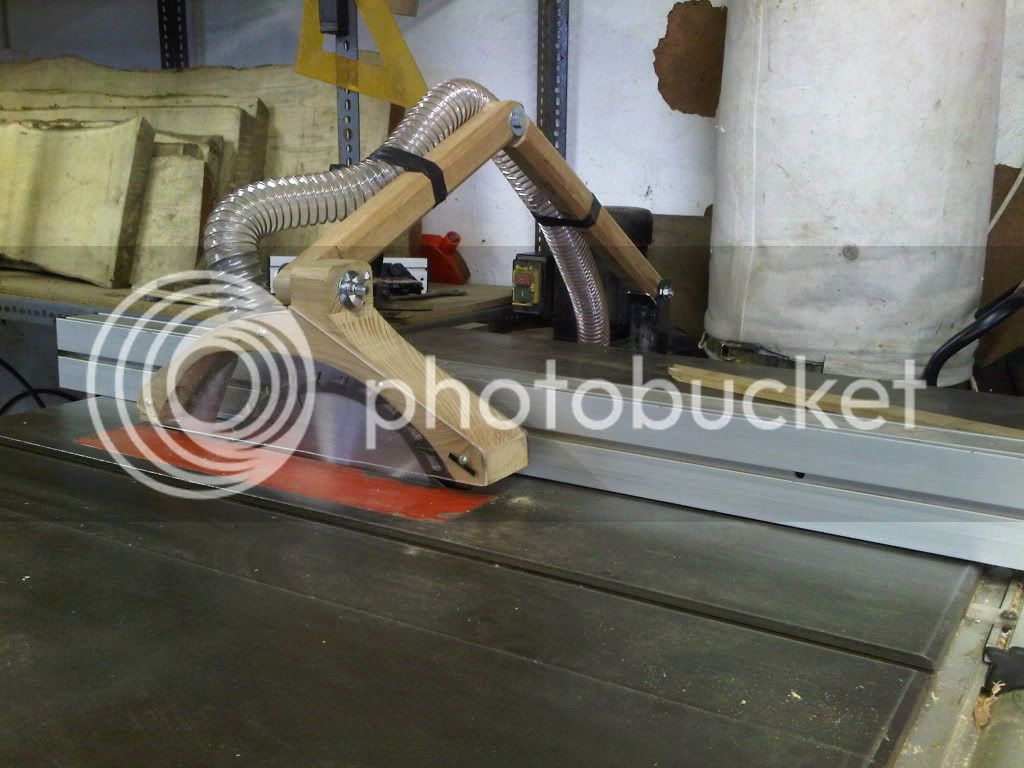
I can't find the thread to post this, but anyway, today i made a lash up for my table saw and it worked so well i am going to keep it for a while! The best bit seems to be the hinges that are like friction joints so stay where they are set.I am not proud of the construction as it is all made from offcut,but it works really very well....

 
Nowt wrongt with that Squib, looks the danglies to me. As long as it works well what is the problem? Not for show is it? :wink:
 
GENIUS Squib...pure genius...

I have been fiddle-arsing around with bits of metal and springy things and there it was...the simple elegant solution...right there in your brain!

Brilliant mate....

Off to the shop to whittle one!

Ta!

Jim
 
Thats an SIP saw isn't it?

Good performance then, how about a before shot, table all clean, then a single rip of some MDF and an after shot?

I don't know why you say Lash up, I think it looks very neat and well made.
 
There's absolutely nothing wrong with that, I'm sure there will be a lot of people following your method, not a lash-up at all, well done.
 
hi

actually i like it , its functional and if it does the job, what the problem? as chems says let see some shot of before and after .
 
Excellent work Squib. The only comment i'd make is that the timber construction of the hood will obstruct vision of the blade from the front. But looks great.

Cheers

Karl
 
If that doesn't wobble about, then it looks fine to me.
You just need to adjust your riving knife correctly and you are all set to go! :)
S
 
As you can see the top of the guard is basically flat so i am going to cut a window to see the blade, but of course guess where i put the screws :roll: ,the bars are mahogany that i cut a little small for my rounder and the guard is an offcut of western red cedar so is really light, the perspex bits are box dividers and were too small.I tried making a metal one and it squeeked and wobbled and all the joints kept loosening and you can't tweek the angles with a chisel! The riving knife is set for rebating......isn't that right?
PS... it is way more rigid than the original sip cr&p...
 
squib":16zoprs7 said:
The riving knife is set for rebating......isn't that right?

Well, I'm sure my concern is the same as Steve's - the knife is too far back from the rear of the blade to have any effect! :?

Following the H&S regs., the gap between blade and knife at bed level should be no more than 8mm (it used to be 10mm but, they changed it four-years ago).

You don't need to be that "anal" about the distance but I'd certainly move it in much closer from where it is now and also ensure it follows the curve of the blade, with an even gap following the circumference. :)
 
squib":23u0ggc5 said:
The riving knife is set for rebating......isn't that right?
PS... it is way more rigid than the original sip cr&p...

Height-wise, yes, OK, but it's not the height I'm worried about. It's miles behind the blade. Even if you raised it it would be in the wrong place. It should hug the blade, just a few mm gap.

I'm glad it's rigid. I use a SUVA style guard and rigidity was a problem, which I solved by using the rip fence to support it.

Cheers
Steve
Edit - I can't type as fast as Olly.
 
I think it's brilliant really but it seems unfair to have all these guys disagreeing with you. So, ok, it's a lash-up! :roll:

Richard
 
Thanks for the heads up on the knife...it was one i made for a larger blade and fitted to the sip...I will regrind and fit much closer, looking at my pic i may have to make another.
 
I'd make another....

Did you check that it was the correct thickness for the new blade?

(or the new blade was the correct thickness for the riving knife if you want to be that way around?)

Jim
 
Looks great to me Squib! Comments about lack of vision from the front bother me though, does this mean some stand in front of the saw?
I was taught, and still do, being right handed, stand to the left of the 'firing line'.

Roy.
 
Digit":21b9vv85 said:
I was taught, and still do, being right handed, stand to the left of the 'firing line'.

To right, with the standard guard you can't see the blade at all it been red plastic. If you want accurate cuts you should be watching the fence not the blade, it will do its job with out been watched. Also your fingers of course but they should be miles away!
 
Thanks for posting this. If I may, I'll copy your design and use it for the lathe, edge moulding (with the router) and many other setups. Just what I was after.
Cheers fella.

Adam.
 
Squib, this looks great. As I am a table saw virgin having just bought one for the first time I am now looking into what jigs and accs I need to get going. My dust extractor hood attaches as normal to the riving knife, presumably the fact that yours is elevated above the blade and knife means it is not getting in the way? cheers HM
 
Digit - I was going to post exactly that when I read the comments about seeing the blade from the front.

I used my TS in anger for the first time recently and from the very first cut I was off to the side. I made a few terrible cuts by looking at the blade (it is kinda mesmerising at first though) which improved massively by keeping an eye on the fence.

In fact - having an obscure front on the blade guard is probably a good thing as it should remove the temptation to stand in the firind line... that can't be a bad thing.

Next project - featherboard!
 
that can't be a bad thing.

Too true. On 24 inch saw I once saw a man use his wedding tackle to stop a railway sleeper sized billet of timber.
Brought tears to my eyes as well!

Roy.
 
Back
Top