Infill coffin smoother wedge repair / replace WIP

UKworkshop.co.uk

Help Support UKworkshop.co.uk:

This site may earn a commission from merchant affiliate links, including eBay, Amazon, and others.

Mr_P

Established Member
Joined
22 Mar 2013
Messages
1,094
Reaction score
2
Location
Oldham
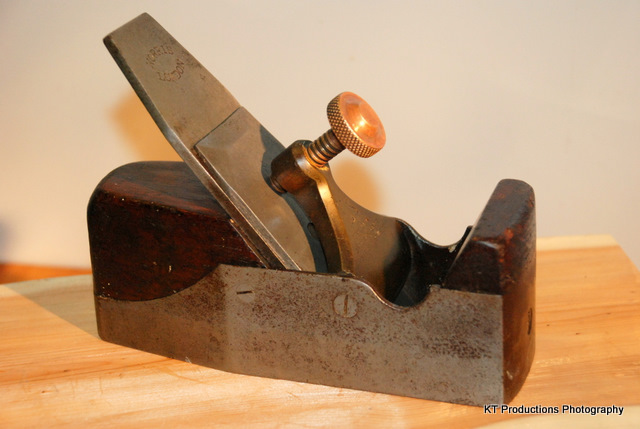
Suffering from a serious case of the infill bug. This 7.5" beauty has just arrived

Coffin 01.JPG

Coffin 02.JPG

Coffin 03.JPG

Coffin 04.jpg


Was thinking it might be repairable but since its Mahogany and I have loads of parquet flooring that is just thick enough I might as well make another.
 

Attachments

  • Coffin 02.JPG
    Coffin 02.JPG
    159.8 KB · Views: 1,731
  • Coffin 01.JPG
    Coffin 01.JPG
    249 KB · Views: 1,731
  • Coffin 03.JPG
    Coffin 03.JPG
    167.8 KB · Views: 1,731
  • Coffin 04.jpg
    Coffin 04.jpg
    186.5 KB · Views: 1,731
Make a new one keep the old one, is what I would do.

Pete
 
That looks like it was made by someone who knew what they were doing.

Then used by someone who didn't. :shock:

I have enjoyed making the couple of wedges I have made. They 'sort of' self fit. That is to say you tap them in and make a mark, tap them out, remove/smooth the mark and tap in again to make another mark and so on until you achieve a good fit.

A good tip, therefor, might be to not finish the scroll before fitting - it gets tapped around a lot during the process.
 
A nice looking plane there. I agree with Pete and Richard's advice - make a new wedge for use and keep the old one as part of the history. Does it have a maker's name on? I think I can make out some letters from the word "WARRANTED" in your second picture.
 
There's a rumour around you got a bit of a bargain here :wink:
The infills look good and as said the wedge was once a really nice one, a likely indicator of a fine tool (the scroll and general attention to the details). Could become a really excellent smoother, any dreaded pitting on back of cutter?
 
Douglas,

Slightly more expensive than your stunning Buck hybrid smoother, fancy a swap ?

The ward cap is in good nick but the I.Sorby iron has had a hard long life (Mr P logo looks v.early) less than an inch from the base of keyhole to edge. Another iron for the David Stanley shopping list. Don't have a grinder and it will take a lot of work on my oilstones to get it right, so might as well wait another week.

Andy,
Sadly no makers marks just two owners fighting for the front bun spot, they both lost since I can't read it.

Richard T and Pete,

Took the plunge and started making a new wedge. Hand scraped the bitumen of one piece but the stamping machine was working well that day and the stamp on the back was very deep. F.Hills & Sons Ltd Ghana a bit like Gabriel they went from planes to timber (except F.Hills was Aeroplanes).

2nd piece was very faint phewww. Forgotten how hard that is, these days I normally take a layer off the top on the bandsaw but I couldn't afford to lose the thickness.

wedge mk1 01.jpg

wedge mk1 02.jpg
 

Attachments

  • wedge mk1 01.jpg
    wedge mk1 01.jpg
    247.7 KB · Views: 1,494
  • wedge mk1 02.jpg
    wedge mk1 02.jpg
    148.8 KB · Views: 1,494
Lovely plane mate!!!

Sorry I bit against you without knowing! Still...you got a bargain anyway.

Keep the wedge...it has a lovely patina and someone might want the original if/when you do sell it.

Looks to be an early Slater of London body. It is very similar in shape to the later lever cap infill I have sold through Tyzak...

YOURS

file.php


MINE

DSC_0194.JPG


Cheers

Jim
 
Thanks Jimi, now I can find its flashier cousins.

That's not a wedge, THIS is a wedge

325.jpg
 

Attachments

  • 325.jpg
    325.jpg
    41.1 KB · Views: 1,434
You wonder how someone managed to do so much damage to the wedge given its juxtaposition to the iron, they must have a certain technique (and probably a 'special' screwdriver for mangling the lock screw??).
Nice lump of mahogany - and the connection from 'plane to plane is neat.
Re swaps I'm not ready to lose the Buck yet, but I have some other possibles maybe.
There are some very nice details on the original wedge (chip clearance cutaway) - all signs of original quality. Let's see it all finished soon.
 
Made a good start and got to test drives Mr Grimes (Thanks Roger and Pedder I'm very impressed).

wedge 001.JPG

wedge 008.JPG

wedge 009.JPG

wedge 012.JPG


I've been following Richard's advice about making it a bit bigger before fitting but I'm getting tear out on the right hand side so I'll have to make it to size before cutting it to width.

Unless someone can tell me where I'm going wrong.
 

Attachments

  • wedge 001.JPG
    wedge 001.JPG
    168.2 KB · Views: 1,340
  • wedge 008.JPG
    wedge 008.JPG
    90.5 KB · Views: 1,340
  • wedge 009.JPG
    wedge 009.JPG
    226.7 KB · Views: 1,340
  • wedge 012.JPG
    wedge 012.JPG
    142.4 KB · Views: 1,340
Have a look at the old wedge's scroll and how curved the edges/corners are - I only noticed this after struggling to shape it with no relief cuts and merrily tearing out all over the place even with files. For the first one I had no wedge to copy and no internet... #-o It was Yew though and I'm sure Mahogany is less prone to it.

With the actual wedge area I found that it's best to file along the length as much as the sticky up scroll permits (diagonally) when finishing to size.

Paring from either side to the middle is also a belt and braces option on the scroll.

Also sawing from either side of course.
 
Thanks for the tips Richard.

Think the chap who made my mitre wedge had the same problem so he just copied a chariot wedge.

mitre.jpg
 

Attachments

  • mitre.jpg
    mitre.jpg
    119.5 KB · Views: 1,294
I shouldn't worry too much about your wedges appearing to be more than just good friends....just wait a while and use the offspring for a block plane!!!!!

:mrgreen:

Jim
 
Here is a restoration job I did on a piece of fire wood :)
Way I figured it if I messed up I don't loose out.
The shaping of the wedge was great fun, I used the blunt chisel technique, thanks bill.
This was my first attempt of this nature. Tho I plan to do the same to a few other woodies I have, scrool wedges look so much better :)


https://www.dropbox.com/s/2i28q8wo8kh25 ... .49.28.jpg
https://www.dropbox.com/s/diflcawdc352q ... .44.29.jpg
https://www.dropbox.com/s/f0caa6oynl2wc ... .44.25.jpg
https://www.dropbox.com/s/fm5o7z32ak55i ... .48.25.jpg
https://www.dropbox.com/s/ojixenb4t93wh ... .30.43.jpg
https://www.dropbox.com/s/y0lwl87jk0bte ... .30.58.jpg
https://www.dropbox.com/s/2hhlenwbmjjii ... .34.08.png
It's no means a great tool, but for a piece of junk I'm happy with the out come and will keep this plane.
Was originally going to chuck it after I messed about.

https://www.dropbox.com/s/9g22wmzzu843b ... .44.34.jpg
Some tools I used, didn't use all of them, I also used A pair of H&R, was good fun, learnt a lot during this process.

Thanks

TT
 
Thanks Toby,

Haven't forgotten this thread I've been preparing. Purchased Bill Carter's CD and finally admitted defeat and bought a bench grinder just need some new chisels from the pound shop. Yes I have loads already but just couldn't do that to Sheffields finest.
 
Excellent, tho if you are considering making wooden components a lot then I would use shed fields finest, no point in having owing a horse but riding an donkey.

Worst comes to worse you can regrind, if that still dosent sound appealing you can use just so steel stock flat ground, that will do the trick. I only have one firmer chisel flat ground and it's worth it.

Thanks
TT
 
Back
Top