WIP Comp entry Sideboard Thingy

UKworkshop.co.uk

Help Support UKworkshop.co.uk:

This site may earn a commission from merchant affiliate links, including eBay, Amazon, and others.

Dave D

Established Member
Joined
28 Aug 2008
Messages
92
Reaction score
0
Location
Bath
Since this has to store everything but not be too big and clunky we decided that anything not actually necessary, like legs for example, should be left out.

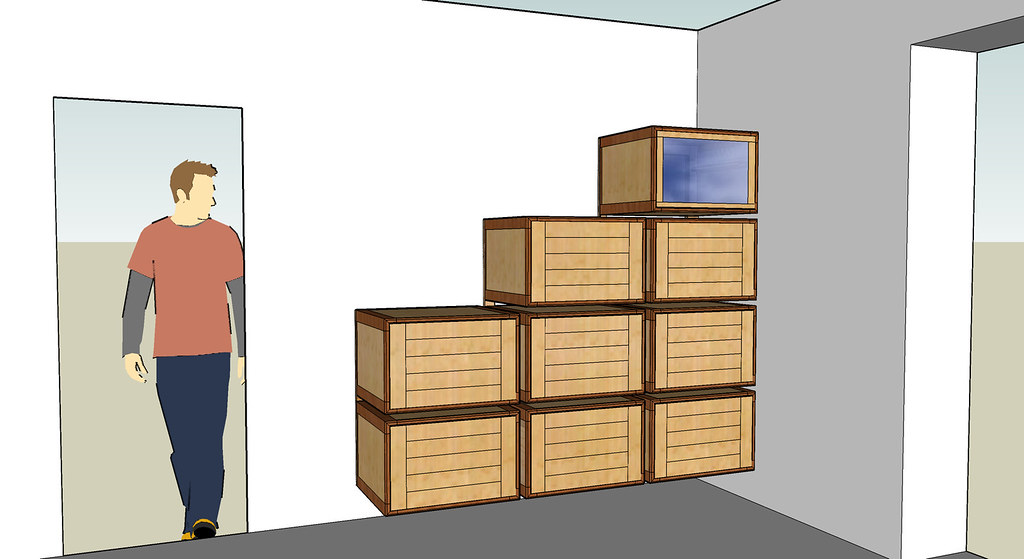
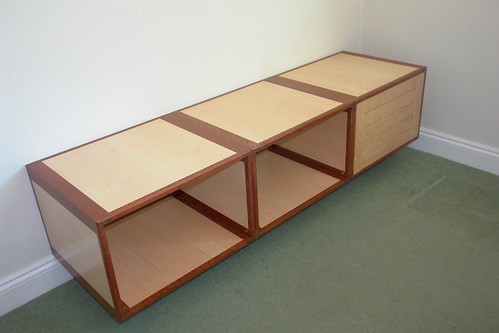
This is what we came up with. Identical carcasses should mean reasonably rapid construction.
Some of the fronts will be split across to form two drawers.
Boxes could be arranged in different patterns if we change our minds after construction.

I am looking forward to seeing what actually results. I like the fact that in this comp design evolution is to be expected.
3491156760_bab02dc1a5_b.jpg
 
Interesting design. I've often thought of a 'wall of boxes' style arrangement, how are you intending on attaching these to the wall? Also, what woods are you going to be using?
 
I have discovered Woodfit's cabinet hangers, part number BC654.
They fix to the side of the cabinet behind the inset back panel and can be adjusted from the front through a hole in the back panel.

I hope that they work otherwise I will need a serious rethink.

My wife has already selected the wood she would like. Birds eye maple for the fronts, maple veneered mdf for the carcases with Rapala Lacewood lippings.
 
I love the concept and the design. I was thinking about ways of making this type of piece modular so you could make different units and then have the ability to switch them all around.

Also you could incorporate "double height" units - such as shelving or a taller glass fronted unit?

Of course you wouldn't be able to take the approach with it being wall mounted unless you first mounted a huge framework on the wall itself!

Ref bird's eye maple - that's a hell of a lot of the stuff if you use it for the fronts! Given its fairly decorative nature it might distract from the overall piece?
 
Thanks for your comments,billw.

I agree. If this project works out OK I can see myself doing more wall hung stuff.

The Sketchup was done before I discovered the Woodfit hangers.
These are intended to hang on to a horizontal bent steel rail fixed directly to the wall, so I don't think that I will need a frame after all.

If you were to make something re-positionable then there may be the problem of what remains visible when a box is removed. An exposed frame would look better than a metal rail.

Re the birds eye maple. I was intending to use plainer maple but Herself fell for the birds eye so I will take a chance with it.

Not surprisingly it needs some careful hand planing after a minimum of machine planing, which tends to tear the eyes out.

I have re sharpened my BU smoother to give a 52 degree cutting angle and that seems to have done the trick.
 
ByronBlack":1rqi1aqe said:
Interesting design. I've often thought of a 'wall of boxes' style arrangement, how are you intending on attaching these to the wall? Also, what woods are you going to be using?

I've though about this for my prospective plans. I'm thinking matching bevelled rails should work.

Have some thought about how they might be removed in the future.
 
When I did the Sketchup drawing above I was thinking of using the two bevel approach to hanging the cabinets and I am sure that it would work.

It has begun to dawn on me how much work is going to be involved, even though much of it is repetitive, and can be speeded up by jigs and things, so the frame was abandoned in favour of hanging them directly on the wall.

I also originally intended there to be gaps between the cabinets on the grounds that any small misalignment would be less noticeable.
This however was vetoed by Herself who pointed out that since it was very rarely me who did the dusting I should not create any additional dust traps.

So the new plan will have the cabinets touching each other and I expect that I will have to have some method for bolting them together otherwise varying weights of the contents could cause misalignment.

I will probably use Scan fittings' Brass Heads which are nicely made flat headed nuts which screw on to M6 screwed rods. They have a hex shaped depression so they can be tightened by an allen key.
 
Dave D":3ppbnv5z said:
So the new plan will have the cabinets touching each other and I expect that I will have to have some method for bolting them together otherwise varying weights of the contents could cause misalignment.

There are books describing how do do kitchen cabinetry, amongst other things they describe fitting cabinets snugly, methods of hanging them, and ensuring they seem level to the floor.

I suggest you check out your local libraries and bookshops.
 
Thanks johncs.

The job has turned into a glorified kitchen cabinet system with the advantage that I can use existing best practice. I shall search assiduously before I get to the hanging stage.
 
Dave D":31js62vw said:
Thanks johncs.

The job has turned into a glorified kitchen cabinet system with the advantage that I can use existing best practice. I shall search assiduously before I get to the hanging stage.

Do some research first, it might have implications for design.
 
On previous projects I have done the wood work first and left the metal work to last, then in the rush to get things finished I have done a less than perfect (that means botch) job of it.

This time I am doing things the other way around.

Some of the fronts on the project will be drawers not doors but that still means a lot of hinges.
I have never really liked fitting butt hinges and I have been a fan of pin hinges ever since reading James Krenov's wonderful books so I have opted for cranked pin hinges which will also allow the doors to open a full 180 degrees.

SU was a great help in working out the dimensions as it enabled me to "open the door" on the computer to check that the clearances were OK.

Since I have a metal working lathe with a milling slide I was able to make the hinges and a drilling jig so the the hole positions all correct.

The photo shows the cranked hinge in the jig with the top of the jig lifted off and upside down.
In use the hinge blank is sandwiched between the two halves of the jig which are screwed together. It is then easy to drill through the guide holes for the hinge pin and the hinge screw holes.

While writing this it occurred to me that if anyone without a lathe wanted to have a go with straight pin hinges, then brass of a suitable cross section could be bought from places like
http://www.metal2models.btinternet.co.uk/
and a drilling jig could be made of hard wood. The ends could be rounded using a disc sander with the hinge rotating on a fixed pin.

This would be a lot cheaper than commercial items.

3542235086_0da2ec96af.jpg

3541429089_dec7e07003.jpg
 
Here is a photo of progress so far.
The hanging method seems to work OK.

The boxes without doors have been acrylic laquered but not rubbed down yet.
The one with the door has been rubbed with 0000 grade wire wool and looks much nicer.

All my spare time at the moment is going into making a climbing frame/swing/ slide set up as a birthday present fort my 3 year old grandson so cabinetry is definitely on hold.

No idea how many boxes I will be able to complete before the deadline but one reason why I like this project is that at least the first three will be useable even if there is a long wait for the rest.

3656104139_0181c2ba06.jpg
 
looking damnn good there, any idea if you were to batch make those hinges how much they would cost ?
I'd love a couple sets myself for my planned bookcase.

all the best with the remaining boxes :)
 
Hello Houtslager

Sorry to have taken so long to reply to your request but I was waiting to see if I would have any hinges left over.
A change of plan now means that I have two pairs of hinges spare (that is four hinges)

The length of the L shape is 47mm and the pin offset from the centre line of the L is 10mm.

If they would be of use to you then you are welcome to have them, just let me know your address and I will pop them into a jiffy bag.

Batch production is an unlikely prospect since I have no milling machine therefore the time involved would not make it viable.
 
From the picture they look really nice boxes, seems a shame to cover up the tops with another row!
What was the construction method ? Biscuit ?
 
Right first time, outcycling. lots and lots of biscuits.

Gluing up all four corners at the same time would terrify me so I have tried a method which glues things up in small steps.

First cut the corner mitres on a bandsaw (with a dragon blade of course)

Then clean up the mitre faces on the Woodrat.
The clamping system is a derivative of this design.

http://benchmark.20m.com/tools/LittleRa ... serail.htm

Then the corner pieces are biscuited and glued in a jig which enables the inside faces to be checked at right angles with a square.

The corners are then planed to the right widths and glued to the sides, followed by gluing the sides to the top and bottom of the boxes.

This way there is no corner clamping involved in the final assembly of the boxes which I think makes it easier to ensure squareness.

I would welcome any comments about this method or suggestions for better ways since I still have a lot of boxes to go.

3747145408_35d2672e31.jpg

3747146612_e588308a9d.jpg

3747147742_3edf3b2361.jpg
 
Dave,

this looks striking, and beautifully made.....but you absolutely cannot stop where you are! At the moment you have a few boxes at shin height, which is just a bizarre place to have storage if you have nothing above it. Carry on with your original plan and bring the height up to waist/ hip height at least.

However, I have always worried about the gap underneath. I know why you have sat it on top of the skirting, but this leaves a visually uncomfortable gap for me......neither one thing nor t'other. It is too big to be a shadow gap, and way too small to clean under, and to see under.

I think the design would work better if you could see under the boxes and in to the corner of the skirting........or, less likely, if there was a plinth or toe-board underneath. The latter obviously doesn't fit with the philosophy you have for this design, so my view is that you would be better off raising the whole edifice by 12 or 15 inches.

Just a thought!

Mike
 
Thanks for your observation Mike, I shall give it some serious consideration.
It is certainly not too late to raise the hanging rail.

Of course I do not want the top cupboard to be too high either.

I do not want any sort of plinth since it is not physically necessary, but I can experiment with raising things up a bit.

I might wait until I have made a few more boxes which I can stack on top in various configurations to see what the visual effect is.

Thanks again for getting me to think this through before it is too late.

Comments like this are one of the great benefits of this forum.
 
fantastic,

how did you plane the roupala lacewood? I built a box with a lacewood top, and got significant tear out. Even with a scraper the rays were left fluffy.

In your sketchup there is space between the boxes, I prefer that look to the completed version where they are all butted up together. What changed?
 
What more can a relative newbie say?

I think it's a great idea, well put together (LOVE the clamps for the corners - tried it, but failed :( ), and the different woods are quite striking, IMHO.

As for the gap - if your SWMBO can get a hoover under it (other suction devices are available), then leave it be - you've put holes in the wall, you don't really want to fill and make new ones again, do you?

To whomever stated "it's at shin height" - or close quote, the idea I believe, was to put more on top. It's just a matter of time (yes?).

Glad to see such workmanship, makes me want to try harder - which is a good thing for all of us isn't it? That's why I like this website, showing what we can do, and help each other along.

Cheers for the pics, when I'm fit to return to the workshop/garage, I'm going to make a real effort to improve. [-o<
 

Latest posts

Back
Top