Turned Leg Challenge

UKworkshop.co.uk

Help Support UKworkshop.co.uk:

This site may earn a commission from merchant affiliate links, including eBay, Amazon, and others.

Slim

Established Member
Joined
4 Feb 2006
Messages
1,736
Reaction score
0
Location
Trossachs
How about this for a Sketchup challenge. When I was first learning, I really struggled with this leg. This time, it took me 5 minutes to draw.

2430840041_380c5d0848_o.jpg


Lets see how you do.

BTW, If you're wondering where this leg came from, it is from the coffee table my laptop is sitting on right now. :)
 
By the way, here's one I did for the fun of it. It was about 2 minutes to do. If it was a leg I was going to use for a project, I'd have spent a little more time on it to keep the file size down. As it is, it saves out at 994Kb. Too big for my taste. For just a leg, though, it was quick.

Tableleg-2.jpg
 
Yeah right fellas,

took me most of the night to work out the fretwork challenge....
can I at least learn to walk before you have me running a bloody marathon :lol: :lol:
 
Its not as difficult as you think.

Lets start with the central turned section.

There are only three steps to creating a turned piece like this.

Firstly, draw the profile in 2D. Then draw a circle so that the centre point is in line. Like so:

2430972465_7a08300459_o.jpg


Then select the circle (so SU knows which path to follow), click the 'follow me' tool, and click the 2D profile. That is all there is to it.

2430972247_7d29d7e064_o.jpg
 
Simon,

silly person question : how do you draw such a profile ? which tool/s ?
 
Paul,

I just used a mixture of the Line and Arc tools. You could set yourself some guide lines to help you by using the Tape Measure tool.

If you want more freedom when creating curves, you can install the Beizer plugins, which you can get from Dave's Blog. Save the beizer script to your Sketchup/plugins folder. The BeizerSplines script will need to be extracted to the same folder.

Hope this helps.
 
thanks simon, i tried using the line and arc tools but discovered a weakness in sketchup ,it doesn't cater for someone with no design acumen !

i'll get the plugins from dave's blog and see if they can enhance me :D
 
Simon may have a different answer but if I were drawing a leg like those from scratch, I would start with a large rectangle and draw the profile on it. I would use a combination of tools including Line, Arc and Bezier. I would also make use of guides for establishing transition points.

That's not what I did for the leg I drew today. Instead, I downloaded a 2D profile in DXF form from Osborne Wood Products and used it as the profile after a couple of quick modifications. Before anyone accuses me of cheating, I was just using the tools at my disposal. ;)

This is Simon's thing but if someone is interested in seeing my steps, I'll work out a little show and tell.
 
Dave R":25gfd0r8 said:
This is Simon's thing but if someone is interested in seeing my steps, I'll work out a little show and tell.

Not my thing at all Dave, I just thought it would make a good challenge. It is always useful to see different ways of doing things. I am willing to put money on the fact that your way is better than mine. :D. I am still learning and would apreciate seeing how you would do it.
 
Its no oil paining but I've learnt how the follow-me tool can do something that looks complicated but does it easily :

2432443158_53b6f29062.jpg
 
That's great Paul. I told you it wasn't hard. :D

Now you just have to do the square sections with the rounded corners. :wink:
 
Alright, here's how I did it. Keep in mind I used the raw DXF import from the manufacturer for this. Normally I lighten the profile a lot by redrawing the curves using fewer segments. I figure you can do that part easily enough so I bypassed it here.

First the imported profile.
b16c7d98.jpg


Next, I drew three lines across the profile. The first one cause the faces to be filled. I placed the lines so as to separate the square sections from the round. Then I copied the rectangular faces off to one side. I moved the copies a known distance so I could move them back later. The green is my back face color.

dcef30d6.jpg


Next I deleted all but half of the profiles. I use a few guidelines to show where I needed to draw lines to refill the faces. In order to make the pommels later, I extended the curves outward to the guides that are parallel to the red axis. The distances for this aren't critical. You just need to make sure the profile will intersect the square portion of the profile properly.

Before drawing the rest of the lines back in to refill the faces, I ran weld.rb on the profiles. This saves a lot of time later because I won't need to smooth the rings around the legs later.

After running weld, I added the lines in to complete the faces.

d249ed36.jpg


Push/Pull makes quick work of the square portions of the leg. Instead of plling the entire height in one step, I pulled up half way and then orbited around to the bottom and pulled down the rest of the way.. This kept the square sections on the same line as the impending turnings. The boxes could have been pulled in one step and then moved down, instead.

I also added a circle for the Follow Me path. Note that it is larger than the diameter of the leg. It doesn't matter what size the circle is as long as it is centered on the centerline of the profile. I deleted the face keeping only the circle's edge. The circle is drawn right at the end of the leg. If the faces was kept, Follow Me might leave a hole in the bottom of the leg. Without the face, on the circle, there will definitely be a face on the bottom of the leg after Follow Me.

Finally, I reversed the faces of the profiles. It is faster to do it now than to do it after the leg is completed.

9cb12797.jpg


After Follow Me we have this:

e86c55f8.jpg


The square sections are moved into place.

08b79c29.jpg


At this point I scaled the model up by a factor of 100 to avoid the tiny face syndrome. To scale the model up, I drew a short line segment 1" long off to one side. Then I measured that line with the Tape Measure tool. It measured one inch but I entered 100 in the VCB and hit Enter. SU asked if I wanted to resize the model to which I answered, 'Yes.'

Then I ran Intersect with model. Because of the huge number of entities in this one, I dragged selection boxes around the areas where the intersections needed to be made and ran Intersect. So this was done once for each intersection.

3a747e7b.jpg


I deleted the waste after the intersections to get to this point.

b1bf7cae.jpg


Finally, I rotated the leg to the vertical position and then made it a component. Doing those things in that order makes it easy to get the component axes oriented properly.

c6f590b4.jpg


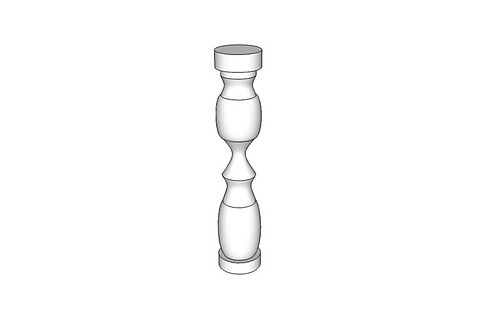
And there you have a finished leg. It goes much more rapidly for me when I don't have to make screen grabs but even so, I finished up in under 5 minutes.
 
Hi Dave,

That is essentially the same way I did it. Although I rounded the pommels (Didn't know they were called that until now :) ) separately. I can see your way is quicker.

Dave R":3jjd1gbl said:
I would start with a large rectangle and draw the profile on it.

Been thinking about why you would do this. Is it to prevent you accidently drawing in 3 dimensions?
 
Slim":2cxjhsdm said:
Hi Dave,


Dave R":2cxjhsdm said:
I would start with a large rectangle and draw the profile on it.

Been thinking about why you would do this. Is it to prevent you accidently drawing in 3 dimensions?

Yes, that's the reason. Not so much for the line and arc tools but for Bezier because it is happy to draw curves in 3D and it's impossible to tell unless you orbit around.
 
Thanks slim and Dave. Can't see me doing any turning any time soon, but still interesting to see the power of the mighty SU.

Well Done
 
Had some time to fill at work. Designing a (to me) attractive profile took the longest about 15 mins) making the leg is just a couple.

challenge_leg.jpg
 
Back
Top