Trouble getting in control

UKworkshop.co.uk

Help Support UKworkshop.co.uk:

This site may earn a commission from merchant affiliate links, including eBay, Amazon, and others.

tnimble

Established Member
Joined
8 Apr 2007
Messages
945
Reaction score
0
with my detail spindel gouge.

When try to use the tool the tool cuts very agresively. I start with the bevel rubbing the work piece. I raise the handle of the tool very very slowly until so,e but little very fine dust is coming off the tip. When raising the handle kust a hair more a very nice and thin shaving ribbon comes shooting off and with in a fraction of a second the gouge has turned away a deep cove.

When trying to create a bead (which is very difficult not to end up with only a thin stem) as soon as you get to the sides of the bead the tool catches on the side of the bead and creates a spiral about 1.5 mm deep.

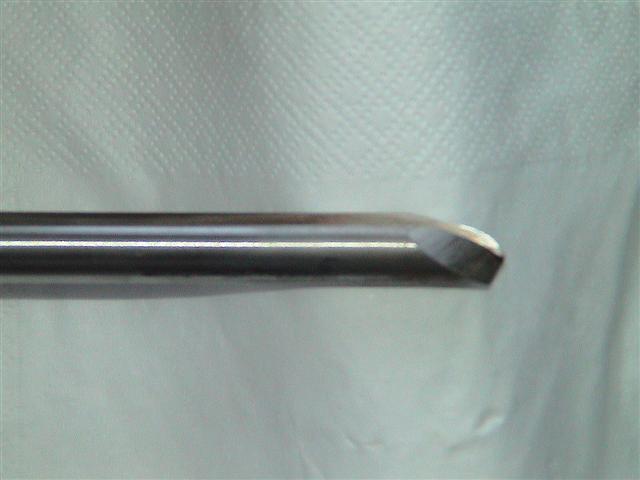
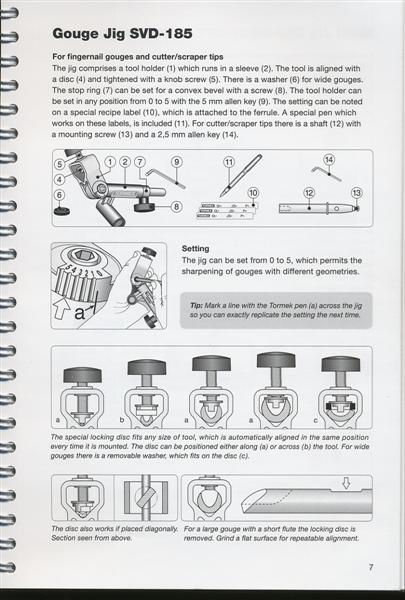
What am I doing wrong. The gouge is sharpened for the first time on the tormek. I used setting 2 on the SVD-185 and the on the TTS100 the middle depth gauge in combination with the hole nearest the to wheel which seemed to match the factory grind best.
 
Laura, it would be so easy to show....
Can't you go to a turning club and share the experience with the members?
They'll be delighted to show you.
 
La Truciolara, unfortunately there's little around and nothing near. It is only this gouge I have trouble with. The other gouges I can easily get a good cut with only they can't make a small enough curve, they are to wide.

I can only get this detail spindle gouge to cut as a scraper. Laying the tool on its side (heel away from the workpiece) and using the sides to scrape. This gives some tearout and is not very useable for most spindle work because the tool has to come parallel with the tool rest to finish the cut of a bead.
 
TEP":2qrvh2qb said:
Hi Laura, couple of short video's Here they may help.

I had very little time yesterday to mess about with it but this is about what I do or at least try to do movement wise.

Spotted on another thread:
DSC02889%20(Small).JPG

Posting and photo by CHJ.

This is not near to how the grind looks like. The front bevel is about twice maybe tripple as long, the sides seem to flare more in towards the centre, more V then \_/ and are much longer

I' guess I'm going to fully reshape the gouge with the tormek recommended settings instead of only honing close to the facory ground.
 
Mornin' Laura.

You mention that it was your 'spindle gouge' that was causing the problem, look carefully and I think you'll find that the photo from Chas (CHJ) is of a bowl gouge. With a 'spindle gouge' you need the front bevel a little longer than shown.

When shaping the spindle gouge make sure the tip (looking from above) has a nice rounded tip. This is where the nick-name of 'lady's fingernail shape comes in.

Where a lot of people make a mistake is grinding the tip to too much of a point which can make the tool quite vicious to use. The idea is when initially shaping the gouge what I do is.

1/ Place the tool, flute down on the stone so as you can grind the corners of the bevel away, leaving a flat on each side where the corners where. Set the table so you only grind the flats as long as you want the long grind to be. Now when you look down on the tool tip you should now see the final shape of the grind showing.
2/ Place the tool in the jig and work slowly on each side to bring the flats to a edge, at this stage keep off the tip.
3/ Once you have the ideal shape you want, then work at the tip to the angle you require. then as it all comes together sweep the chisel completely from one side to the other until sharp. You should only have to do this when the tool is new, but learners often find on re-sharpening that eventually they have to re-shape because the bevel becomes shorter and shorter with each trip to the grinder.

In the future spend a little time when resetting the tool in the jig to re-sharpen, then all it will need is a swift side to side sweep and back to the lathe.

Tip - Don't get too hung up on angles, shape to what suites you and just start off at the general angle of 45 deg. for a spindle gouge, and 60 deg. for a bowl gouge. Once there you can modify slightly as you learn more.

Good luck!
 
Thanks all for the help.

TEP":2k3yjwyb said:
look carefully and I think you'll find that the photo from Chas (CHJ) is of a bowl gouge.
I was aware of that. The picture (which come along while reading up with the forum, kust prior to my postng) was merly as a reference.

I've measured the bevel angle on the gouge. Its very close to 20 degrees. Probably 18 of 19. Upon close inspection one side has a long uniform bevel. The other side has a bump in the bevel about a third along the way from the tip to the handle and is much higher than the other side. Also there is a slight curve along the steel og the gouge. I don;t think this would cause problems because the gap at the ends is only a few thou.

Probaly best to buy the more expensive gouges if you expect the tool comes well shaped from the factory.
 
Hi Laura, to my knowledge only one gouge comes pre-ground which is the Crown Ellsworth grind bowl gouge. Also there are so many individual grind the manufacturers couldn't keep up.
 
Spend some time reshaping and aharpening the gouge yesterday.

detail_gouge_001.jpg

The odd piece of metal is the spanner of my B&D electric hand planer. It is just the shape. Without this extra thickness the Tormek jig has to big of an opening when fully closed to be able the secure the gouge at all.

I have trouble to getting the sides the same shape. In this closeup photo you can the the profile difference between the two sides.
detail_gouge_002.jpg


I do not seem to be able to correct for that. One side is cleatrly concave and the other convex.

The sides are evently spaced and the bevels are the same length. The tip is nicely in the middle.


Anyhow I tried the gouge and it certainly worked much better this time.

This was about the only thing the I could get with te gouge previously:
detail_gouge_003.jpg


This was done after yesterdays reshaping:
detail_gouge_004.jpg
 
Laura, the convex/concave differences in your side grinds are correctable by the amount of time you spend grinding each side and you should aim for slightly convex on both sides, if your gouge has an uneven or off centre grove ground in it then the two side wings will appear different and not balanced. You appear to have ground too much material off the 2 o'clock position looking from the top.

The main criteria is to have an effective cutting edge not that the gouge looks a perfect shape.

You appear to be using some spalted wood for your practice piece, if so you are making things more difficult for yourself, a piece of evenly grained sound material would be far better.

Your Tormek Jig should have a brass insert to fit in the large washer capable of clamping on your gouge.

p7.jpg
 
Thanks you CHJ for the advice on the bevel. The wood is indeed spalted, spalted beech to be precise. I was practicing on some pine and oak, made some finials and a box. But ran out of pine :roll: and want to safe the oak for a project. The spalted beech I have in surplus and I find it not any harder to turn. This gouge also gave trouble on the oak and pine. I actually tossed the gouge aside until I had the Tormek.

About the Tormek jig. The picture is with the brass insert placed acros the spanner and gouge. With only the gouge when fully tightend there is still a gap between the gouge and the brass insert across it of about just under 0.5mm.
 
tnimble":3f5mly2p said:
....About the Tormek jig. The picture is with the brass insert placed acros the spanner and gouge. With only the gouge when fully tightend there is still a gap between the gouge and the brass insert across it of about just under 0.5mm.

Does the Brass inset not bottom on the Vee of the jig as in the left hand example (a) on the guide page.

If you have the Brass insert turned so that the anti spin/location spigot is at 90 deg. to the gouge as at (b) it may be fouling on the Jig Vee before the washer comes into contact with the gouge.
 
CHJ":10emey9v said:
tnimble":10emey9v said:
....About the Tormek jig. The picture is with the brass insert placed acros the spanner and gouge. With only the gouge when fully tightend there is still a gap between the gouge and the brass insert across it of about just under 0.5mm.

Does the Brass insert not bottom on the Vee of the jig as in the left hand example (a) on the guide page.

If you have the Brass insert turned so that the anti spin/location spigot is at 90 deg. to the gouge as at (b) it may be fouling on the Jig Vee before the washer comes into contact with the gouge.
 
Laura.
I have a Tormek jig similar to yours which came with my Sorby jig and this holds my 6mm gouge easily.
Does yours have the brass nipple on the end as in the piccy of mine :?:
Lovely loking piece of Beech by the way :(


loz":3lrxhrw3 said:
:shock: :shock:

Send some over here Laura !!!!
The shipping cost may a bt high for that.

I got this wood very cheaply or gratis from construction sites. They use the wood as support. Most of the wood they use is beech, popler, birch and oak. Sizes very and spalted wood is not uncommon. Also at construction sides there is often cut down trees they are very happily to par with. Ut costs them more to dispos of it. Most cut down trees are cut to small pieces to be burned, or composted.


About the Tormek jig its slitly different then yours PaulJ.

tormek_001.jpg


With the plastic ring on the jig no way closes up enough. With the ring removed and the brass bit oriented sidewards like on the left hand photo it just about not closes enough. With the brass bit rotated as on the right hand photo the brass bar like hit the bottom of the gouge but the gouge is not stable it flexes left and right a bit.
The gouge is probably just in between for the two positions of the brass insert.
 
Laura , try rotating the brass insert until the bottom piece sits diagonally across the top of you gouge flute.

As shown on Guide Page 7 bottom row left.
 
Mine must be an older type Laura
Mine does centralise itself though.
I tighten it down just so it holds it in place in the v part,then move it side to side to make sure that it is flat,then tighten.
You do seem to have enough thread there to tighten down.
 
Back
Top