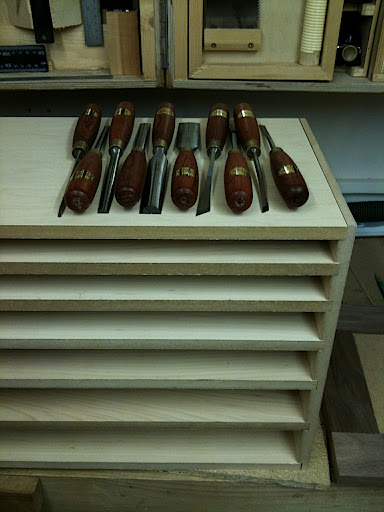
Tom's Tool Chest - Finished!

UKworkshop.co.uk

Help Support UKworkshop.co.uk:

This site may earn a commission from merchant affiliate links, including eBay, Amazon, and others.
Alan Jones":2li9jmyr said:
Looking good Tom,I see you have japanese as well as lie nielsen chisels which do you prefer?

Oooh definately the lie nielsens :D

The japanese ones were moderately cheap from tilgear, so its probably a slightly unfair comparison - I'd like to try some decent ones as well at some point. They do hold a really good edge, but I had problems with the edges being too fragile. I managed to fix this by honing a 35 degree angle, and grinding back a few mm. I read somewhere that often the very edges of a brand new chisel is more brittle because it cools quicker, so its normal to have to remove it. I quite like them for chopping - the iron hoop means I'm not shy about whacking it with my japanese hammer.

They're not as nice to hold for paring though, and the sides of the smaller chisels are pretty much 90 degrees, which can make it awkward for chopping dovetails.

The lie nielsens on the other hand are lovely to use for paring and fit perfectly in my hand. According to LN they test them with a framing hammer, but I'm always too scared to use anything other than a small brass carving mallet.

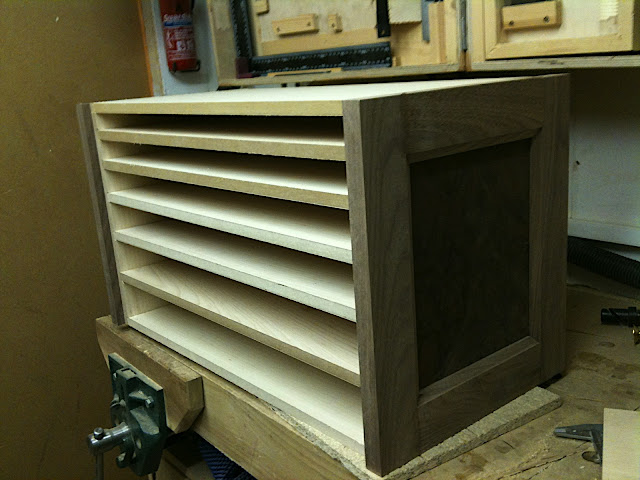
My plan is to try and build up a collection, but at 50 quid a pop, its not easy! The Aka-Kashi chisels were about 40 quid for 4, which I reckon is a bargain for anyone starting out or looking to try japanese chisels.
 
Thats a good tip about the vacuum bags - I think I have one of those in the loft somewhere....

Is there a cheap way of getting a pump?
 
You don't need a pump, you just use the hoover to suck the air out, and then push the stopper in, job done :wink:
 
Now that I've recovered from Chirstmas I've made a little more progress on the inside of the chest. The interior is made from 13mm maple veneered MDF joined together with housing joints and rebates.

I begun by cutting the components to width with my rail saw, then crosscut them to length on the table saw:

IMG_0166.JPG


A quick check to make sure I've got the right length:

IMG_0168.JPG


Then I cut the remaining pieces. To join the members together I cut housings using a router and a straight edge, but annoyingly the panels were actually 13.4mm :roll:. After frustrating myself trying to get the right size by tapping the straight edge over a smidge, I remembered this much more accurate method: just stick a wodge of post-its to the side of the router - perfect housings every time!

IMG_0170.jpg


Much routing later, I did a dry fit to check for screw ups:

IMG_0171.JPG


Here's another with the panels in place:

IMG_0173.JPG


Obviously I had to check that my Christmas presents would fit :ho2

IMG_0174.jpg


Then before I called it a day, I cut a few scraps to have a look at my intended drawer layout:

IMG_0176.JPG


Next up - edge band and pre-finish the components then a little assembly!
 
Modernist":35dlicm9 said:
Looking very nice. Arn't the top spaces a bit narrow?

Yeah, they're about an inch high, but before I decided on the layout I totted up the size of all my tools and there are quite a few icle things which will go up there - rules, marking knives, pencils, punches, squares.

Plus my secret santa was kind enough to give me a few more marking tools, so it's only right that I give them I good home :)
 
I presume you plan on drawers going in those gaps, in which case by the time you allow for an inset groove in the drawer sides and then the drawer bottom you're going to be left with about 1/2" useable space? Seems a bit tight to me

I am loving the veneer work on the panels - the finished effect is going to be quite striking.

Ed
 
So, my cunning plan is to use thin ply for the bottoms of the really thin drawers, then glue dividers for the kit to the inside of the drawer to strengthen it (like a guitar). We'll have to see how it turns out :roll:
 
Its a scheppach TS2010. I really should do a proper review one of these days, but it's served my well. I'm very pleased with it, the only thing that lets it down is the width of cut with the rip fence - I really should get the extension.
 
I've been looking at that saw. My local dealer will do it for me with the sliding table, width extension and outfeed for £1900 which is pretty good. I've still some reservations about Scheppach - the P/T I have is good, but I never really got on with the bandsaw.

Ed
 
:shock: Do you mean the 2500?

I've got the smallest in the range - the 2010. Having had it for about 4 years, I'm not sure I'd go with scheppach again because of the funky mitre slots. I do think it lives up to it's title as a "precision" saw however. When I crosscut the 270mm wide components using the sliding table it was perfect first time (although admittedly I hadn't touched the slider since I last squared it up).
 
Looks like you've got it setup nicely Tom. I don't think I'd go for one, but I'm warming to the idea of having a TS close to the wall like that. I've seen a couple of members that have done that.
 
wizer":3268kgj5 said:
LI'm warming to the idea of having a TS close to the wall like that. I've seen a couple of members that have done that.

I quite like it where it is, but I do have to make a rough cross cut first if I'm using the sliding table. Apart from that I think I've sited it sensibly given that the space is only 4.2x2.5m. I can rip just under 2m worth and crosscut about 1.2, but I have an SCMS on the other side which takes care of most of my crosscutting. Combine that with a rail saw, and I think I've got all bases covered.
 
hi

I know pics can be deceiving, but from these pics the drawer carcase depth before drawers are built look very shallow from one of the pics you show a set of chisels are these intended for the lower drawers , if so what are you intending to put in the upper drawers? . hc
 
head clansman":d39la2xp said:
what are you intending to put in the upper drawers? . hc

Thats a popular question:
Pens, pencils, mini squares, grinding bevel gauge, center punches, cabinet scrapers, scalpels, marking knives, calipers, rules, etc

Plus I need room for expansion :wink:
 
This afternoon I finalized the layout of the drawers. After some careful consideration, I decided to graduate the triple drawers so they go in a V shape. This is to give a more efficient layout for certain tools, plus I reckon it looks good too.

Here it is with all the housings cut in the horizontal members:
IMG_0179.JPG


And again with the vertical partitions in place:
IMG_0180.JPG


Now to edge band the front with some walnut. I needed some thin strips, so I knocked a thin strip cutting jig together from some scraps:

IMG_0181.JPG


I dry assembled the whole thing and glued on the edging:

IMG_0182.JPG


Lastly I took it all apart again so nothing got stuck that wasn't supposed to be. Hopefully, tomorrow I can pre-finish the inside and start work on the stop.

Thanks for looking
-Tom
 
Today I managed to get the insides finished. I wanted some kind of finish, if only to make the drawers slide nicely, so I had a rummage and found some cellulose sanding sealer. This was perfect because it give a relatively smooth surface and dries in minutes (and I'm very impatient).

I removed the tape holding the edging on and sanded all the components to 240:

IMG_0183.JPG


Next I masked off all the glue surfaces and gave everything one coat of sanding sealer, here are half of them:

IMG_0184.JPG


The more eagle eyed amongst you may notice that I forgot the masking on one of them, oh well...

I took a couple of minutes and planed the edging nice and smooth.

IMG_0185.JPG


On to the glue up. This wasn't particularly stressful, but I do wish I had a few more clamps:


IMG_0186.JPG


IMG_0187.JPG


Cheers
-Tom
 

Latest posts

Back
Top