tips for ripping plywood with circular saw

UKworkshop.co.uk

Help Support UKworkshop.co.uk:

This site may earn a commission from merchant affiliate links, including eBay, Amazon, and others.

johnny

Established Member
Joined
3 Jun 2014
Messages
381
Reaction score
135
Location
South Somerset UK
I could do with some tips on cutting plywood and achieving a reasonable edge finish.
I do not have access to a table saw all I have is a cheap unbranded circular saw.
I'm looking to replace the 18T blade with a 30T blade will that be sufficient teeth ?
The blade fitted is a 160mm x20 x2.5mm but I'm having difficulty in finding a replacement . Most sellers will only sell a pack of three blades with a varied tooth count and rings.


What I need to know is what tooth and thickness blade should I fit ,could I use a 150mm blade for instance ?
How much depth should I set below the plywood .
Would it be best to set the ply on top of a sacrificial piece of timber and cut through both to get good support under the cut.?
Any advice appreciated however I cannot afford to buy /make a table saw or buy expensive blades /saws or get somone else to cut it for me :wink:
 
I think you will need more than 30.... My track saw has 48 and the finish is pretty good though it could be better.

A sacrificial piece underneath which you cut into by a couple of mm will help.

Also, instead of cutting all the way through do a "scoring cut" first where you only go a few mm into the material as a first pass, then go over the cut again to go all the way through.

You could also score your cut line with a knife instead.
Also possibly putting masking tape over the score line.

Hopefully that helps!
 
I would make a guide with some ply for the saw, if you make it work like a track saw so the blades runs against the edge of a ply strip, that will make it easy to position for cuts and help to minimise break out on the top surface. There are guides on youtube for making such a track and will give you a much better finish as it will reduce the amount of rock on the saw as you push it along.

would this blade be in your budget?

http://www.ebay.co.uk/itm/Freud-Pro-LP3 ... SweW5Vax-m

it is still a ripping blade but will cut much better than the 18T blade that came with the machine.

Better still would be this finer blade:
http://www.ebay.co.uk/itm/Freud-Pro-LP4 ... Sw~OdVaxmW

Try different depths below the plywood, the amount of break out will vary somewhat adjust until you get the best finish.
 
hrk":376ozsgp said:
I think you will need more than 30.... My track saw has 48 and the finish is pretty good though it could be better.

A sacrificial piece underneath which you cut into by a couple of mm will help.

Also, instead of cutting all the way through do a "scoring cut" first where you only go a few mm into the material as a first pass, then go over the cut again to go all the way through.

You could also score your cut line with a knife instead.
Also possibly putting masking tape over the score line.

Hopefully that helps!

wow theres some great tips there thanks . i haven't read about any of those . I especially like the idea of scoring the cut line first to reduce splintering of the edge.
I haven't found any blade over 30T yet , that doesn't cost more than my circular saw but I'll keep looking
Thank you
 
RobinBHM":2ozw0vs4 said:
I would make a guide with some ply for the saw, if you make it work like a track saw so the blades runs against the edge of a ply strip, that will make it easy to position for cuts and help to minimise break out on the top surface. There are guides on youtube for making such a track and will give you a much better finish as it will reduce the amount of rock on the saw as you push it along.

would this blade be in your budget?

http://www.ebay.co.uk/itm/Freud-Pro-LP3 ... SweW5Vax-m

it is still a ripping blade but will cut much better than the 18T blade that came with the machine.

Better still would be this finer blade:
http://www.ebay.co.uk/itm/Freud-Pro-LP4 ... Sw~OdVaxmW

Try different depths below the plywood, the amount of break out will vary somewhat adjust until you get the best finish.

Thank you Robin they are a bit more than I had hoped to pay but as they say you get what you pay for. If I want to achieve a half way decent finish I'll have to invest in a decent blade . i'll probably go with the 40T . I hadn't come across that blade when I did some searching. A lot of it is down to putting in the correct search wording I guess.
Thank you
 
About £20 for a 40 tooth Freud blade from the well known auction site should do it.
thats a 160x20 2.4mm kerf blade - 0.1 mm should be OK as long as your riving knife - if fitted is thinner than 2.4mm

A decent blade is essential as plywood is tough on blades.

Depth below - I would set 1/4 inch

A sacrificial top is likely to be best for finish if you need it as good as possible.

Keeping the saw as stable and - un molested/forced as possible will give you the best finish on the cut face and edges.
Look to makeup a saw guide - one like the DIY tracks for std Circlular saw would be well worth making - lots of
info on web about them.
Wax the saw sole plate and guide if they have any " stiction" as the resulting jerks and jumps ruin the cut finish

wrote this whilst all the other posts came in - I think we are all on the same blade/track :)
 
finish_that":2vq8wgkl said:
About £20 for a 40 tooth Freud blade from the well known auction site should do it.
thats a 160x20 2.4mm kerf blade - 0.1 mm should be OK as long as your riving knife - if fitted is thinner than 2.4mm

A decent blade is essential as plywood is tough on blades.

Depth below - I would set 1/4 inch

A sacrificial top is likely to be best for finish if you need it as good as possible.

Keeping the saw as stable and - un molested/forced as possible will give you the best finish on the cut face and edges.
Look to makeup a saw guide - one like the DIY tracks for std Circlular saw would be well worth making - lots of
info on web about them.
Wax the saw sole plate and guide if they have any " stiction" as the resulting jerks and jumps ruin the cut finish

wrote this whilst all the other posts came in - I think we are all on the same blade/track :)

some great tips here thank you.I like the idea of waxing the CC plate :wink:
Are you suggesting I should put a sacrificial piece of timber on the top of the plywood in addition to the piece beneath yes ?
 
re the sacrifice and top :

The bottom will cut clean as the blade tips are pushing down on the wood fibres - with a decent blade they cut .
As the tip passes through the wood it exits on the top - this is where tear out is a risk so top sacrifice or build a track
which will really help and reduce wasted sacrificial wood .

Another tip would be to cut more than one peice at a time where you can - bottom one gets auto clean cut on top surface .
The scribe cut as suggested above is also worth a practice - you will need a guide/rail for that.
 
+1 for a home-made saw guide; home-made guide + cheap saw + decent blade can give excellent results. I used one for a while before getting a track saw and could achieve consistent, clean cuts in the least-forbidding of materials e.g. hi-gloss MFC.

HTH Pete
 
Can someone post a home made saw guide picture for the OP
Once you see one its a light bulb moment
 
Like this...
track.jpg
 
thanks guys .
I have seen various guides on youtube videos and have a design in mind
heres a good video here https://youtu.be/oiSz7kPwFY0
I'll go build one today whilst I wait for delivery of a blade
i'm overwhelmed by your support and helpful advice thank you.
So much to learn ....so little time. :D

Have a great day all
 
When I used one of those guides I also had a support to the right of the blade to stop the saw rocking. This was just another strip of the plywood, with a block of ply top and bottom at each end that spans the blade gap with a clamp holding it all together at each end.
 
paulrockliffe":2ord7r3d said:
When I used one of those guides I also had a support to the right of the blade to stop the saw rocking. This was just another strip of the plywood, with a block of ply top and bottom at each end that spans the blade gap with a clamp holding it all together at each end.
that sounds like a great suggestion especially when cutting thicker ,longer sheets . i have had several instances where my saw has dropped on the right side .
This would effectively give you an upside down table saw but with fixed wood and moving saw :wink:
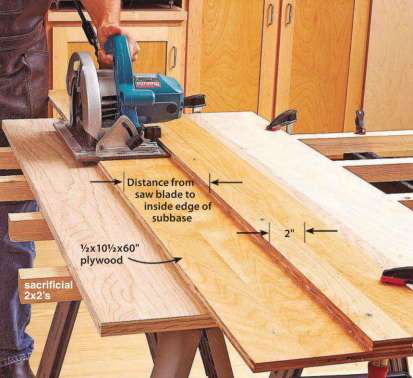
With this type of guide I wouldn't need to pay so much attention on keeping the saw sole plate level .
 
well although I ordered a 48T blade this morning,.... I just couldn't bear to wait over the weekend, so I knocked up a crude guide with the few scraps of MDF that I had and went ahead and ripped a 1/4 sheet of 18mm hardwood faced ply in half along its length .
I was amazed to find the edges were quite acceptable :shock:
Clearly they could be a lot better but I was surprised that there was only one small tear of the veneer where the circ saw motor hit the G clamp I was using .

Next time I'll prepare properly so I don't have to stop twice and restart half way through the cut and I shouldn't get any burns.

The widest bit of mdf I had to hand was just 150mm which meant that the fence overhung the edge of the guide and there was nowhere to clamp the guide at the back out of the way of the circular saw motor.

If I had ripped from right to left I would have had a clean uninterupted cut but there would only have been a 50mm wide part of the saw shoe supported !
Ripping left to right meant I had to reach over the board some 1200mm which was quite a stretch .
Anyway the most difficult cut has been made and I can put the cut edge to the back of my cabinet where it will be covered up
 

Attachments

  • saw guide.JPG
    saw guide.JPG
    67.1 KB
  • 18mm cut edge burn-001.JPG
    18mm cut edge burn-001.JPG
    52.1 KB
  • circular saw blade.JPG
    circular saw blade.JPG
    87 KB
Some time ago I bought a Wolfcraft 160mm, 100 T, labeled for ply and laminates.
I still didn't use it, as the project it was intended for was cancelled, so can't tell wether it is any good

In my experience Wolfcraft tools are usually not up to hard usage, I'd say they are properly meant for the amateur (which I am); anyway here is a link:

http://www.wolfcraft.com/en/products/p/ ... index.html

The one I have is code nr. 6268000 (160x20x2mm)
 
Back
Top