Time to join in....

UKworkshop.co.uk

Help Support UKworkshop.co.uk:

This site may earn a commission from merchant affiliate links, including eBay, Amazon, and others.

santiniuk

Established Member
Joined
12 May 2007
Messages
99
Reaction score
0
Location
Darlington
Well after pestering you all for guidance I'm finally ready to contribute a little with my 1st turnings.....

I feel like I'm making progress, sharpening isn't the nightmare it used to be and I feel like I'm controlling the tools a lot better. Still not perfect by a long way but I'm seeing some nice shavings at times :)

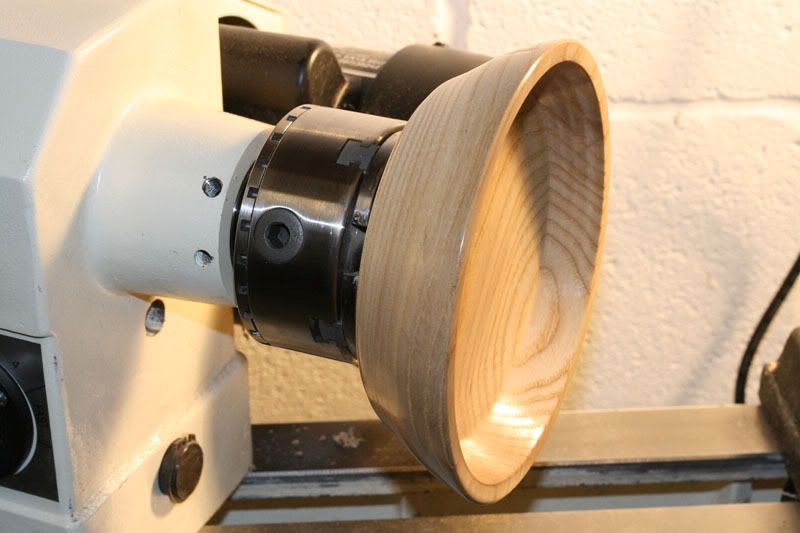
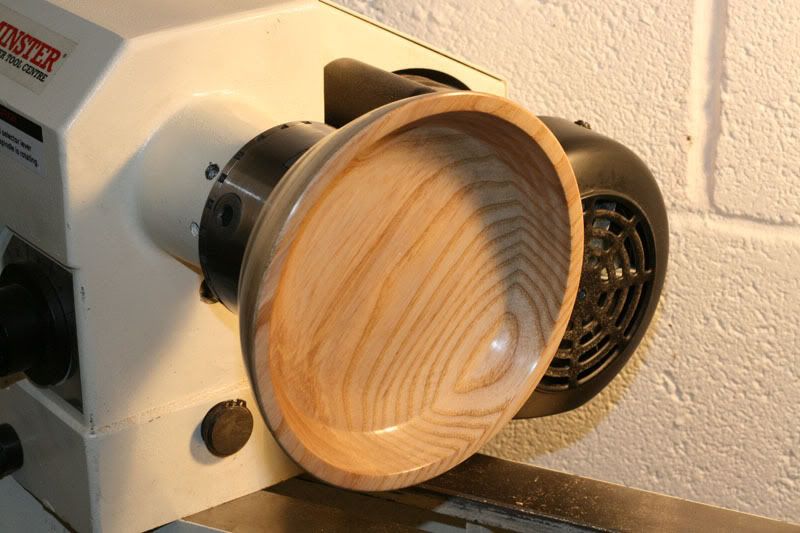
Today I tried a piece of Ash that I had obtained from a local guy on ebay.

I just wanted a very simple platter shape and also wanted quite a thick edge. (It is to be used in my kids playroom and is guaranteed to be abused and dropped!)

I only used a bowl gouge and used a scraper for a couple of very light passes on the inside bottom.

I then sanded a couple of grades and finished with some fine wire wool.

Overall I'm pleased with my effort. Style isn't important for me at the moment, its the feeling of being in control of the tools. The photo's show it with one coat of danish oil. This has highlighted the inside sides have 'scores'. I couldn't see them before as everything was really smooth.

Any tips on what I should do to prevent these score lines in the future ?

Thank you.

IMG_0332_1.jpg


IMG_0331_1.jpg
 
Nothing wrong with the shape santiniuk, designed for purpose and that's what counts.

The 'scores' look more like tear out marks due to the tool pulling the fibres rather than cutting cleanly.

Keep the gouge sharp for the last few fine cuts.

Try using a wood sealer to stiffen them before final cutting or if using your oil finish wet with oil before final cuts, this will swell the fibres a little and lubricate the cutting edge which should help.

If you used the scraper in this area that may be the cause of the tearing. You need to make sure the edge is sharp and presented in a shearing mode to produce what is little more than fine wooly/fluffy shavings, possibly with an oil or sealer dressing before the last few cuts.

Some people just wet with water to swell the fibres and soften them.
 
If you give it a coat of sealer you will see all the faults show up. You can then either go back with the tools or sand paper.

This looks pretty good to me. Especially if it's a first attempt. Mine were (still are at times) wore than that

Pete
 
Looks good,Shaun :D The shape and finish generally is very good,just follow Chas' sound advice;slight marks like those sometimes don't show up until a finish is applied.There is something to be learnt from each piece that we make - it's just a case of practice until you find which method suits you best.

Andrew
 
santiniuk":9wu8a3e2 said:
,,,Any tips on what I should do to prevent these score lines in the future?...

As you rightly say, any fine tool marks are difficult to see until you 'tune' your eyes in.

I prefer to sand though the grits (up to 400/600) and then use 1000 wet'n'dry (use it dry) ... allow to clog a little as this will burnish the surface and make it easier to see the fine imperfections... it will also give a superb surface for sealer or melamine.

Wire wool... great for cutting back areas where the finish may have lodged but I prefer not to use it on bare wood ... fine strands can become embedded in the wood and are the very devil to remove! (not to mention the fine strands that can become embedded in your skin :shock: )
 
Hi Shaun, now't wrong with the shape if it is doing the job you want. As to the lines, these are left by the gouge tip not being supported properly by the bevel, and your movement of the gouge not being consistent. This will only come with lots of practice. Generally sanding will not remove these marks unless they are very slight.

Also as has already been said, use something to harden the surface, and once you achieve the shape you want re-sharpen your gouge and take a very fine cut which should remove the marks.

Tip - It is not easy to get a smooth surface when you leave a transition point like the corner inside this bowl. You end up cutting on two surfaces. It is much easier if you have a nice curve where you can follow the shape with one flow of the tool edge to centre. Also start at the appropriate grit when sanding, if you begin too fine you'll never get the marks out. After all sand paper is only another tool in your arsenal. (It just gets cheaper with experience when you can start with finer, you don't have to buy so many grits. :lol: )

Good luck, and don't try to run before you can walk, you will only get frustrated. ](*,)
 
HI Shaun, that is a brilliant first piece! as already said, curved down to the bottom is easier to get a smooth finish, but I've been turning since January and I'd struggle to to get the inside like that much smoother. =D>
 
I agree with Tam's tip. It's much easier to work a smooth curve to a good finish with both the tool and the sandpaper. Don't feel you can't start sanding with a coarse paper - I often begin with 60 or 80 grit. As you get better with the tools you'll find you don't need the coarse papers so often. I assume you know about power sanding with a small disc held in an electric drill?

Bob
 
Shaun that is one piece of turning to be proud of,better than my first attempt :D
Those rings will get less visible the more you turn,i can still see the ones left in my earlier attempts :roll:
At this stage i was just glad to be using the tools correctly,the finish is always something to concentrate on later when your happier with the tool use.
Keep it going :D
Paul.J.
 
Well firstly thanks again for the very encouraging comments. Great to be on a forum where people take the time to do this.

I have picked up some excellent tips and look forward to putting these into practise on my next piece. :D

I'll keep the transistion between the inside to the base less sharp in future and make them more flowing. I also went in a bit too much with the recess so was paranoid breaking through when hollowing. It could have done with a bit more removed.

Power sanding is something I'm keen to try, I suspect this may be next on the purchase list along with a better choice of sandpaper grades.

My paranoia of the inside 'scores' were soon forgotton as my two girls quickly emptied todays collection of Conkers into it. Great Conker bowl dad :?

I'm trying to keep my other new hobby involved, Photography with a DSLR. It's proving almost as much a challenge as turning!

Thanks again.

Shaun

IMG_0351_1.jpg
 
Personally I think you ought to get out the CA glue and make those conkers a permanent fixture. They work perfectly with the bowl. :D

Pete
 
It's be interesting to see what others think... re: the grain showing in the conker pic looks a bit like this :( it would have been better the other way up ... like a happy smiley :wink:

None of which detracts from your bowl :wink:
 
oldsoke":2m2s9l0f said:
It's be interesting to see what others think... re: the grain showing in the conker pic looks a bit like this :( it would have been better the other way up ... like a happy smiley :wink:

None of which detracts from your bowl :wink:

But then the conkers would all fall out Graham :roll:

Pete
 
Graham,

I totally agree, for some unknow reason, I have turned this with the grain pattern opposite to what I would normally do :( . I normally go for the :) look.

Apart from looking better, am I correct in thinking that it should be practise to hollow out keeping the grain in :) when viewd from the side ?

Conkers didn't last long, they are now scattered on the playroom floor, I think they are now used as marbles and no doubt will be embedded in my foot sometime soon..... :roll:
 
santiniuk":5lewh6jd said:
...
Apart from looking better, am I correct in thinking that it should be practise to hollow out keeping the grain in :) when viewd from the side ?

Not sure what you mean :?
 
I should have learnt not to post so early in the morning. I'm still half asleep....

What I was trying to say is that when I mount the blank to my chuck should I look at the end grain first and mount it so that when the bowl is being hollowed out the grain looks 'concave' when viewed from the side.

So when I finish the bowl and it is placed on a table for example the grain looks like you state. :)

Hope that makes sense.

Thanks
 
Hello all,

The cold weather has certainly made the garage not as inviting to work in :(

Tonight I wanted to do a simple experiment. The wife had seen some Tealight holders which she quite liked. Very simple profile, nothing fancy was her instructions :roll:

So armed with some candles from the pound shop I had some small bits of maple board to experiment with. What I wanted to try out was a recently purchased set of forstner bits.

I roughed out a roundish shape on the bandsaw, then used a 50mm forstner bit to put a small recess in. Mounting this to the lathe I profiled a 'simple' shape and then used a 40mm forstner bit to put the hole in for the tealight. I think a 38mm will be a better fit in future. I also should have gone slightly deeper.

All in all it was completed very quickly. I don't intend mass producing these but the forstner bits made it a quick process to mount and hollow.

Is there anyhing wrong with this method for producing small items ?

Pics below. (Still learning the camera too... 1st pic is blurred)

Shaun

tealight1.jpg


tealight2.jpg
 
Quick and easy :!:

My only concern would be the bottom of the tea light and the mounting recesses... did you clean them up to remove the telltale signs of the forstener bit?

It would only be of concern if you intended selling the items...

Edit: An afterthought... bet I could cut both recesses in the time it takes to change bits... and leave them with some decoration :wink:
 
Back
Top