You are using an out of date browser. It may not display this or other websites correctly.
You should upgrade or use an alternative browser.
You should upgrade or use an alternative browser.
The UKW Infill Project
- Thread starter jimi43
- Start date


Help Support UKworkshop.co.uk:
This site may earn a commission from merchant affiliate
links, including eBay, Amazon, and others.
gasman
Established Member
Jimi it is all looking great - really beautiful all round.
Re the initials on the brass bolts - what about using sticky labels - if you stick one to the end of the bolt, trim it round and in the slot then you will see exactly where to strike?? Just a thought
Cheers and really well done
Mark
Re the initials on the brass bolts - what about using sticky labels - if you stick one to the end of the bolt, trim it round and in the slot then you will see exactly where to strike?? Just a thought
Cheers and really well done
Mark
jimi43
Established Member
There is a masking tape that's transparent too I believe Pete...another great idea!
Cheers Mark..excellent idea with the labels..in fact they can be pre-stamped to give the correct letter location and act as a guide! Brilliant!! It's coming along and I hope we are on the final lap now! 8)
That being said...I did two major modifications to the design today.
Firstly...the lever cap. I needed to remove quite a bit of stock from the front of this to allow for fingers to get into the throat and clear any shavings. Also...I reshaped the rear of the bun so that this also allowed further clearance. This solved the problem very quickly and there is little visible evidence of either of these modifications.
The layer of Tru-Oil was applied this afternoon so that needs cutting back but even so..the surface aberrations and open grain are disappearing rapidly....
I will have more of a clue about how much further is needed once I cut this session back tomorrow....
But we're going in the right direction....
I have a pretty full weekend of work and other plans...one of which includes the Saturday 5:30am bootfair...but it is expected to be raining heavily by then...we shall see.
If this is the case then I shall retire to the workshop and get the cap iron and second iron done...and maybe tinker with the lever cap bolts.
Cheers
Jimi
Mrs T
Established Member
Bloody hell, Jimi, that is looking exquisite. I really love the bolts ")
jimi43
Established Member
Mrs T":37tbsk3a said:Bloody hell, Jimi, that is looking exquisite. I really love the bolts
Thanks Emma...I want it to be as good as I can make it...and I'm glad you were happy to go ahead in Richard's memory.
His fine engineering has really made this a breeze...that is the sign of a master craftsman indeed!
Jimi
:idea: There's a medical dressing tape called "Micropore" that's almost see through (you can read small print in a newspaper through it) and very sticky.
iNewbie
Established Member
jimi43":2nlndirv said:There is a masking tape that's transparent too I believe Pete...another great idea!
There's a masking film - and one known make is: Frisket.
jimi43
Established Member
Ya know....I have a few sheets if masking film.....from my airbrushing days!
Amazing how you forget these things.
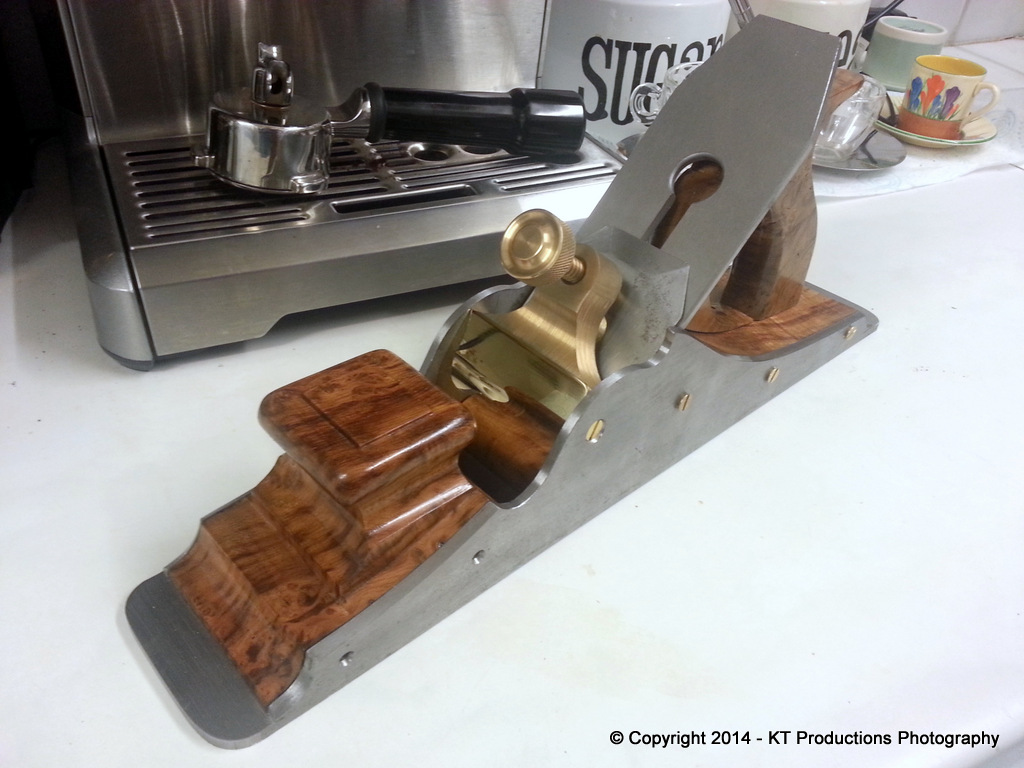
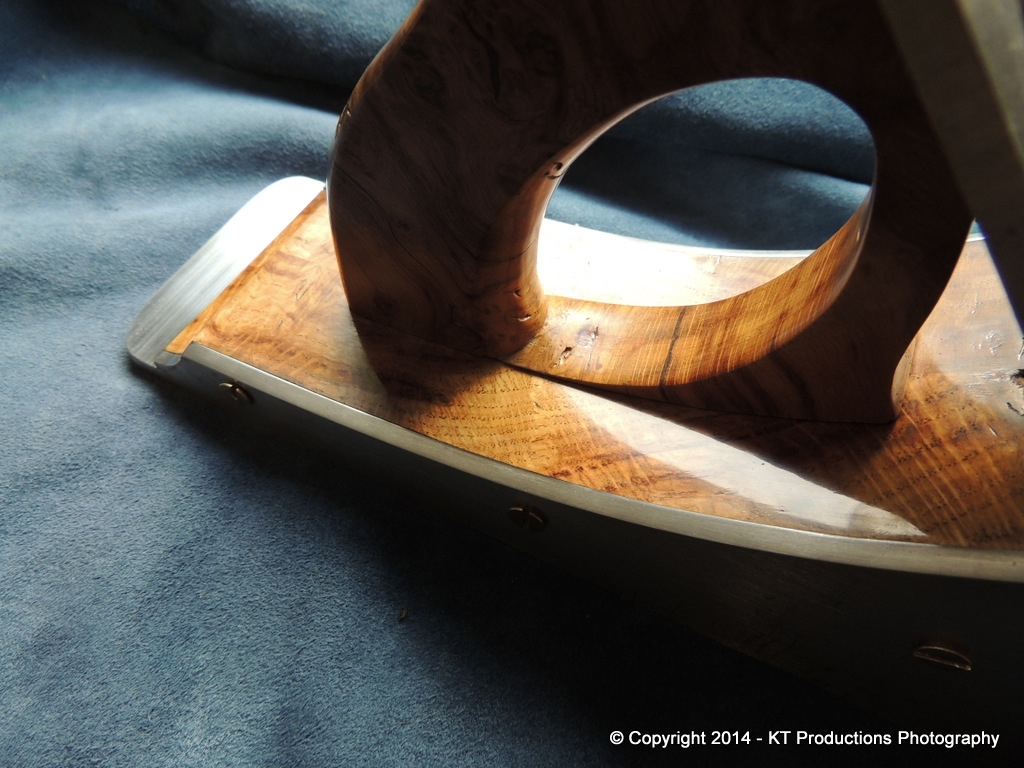
Indoor shot...

Amazing the effect of natural vs artificial light!
Quite a ways to go yet! 8)
Jim
Amazing how you forget these things.
Indoor shot...
Amazing the effect of natural vs artificial light!
Quite a ways to go yet! 8)
Jim
G S Haydon
Established Member
- Joined
- 24 Apr 2013
- Messages
- 1,667
- Reaction score
- 223
Enjoying this a great deal Jimi, nice book choice too
jimi43
Established Member
G S Haydon":3jx5x4js said:Enjoying this a great deal Jimi, nice book choice too
Cheers GS!
Yes...I bought two..the first was a penny the second...£8 but both were worth every penny!
The first was for my daughter who has just bought a Georgian cottage and I liked it so much...I had to have one.
That price...it seemed rude not to eh!? :mrgreen:
Jimi
jimi43
Established Member
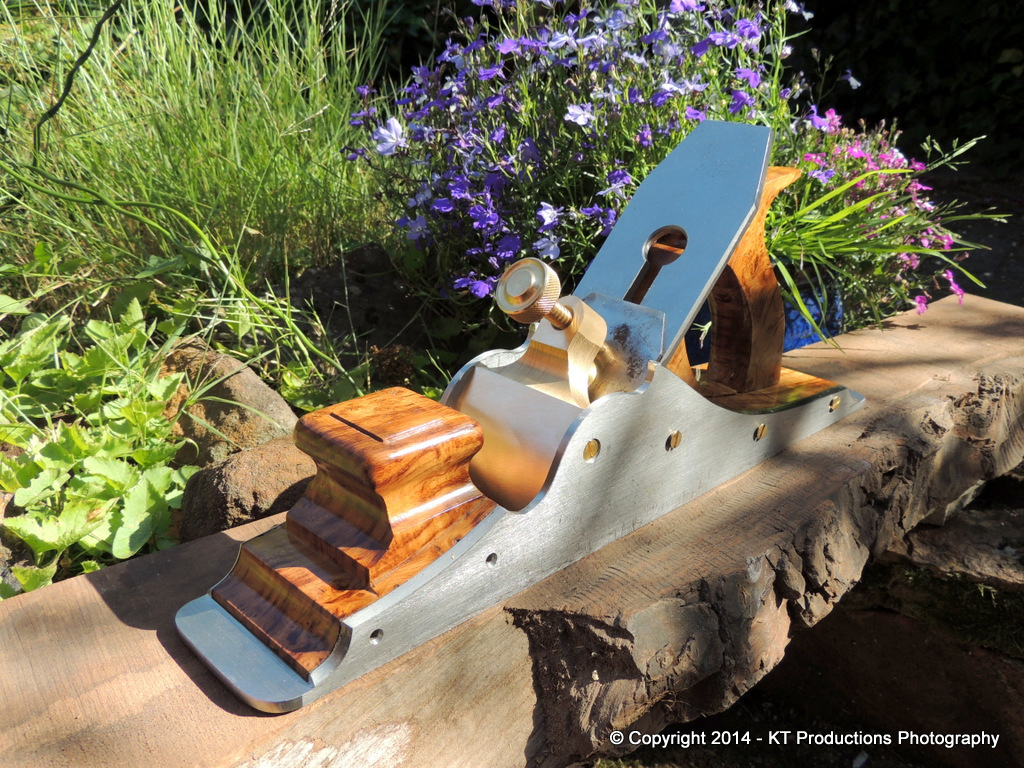
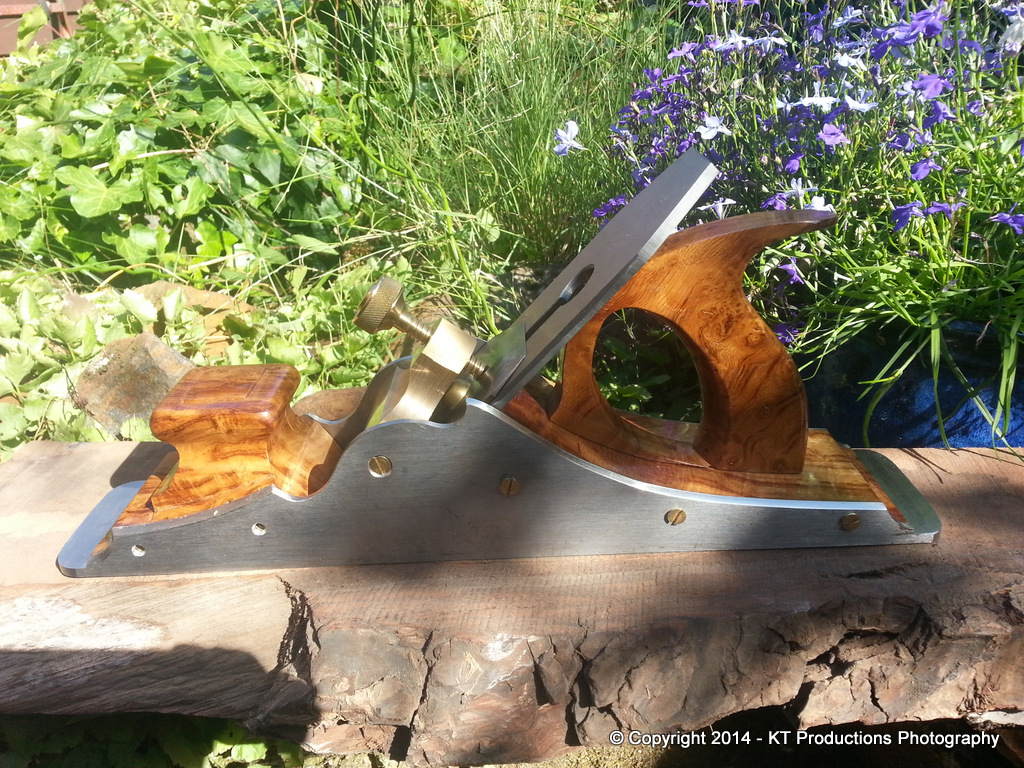
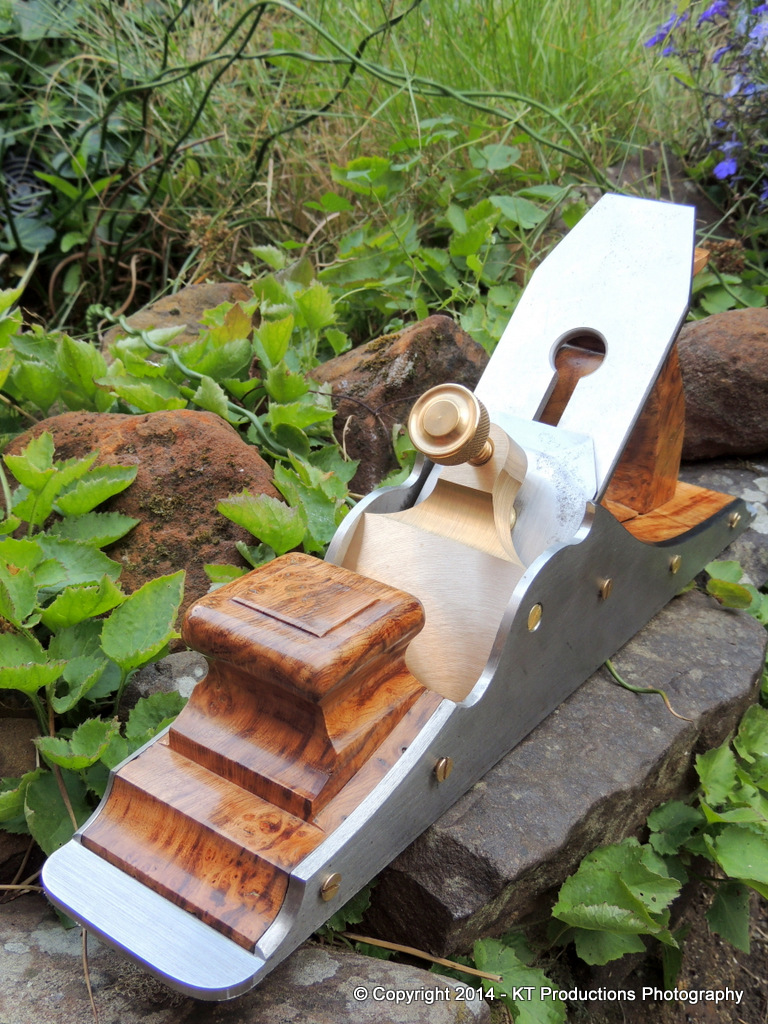
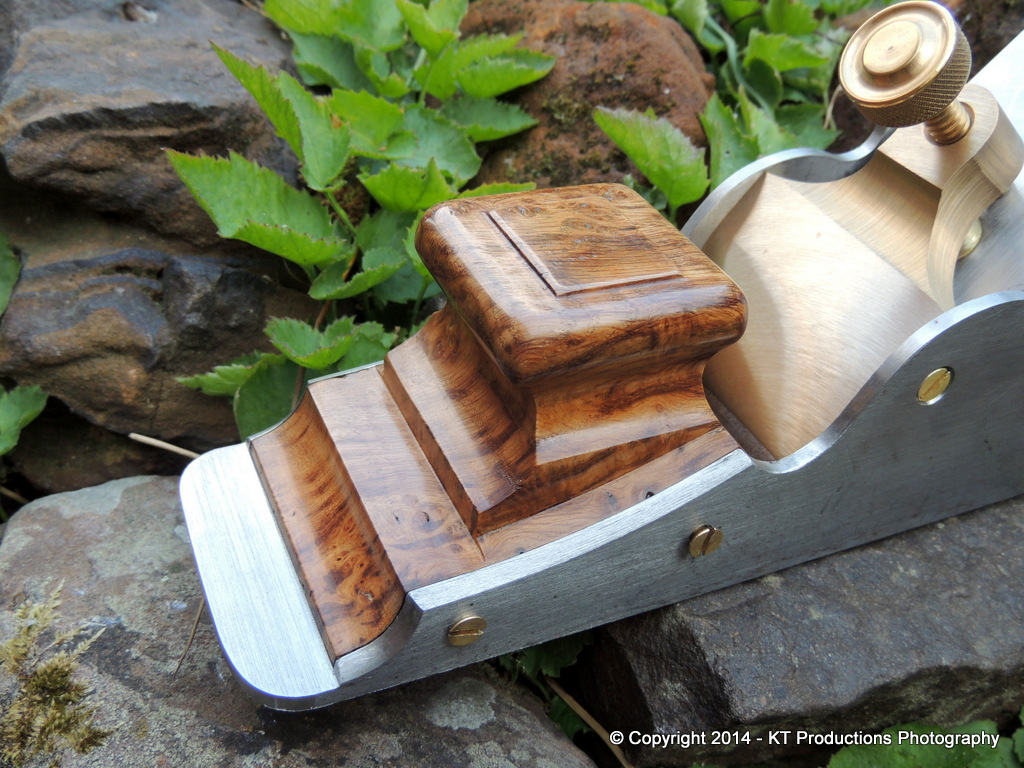
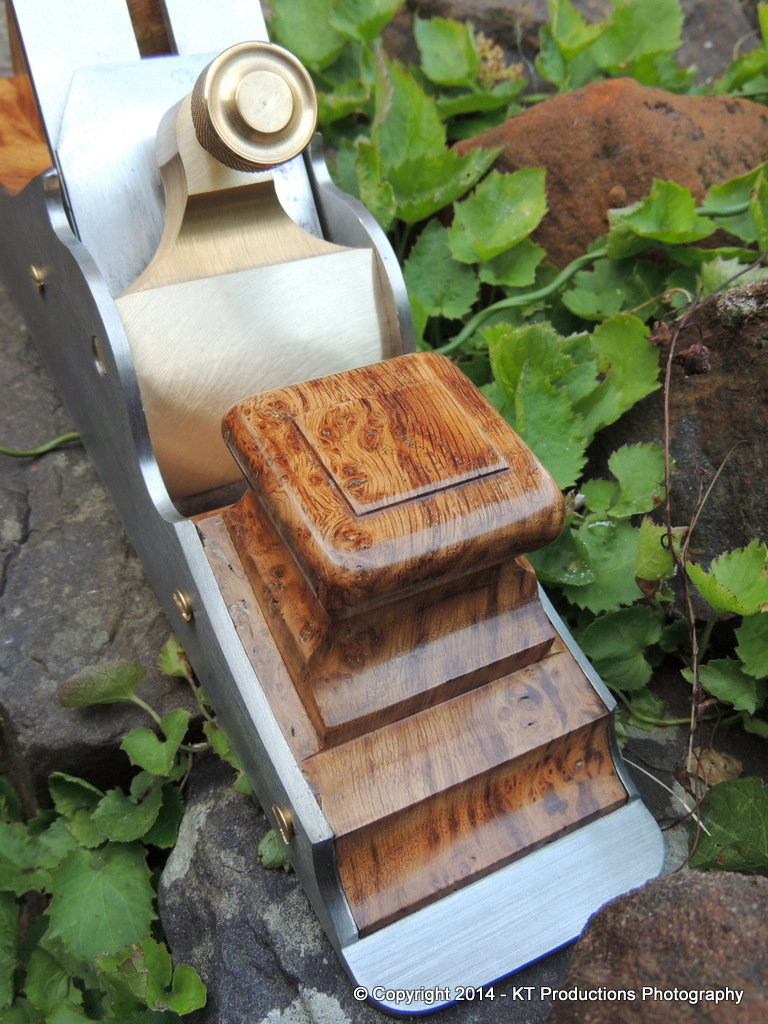
Last coat of the day...and some polishing of the lever cap ready to send to Chalco...
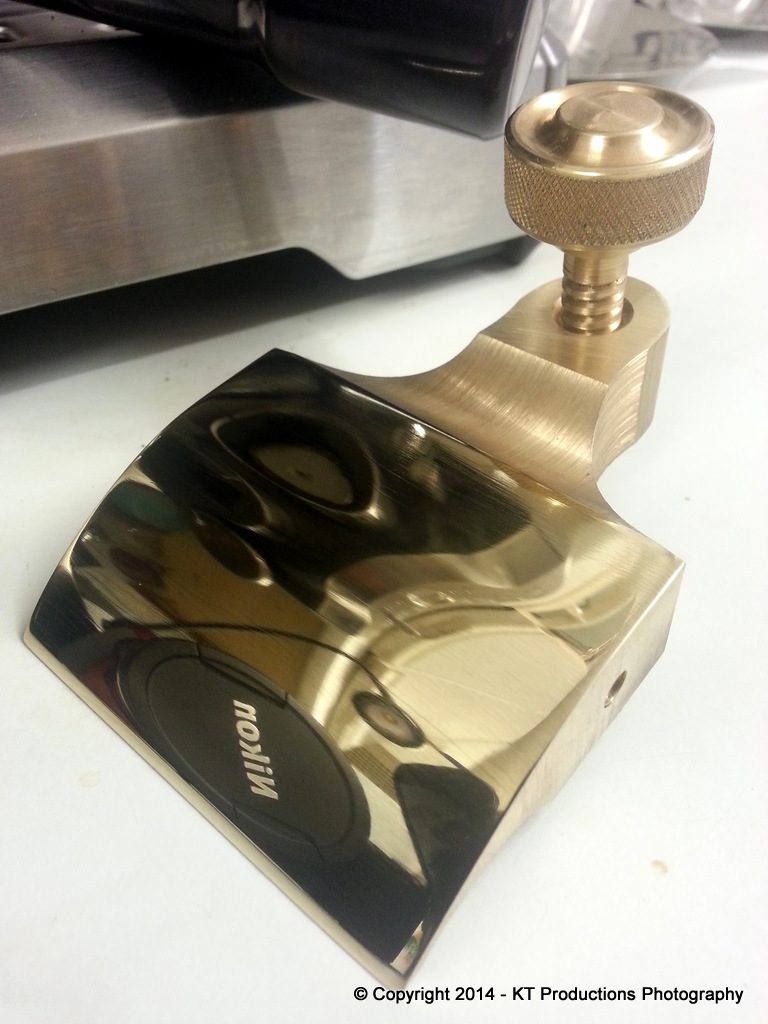
I'm going to have to do this again in the daylight...there are a few scratches that I didn't get out totally at early stages of abrasion and they are showing.
But generally...the effect of the silky look of the Tru-Oil is now starting to come through.
Almost all of the scratches are now gone...and I just want to get the open grain to disappear below the surface and we can then cut back and polish.
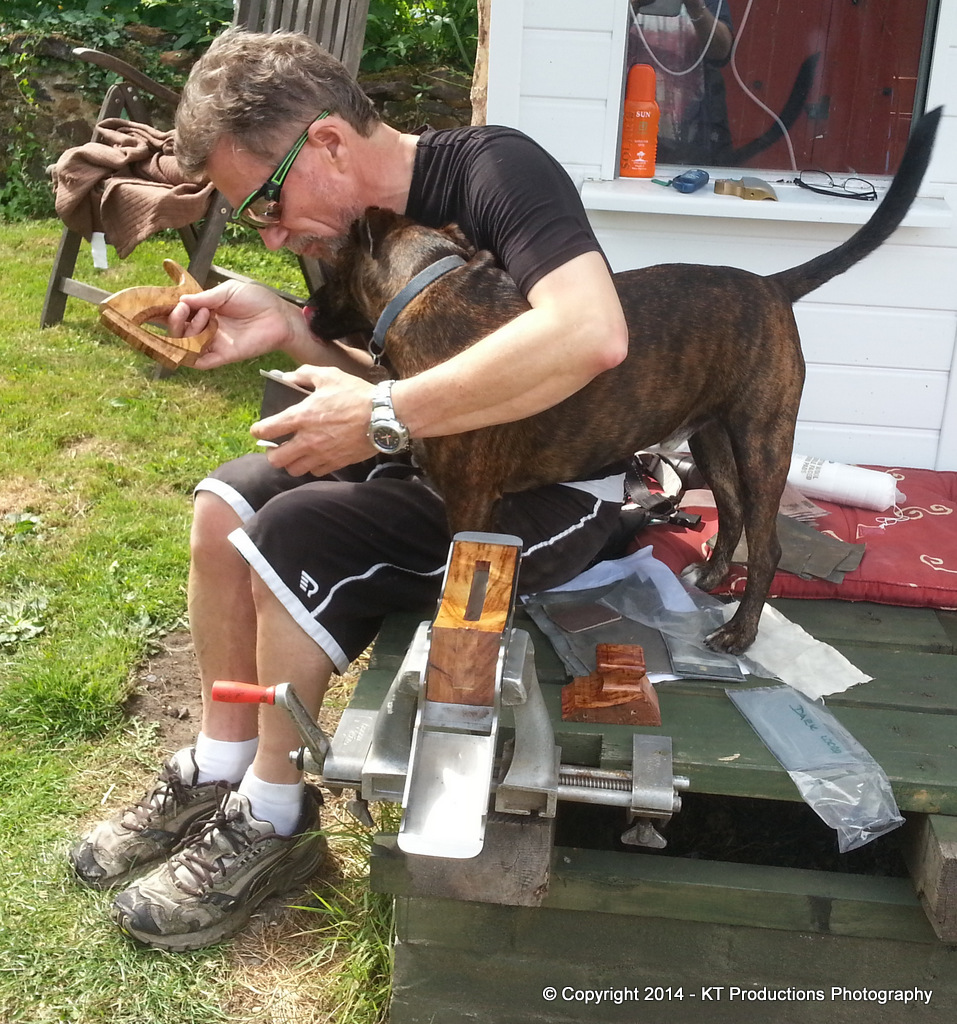
The thunder and lightning was amazing tonight and sitting on the patio at close to midnight working was a rare treat...I love thunderstorms and ALFIE was not bothered either...my old dog Jake used to suffer so much so I'm really pleased! ALFIE's as tough as old boots! :mrgreen:
Night all...hopefully bootfair in a few hours! (we can always hope!)
Jimi
I'm going to have to do this again in the daylight...there are a few scratches that I didn't get out totally at early stages of abrasion and they are showing.
But generally...the effect of the silky look of the Tru-Oil is now starting to come through.
Almost all of the scratches are now gone...and I just want to get the open grain to disappear below the surface and we can then cut back and polish.
The thunder and lightning was amazing tonight and sitting on the patio at close to midnight working was a rare treat...I love thunderstorms and ALFIE was not bothered either...my old dog Jake used to suffer so much so I'm really pleased! ALFIE's as tough as old boots! :mrgreen:
Night all...hopefully bootfair in a few hours! (we can always hope!)
Jimi
jimi43":3pnoj2j2 said:
Fabulous skills and what a showman.
The plane gets better by the day and that lever cap is looking very sexy.
Jim
Just a thought on lining up the letters R and J - I think you need to make a simple jig, where the brass rod is pushed into a tight fitting hole and the letter punches (which I assume are square on the body) rest in an internal corner made in a couple of cross pieces.
Alternatively, is it another detail Chalco could do, if not too dazzled by that extraordinary lever cap? :wink:
Alternatively, is it another detail Chalco could do, if not too dazzled by that extraordinary lever cap? :wink:
jimi43
Established Member
At work at the moment and we have British Superbikes at Brands Hatch so will be brief...
Thanks Jim...I'm only sorry I couldn't get a fixing as swish as Karl...I did ponder that briefly and then decided simplicity was probably the best way without CNC.
Actually Andy...I think I will just ask Ian to do the job right...he's away on holiday until August so we've agreed to get the engraving done then...so the pressure's off a bit now and I can focus on machine screw head design...that'll be fun in itself!
Glad I have the Sieg C6B as I would hate to attempt this on the old Myford.
Slight dome head I think....we'll see.
Coat no 8 and 9 applied before I left for work...so they can have time to harden for a while.
Cheers
Jimi
jimi43
Established Member
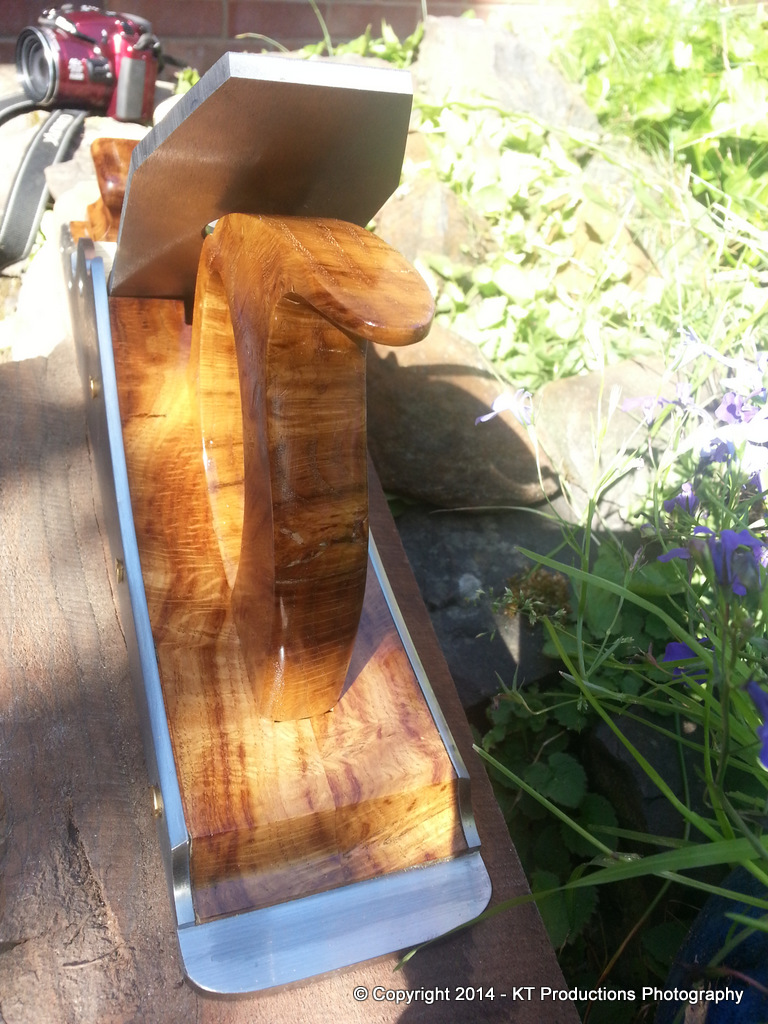
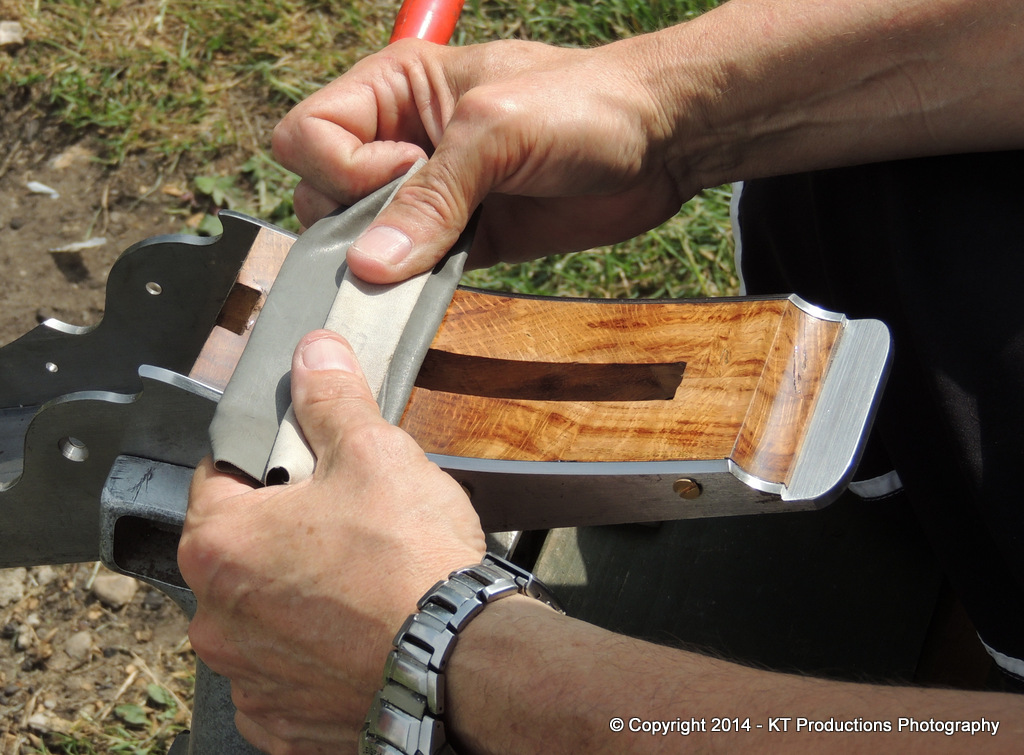
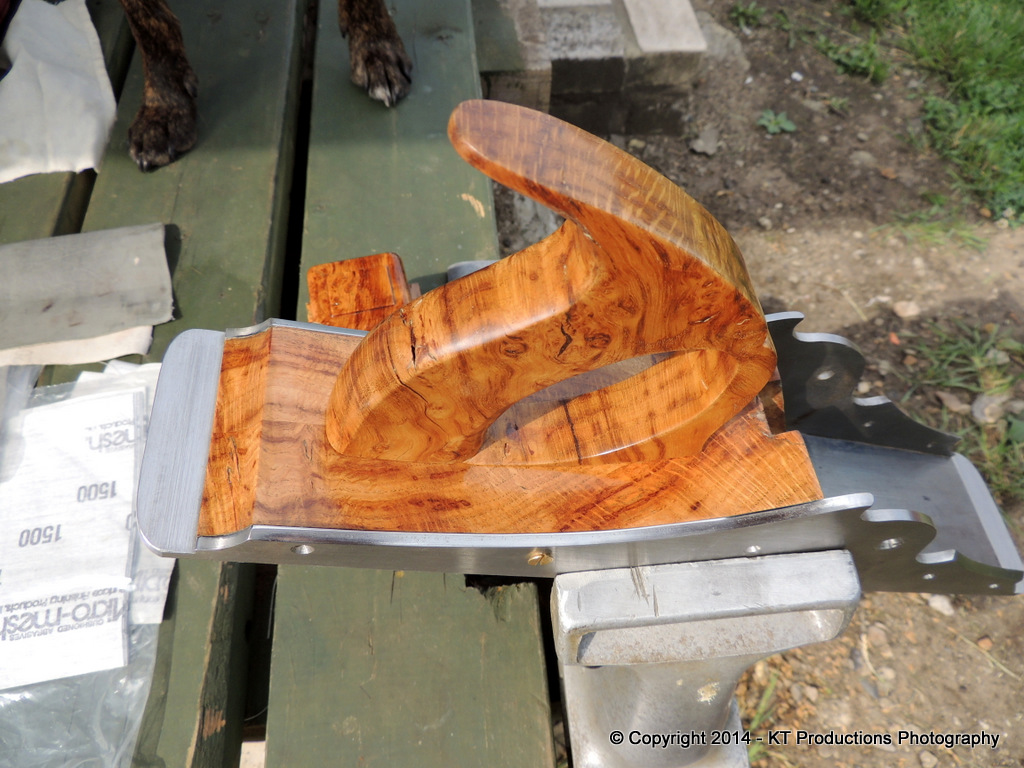
After a weekend of layers of Tru-Oil...it's now time to test to see if we have enough or another set are required and for this we need to cut back the existing finish to flat...
It does look like we're nearly there so I decided to run this up to full gloss...
Doing this by hand is really relaxing...and you get to work on your tan too...but there are a few distractions....
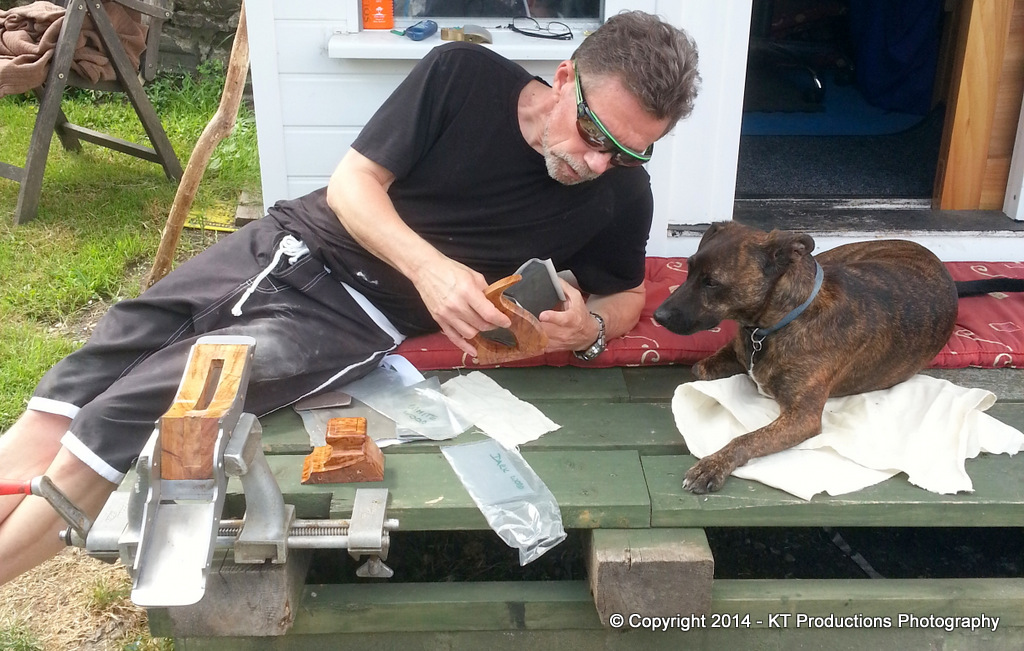
....especially with quality control always present to check your work!
But with all this fine dust around...it's handy to have the upgraded dust extraction system on hand....
So...just as a reminder...we start cutting back using 1500M Micro-Mesh and work up to 12000M...making sure at each step, the preceding scratches are removed....

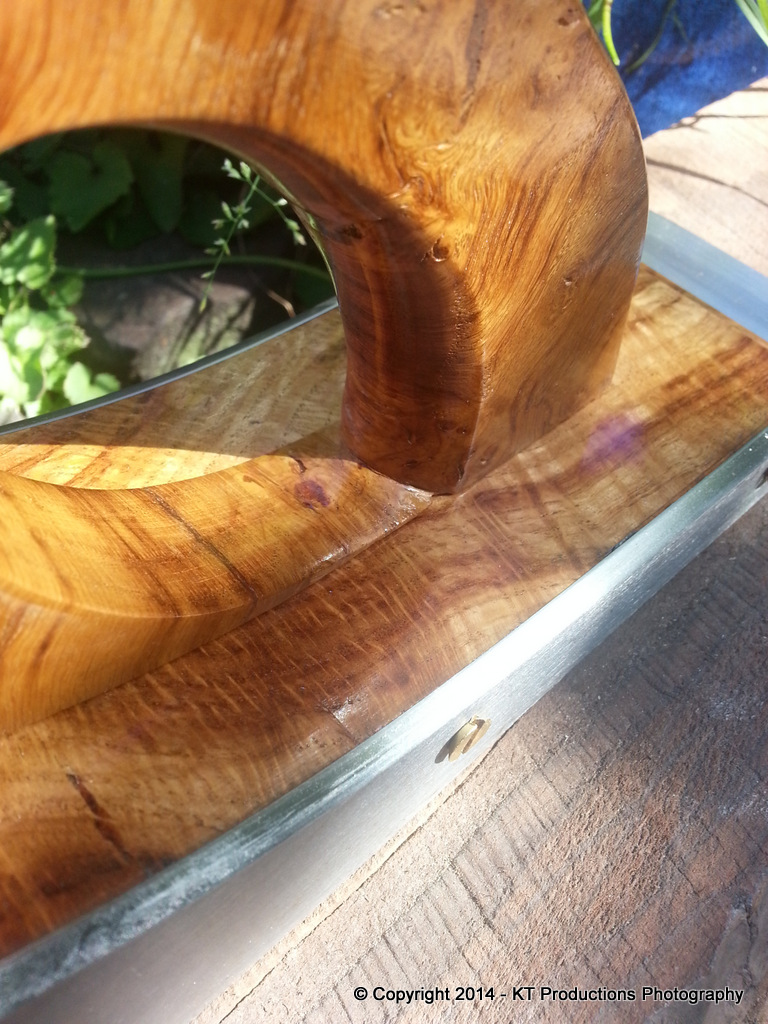
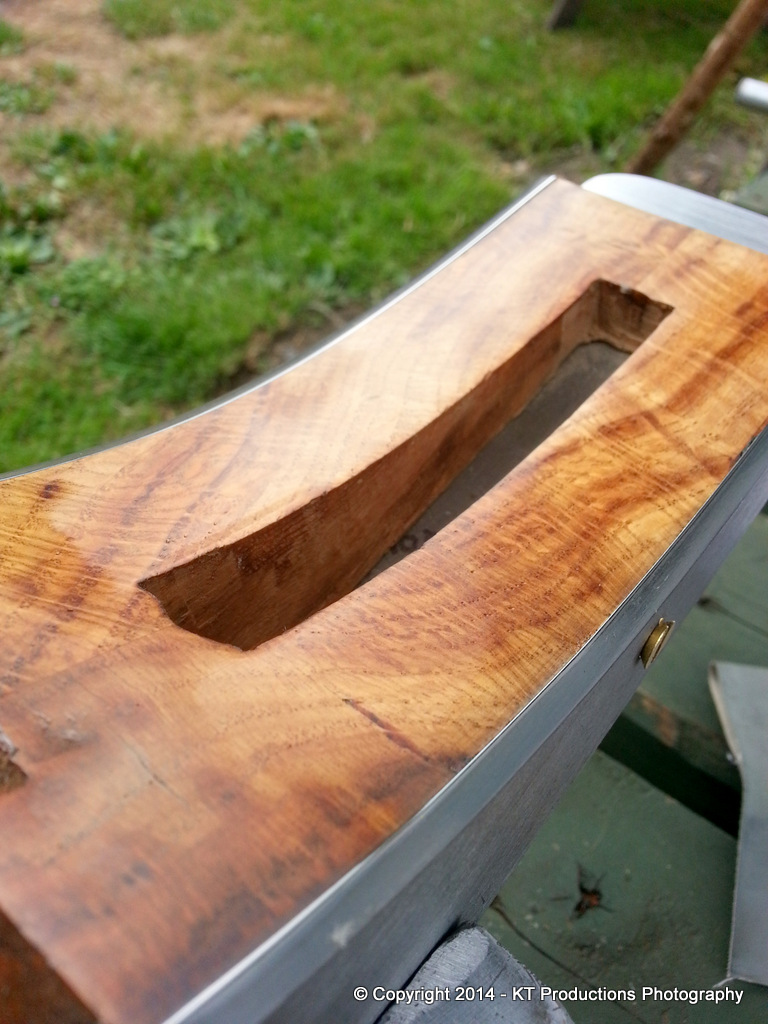
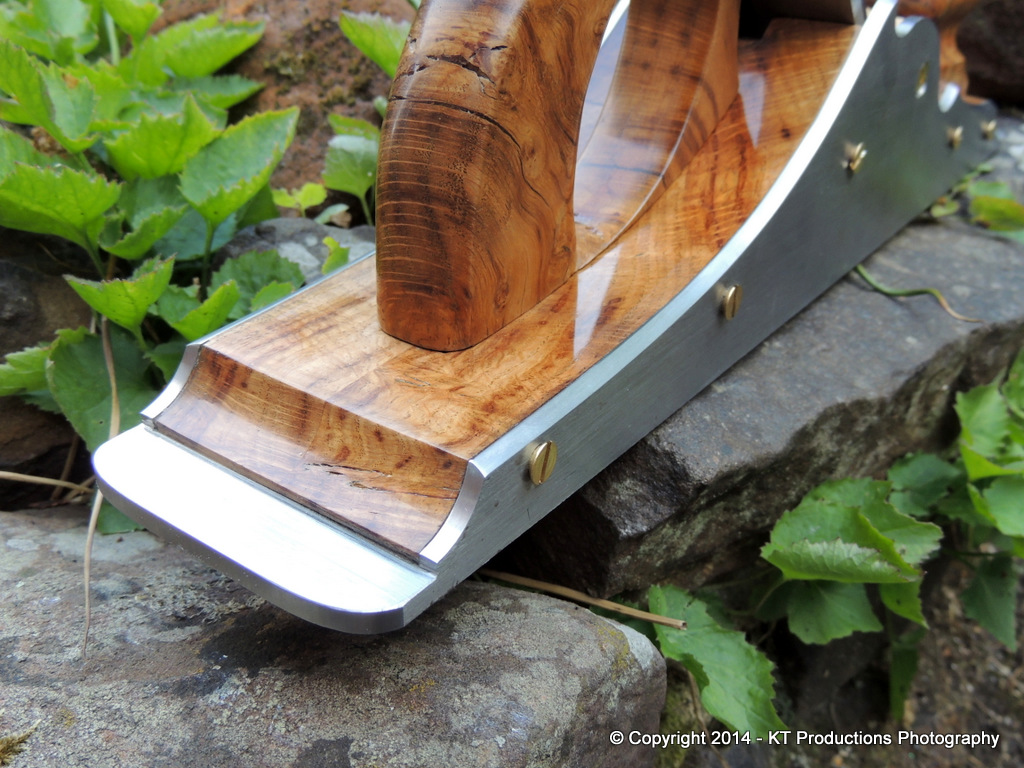
I've been asked to make sure I get clear shots of the amazing figuring of this wonderful burr....so for the people who've asked...how about this one...
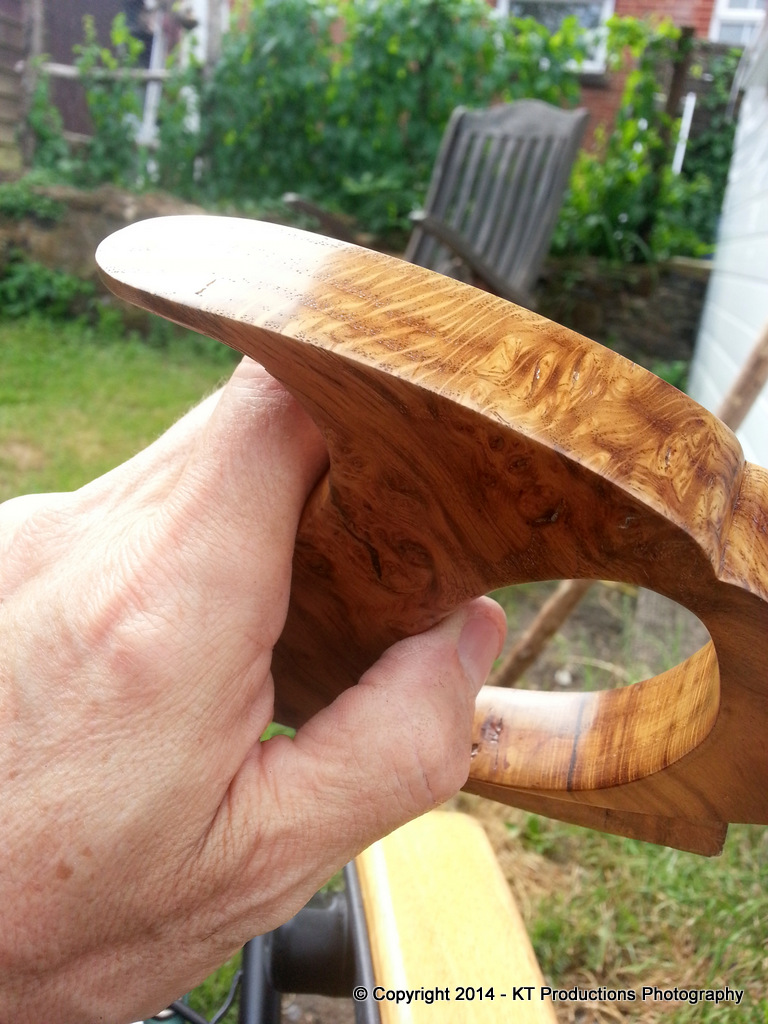
There are swirls and pips...and cutting through it all...the most amazing flower(ing?) I have seen.
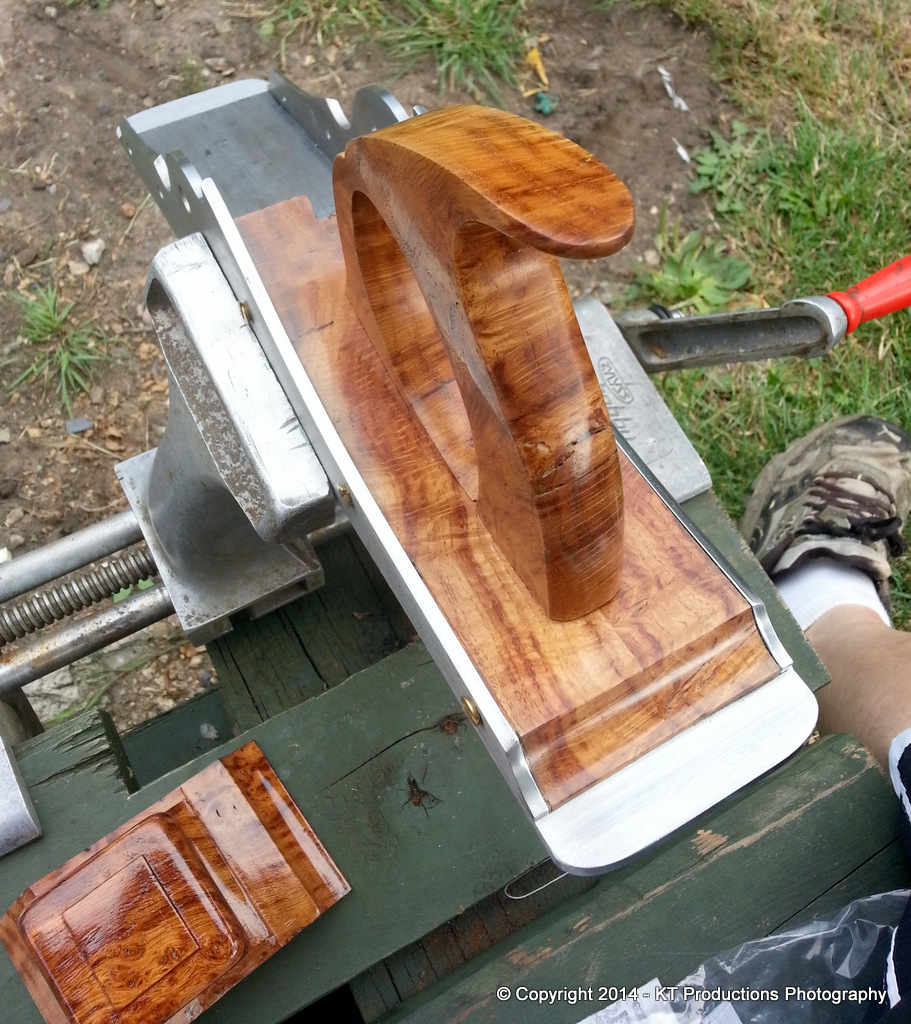
All nine meshes on three elements took most of the day...and then just as it threatened to pour down...I called it a day.
So with a little help from my mate ALFIE...

...we finished for now...
...and we leave today with a few more shots...as the sun goes down...
Oh...and before anyone asks...I put a new disc on my sander and took out those pesky tiny scratches on the lever cap...and back to matt...so I can start polishing all over again... :mrgreen: :mrgreen:
Jim
It does look like we're nearly there so I decided to run this up to full gloss...
Doing this by hand is really relaxing...and you get to work on your tan too...but there are a few distractions....
....especially with quality control always present to check your work!
But with all this fine dust around...it's handy to have the upgraded dust extraction system on hand....
So...just as a reminder...we start cutting back using 1500M Micro-Mesh and work up to 12000M...making sure at each step, the preceding scratches are removed....
I've been asked to make sure I get clear shots of the amazing figuring of this wonderful burr....so for the people who've asked...how about this one...
There are swirls and pips...and cutting through it all...the most amazing flower(ing?) I have seen.
All nine meshes on three elements took most of the day...and then just as it threatened to pour down...I called it a day.
So with a little help from my mate ALFIE...
...we finished for now...
...and we leave today with a few more shots...as the sun goes down...
Oh...and before anyone asks...I put a new disc on my sander and took out those pesky tiny scratches on the lever cap...and back to matt...so I can start polishing all over again... :mrgreen: :mrgreen:
Jim
G S Haydon
Established Member
- Joined
- 24 Apr 2013
- Messages
- 1,667
- Reaction score
- 223
I wondered what had happened to the lever cap. That Burl is looking very special.
jimi43
Established Member
G S Haydon":15cvb1p9 said:I wondered what had happened to the lever cap. That Burl is looking very special.
Yes Graham...I had a few tiny scratches right where the engraving is going to be done...so it had to go back to base matt again and I will have a chat with Ian at Chalco...I think that part might look better matt with the "glossiness" of the engraving standing out more...but I will check.
Jimi
tobytools
Established Member
Cracking work Jimi, I can't wait to see the engraving complete.
This plane it just out of this world and far better than any S&S and holtey combined.
When you finish this master piece you might want to take a break and build my infill kit for me
All parts are made just need assembling and finishing
Ttfn
TT
This plane it just out of this world and far better than any S&S and holtey combined.
When you finish this master piece you might want to take a break and build my infill kit for me
All parts are made just need assembling and finishing
Ttfn
TT
jimi43
Established Member
if Konrad and Karl had been mates in kindergarten maybe close Toby!! :mrgreen:
I think your infill kit would be an ideal project once you get going in college don't you? 8)
Jim
I think your infill kit would be an ideal project once you get going in college don't you? 8)
Jim
tobytools
Established Member
jimi43":3tcgh1k3 said:if Konrad and Karl had been mates in kindergarten maybe close Toby!! :mrgreen:
I think your infill kit would be an ideal project once you get going in college don't you? 8)
Jim
I will make a project one day I guess. Tho I dout I'll ever get around to it, anyways that's of the back burner for a decade or so.
First is, woodwork...
Then making plane irons and wedges
Sorry not trying to hijack thread
As allways Jimi keep it up
TT
Similar threads
- Replies
- 12
- Views
- 780
- Replies
- 8
- Views
- 361
- Replies
- 8
- Views
- 1K
- Replies
- 8
- Views
- 1K