The Thing in the Garage

UKworkshop.co.uk

Help Support UKworkshop.co.uk:

This site may earn a commission from merchant affiliate links, including eBay, Amazon, and others.
Richard T":1d5alwam said:
I'm not sure I entirely understand the question - I had thought about disk brakes - I freely admit it; but when it comes to thinking about how to translate that to what I need compared to a ratchet and pawl. the later seems much more likley viz:
1_Headblock_with_Throwout_2_5-5-05.jpg

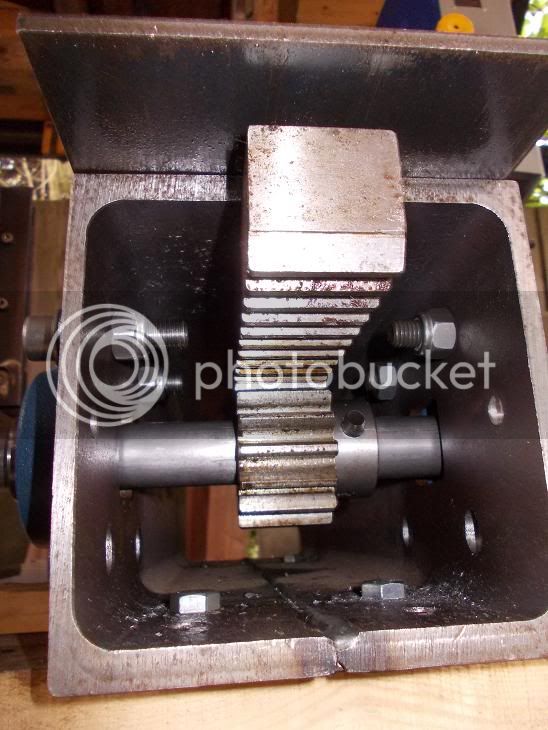
A modern setworks, albeit with complicated reversing stuff involved ....
I just want to wind on and wind out again with the relevant old fashioned noises.

Ah, I see what you mean! Belay that then!

I thought the shaft was driven at one end, rather than half way along, so that you had a crank handle or similar and then just wanted to lock it.

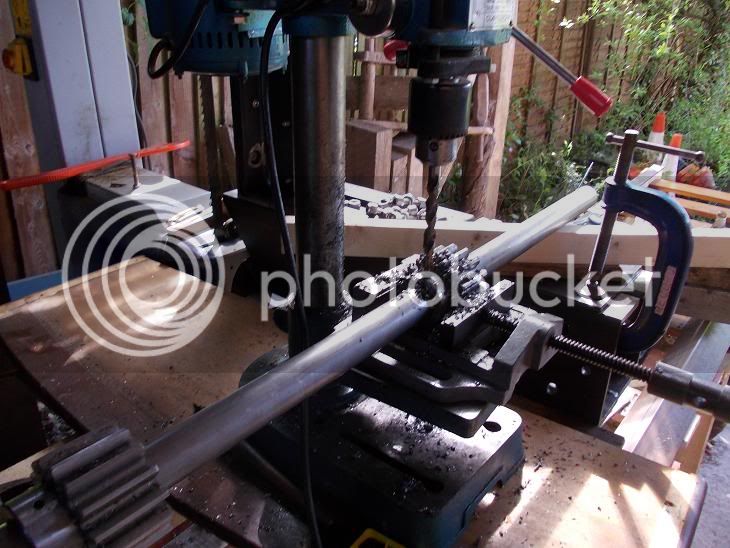
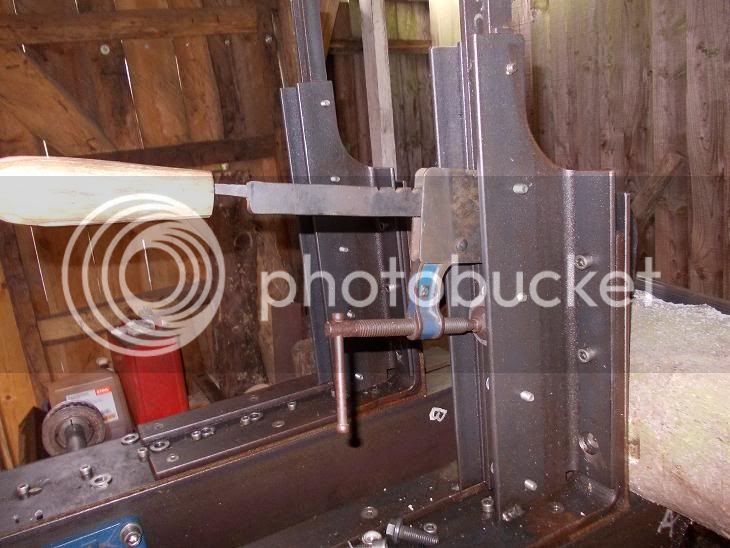
The ratchet is actually driving the shaft (if I understand you correctly), and then releasing to reset for the next log.

In which case, can you take a different approach entirely? Would a worm gear work instead? I can see difficulties in obtaining that too, but it would even allow you to motorize the 'sideways' movement (I guess), allowing quite precise control of the thickness (although that probably isn't important).

They're used in winches and similar lifting kit, where the thing being moved mustn't slip if power is removed. Could you use one from a vehicle winch, or possibly an old hoist? I've got some in Meccano sizes, but I don't think they'd do it!

After Googling, it looks like the winches from these people have ratchets too (and presumably clutches).

Something like that ought to be about secondhand/scrap, somewhere. If it won't run straight on the shaft, you might be able to replace the drum with a sprocket and use a short length of Reynolds (or sommat) to couple it to the main shaft.

I just want my time on Scrapheap Challenge!

:D :D :D :D
 
Hey Richard,
I'm loving this thread, how are you getting on, any pictures of the pile of bits would be very welcome.
Same to animatedpomegranate, how are you doing?
Hats off to you both for getting stuck in.
Cheers,
T
 
Thanks Teo for the encouragement - am due to check on the pile of bits tommorow. Hopefully they will have been transformed into some nifty working parts.
Eric. was going with a worm arangement from the start, but if one thing this project has taught me, is that a simple worm gear arrangement costs half as much as a brand new bandsaw. So.... ratchet it is - maybe with a disk brake lock. - Looking forward to this part; Scrapheap Challenge central - going to make this bit myself with spare flange bearings, a surplus timer belt wheel and a liberal sprinkling of jiggerypokery. (He said like he knew what he was doing.)
 
I just rang my engineering buddy and he's had to go to something called "work" this week, so I won't have those finished bits til next week now.
It's been like this all along - weeks turn into months, cash turns into nothing ....
Still, I've just been and bought a taper bush for the rachet wheel that will fit onto the 1 1/8" shaft. Over the weekend I can get on with making the double pawl. I'll try to get some photos.
 
I will soon have to drill the bolt holes into the two lengths of the carriage body to bolt on the steel beds.
Anyone have any bright ideas about the best way to drill dead square to the wood? It's 6" through so I can't get it anywhere near a drill press.
I have vague memories of seeing people using hand held thingies with monsterous jigs on ... if I knew what they were called I could feel less of a nana asking about such at hire shops. Any ideas?
 
Richard T":yqmio0og said:
I will soon have to drill the bolt holes into the two lengths of the carriage body to bolt on the steel beds.
Anyone have any bright ideas about the best way to drill dead square to the wood? It's 6" through so I can't get it anywhere near a drill press.
I have vague memories of seeing people using hand held thingies with monsterous jigs on ... if I knew what they were called I could feel less of a nana asking about such at hire shops. Any ideas?

My drill jig is broadly similar to this:


wolfcraft-portable-drill-guide.jpg


It has a major disadvantage in that the clamp (for the cylindrical collar of the drill) has too much movement, allowing it to move off square. The guides are nylon, also introducing some slop. Note mine isn't a Wolfcraft one, but it's very similar.

This sort might be better... because the spindle is securely held (click for the pic - it's too big for the page, hence the link).

Otherwise, can't you improvise a guide, with the thickest block of wood you can fit in the drill press, and clamp that where you want the hole. If you mark crosshairs on the 'guide', before you drill it, going up the sides, you can use those for alignment on the actual workpiece.

HTH,

E.

PS: @mods: is there a way to scale down a preexisting image. I've supposedly got HTML enabled, but the usual height="Npx" etc. attributes don't work in the {img} block. Is there a way to embed 'raw' HTML?
 
If your drill press will handle 3". How about approaching the job from both ends? Or if the hole is not complete, start at both ends and finish by hand using the part holes as guides.

xy
 
Eric The Viking":1pf5h3m6 said:
My drill jig is broadly similar to this:


wolfcraft-portable-drill-guide.jpg


It has a major disadvantage in that the clamp (for the cylindrical collar of the drill) has too much movement, allowing it to move off square. The guides are nylon, also introducing some slop. Note mine isn't a Wolfcraft one, but it's very similar.

This sort might be better... because the spindle is securely held (click for the pic - it's too big for the page, hence the link).

I have the Wolfcraft jig and, unfortunately, is does suffer from the same problem, if you're not careful. I think it helps to pay attention to the start of a cut, whenever doing something like this - the bit isn't cutting dead square to the face unless you can see it 'creating a circle'... Hope that makes sense! :) From then on, you just need to keep it steady without forcing the bit; let the tools do the work for you. It's only when you try to put too much pressure on that the jig's shortcoming become apparent.

Or, depending on the maximum plunge/stroke depth on these, you might be better off with a drill stand, like this.
 
I have heard of "mag mount" drills being used on steel work. These attach to the steel with magnets and have the drill on a slide which is held by the magnets at 90 deg. to the steel. Perhaps something like that could be used - I gather that you are drilling wood, but perhaps the drill base could just rest on the wood? Not sure if it would be stable enough and never used one myself, though.

The idea of drilling a block on the pillar drill and then using it as a guide sounds good. I have used it on a much smaller scale to guide a tap on occasion.
 
Evening Folks, ... bit of an update - only 18 months or so later .... :roll:

The continuing saga of the thing in the garage continues. During my absence from this thread I've changed plans a lot, spent loads of money I didn't need to and given up on several occasions.
Though now, I have finally got to a point with it from which the end is in sight so I feel an update is in order.

Some months ago I built the track and got the carriage together:

Walnut.jpg


And after gradually doing bits and pieces it has come together in the last week or so.
I took advantage of the good weather last weekend to finally get the drive bar measured, drilled and fitted:

DSCN0457s.jpg


I decided that the best way to do the drilling was to bring the drill press to it rather than vice versa and use the carriage itself as a bench.

DSCN0450s.jpg


DSCN0451s.jpg


This was a bit of a pig, not to put too fine a point on it. I had no knuckles left but it went together better than expected in the end. Here is a shot of the knuckle - stripping dark interior:

DSCN0459s.jpg

And there were four of those. Notice I haven't been able to face putting the lower bolts in yet ...

If you recall, back in the mists of this thread, I had been messing about with a universal dog (steady) and came up with this thing, borrowing heavily from the Carver clamp idea:

DSCN0454s.jpg


I needed another one so I set about forging a new dog, then realised that if I made another two, I could clamp them together back to back and drill through where they met, leaving half holes in each and save myself filing all the pineapples. So I have two new ones, much better made and proportioned than the first (which I drew out of a round bar). The new ones are 1/2" x 1" and much sturdier. So I got thinking that a quick lock and release might be possible - something like a hand brake .... four full days later, after much swearing and despairing, I have something that works though could be much better:

DSCN0453s.jpg


Above is testing without its spring. The notches on the ratchet could be closer together and both ratchet and pawl could do with being made from gage plate and hardened ... but this is, yet again, a prototype.
Still, it worked. So I had finally got two working dogs ... I had to give it a try.

I had had a surprise free load of Sycamore arrive a few days ago so I had something green to go at.

DSCN0458s.jpg


A 3' length across the mid beds and I gave it a gentle push:

DSCN0455s.jpg


Hooray! It's straight and it's square.

DSCN0452s.jpg


All this without anything being finished - the rail is not fixed, the dog mechanism is only half there .. etc .. so a promising first go. The only thing I am worried about now is the power and general umph of the saw. Even though I was going very gently I feel it was just about at its limit. Still, lots more to do and wood to test.
 
Very impressive. I really enjoyed reading through this thread, it was very interesting. I also had the added benefit of the seeing the almost end result straight away.

How big is your to do log pile?
 
Hi James

Almost finished it isn't I'm afraid ... this was just the first time I could actually test it. there's all sorts of fun to come with squaring up, putting big bolts into concrete, on board brushes, major dust extraction .... etc.

I have been saving quite a few bits into the to do pile(s) but I fear some of it may have suffered during its long wait out in the elements. :(
 
Wow, impressive, I thought you had given up! That blade on your bandsaw looks to be a fairly standard blade, for this sort of roughing isn't there a blade with less teeth you can use to help it through the wood?
 
Thanks Andy

"can do" has been "might do" for far too long. :)

Chems - if only it were a standard blade, I could change it for a whizzo one by Dakin Flathers. Unfortunately ... it's a whizzo one by Dakin Flathers. Ripper blade; 3tpi. Like is used on band mills.
I suppose there are plenty of options for upping the cutting power - getting cast iron wheels, getting a cast iron saw, getting three phase and a huge motor, driving it with the landRover etc. (if I still had a series 3, I would - pto shaft srtaight out of the front bumper ... :wink: )
 
Started to have a proper play today - big lump of conifer:

DSCN0471.jpg


Two sides off. This is much easier to cut than the Sycamore

DSCN0473.jpg


And squared up.

DSCN0474.jpg


Cut through at the pith

DSCN0475.jpg


and the larger side planked into 5/8" boards for 1/2" ... pseudo quarter sawn.I've marked them out on the wood - must get a calibrated system on the back bed so I can measure as I go.

DSCN0477.jpg


DSCN0481.jpg


DSCN0482.jpg
 
fantastic, the pieces you cut off to get the square edge boards are they of any use? or is it just the fact that they are crappy softwood thus being a bit useless?
 
Back
Top