Steering Wheel Project

UKworkshop.co.uk

Help Support UKworkshop.co.uk:

This site may earn a commission from merchant affiliate links, including eBay, Amazon, and others.
Dave R":3cuekfq4 said:
Yes, you've got it right. I tried it the other way and didn't like it. Since the wheel is behind you when you're sailing, setting it up so turning to port makes you go to port was backward. I found it more intuitive set up as is, It works basically like the tiller on the typical small boat. You push the top of the wheel away from the direction you want to go as you would with the tiller.
Ahh! So it's a circular tiller then? Nice idea, and intuitive for an old 'seadog' like me.. Oh but you would have loved the old 'Kitchener-gear'... . Happy Days!

Nice one

John :D
 
John, thanks.

Kitchener gear? Do you mean the Kitchen Rudder?

664px-USPatent1186210_Kitchen_rudder.png


They are pretty cool but don't work so well on a sailboat. :D[/url]
 
Dave R":csu15ing said:
John, thanks.

Kitchener gear? Do you mean the Kitchen Rudder?


They are pretty cool but don't work so well on a sailboat. :D[/url]

This is true of course, so you must be older than you look Dave!
Your image illustrates it nicely. 'Kitchener-gear' was fitted to the old, RN, carvel-built motor-pinnaces, and comprised of two rotatable 'buckets' which enclosed the screw. The wheel on the 'tiller' moved the buckets to port or starboard, so that the force of the wake, against the buckets, acted as a rudder, thus turning the boat port or starboard. Add to that the rev control on the brass/nickel 'tiller' and all the metal-work that had to be polished, they were a chore! But they made the boats very maneuverable. It has been a long, long time since I used a boat like that, and I cant recall if it was just an adjunct to the tiller, but they could spin on a 'sixpence' (A nickel if you will!' )

Happy Days, as I said.

John :)
 
I remember seeing a small boat that was fitted with a kitchen rudder. The small motor had no transmission. The screw was attached directly to the crankshaft. THe boat had no neutral or reverse gear positions because of that. By operating one control the helmsman could steer the boat. There was another that would run the two buckets together aft of the screw to create reverse thrust. (Very similar to the thrust reversers on some aircraft such as the DC-9, MD-80, B-727.) There was also a setting that created a zero-thrust condition by leaving a gap between the two rudders.
 
Benchwayze":2scf8h3f said:
...fitted to the old, RN, carvel-built motor-pinnaces...
I wish you hadn't said that, John - I was immediately compelled to leap to the books for more info. #-o Anyway, I'm sure the 1951 Manual of Seamanship was before your time :whistle: but thought you might enjoy this:

132fs749370.jpg


And a nice explanation of how it works (mainly for my benefit :oops: )

132fs749257.jpg


Darn clever, but as Dave says, maybe not ideal for a sailing boat. :lol:

Cheers, Alf
 
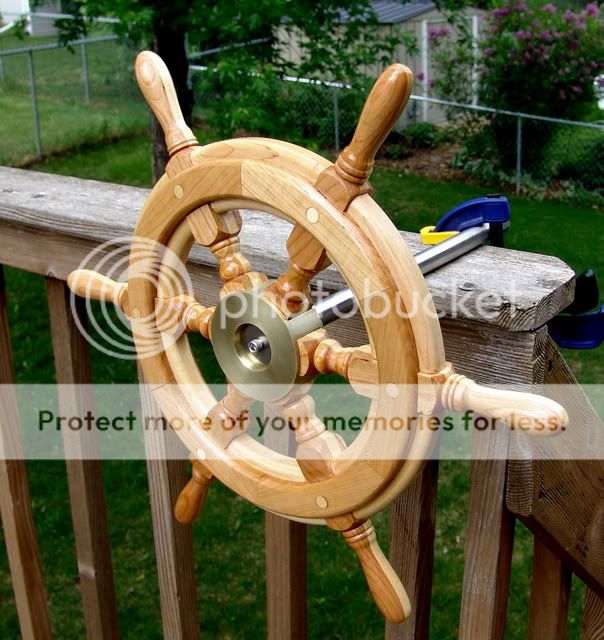
Right! You lot already forgot about my steering wheel project. Probably thought it beat me and I gave up. Well, not yet but I'm getting close to considering what color I should paint it. :D

Actually, I've been working on the wheel mostly in very short periods due to other things going on. I've also forgotten to take pictures as I went. I finally remembered to haul the camera out and get some shots and here they are.

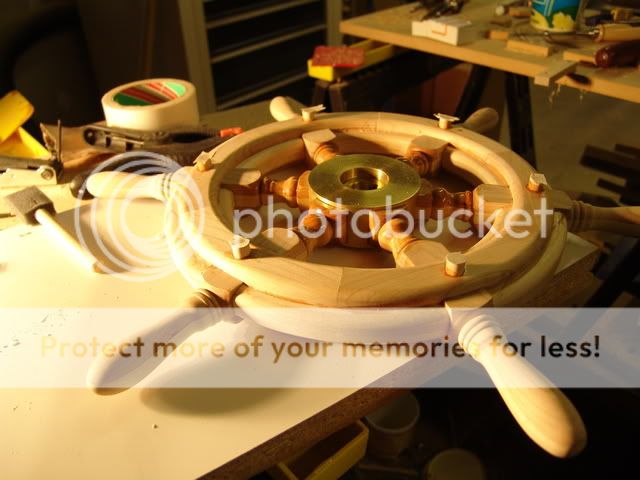
First, the wheel as it sits now.
DSC03822.jpg


I've got the entire wheel assembled and in this shot you can see the bungs in the screw holes on the front. The wheel is glued together with epoxy slightly thickened with fumed silica. There are screws into the spokes but they aren't really useful once the epoxy has cured. the bumngs are "glued" in with spar varnish which is what I'll use to finish the wheel. The varnish will hold the bungs in place just fine and there won't be an unsightly glue lines around the bungs.

the inisde ends of the spokes were varnished since I'll never have access to the ends again.

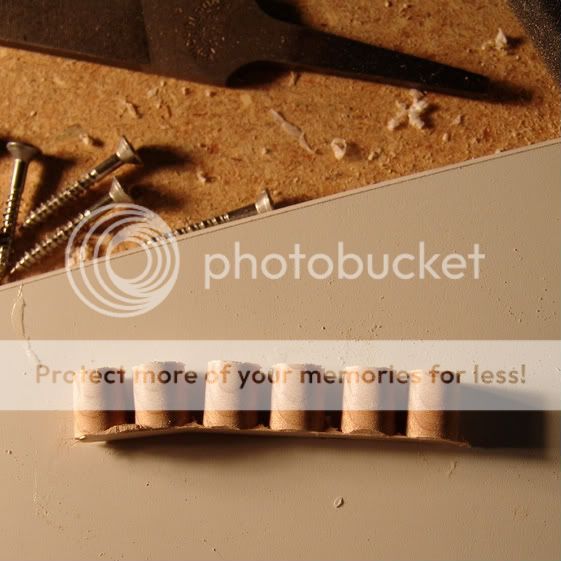
Here are the bungs for the opposite side.

DSC03817.jpg


As you can see, I cut the bungs nearly free but left a very thin bit of wood so they stay together. This made it possible to dip them into the varnish and place them without getting varnish on my fingers. after dipping the bung in the varnish, I set it in place over the hole and drove it in with a little hammer which also managed to break the bung free of the strip. Leaving the bungs in the strip also makes it easier to align the grain.

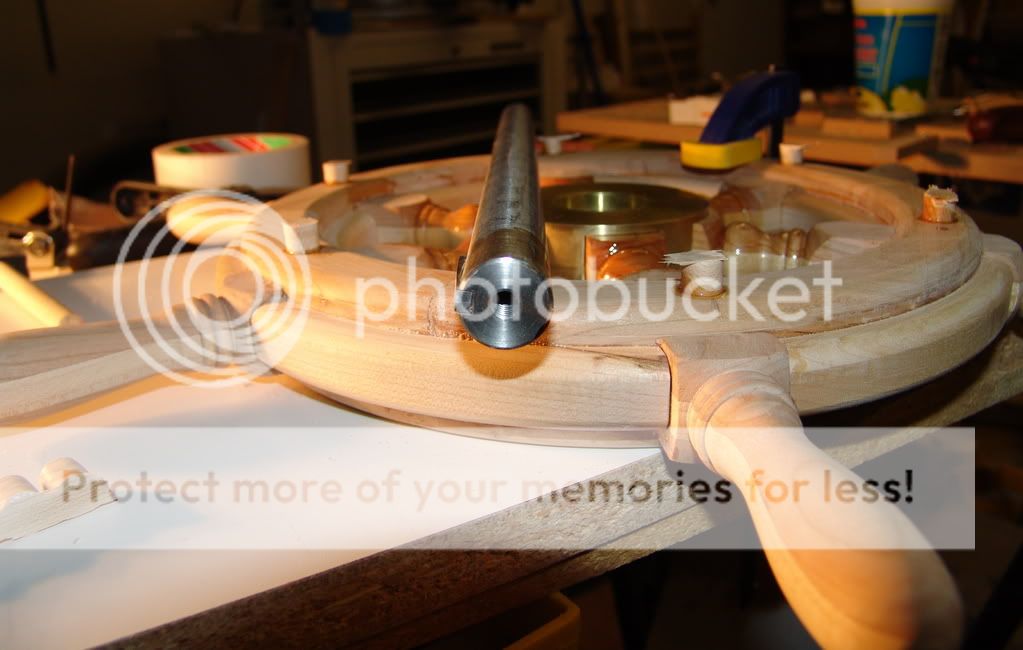
And, FWIW, here's the steering shaft made by a friend from a bit of stainless steel round stock. The center is drilled and tapped for a machine screw and a key way is cut to mate with the keyway in the hub. the key is glued into the keyway with CA glue.

DSC03814.jpg
 
That's looking great Dave. A thick coat of magnolia gloss paint should finish it off nicely. :lol:

John
 
Johnboy":roda2j8h said:
That's looking great Dave.
Must agree, looking good. :D
Johnboy":roda2j8h said:
A thick coat of magnolia gloss paint should finish it off nicely. :lol:
Shouldn't that be donkey brown with a nice ploy gloss top coat? :twisted: :roll: :wink:
 
Dave,
that sure looks beautifully made. You will remember to show us an in-situ shot won't you?

Andy
 
Dom, I made a lot of mistakes. You're being kind not to point them out. I'm hoping that with enough varnish the glare will be so bright no one will see the flaws. :D
 
Thank you guys.

Dave, I'll probably put on two more coats of varnish before I start with the paint. Just kidding. I have too much other stuff to do to worry about painting it now.
 
Dave R":187gtlxh said:
LN, I've considered that. Do you think I could sell any?
I would imagine on your side of the pond and especially in the San Francisco area they would bite your hand off, even more so if you advertised it as hand made. That huge brass/bronze boss really makes it, I bet that don't come cheap. To be really authentic though it needs a brass cap on one of the pins.
Like the one in this pic near the top of the wheel
mb-bridge3.jpg


Or you could do some nice rope work like done on this Marlin spike or do you call them fids?
movie.JPG
:lol:
 
Och! Brass cap on the king spoke. Pshaw! There should be a turk's head on the king spoke like this:
dsc03125.jpg


A new cast bronze hub would be more than $200. I'd have to get at least $225 to pay for the materials.
 
Dave R":ro0cjcrm said:
Och! Brass cap on the king spoke. Pshaw! There should be a turk's head on the king spoke

A new cast bronze hub would be more than $200. I'd have to get at least $225 to pay for the materials.

Turks head! cheap skate :wink: Thats too easy and would only add pennies to the value :lol:

$200 ouch! why not use a very hard wood hub turned on a lathe with a machined metal insert with the key way cut into the insert? That would get the price down or should I say cost down, then the $200 would be extra profit.

I suppose the real problem of selling your wheels are the cheap replicas that are on the market, most people think they are the real thing but one season out in the wet would prove other wise and it is the price of these replicas that your trying to compete with, as the saying goes "you get what you pay for" :(
 
Back
Top