SOLD: Beech Hardwood Workbench

UKworkshop.co.uk

Help Support UKworkshop.co.uk:

This site may earn a commission from merchant affiliate links, including eBay, Amazon, and others.
Nah Byron.. Pukka is an Indian word. But it is suposed to mean the real McCoy!

Your Bench would be ok, But I do really need just a top!

regards
John :)
 
Popular Woodworking is Chris Schwarz's magazine, and a good source for bench related stuff.

This video titled '21st Century Workbench' http://www.popularwoodworking.com/article/bench goes through how a modern Roubo interpretation can be used in many different ways to hold work. It doesn't get into really fine detail, but it covers the basics plus a bit more.

The removable tool well/centre section is an interesting option that opens up some possibilities.

It's not in the video and I can't find a link on the mag site, but this month's mag (i like the practical but high end focus, good writers and minimal advertising in it) issue ran a tip for how to make a drop-on/detachable old style shoulder vice to fit a bench that doesn't have one built in.

It basically uses a hefty top board at rt. angles to the front edge of the bench, this fitted with four 3/4in glued in dowel pins at the inner end to drop into the dog holes in the bench top. The shoulder vice arm/beam that carries the screw is mounted under this at right angles, and screwed to a set of laminated roughly 14in long boards of about the same depth as the bench top - the resulting block is also screwed to the underneath of the top board and packs the gap between the vice arm and the front edge of the bench top when it's in place.

I can post a sketch if it's of interest to anybody. I don't know how well it might work (but it looks feasible if you make it good and robust, and carefully fit it - you might even choose to use a bolt or even two through the laminated block/body into a threaded insert in the bench edge to make it rock solid), but it struck me that it's a way off the hook if you found afterwards that having built a modern take on a Roubo that you occasionally needed a shoulder vice for some overlooked task.
 
I had considered this design for a top. Mainly because I don't have a 24" planer/thicknesser to flatten a top. (Yes I know I could could do it by hand; twenty years ago!) :wink:

With the 'split-top' design I could prepare two 11.75" wide beams and run each through my thicknesser, knowing they will be flat and identical. All that remains then is to ensure the frame on which they rest is also true and not in winding.

Also, the bench could be designed so that when re-flattening becomes necessary, the main sections are removeable. Just detach the vices, then plane and thickness the 'beams' again.

What I hadn't thought of was including removeable tool boxes in the well. I would sink them about 5/8 " to accomodate an MDF cover for when I want solid support. And how much easier to manhadle an 11.75" wide beam instead of one lump that's twice the width!

So thanks Ondablade. I am obliged for this.

Regards
John :)
 
John, I can highly recommend anything by 'The Schwarz' - His workbench book is the best on the market IMO and really has almost any info/detail required.
 
Chris Schwarz is to my mind very good too - he figures stuff out properly, seems to have a lot of integrity, and doesn't just mouth what he has heard.

I want to fit the twin screw Veritas vice i have to the front like he has it, and so liked the way the removable centre on the bench opened up too John. I also like the way it opens up the possibility of properly cross cut sawing off the RH end of the tail vice. I've worked on a bench with a tool tray and they seem to me more trouble than worth.

Another advantage is that it might possibly (for those who understand properly what it does, because i don't :roll: ) restore some of the capability of an old style wooden tail screw vice.

There's to my mind at least two downsides though that need thinking about before going for the split top - pardon me if you are there already.

A true Roubo relies heavily on the weight and the stiffness of a thick one piece top - to the extent that the legs are (whatever the joint is called!) sliding dovetailed directly into the top with no skirt or other structure to the tie the upper ends of the legs together.

So a split/two piece top would need at least some sort of hefty cross piece under the top and between the legs. It also strikes me that if you want to chisel vertically down on to the end of one or other of the separate bench 'tops' that being only half as wide and heavy as a one piece top and cantilevered out a little they may be inclined to bounce or spring - to not be as 'dead' as you might like.

Maybe it's possible to get around this by making the two tops ultra thick to give them some extra mass and vibration deadening - or maybe it would be OK anyway. I don't have enough experience to know. Make it very thick and it could impede clamping.

Maybe an in between option would be to machine plane two tops (that appeals to me too ;-)), then glue between them a shorter (and maybe narrower and thinner) third using dominos or biscuits to get accurate positioning if you want it flush - to as a result leave a long enough gap in the centre at the tail vice end so you could as above cross cut saw in it.

That way it would still be machine planed, (mostly) one piece, and still give the sawing option - but lose the clamping into the centre option.

Lots of benches with a tool tray in the centre certainly get by in this format, whether or not they give away anything compared to a fully solid top i just don't know...

PS The bench in the video not only has a split top, but also a stretcher set flush with the front face of the legs, but a bit down from the bottom of the bench top. (probably part of a general beefing up due to the split top, and set down a bit to clear the tenons for the cross braces under the top i imagine)

The result (a la Roubo) is a large vertical clamping surface that is square with the bench top surface. The legs, stretcher and bench top edge that make up this surface are all drilled for holdfasts.

The use of a drilled stretcher as a clamping surface is perhaps a bit less flexible than the sliding dead man usually found on a Roubo, but might have some advantages in terms of accuracy and strength too.

Thoughts anybody?
 
I'm with you ondablade.

I was thinking of using transverse 4" x 2"s on edge across the under-frame to 'spread the load'. As I envisage a bench just 7 feet long at most, maybe five of those would do the trick.

Alternatively the slabs could be fixed to a rigid WPB base, in such a manner that they could be removed for flattening.. I.e., no glue!

I am still in thought mode over this one, as I was originally leaning towards the 'French-bench' design, sans leg vice!

That's the alternative to Byron's chosen design. :wink:

One thing for sure. I can't go on for much longer with the old 'knacker' I have at the moment!' I am definitely going to use the frame from that mind. It's good, solid Douglas fir. All I will need to do is adapt it for the top.

Regards
John
 
such a nice bench at a very good price... if I would not be working out of my livingroom (my girlfriend hates me) I would love it. I remember one that my grandfather built by himself when I was around 8, looked fairly similar only the vice was part of the top and had a massive wooden threaded screw. no metal in that one. no idea what wood he used for it...
 
showed to gf and she loved it - I'd buy it if you can help me out with delivery to SE london, East Dulwich area. Let me know. Oliver
 
Personally, I wouldn't bother with all the hassle of going for a split bench. The gap in the middle will quickly fill with hamster bedding, pencils, gauges, chisels et al will disappear never to be found again, and it seems a massive workaround for not much benefit.

I would stick with a single piece workbench top - but plane it up in sections like you mention (John) and then glue up using splines or biscuits to align them perfectly, all that would be needed is a little tickle with a smoother. Flattening in the future will be very easy and can be done in less than 20 mins with a hand plane - very easy work.

I can't see any real benefit in making it a split top, as in my humble opinion it introduces too many negatives, and as for work holding, it doesn't do anything that can't be achieved with a single top - you also don't have to faff about with added construction to retain rigidity.

As my tutors would always say to me: Keep It Simple Sunshine. :)
 
Oliver R":37kypbg7 said:
showed to gf and she loved it - I'd buy it if you can help me out with delivery to SE london, East Dulwich area. Let me know. Oliver

Oliver, I'm afraid I couldn't help with delivering, but it can be easily knocked down and put into the back of a car if that is of any help.
 
Byron and Ian..

I see your reasoning Byron, and I do agree with your points.
The problem is, I have times when I can't even lean forwards to turn on a tap! (Like Saturday. I was fine. I stretched out a hand to pull the curtains closed, and 'pop'! The disc slips a bit! I have been walking around like a ramrod for two days!)

If I go for a solid top, I have a big slab of wood to manhandle! Still I might have a few weeks when there's no trouble! :) And I do have a helpful No. One Son! :D

For Ian,

I have seen the bench made by Khalaf, the Luthier. He uses one of those left hand thread Benchcrafed 'wagon-vices'. That looks pretty good.

Very much along the lines of Chris Swartz's design overall.

For a look at the video:

http://oudluthier.blogspot.com/2009/11/ ... stery.html

For a spilt top idea:

http://benchcrafted.blogspot.com/2009/0 ... -sale.html
Regards John
:)
 
John, you could always glue up the two (or even three) sections of the top actually on the base in situ, so you don't have to then manhandle a single giant piece.
 
I quite like the idea (now! :roll:) of having a 'split bench' with a tool well in the middle. When I first saw the bench in the 21st Century video, I assumed this arrangement would only suit a workshop where you were able to access the workbench from all sides... However, I reckon that if you fit a series of lidded boxes in to the well space (as I did on my blog, a few months ago :wink:), I think it could work quite well. Also, having to glue up and flatten two narrower leaves has it's advantages. Although, you would still have to true them up to each other.

On my next bench (probably in about nine-years! :D), I think I'll be trying it out. Though, it still doesn't stop the problem of tools falling off the back edge when it's sited against a wall! :x Anyone got any bright solutions for this? I could just fix a strip of MDF along the back edge but I wonder whether it's worth making something 'better' - like Byron's height-adjustable end stop. The problem then would be adjusting it, without dragging the bench away from the wall... :-k
 
The other issue I have with split tops - is the same I have with quick release vices used in a tail vise manner - the gap doesn't provide support for the workpiece, so you have to be somewhat careful where you are clamping stuff, especially small pieces

And as you say Olly, regardless of the split, the top still have to be flat and the surfaces equal to each other, and this is much easier to do when then there is no split.

The final reason why I personally dislike a split top - is that it looks ugly! Why spoil a beautiful top with an ugly chasm down the middle. :)

To prevent tools falling off the back of the bench, you could do a couple of things - add a small ditch a few inches deep to catch them as they go off the back, or add an adjustable stop like my plane stop as you mention - but have the back attached to a couple of runners on the side of the bench, and this arrangement could then easily be adjusted from either side of the workbench to lower and raise the stop at the back.. if that makes sense.
 
ByronBlack":3obah7qa said:
John, you could always glue up the two (or even three) sections of the top actually on the base in situ, so you don't have to then manhandle a single giant piece.

True Byron... but as I said, the bench I have is solidly built, and is going to be recycled. At 30 inches wide, it's been a pain in my pokey shop for a long time. It's going to be a bit of a job to shorten the side rails, but it's Douglas Fir, all perfectly useable, with 4 x 4 legs; too good to throw out.

Thus whatever benchtop I go for, I will have to make the top first, to get the remodelling right. But split top or full, I have a hulking great Son who is a willing helper. It will save him buying me a Birthday pressie! :lol:

John :)
 
If I could just tip in my two controversial euro's worth as per normal :roll:, I've had a look at those linky's to the bench with the split top thingie and both vices at one end, very clever...
However, in my view there are just two prerequisites for a decent bench, whichever way you slice it and whatever way you arrange the top (which is down to personal preference at the end of the jour)
The first is that it should be as heavy as possible (if you have a No1 son John, to help lug it around, so much the better) and secondly:

daddd.jpg


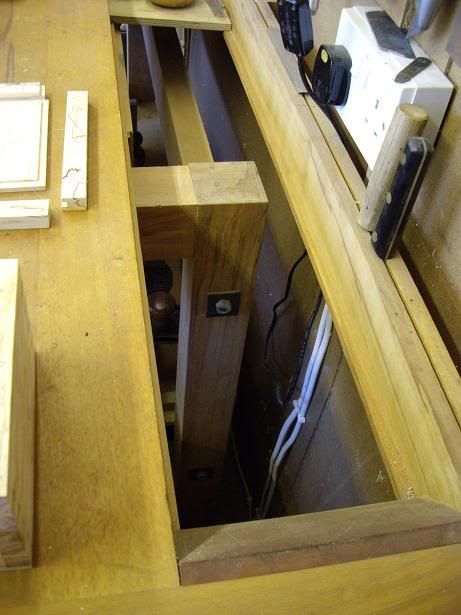
it should be rock solid (absolutely no racking) when you're belting something on it or planing a bit of wood. In most designs that I've seen, the absence of racking is because the top is bolted directly to the frame, but in my bench I've gone for the belt and braces approach by including a third draw-bolted rail at the top of the frame, which can be seen in the pic through the removable Charlesworthian bench well inserts (well worth doing as you can get access for cramping from both sides of the top)
The material on my bench is 3" thick solid beech throughout...there's no thinner bit in the middle with just a skimpy front apron to make it look thicker than it is.
Plenty of forum members have used the bench on various occasions and it does move in use...but it's not the bench, it's the floor :oops: (soon to be rectified)
Going to crawl back under me rock now :D - Rob
 
ByronBlack":nmukup5r said:
...but have the back attached to a couple of runners on the side of the bench, and this arrangement could then easily be adjusted from either side of the workbench to lower and raise the stop at the back.. if that makes sense.

Sorry, Colin, I'm sure I understand what you mean?
 
Olly,

Here's a quick sketchup image I knocked up, hopefully it makes sense.

There is a rectangular piece on the back of the bench (the bit facing you in the image) that is attached to pieces which affix to the sides of the bench with grooves cut out that will ride up and down a bolt to lower or raise the rectangular section on the back of the bench, thus preventing stuff from falling off the back.

Screenshot2010-05-31at104726.png
 

Latest posts

Back
Top