sketchup query - pulling component up to another

UKworkshop.co.uk

Help Support UKworkshop.co.uk:

This site may earn a commission from merchant affiliate links, including eBay, Amazon, and others.

ColeyS1

Established Member
Joined
2 Nov 2009
Messages
4,245
Reaction score
39
Afternoon all,

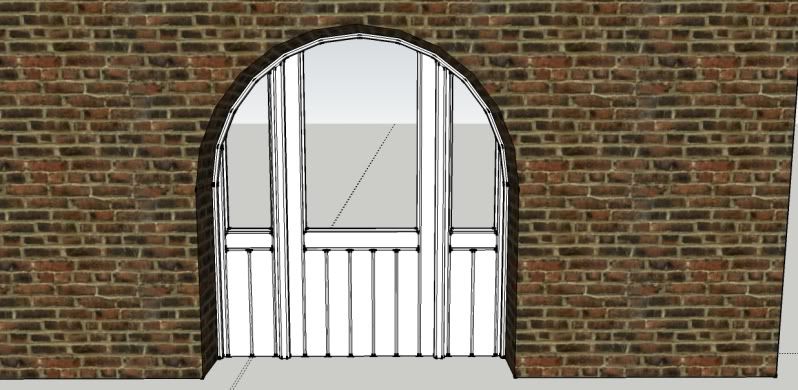
Ive been playing around with sketchup quite a bit lately. One thing i havent managed to learn is how to pull a component up to fit against another seperate component. For instance ive got a curved frame with a rebate in,im looking to put a centre upright in but cant figure out how to stop it from going through the component thats already there
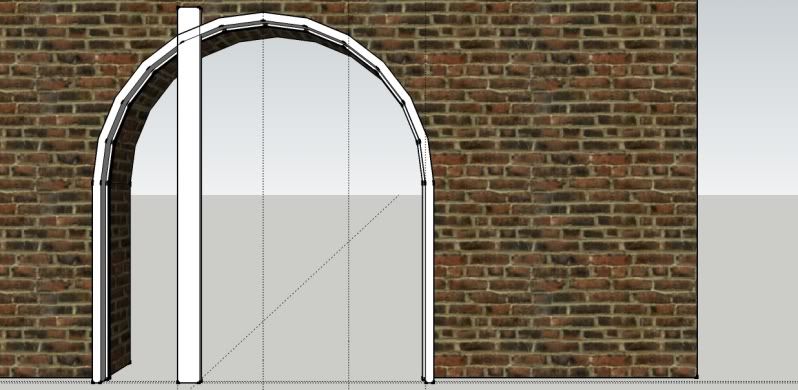
d1aa2462.jpg


This is ott, but you get the idea. Im just wondering if theres a way to make one component solid so it wont let anything else go through it. I dont need any detail like mortices or anything but would be nice to see it drawn properly. My mate came in with this bright idea and asked if i could draw it out to scale. Telling him my sketchup skills wouldnt stretch to this, he then proceeded to bribe me by cooking the best omlette ive ever had #-o

Somehow i now strangely owe him :lol:

Many thanks

Simon
 
I think you may well be making a mistake. If you can't do what you want (and I think you may not be able to) then think of another way to achieve the same final result.

I'm sorry that I can't help more as I don't understand what you are trying to do. If you are trying to get the upright to sit against the frame then you need to make sure you grab it by the correct point and use reference locking to place it against the frame.

This is way too difficult to explain in words. You need to watch some of the many videos and video podcasts. They explain far better than I, or anyone, can in words
 
Simon, this is really not a difficult thing and despite 'sometimewoodowrker's' comments you are not making a mistake and it is indeed possible todo what you want. You just need to do take a few extra steps.


SketchUp won't stop the Push/Pull operation when the face hits another component. After you extrude the vertical piece up through the arch component, select the faces of the vertical piece, right click on them and choose Intersect Faces>With Model. This will create lines on the vertical piece to divide its faces. You can then delete the waste side of the lines. Think of the intersection as creating the cut lines and Eraser as throwing the waste away.

You will end up with cut lines representing the intersection of the top or outside face of the arch as well as on the inside. If the vertical piece is to go through the arch, delete the lower intersection lines with the Eraser. If, on the other hand, the vertical piece is to go up to the inside face and stop, you'll need to delete the edges that end up inside the arch. Either way, temporarily hide the arch component.

If you need to cut a notch in the edge of the arch, open the arch component for editing, trace the edges of the vertical piece using the line tool. You only need to draw the lines on the edge of the arch. Then use Push/Pull to push in the face between those two lines to create the notch.

I would suggest that you turn off the endpoints in your style for modeling. It'll be a lot easier to work that way.
 
sometimewoodworker":iovd2vh9 said:
I think you may well be making a mistake. If you can't do what you want (and I think you may not be able to) then think of another way to achieve the same final result.

Thanks for your thoughts sometimewoodworker :wink: I've looked at so many other softwares out there and now ive stuck with this one im finally getting results. I cant really figure out why google make it free as its such a usefull bit of kit (please keep it free ) :lol:

Dave R":iovd2vh9 said:
After you extrude the vertical piece up through the arch component, select the faces of the vertical piece, right click on them and choose Intersect Faces>With Model. This will create lines on the vertical piece to divide its faces. You can then delete the waste side of the lines. Think of the intersection as creating the cut lines and Eraser as throwing the waste away.

Once again, thanks for your speedy reply DaveR =D> with this new found tip i'll be able to do so much more (hammer)

Dave R":iovd2vh9 said:
I would suggest that you turn off the endpoints in your style for modeling. It'll be a lot easier to work that way.
I have no doubt you're correct.................... but what am i actually doing by doing this :duno: I dont really understand what this means/enables me to do.

One more quick question if i may (well 2 really :roll: ) When ive been doing my drawings- lets say a door frame-

i'll draw an upright, make component, copy flip along green etc
then draw a head, make component
then finally draw a cill, make component

What would be the way to um...............compress them all into one big component ? Im thinking i can group them somehow so at the push of a button i could hide them all (so just the doors are seen)

Final question (not really after an in depth answer) Is it possible to photograph a wall to use a sketchup background, then draw a sketchup model to scale- just for that extra wow 8)

Thankyou very very much

Simon
 
One more quick question if i may (well 2 really :roll: ) When ive been doing my drawings- lets say a door frame-

i'll draw an upright, make component, copy flip along green etc
then draw a head, make component
then finally draw a cill, make component

What would be the way to um...............compress them all into one big component ? Im thinking i can group them somehow so at the push of a button i could hide them all (so just the doors are seen)

Simon

The easiest way to do what you want is to create a new layer, using Window/Layers/+ and call it, say 'door frame', and use the Entity Info window to put each of the components for the door frame onto this layer.

You can then use the Window/Layers box to hide/make visible the door frame - or any other components that you put on their own layers.

You can as far as you like with this, and have separate layers for the head, cill, uprights and turn each or all of them 'on' or 'off' as you view your creation.

Regarding the other question - I think you CAN do this, but I've not done it myself, so I'm no help there

Don
 
Don, thats incredible !!!! I didnt even know this was possible. This should make things so much easier to see what im doing- thanks for sharing.

Cheers

Simon
 
Well, Simon, if you were unaware of this aspect of Sketchup, you are perhaps at the stage I was when I found excellent intros to Sketchup on Joe Zey's site: http://www.srww.com/google-sketchup.htm.

His Beginners and Intermediate Sketchup Tutorials are brilliant in my opinion, and actually enabled me to really 'get' Sketchup, whereas I had struggled and given up previously.

If you have the time, the videos are well worth watching, and they can be downloaded (in the background whilst doing something else ?) for later viewing and easy skipping backwards and forwards.

The Primitive, Components and Layers section is particularly pertinent to avoiding funny things happening, and the Cutlist tool is very handy.
 
Simon, endpoints are part of the style setting for the template you've chosen to use. They are intended more as a display thing not for when you are drawing. It's much like the drawing I showed in which I've employed a sketchy line style I've created. Endpoints do have a use for troubleshooting but under normal circumstances you don't want them on. Go to Window>Styles and hit the Edit tab. Choose the little wireframe cube you'll find below the tabs. Untick the box for Endpoints and then click on the thumbnail image for the style in the upper left corner to make that change stick for the model. To make the endpoints not show up again for new models you'll need to do the same thing for a blank drawing and use File>Save as Template.

As to hiding things, Don is correct. Layers are the way to go. Follow a few simple rules and you'll be good to go.
1. Layers only control visibility. They do not separate entities from each other.
2. Always leave Layer 0 as the active layer. That means the radio button must always be at the left of Layer 0.
3. All entities (lines and faces) are created on Layer 0 and will remain on Layer 0.
4. Only components or groups* get layer associations other than Layer 0.

So you'll always draw on Layer 0. You'll make components and then give the layer associations in Entity Info for the components. You really don't need more than that for dealing with layers.

As to your question about grouping a bunch of components, you can do that but my recommendation is that you limit that as much as you can. It can get out of hand very easily and cause you much grief.

By the way, it's Joe Zeh not Zey.

*I only use components and have never in more than seven years of using SketchUp (which I do nearly every day) found a case where a group was more desirable than a component.
 
Thanks for the link Don. I'll have a quick look when i get chance.I find with sketchup unless im forced to learn something new, then i very rarely go out there searching for new things to learn-So while this has been a pain in the backside ive learned so much even by just drawing this simple frame for my mate. I've got to admire his design- its only for a workshop to keep his motorbikes in :tool:

6acbc236.jpg


This is the stage ive got to so far. Ive managed to mould all the rail, boards etc as hes specified. The only thing that haunts me is how im going to draw the top curvy rails. They need to be 120mm wide parallel so im a little unsure of the best way to do it.

Thanks for the explanation Dave. I'll alter the settings to your suggestion. This is becoming a more and more useful programme by the day. Be it working out the length of a stair string, to recently drawing out a angled plate rack for the lunch room, the more i use it the more im realising how useful it it :mrgreen:

Thanks

Simon
 
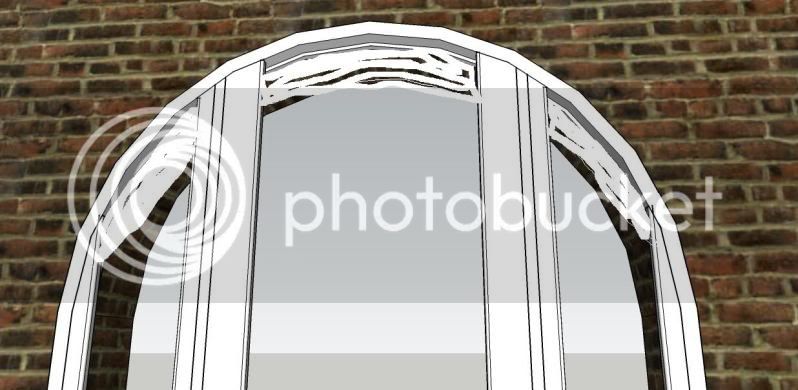
888ec880.jpg


Something like this. Just to tie the door stiles and sidelights together
 
I get it. I would open the current arch component for editing and select the inside arc using Ctrl+C. Then I would close the component and click on Edit>Paste in Place. This will create a matching curving for the outside of these top rails. Use Offset on that pasted arc to create the inner curve of the rails. Then use the line tool to trace along the stiles to join the inner and outer curves. Push/Pull will take care of the thickness. You'll delete the parts of the arcs where they cross the stiles.
 
Final question (not really after an in depth answer) Is it possible to photograph a wall to use a sketchup background, then draw a sketchup model to scale- just for that extra wow 8)

Thankyou very very much

Simon

If you haven't sorted this query already, you may find that this plug-in from Joe Zeh does the trick

http://www.srww.com/blog/?p=63

But you might want to stick to the FREE version :lol:

Don
 
ColeyS1":yfkbbnvs said:
[
Final question (not really after an in depth answer) Is it possible to photograph a wall to use a sketchup background, then draw a sketchup model to scale- just for that extra wow 8)


Simon

Simon, I missed this question before. You don't need any plugins to do this. Depending on how the photograph is made, you'll import the image in one of two ways. One would be to import it as a texture and apply it to a face you've drawn to be the wall. The other option might be to use Match Photo. See this for ideas.
 
Back
Top