Signals From The Bunker

UKworkshop.co.uk

Help Support UKworkshop.co.uk:

This site may earn a commission from merchant affiliate links, including eBay, Amazon, and others.
Okay, the gap between the supports is 21.5" (55 cm)

In that case the 45cm cavity boards are not going to be much use to you. You'll need to compare prices with Screwfix's 60cm pitch roof insulation.
 
Jake":3pdy1vxg said:
Trouble is, I can't find anywhere that sells the 'timber frame' type of board. Travis Perkins, Buttles and other builders merchants seem to concentrate on the cavity wall boards

The difference between the two types being what?

Dunno! lol But they're definitely different numbers. (tw50 vs tw55, I think)

Jake":3pdy1vxg said:
30 mm boards, 1200 * 450 mm, 18 in a pack! 3 packs is enough to do my whole garage!

I was looking at the 45mm. OK, for the 30mm it is not quite 3.5 boards. Seconds (as an illustration because we have the prices) don't do a 30mm. So let's try 35. Screwfix = 16*1.2*.45 = 8.64 sq m for £63.57. You are after three packs, that gives 25.92 m2 for £190.21. 25.92m2 is 9 full boards at £10.08 from Seconds, plus 20 for delivery, plus VAT. Total is £130.

Ah, ok - I get you now - by 2 boards, you mean 2.4 * 1.2 boards...yep. I hadn't seen the seconds price list, and you're right - they are better value. And agree that the 450mm boards wouldn't be appropriate for the frame Gill has - for me, I'll be putting the studwork in myself, so I'll be able to space for the boards. Mind you, having thought about it, if I use the insulating/plasterboard versions of kingspan, then I can avoid the inter-stud insulation and also avoid the ply I was going to face it all with - then the kingspan stuff starts coming out cheaper, even at full list price!
 
I don't think you need a special board to go between studs, perhaps the special one is just pre-cut, like the Sfix version, to the right width? It is very easy to saw this stuff up, so I wouldn't think of that as a consideration.

You'll lose the extra space if you go for the wallboard version, of course, and it will make it harder to hang things off the walls. I'd just go for between the studs, but buy from a builders merchant/seconds, whatever is cheapest and saw it up yourself.
 
Gill,
Have a look in your yellow pages or phone book and see if there is a 'Sheffield Insulations' near you. i bought some 50mm thick x 1200mm x 600mm polystyrene insulation from b&q sold in packs of 4 for £10 but they only had 0ne pack left so i was told to try sheffield and they sold me 40 sheets of similar size and thickness for £40 plus the vat.
I would imagine they do a far better deal than any of the major stores for any kind of insulation, they also have engineers employed that can work out the 'U' rating for a new build property. they would certainly be worth asking for advice on the best product to use in your workshop
it would certainly be worth a try.

Ian
 
I'm quite overwhelmed by the way that you guys are looking after me with such generous and good advice :D ! Thanks ever so much.
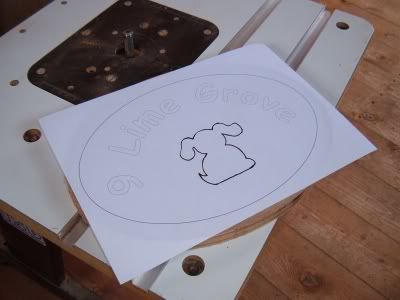
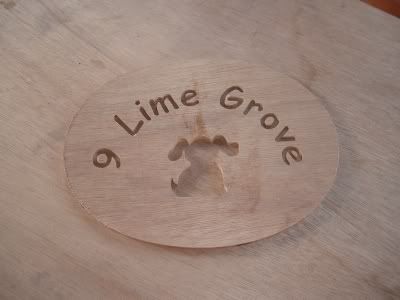
Ian, I've just checked the Sheffield Insulations website and there is a branch a few miles from me in Birmingham. I'll email them and see what they have available.

Gill
 
Polystyrene would probably be a fair compromise for something like a workshop/shed here you are presumably going to be working so keep yourself warmer than sitting around in the dead of night. And as Ian shows, it is cheaper, although that is a truly truly remarkable price. I've never called them because their catalogue prices are goodish, but no better than that. I have missed a trick so far , so thanks Ian!
 
Gill,
something else for you to consider, and others here to comment on, is the application of a reflective roof paint on your workshop roof.

My workshop (14'x8') lays east-west so one half of the apex roof is facing south all day and consequently attracts a lot of sun and heat during the day.
There are both silver and white solar reflective paints available, I could only get the white at the time I did my shed but my garage is covered with the silver. This paint may well increase the life span of the felt as well.

Now obviously the insulation in the roof will help keep the inside cool but solar reflective paint may well help if it gets to hot in the summer.

Andy
 
When we bought our house, the flat roof on the bathroom needed replacing. Our surveyor wrote up a "specification" for the seller to get the work done to (not surprisingly people selling try and get it done on the cheap) and this included getting silver solar reflective paint applied.

Could well be worth considering - as the large black surface of a felted roof really does warm up quite a bit!

Adam
 
Solar reflective paints should always to be used over the top of any bituminous surface which should never be left in its natural state i.e black.

The reason for this being two fold, first of all, left untreated bitumen will degrade under ultra violet light significantly reducing the lifespan of the roof. Secondly, as indicated by their name, solar reflective coatings will reduce the heat build up in the building space beneath the roof in question.

However, in Gill's case no treatment to the workshop roof will be required just yet, as the green mineral felt used as the cap sheet is acting both as a decorative as well as reflective finish.

Cheers

Karl
 
Despite having no electricity or insulation in the new workshop yet, I couldn’t resist butchering some wood in there today. We’ve needed a new address plaque for our house for quite a while, so that was what I turned my hand to. Since I’m a little out of practice, I decided to use some cheap material.

The first step was to screw two pieces of 9mm exterior grade plywood together and cut it oversize in an oval shape using the bandsaw.

HS1.jpg


I purchased an oval blank from a craft supplier some time ago, so I took this and screwed it to the plywood that would serve as the rear of the plaque. These prefabricated shapes make great templates for those of us who don’t have oval cutting jigs. Then I removed as much excess plywood as possible using the bandsaw again.

HS2.jpg


The router table had a large profile following bit which trimmed the plywood into identical ovals.

HS3.jpg


Next, the plan was attached to the piece of ply that I had designated as being the face piece with artists contact spray adhesive. The lettering and motif were cut out using the scroll saw.

HS4.jpg


Unfortunately, there was considerable vibration when I first tried to use the scroll saw. This may be due to the fact that the saw was clamped to a workmate, but it might also be attributable to the workshop’s wooden floor. Anyway, I returned the scroll saw to the scullery where I secured it to a bench that is fastened to a brick wall and a concrete floor. That cured the vibration problems! I’ll have to think about how to minimise scroll saw vibration in the new workshop on future projects.

For the first time, I used Flying Dutchman reverse-tooth blades. These did seem to give a better finish on the plywood than I normally get but there was a price to pay; the reverse tooth definitely lifted the workpiece on the up stroke. I don’t have a hold-down on my saw so I had to apply more weight than I normally would when cutting. I soon adapted to this peculiarity but found the blade very tricky to use when I was cutting small details such as the inserts for the letters and numbers.

HS5.jpg


Tomorrow I’ll round over the edge on the plaque rim, sand it, then start painting it.

Gill
 
Crumbs, Gill, I don't know how you do it. I just know I'd have wandered over the line a few million times. :roll: Looking forward to the finished article. :D

Gill":2r1b7ww4 said:
These prefabricated shapes make great templates for those of us who don’t have oval cutting jigs.
Cunning, very cunning.

Cheers, Alf
 
Gill,
It's great to see you back in action! The plaque looks good as it stands, I'm sure it will look absolutely terrific when you have finished.

PS - low tech anti-vibration solution - sandbags
 
Been interested in reading this thread as I too am just starting to build new shed/workshop.

Gill, don't know if you have lined the wall yet?
Had you thought about using sterling board/particle board?
When I last looked B&Q had this at about £9 per 8x4 sheet (10mm thick). Whilst a bit dearer than p/.board it is much stronger and would allow you to fix things directly to wall much easier.
It is what I have decided to use for the internal walls of my new w'shop.
(If anyone is interested, outside is going to be shiplap, and then 4x2 studs in between with insulation of some sort (prob. cheap f'glass) filling the gap (and a vapour barrier under the shiplap to stop damp)).
 
Hi Amilford

No, I haven't lined the workshop yet. The workshop has taken a bit of a back seat lately because of problems getting the electrics installed. I had been relying on one of my other half's colleagues to do this, but he's made it clear that he doesn't want to do the job :(. So we've been ringing round local electricians, only to find that they all have answerphones and only one has returned our calls. He looked over the job and gave us a quote of more than £1,000. I checked his prices against the Screwfix catalogue and found he would be charging us more than 3 times their price for each of the components he used!

My other half mentioned this to another of his work mates and learned that he has two nephews who are electricians and would probably be interested in the job. So we're waiting to see what happens next. Once the electrics are installed, then we'll look at insulating and cladding the workshop. I like the sound of using sterling board (especially from an economic point of view :) ) so I'll probably give it a bash. Thanks for the suggestion.

It's probably a good thing that I didn't insulate and clad the walls immediately after construction because there was water ingress on the end gable wall when we had heavy rain last week. I telephoned Tudors and they sent someone round to fix it promptly. The leak had arisen where two panels had been butt joined. Normally, these panels would have been one piece but access to our garden is so restricted that the panel had to be constructed as separate pieces in order to fit through our garden gate. Tudors have sealed the leak and fastened a piece of timber over the top of the join to cap it; let's hope that does the trick.

Unfortunately, I don't think I'll have much time for woodwork over the next couple of weeks due to other commitments :(. Not that things have been going well in any case. I sanded the blotchy varnish off the house sign I've been working on (the embarrassing photograph is elsewhere on a different thread) only to start respraying and find the paint ran out. As a result, such paint as came out has spattered the work and needs sanding off again. So I hiked into town to our local 'shed' (Focus) only to find that they don't stock white gloss aerosol paint suitable for external uses. What sort of DIY shop is that :x ?

However, on the positive side I had a good time with a girl friend who came to stay the weekend. There was a Fleetwood Mac tribute band playing locally that she likes (Rumours of Fleetwood Mac) so we had a night out. It was great going for a spin in her new open top BMW roadster - it felt like we were travelling at about 40 mph at one stage but when I looked at the speedo she was actually doing the ton. Then she changed up into 4th gear. Wow - that was fun :) 8) ! Anyway, she had a look at some of my woodwork and reckons I'm good enough to turn professional. We had a long chat about our futures (I'm helping her plan a business project) and she reckons she has contacts that could give me an 'in' into the corporate world. We'll have to see what happens, but in the meantime it's nice to dream.

Gill
 
This little fella actually represents the first project I've ever made with proper wood, as opposed to MDF, ply, veneer and suchlike.

Elephant1b.jpg


He's about 9 cm tall and made from mahogany and lime. All pieces were cut on a scrollsaw, rounded on a Dremel router station, sanded, then glued in position before applying a satin varnish. Working with proper timber is far less forgiving than MDF, as I soon learned; bits of my elephant broke off when I started rounding the edges with the Dremel. I believe I had too aggressive a setting, so next time I'll do the job in several passes.

Still, despite the piece not being perfect, I'm happy with the result and I've learned something for the future.

Gill
 
Gill, it looks excellent. Well done! Will this be the beginning of many pieces in real wood?
 
Gill,

He's a great little chap. I am sure you will enjoy working with more woods and exploiting the colour and grain variations you can find in various timbers - as you will obviously know from your veneering experience.
 
One small elephant to us, but one jumbo woodworking step for you... :wink: Cute, Gill; I like it. The lime tusks work really well. :D More!

Cheers, Alf
 
Back
Top