


Derek Cohen (Perth Oz)
Established Member
Side Sharpening and The Sharp Skate Honing Guide
by Derek Cohen
The Sharp Skate is a recent addition to the range of blade honing guides on the market. Designed by Harrelson Stanley, it is different in concept to anything else I have seen to date. There is no doubt that in discussing its pros and cons it is capable of polarizing woodworkers. It will raise a number of questions for those who are curious about how blades are best sharpened. It is definitely better suited to a certain type of hand tool user than another and, consequently, woodworkers will need to ask of themselves “who am I and what do I want from the Sharp Skate?” Lastly, regular users of other types of honing guides are likely to experience an initial frustration with the Sharp Skate. This is not a criticism but a part of the journey.
If this all sounds rather intriguing, then read on …
The Sharp Skate
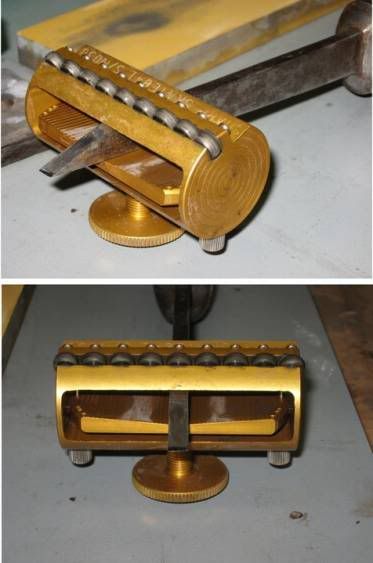
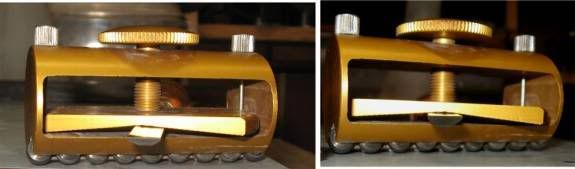
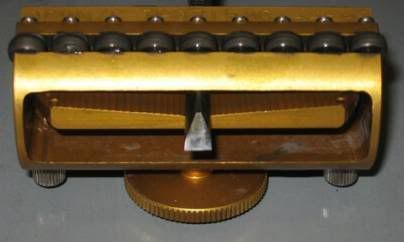
The Sharp Skate is built from anodized aluminium. It has a large screw head that adjusts the blade hold down. The underside has 9 small wheels along which the Sharp Skate runs. Unlike traditional honing guides that move fore-and-aft, the Sharp Skate moves side-to-side.
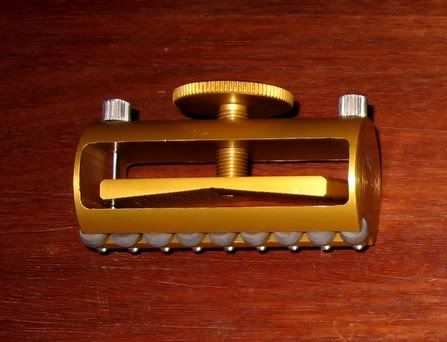
Another original solution is the way a blade is secured, either in square or skew mode. A frequent complaint of many guides is how a blade may slip out of a setting. Here, the underside of the hold down is both angled and ridged. The angle allows pressure to be placed across an uneven blade back, while the ridges create a multitude of fences against which the blade is aligned.
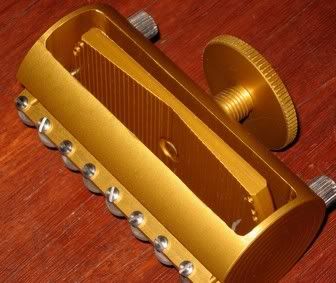
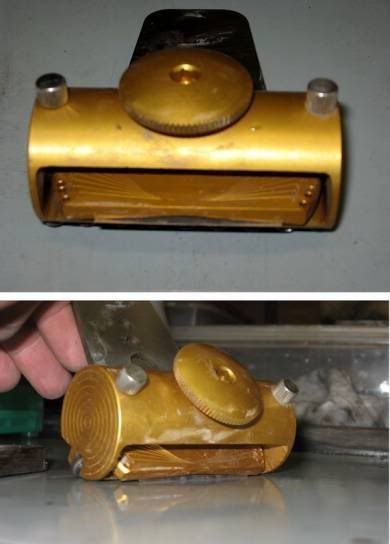
At each side of the guide is a thin steel rod. When removed the hold down is able to pivot, and specific angles may be selected to sharpen skew bevels faces. There are preset settings for 20 through 45 degrees.

Origins of the Sharp Skate Design
Before demonstrating how the Sharp Skate is set up and used, it is important to understand where the concept originated. Let me introduce you to Side Sharpening …
Side Sharpening
I am sure that I am not alone in having used side sharpening as a technique for many years. No doubt like others before me, I “discovered” this technique when faced with honing small and narrow blades, such as those for a side rabbet plane, which were too small to fit a guide or too small to hold comfortably and securely to freehand back-and-forth.
The small blades of a Stanley #79 Side Rabbet Plane
I discovered that moving it sideways rather than front-and-back enabled greater registration area and kept the blade edge from rounding over. Hey Presto – Side Sharpening!
The first time I have seen this method documented was when I came across a DVD by Harrelson Stanley.
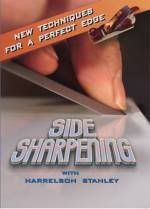
I ordered the DVD, viewed it several times, and practiced side sharpening ala Harrelson Stanley before attempting to use the Sharp Skate. The essence of the method may be summarized as follows:
· The right hand (for a right-handed individual) is used to support the blade. Do so by holding it by the fingertips. “Take the power out of your right hand”.
· The left hand is used to sharpen. Used it like a saw… “as if the left hand is going to saw the stone into ribbons…trying to keep the hand rigid from tips of the fingers to the elbow”.
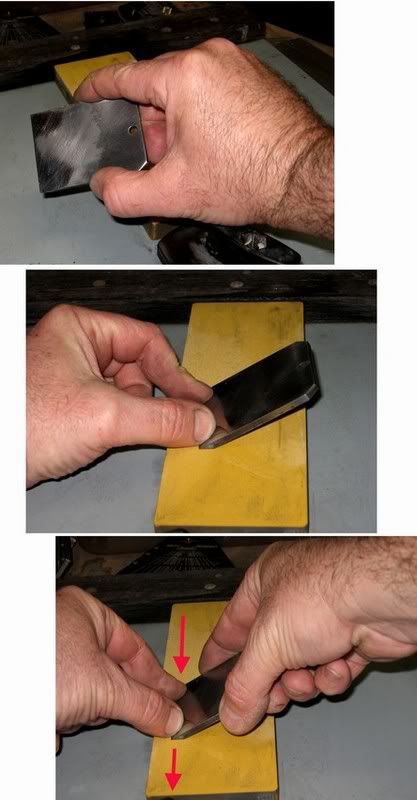
I noticed that my natural inclination is to tuck the remaining fingers of my right hand under the blade. This served to take more of the weight off the left hand, which is doing all the work – pressing down the bevel face and sliding it back-and-forth.
The advantage of this freehand method is the greater degree of face support. Compare this to the traditional front-back method where the bevel face will want to roll.
· Rock the blade until it is flat on the surface.
· Use short strokes to the end of the stone to maintain registration (the temptation is to immediately take long strokes, ala a traditional guide.
The other argument for preferring the side sharpening method involves the removal of the burr that is raised when honing the bevel face. Harrelson views the burr as too fragile to remove with a front-to-back motion as this is likely to cause it to break off with a jagged edge. By polishing it off sideways for the length of the stone, the burr is encouraged to shear off cleanly. It is recommended that this take place between each stone and not only at the end.
What effect does Side Sharpening have on the bevel edge?
The question is whether striations parallel to an edge will weaken the edge compared to those that run front-to-back? Basically, how do the two methods compare?
I raised this issue with Brent Beach who, armed with his microscope, set out to obtain the necessary evidence. It is relevant to note that Brent arrived at the following conclusion using a sandpaper system and with his own honing guide, a design different from the Skate Sharp:
· Using a Stanley plane blade, the difference in edge durability with the two methods was very similar, with insignificant differences present.
From Brent’s research I am happy to conclude that both methods produced equivalent results in regard to durability of edge.
Impressions of Harrelson’s method
The DVD is well worth viewing. As expected the information Harrelson presents is more than just holding a blade and moving it sideways across a waterstone. Harrelson also provides insightful advice about using a waterstone and dealing with the burr created by the sharpening process.
Harrelson recommends working the blade along the inside face of the ‘stone, as opposed to down the center. This will wear a minute camber rather than a hollow. The reasoning here is that the blade is more easily kept flat this way.
Harrelson also recommends removing the burr on the final polishing stone after each successive stone (rather than only doing so at the end). I found that this does provide a better ability to keep track of where the edge is being honed.
He also extols the importance of maintaining flat stones, which he does after each blade. This, and the large amount of water he used, was a surprise since I was doing less of each with the same Shaptons. In following his advice I found that previous “sticktion” (stickiness) was now almost completely absent.
The bottom line about freehand side sharpening, compared to freehand front-and-back sharpening, is that it really makes the task so much easier – greater control, and a flatter bevel face.
What I will point out is that “side sharpening” is not fully side sharpening but really also diagonal sharpening. I suspect that this is one of the reasons for my flat bevel; faces – moving sideways only is likely to lead to some rounding, but less that the rounding with front-and-back since the latter has less registration. Moving the bevel face diagonally enables a flattening effect to take place. Now the question is, can one do the same with the Sharp Skate?
Assessing the Sharp Skate
The Sharp Skate was used to hone a variety of blades. These ranged in width from 1/16” to 2 ¼”, in shape from parallel plane irons to tapered chisel blades, and straight as well as skews.
Here are a few of the many:
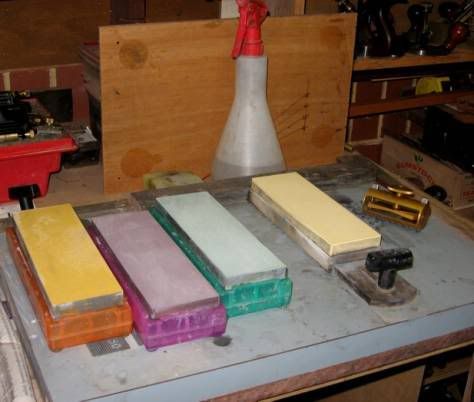
The media used was a set of Shapton waterstones comprising 1000/5000/8000/12000 grit. These were maintained with a 10” DMT Extra Coarse diamond stone.
Setting up the Skate Sharp
Slide the blade in and tighten the blade until just snug. “Snug” means that the blade is still capable of being moved fore-and-aft, but not sideways.
Make sure that the blade is centered and against one of the guide walls.
Raise the blade until it makes contact with the flat surface, and slide it down until the wheels are touching.
Once this is done, you can tighten it all up. Finger pressure is enough. The YouTube video shows Harrelson using a Hex key, but this is unnecessary.

The hold down has sufficient adjustment to secure tapered blades as well. Here it is holding securely a ¼” Oval Bolstered Mortice Chisel, which is a stern test for any system.
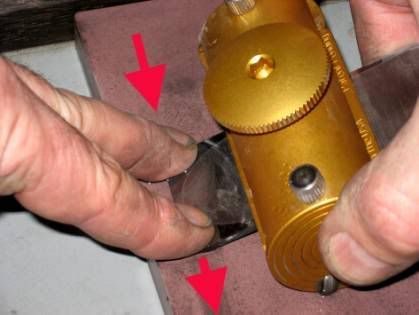
A word of warning. The Side Skate is no less vulnerable than other honing guides to blades being skewed to one side. With some guides too much pressure (down force) to one side of the blade will skew it in that direction. In the case of the Side Skate, unless the blade is centered, the hold down angle will do the same thing. This is illustrated in the picture below:
Once centered, the Sharp Skate is capable of securely holding very narrow blades, down to a 1/16” chisel I tried. Here it is holding a ¼” dovetail chisel …
Setting up a narrow chisel blade is very fiddly. While these may be held quite securely, getting them square is a delicate job, that ends up being redone a few times, and requires several lagers to maintain one’s emotional equilibrium!
Wider plane blades are reasonably easy to set up. I suspect that the ease of securing a blade in the Sharp Skate is proportional to one’s experience in freehand honing. It is necessary to have a feel for placing the blade flat on the surface. This requires rocking it slightly back-and-forth until it is just right. This process is a familiar one for anyone used to freehand sharpening a blade, whether front-to-back or side-to-side. These users will show greater tolerance.
Users of other makes of honing guides, such as the Veritas Honing Guide Mk II or the Eclipse, will no doubt experience this process as extremely frustrating as they are used to installing the blade and clamping it down with minimal fuss. What would make the effort worthwhile?
In my opinion, the Skate Sharp is a honing guide for the would-be freehander. It might also be considered to be “Training Wheels”. As I shall demonstrate, it does a good job of honing, but it relies a great deal on the attitude of the freehander, this being an acceptance that precision is less important that a sense of being hands-on.
There is more, and it is important to clarify these points.
Perhaps this section could have been titles, “What the Sharp Skate Is Not”. Those who seek to hone specific bevel angles, such as possible on the Veritas guides, will be disappointed with the Sharp Skate. It does not have a built in protractor. As noted above, one sets the blade by placing it flat on the surface. For most blades, a few degrees here-or-there are irrelevant. What is at first glance a “weakness” is, in fact, a possible strength for sharpeners with a freehand mentality. For those who believe that they cannot live without a bevel of a specific angle, then the Sharp Skate may be a disappointment.
Of course, it is possible to adapt any guide to hone specific angles. It took but a short while to do so on the Sharp Skate as well. All that is required is to determine the blade extension needed for different angles. Taking the distance from the front edge of the hold down, the following projections were noted:
Blade Angle........................mm projection
20......................................19.5
25......................................17.5
30......................................16.5
35.......................................9.5
Setting the blade projection
I also use bevel up planes, such as the Veritas BU Smoother (see earlier). While bevel angles are less important with bevel down planes, they are critical with the bevel up type since the included angle is the sum of the bed and the bevel angles. For the most part, my BU smoothers require a bevel angle of 50 degrees (for an included angle of 62 degrees). This was possible to achieve on the Sharp Skate, but really it was impractical. The image below will demonstrate that the amount of blade projection was minimal. This made honing difficult and it was not possible to remove the burr between stones.
Gripping the Sharp Skate
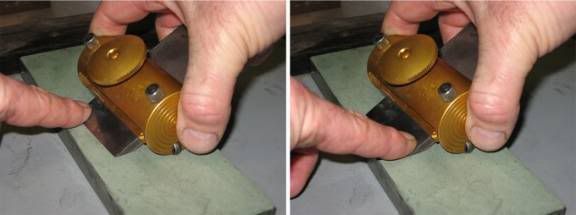
The way one will hold the Sharp Skate is an extension of the way one holds a blade for side sharpening.
As before, the right hand supports the blade – and guide – while the left hand guides the bevel across the stone.
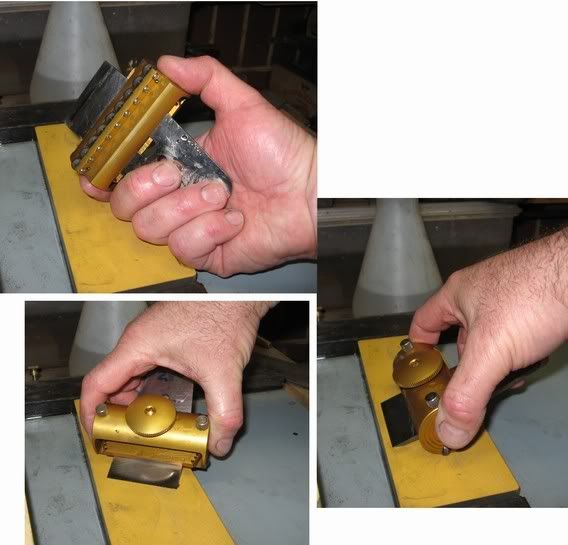
Above is the right hand placement.
Below is the left hand steering the blade across the stone.
Using the Skate Sharp
In my communication with Harrelson, he had this to say:
“I am also finding that it helps to take the pressure off the wheels when sharpening. When I first started sharpening with the SS I was putting maybe equal pressure on the wheels and blade. Now I'm at about 80% pressure on the blade and 20% on the wheels. I'm developing a lighter touch and learning to lift into the outside corners of the blade to make a camber. The more I use it the more I learn. It really is a lot like free hand sharpening and that was my goal in the design.”
My experience paralleled this. When I first began using the guide I approached it as if it were just another guide. The fiddliness of setting it up was irritating, and I found it uncomfortable to hold. It finally dawned on me that I was holding and using it incorrectly. Using the right hand to hold and move the guide forced me to tighten my grip on the blade, and the edges of the steel cut into my fingers. Letting go and transferring the power to the left hand loosened up the process and made it feel more natural.
The Sharp Skate moves smoothly across the waterstone. This is probably aided by the hardness of the Shapton. I did not try it on a softer stone, such as my Kings. It is very directional – and herein lies an issue. It is not possible to move the guide diagonally.
It is best not to use long strokes at first. Avoid the temptation to shoot the blade across the stone. “Short pushes”, as Harrelson refers to them, that is, short strokes will maximize control and minimize the possibility of rocking the blade.
As you can see in the picture below, the whole stone can be used….

Using the whole stone.
Below is a honed straight bevel.
…. And here is the result paring Paulownia end grain. A clean slice on this soft timber is only possible with the sharpest of blades.
Cambering a bevel
So much for straight bevels. What about cambered bevels?
Cambering a bevel is easy enough. It is the identical procedure as used when side sharpening.
Begin by creating a straight bevel, then camber one corner by placing finger pressure on this area, then repeat at the other end.
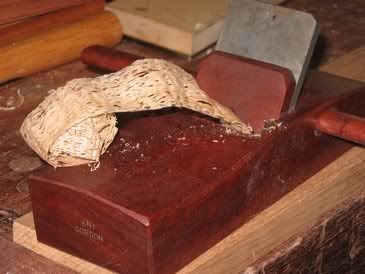
Here is a picture of the HNT Gordon producing a nice cambered full width shaving:
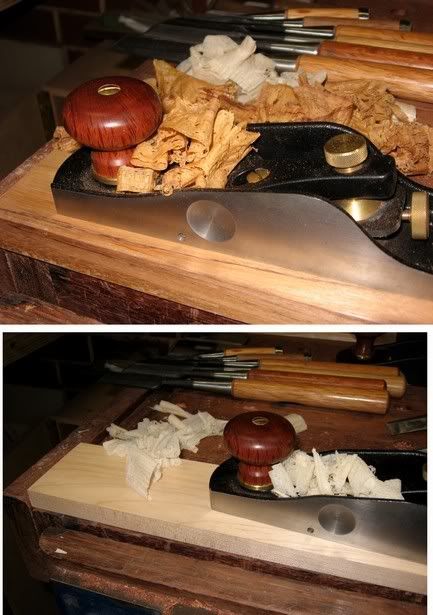
A few more plane shavings ….
The perception of value-for-money
It must be said, the Sharp Skate is expensive. At $150 USD, it is considerably more expensive that the basic Veritas Honing Guide Mk II at $55. Even when one adds in extras, such as the skew jig and the camber roller, the Veritas is only $100 USD.
Here is the Veritas complete with accessories (skew jig, camber roller, and protractor):
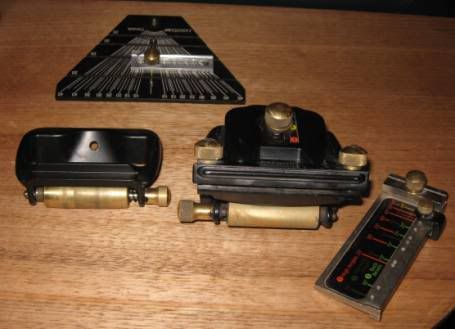
The problem is that the Sharp Skate is made in small qualities and this increases the cost of manufacture.
Summing up ….
The Sharp Skate presents with a unique set of features. This is not the honing guide for those that demand absolute precision in honing bevel angles. While it certainly will hone precisely square or cambered bevels, the Sharp Skate is closer to the experience of freehand freedom than locked in accuracy. In practice, with the method outlined, it is able to lock in specific bevel angles as well, but it was not designed to do this.
By-and-large, Harrelson’s concept works. The guide is rather more directional than I would prefer, but it does make the process of side sharpening easy. The guide, itself, is acceptably easy to set up as long as you maintain the mind set of a freehand sharpener. Users of more traditional front-and-back guides will experience the Sharp Skate as frustrating, and likely misunderstand the rationale behind its design.
If a prospective buyer were to go on price alone, the Sharp Skate may well struggle to sell as the perception of value-for-money is relatively low. Clearly this is not why a purchase will be made. It will be made by one who is seeking a guide to enable the method of side sharpening.
Derek Cohen
Perth, Australia
October 2007
by Derek Cohen
The Sharp Skate is a recent addition to the range of blade honing guides on the market. Designed by Harrelson Stanley, it is different in concept to anything else I have seen to date. There is no doubt that in discussing its pros and cons it is capable of polarizing woodworkers. It will raise a number of questions for those who are curious about how blades are best sharpened. It is definitely better suited to a certain type of hand tool user than another and, consequently, woodworkers will need to ask of themselves “who am I and what do I want from the Sharp Skate?” Lastly, regular users of other types of honing guides are likely to experience an initial frustration with the Sharp Skate. This is not a criticism but a part of the journey.
If this all sounds rather intriguing, then read on …
The Sharp Skate
The Sharp Skate is built from anodized aluminium. It has a large screw head that adjusts the blade hold down. The underside has 9 small wheels along which the Sharp Skate runs. Unlike traditional honing guides that move fore-and-aft, the Sharp Skate moves side-to-side.
Another original solution is the way a blade is secured, either in square or skew mode. A frequent complaint of many guides is how a blade may slip out of a setting. Here, the underside of the hold down is both angled and ridged. The angle allows pressure to be placed across an uneven blade back, while the ridges create a multitude of fences against which the blade is aligned.
At each side of the guide is a thin steel rod. When removed the hold down is able to pivot, and specific angles may be selected to sharpen skew bevels faces. There are preset settings for 20 through 45 degrees.
Origins of the Sharp Skate Design
Before demonstrating how the Sharp Skate is set up and used, it is important to understand where the concept originated. Let me introduce you to Side Sharpening …
Side Sharpening
I am sure that I am not alone in having used side sharpening as a technique for many years. No doubt like others before me, I “discovered” this technique when faced with honing small and narrow blades, such as those for a side rabbet plane, which were too small to fit a guide or too small to hold comfortably and securely to freehand back-and-forth.
The small blades of a Stanley #79 Side Rabbet Plane
I discovered that moving it sideways rather than front-and-back enabled greater registration area and kept the blade edge from rounding over. Hey Presto – Side Sharpening!
The first time I have seen this method documented was when I came across a DVD by Harrelson Stanley.
I ordered the DVD, viewed it several times, and practiced side sharpening ala Harrelson Stanley before attempting to use the Sharp Skate. The essence of the method may be summarized as follows:
· The right hand (for a right-handed individual) is used to support the blade. Do so by holding it by the fingertips. “Take the power out of your right hand”.
· The left hand is used to sharpen. Used it like a saw… “as if the left hand is going to saw the stone into ribbons…trying to keep the hand rigid from tips of the fingers to the elbow”.
I noticed that my natural inclination is to tuck the remaining fingers of my right hand under the blade. This served to take more of the weight off the left hand, which is doing all the work – pressing down the bevel face and sliding it back-and-forth.
The advantage of this freehand method is the greater degree of face support. Compare this to the traditional front-back method where the bevel face will want to roll.
· Rock the blade until it is flat on the surface.
· Use short strokes to the end of the stone to maintain registration (the temptation is to immediately take long strokes, ala a traditional guide.
The other argument for preferring the side sharpening method involves the removal of the burr that is raised when honing the bevel face. Harrelson views the burr as too fragile to remove with a front-to-back motion as this is likely to cause it to break off with a jagged edge. By polishing it off sideways for the length of the stone, the burr is encouraged to shear off cleanly. It is recommended that this take place between each stone and not only at the end.
What effect does Side Sharpening have on the bevel edge?
The question is whether striations parallel to an edge will weaken the edge compared to those that run front-to-back? Basically, how do the two methods compare?
I raised this issue with Brent Beach who, armed with his microscope, set out to obtain the necessary evidence. It is relevant to note that Brent arrived at the following conclusion using a sandpaper system and with his own honing guide, a design different from the Skate Sharp:
· Using a Stanley plane blade, the difference in edge durability with the two methods was very similar, with insignificant differences present.
From Brent’s research I am happy to conclude that both methods produced equivalent results in regard to durability of edge.
Impressions of Harrelson’s method
The DVD is well worth viewing. As expected the information Harrelson presents is more than just holding a blade and moving it sideways across a waterstone. Harrelson also provides insightful advice about using a waterstone and dealing with the burr created by the sharpening process.
Harrelson recommends working the blade along the inside face of the ‘stone, as opposed to down the center. This will wear a minute camber rather than a hollow. The reasoning here is that the blade is more easily kept flat this way.
Harrelson also recommends removing the burr on the final polishing stone after each successive stone (rather than only doing so at the end). I found that this does provide a better ability to keep track of where the edge is being honed.
He also extols the importance of maintaining flat stones, which he does after each blade. This, and the large amount of water he used, was a surprise since I was doing less of each with the same Shaptons. In following his advice I found that previous “sticktion” (stickiness) was now almost completely absent.
The bottom line about freehand side sharpening, compared to freehand front-and-back sharpening, is that it really makes the task so much easier – greater control, and a flatter bevel face.
What I will point out is that “side sharpening” is not fully side sharpening but really also diagonal sharpening. I suspect that this is one of the reasons for my flat bevel; faces – moving sideways only is likely to lead to some rounding, but less that the rounding with front-and-back since the latter has less registration. Moving the bevel face diagonally enables a flattening effect to take place. Now the question is, can one do the same with the Sharp Skate?
Assessing the Sharp Skate
The Sharp Skate was used to hone a variety of blades. These ranged in width from 1/16” to 2 ¼”, in shape from parallel plane irons to tapered chisel blades, and straight as well as skews.
Here are a few of the many:
The media used was a set of Shapton waterstones comprising 1000/5000/8000/12000 grit. These were maintained with a 10” DMT Extra Coarse diamond stone.
Setting up the Skate Sharp
Slide the blade in and tighten the blade until just snug. “Snug” means that the blade is still capable of being moved fore-and-aft, but not sideways.
Make sure that the blade is centered and against one of the guide walls.
Raise the blade until it makes contact with the flat surface, and slide it down until the wheels are touching.
Once this is done, you can tighten it all up. Finger pressure is enough. The YouTube video shows Harrelson using a Hex key, but this is unnecessary.
The hold down has sufficient adjustment to secure tapered blades as well. Here it is holding securely a ¼” Oval Bolstered Mortice Chisel, which is a stern test for any system.
A word of warning. The Side Skate is no less vulnerable than other honing guides to blades being skewed to one side. With some guides too much pressure (down force) to one side of the blade will skew it in that direction. In the case of the Side Skate, unless the blade is centered, the hold down angle will do the same thing. This is illustrated in the picture below:
Once centered, the Sharp Skate is capable of securely holding very narrow blades, down to a 1/16” chisel I tried. Here it is holding a ¼” dovetail chisel …
Setting up a narrow chisel blade is very fiddly. While these may be held quite securely, getting them square is a delicate job, that ends up being redone a few times, and requires several lagers to maintain one’s emotional equilibrium!
Wider plane blades are reasonably easy to set up. I suspect that the ease of securing a blade in the Sharp Skate is proportional to one’s experience in freehand honing. It is necessary to have a feel for placing the blade flat on the surface. This requires rocking it slightly back-and-forth until it is just right. This process is a familiar one for anyone used to freehand sharpening a blade, whether front-to-back or side-to-side. These users will show greater tolerance.
Users of other makes of honing guides, such as the Veritas Honing Guide Mk II or the Eclipse, will no doubt experience this process as extremely frustrating as they are used to installing the blade and clamping it down with minimal fuss. What would make the effort worthwhile?
In my opinion, the Skate Sharp is a honing guide for the would-be freehander. It might also be considered to be “Training Wheels”. As I shall demonstrate, it does a good job of honing, but it relies a great deal on the attitude of the freehander, this being an acceptance that precision is less important that a sense of being hands-on.
There is more, and it is important to clarify these points.
Perhaps this section could have been titles, “What the Sharp Skate Is Not”. Those who seek to hone specific bevel angles, such as possible on the Veritas guides, will be disappointed with the Sharp Skate. It does not have a built in protractor. As noted above, one sets the blade by placing it flat on the surface. For most blades, a few degrees here-or-there are irrelevant. What is at first glance a “weakness” is, in fact, a possible strength for sharpeners with a freehand mentality. For those who believe that they cannot live without a bevel of a specific angle, then the Sharp Skate may be a disappointment.
Of course, it is possible to adapt any guide to hone specific angles. It took but a short while to do so on the Sharp Skate as well. All that is required is to determine the blade extension needed for different angles. Taking the distance from the front edge of the hold down, the following projections were noted:
Blade Angle........................mm projection
20......................................19.5
25......................................17.5
30......................................16.5
35.......................................9.5
Setting the blade projection
I also use bevel up planes, such as the Veritas BU Smoother (see earlier). While bevel angles are less important with bevel down planes, they are critical with the bevel up type since the included angle is the sum of the bed and the bevel angles. For the most part, my BU smoothers require a bevel angle of 50 degrees (for an included angle of 62 degrees). This was possible to achieve on the Sharp Skate, but really it was impractical. The image below will demonstrate that the amount of blade projection was minimal. This made honing difficult and it was not possible to remove the burr between stones.
Gripping the Sharp Skate
The way one will hold the Sharp Skate is an extension of the way one holds a blade for side sharpening.
As before, the right hand supports the blade – and guide – while the left hand guides the bevel across the stone.
Above is the right hand placement.
Below is the left hand steering the blade across the stone.
Using the Skate Sharp
In my communication with Harrelson, he had this to say:
“I am also finding that it helps to take the pressure off the wheels when sharpening. When I first started sharpening with the SS I was putting maybe equal pressure on the wheels and blade. Now I'm at about 80% pressure on the blade and 20% on the wheels. I'm developing a lighter touch and learning to lift into the outside corners of the blade to make a camber. The more I use it the more I learn. It really is a lot like free hand sharpening and that was my goal in the design.”
My experience paralleled this. When I first began using the guide I approached it as if it were just another guide. The fiddliness of setting it up was irritating, and I found it uncomfortable to hold. It finally dawned on me that I was holding and using it incorrectly. Using the right hand to hold and move the guide forced me to tighten my grip on the blade, and the edges of the steel cut into my fingers. Letting go and transferring the power to the left hand loosened up the process and made it feel more natural.
The Sharp Skate moves smoothly across the waterstone. This is probably aided by the hardness of the Shapton. I did not try it on a softer stone, such as my Kings. It is very directional – and herein lies an issue. It is not possible to move the guide diagonally.
It is best not to use long strokes at first. Avoid the temptation to shoot the blade across the stone. “Short pushes”, as Harrelson refers to them, that is, short strokes will maximize control and minimize the possibility of rocking the blade.
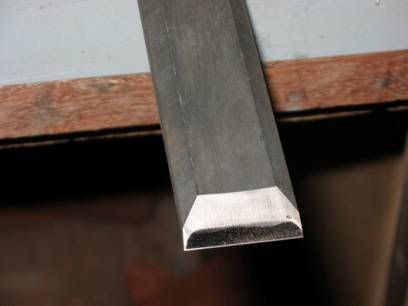
As you can see in the picture below, the whole stone can be used….
Using the whole stone.
Below is a honed straight bevel.
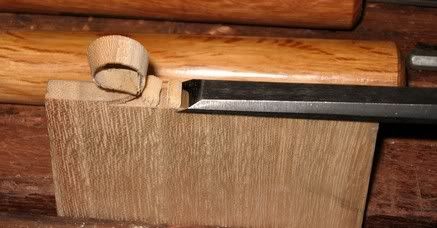
…. And here is the result paring Paulownia end grain. A clean slice on this soft timber is only possible with the sharpest of blades.
Cambering a bevel
So much for straight bevels. What about cambered bevels?
Cambering a bevel is easy enough. It is the identical procedure as used when side sharpening.
Begin by creating a straight bevel, then camber one corner by placing finger pressure on this area, then repeat at the other end.
Here is a picture of the HNT Gordon producing a nice cambered full width shaving:
A few more plane shavings ….
The perception of value-for-money
It must be said, the Sharp Skate is expensive. At $150 USD, it is considerably more expensive that the basic Veritas Honing Guide Mk II at $55. Even when one adds in extras, such as the skew jig and the camber roller, the Veritas is only $100 USD.
Here is the Veritas complete with accessories (skew jig, camber roller, and protractor):
The problem is that the Sharp Skate is made in small qualities and this increases the cost of manufacture.
Summing up ….
The Sharp Skate presents with a unique set of features. This is not the honing guide for those that demand absolute precision in honing bevel angles. While it certainly will hone precisely square or cambered bevels, the Sharp Skate is closer to the experience of freehand freedom than locked in accuracy. In practice, with the method outlined, it is able to lock in specific bevel angles as well, but it was not designed to do this.
By-and-large, Harrelson’s concept works. The guide is rather more directional than I would prefer, but it does make the process of side sharpening easy. The guide, itself, is acceptably easy to set up as long as you maintain the mind set of a freehand sharpener. Users of more traditional front-and-back guides will experience the Sharp Skate as frustrating, and likely misunderstand the rationale behind its design.
If a prospective buyer were to go on price alone, the Sharp Skate may well struggle to sell as the perception of value-for-money is relatively low. Clearly this is not why a purchase will be made. It will be made by one who is seeking a guide to enable the method of side sharpening.
Derek Cohen
Perth, Australia
October 2007