Shooting board question

UKworkshop.co.uk

Help Support UKworkshop.co.uk:

This site may earn a commission from merchant affiliate links, including eBay, Amazon, and others.

builderchad

Established Member
Joined
11 Apr 2006
Messages
85
Reaction score
0
Location
Oxford
I am in the process of making myself a shooting board from two nice and stable pieces of .5" MDF. I will use two pieces of beech as well. One to hold the work piece against (the sticky up bit) and the other as a hook under the shooting board.

I have a lovely book on making tools that also covers making shooting boards and the guy is adamant that the top piece of wood that the workpiece rests on is no thicker than the gap between the plane blade and the plane cheek so the blade does not come into contact with the wood. As such he goes on to say that each shooting board should be made specifically for a particular plane and no other because this gap is different on every plane.

In my evening woodworking class (which is now over so I can't ask my teacher) there was a shooting board whose two main boards were 1/2 inch ply. It worked very well and the plane blade definately overlapped the board that the workpiece rested on and so could potentially cut into it.

So, my question is this - do I ignore this advice and just use the two pieces of 1/2 inch MDF I have?
 
Ah, shooting boards.

AS it happens, I'm just int he process of making a new one for myself, to use with my Veritas planes.

If you search for "Shooting board" by "Alf" you will get an excellent SB primer.

I would say that you are fine using your 1/2" MDF. It really doesn't matter if your blade cuts into it a bit; indeed, I'd say it was essential to do so. Better that than the lateral margin preventing proper action.

Don't forget, with a SB you are better using a square-ground blade than a crowned one. Anyway, good luck.

Cheers
Steve
 
Go with what you've got. Alright you won't have the depth of cut, but with a 2-3/8in cutter you'll still be able to plane about 42mm thick stuff (60 - 15 + 3mm) which is enough. It may take yo a bit longer to get the clearance in the beech upright for the cutter, though

Scrit
 
Thanks for the links, Alf and Deedee's posts have all the info I need. Should have searched in the first place :oops:

For clearance on the beech stop, I guess you mean it will be trimmed away a bit during use? The only other wood that I have that has the right thickness is sapwood and I'm not even sure what type of wood it is. Seems hard but I was doubtlful of using it as a stop that needs to keep the two 90 degree angles. Guess I could always cut a groove in the top board to sink it into...
 
The surface on which the plane runs can be finished with 'Formica'. Its very hard wearing and is very smooth so that the plane runs sweetly on it - all my boards are finished like this - Rob
 
If I'm wrong here I'm sure someone will correct me.

I'm not so sure I would use beech as the stop, this is a very lively wood and absorbs moisture like a sponge. Depending on the environmental conditions in your WS the beech may expand/contract resulting in the squareness changing slightly.
 
From an earlier message I posted about mine...
***************************************

Here's a couple more. The first one I use for shooting veneer when I edge glue.

The second one is for both angles and 90* shooting. It converts by removing the angled portion as seen in the 3rd photo. I have a few different angled "heads" I use for different purposes.


Take care, Mike
 
One other point Builderchad: don't 'over-agonise' on getting your cross piece absolutely spot on at right angles to the face the plane tracks on: people new to shooting boards can worry too much about this point. Get it as close as you can, but be prepared to use paper and card shims between the fence/baseplate and the workpiece to get exactly the angle you want. This technique is rarely mentioned when people talk about shooting boards, but gives complete control over the exact angle achieved: use them both 'under' the stuff being worked to change the vertical angle being planed, and 'behind' it to change the horizontal. Use at the edge nearest the plane to 'open' the angle, at the other side to 'close' it. HTH.
 
I'll look out for Formica, sounds like a great solution for extending the life of the board.

Waka, I hear you about the beech. I didn't realise it was like that and just assumed it was an ideal candidate because its used for plane soles and tools handles. I have other hardwoods but are realitvely thin boards. Which is the best wood for the fence that is readily available?

Great shooting board Mike I will look at making a mitre attachment like yours, very clever and saves having to make up a dedicated board for mitres which I will only need occasionally.

Shady, thanks for the tip, I was agonising last night over the fence being perfectly 90 degrees to the board. I figured this was the only critical angle in the whole construction and was fretting about my Ryobi router not really being dead accurate enough to cut a perfect recess for the fence.

Anyway, off to Woodex now. Who knows I may come back with a nice router and table which will solve all my problems, but SWMBO decided to come along which may put a dampener on the old wallet :lol:
 
don't 'over-agonise' on getting your cross piece absolutely spot on at right angles to the face the plane tracks on........Get it as close as you can, but be prepared to use paper and card shims between the fence/baseplate and the workpiece to get exactly the angle you want.

I sort of agree.

I do not like using shims to square up a fence that could have been square in the first place - I use shims to angle pieces for irregular angles only. However, I do recognise that it can be difficult to get the fence "spot-on" in the first place and, even when you do, it can "move" out of position.

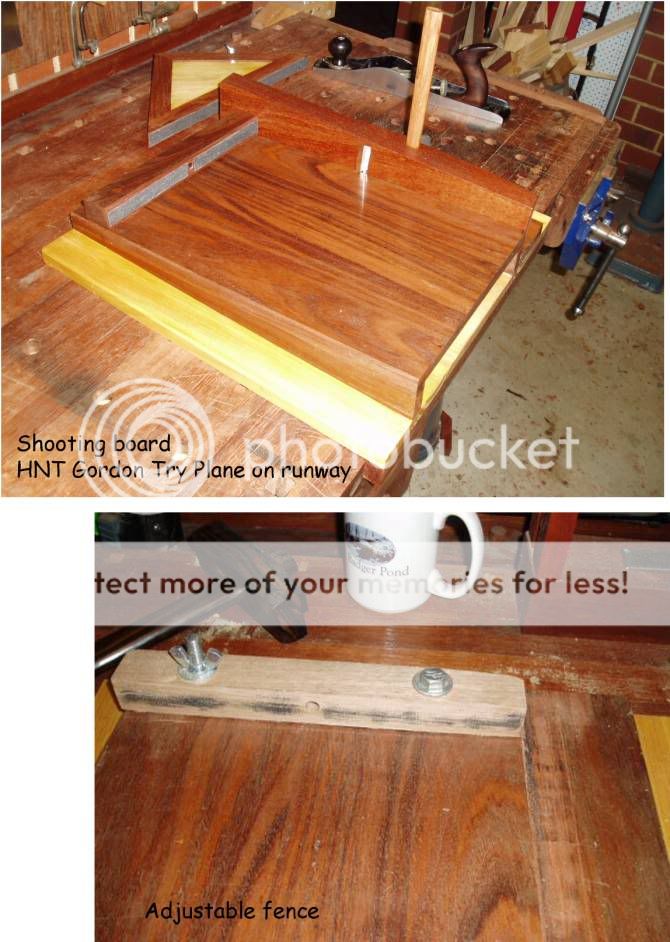
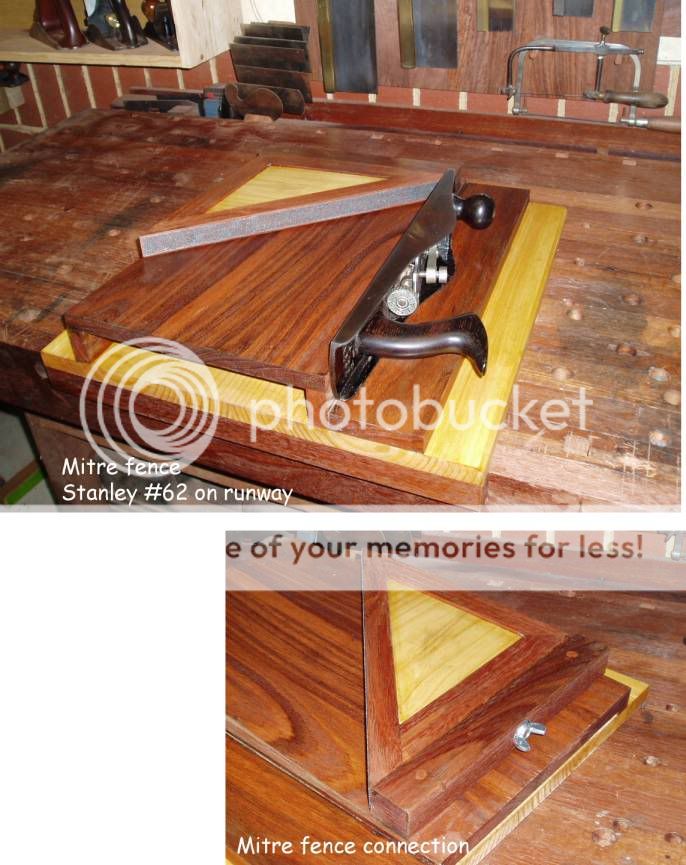
What I did was to add a micro-adjustable fence to my shooting board. This is evident in the second image below. Note that this fence was a later feature, and the pictures below were taken before it was added.

combo1.jpg


You will also note that this shooting board is ramped (by about 5 degrees). This does make it less jaring when cutting end grain, but does not offer much really in the way of a true skew cut. Still, it is a nice feature if you are prepared to go to the trouble. But it does reduce the depth of cut slightly.

The other addition, like Mikes' board, is a add-on mitre fence. Unlike Mikes' which attaches to the board itself, mine attaches to the fence. This allows the mitre fence to also have a degree of micro-adjustabilty (about 5 mm each way).

Combo2.jpg

Regards from Perth

Derek
 
I prefer to have two fences for end grain work. It helps to stop the plane cockling over when using a bench plane (I know it shouldn't if you do it properly, but it can). Based on a Bob Wearing idea.
I find it also helps when planing shoulders with a large shoulder plane, particularly with pairs of small tenons or rebated butt joints. Helps me keep the plane level. In this mode the plane is not resting on the lower board. Probably not the "right" way to do it but it's what I have developed. (pics)
lorryproject%20010.jpg

lorryproject%20009.jpg
 
I sort of agree.

I like your mods Derek - I was just trying to avoid that awful 'spiralling complexity' for Builderchad - when you're new to something like a shooting board, and 'self-educating', it's easy to end up buying an incra-jig just to make the darn thing (well, it isn't - they're too expensive, but you know what I mean...) Better, for a first effort, to just make a plain and simple one as well as you can, and then modify in the light of experience, IMHO (like building a bench - there's always 'just one more tweak' that you find just after making an irreversible design decision/cut...) FWIW, I normally screw one end down, and use a square to align and set the other end, clamp and screw. It's just that I've several times found, when fine fitting mouldings etc, the piece they're fitting to is not always absolutely spot on square, so even if the fence is, shims are still needed - obviously just my poor squaring skills...

Chris - agree with you: Jarviser, unless we're mis-understanding your pics, how does that shoulder plane not gracefully slice it's way ever deeper into your board??? Got me confused there...
 
waterhead37":xn4u132z said:
Using that plane, surely you will cut away the part of the shooting board you need for registration??
I think it's actually balanced on the tenons and cutting the shoulders, not on the board at all. But it's worth pointing out that using any kind of rebate/shoulder plane on a shooting board in the normal way is not advised unless you want to destroy your shooting board.

Peter, how d'you avoid spelching on the nearer rail/stile?

Cheers, Alf
 
Alf,
Yes, looking more closely, I thnk you are right.

BTW re your avatar - have you seen Google Earth lately, it seems to have reduced the detail over most of Cornwall except for a couple of bits.
 
waterhead37":176fdy03 said:
BTW re your avatar - have you seen Google Earth lately, it seems to have reduced the detail over most of Cornwall except for a couple of bits.
I have and it stinks. No longer can I point to a small blurry white square and say "look, that's my workshop roof". :roll: Can't make out anything at all now so pretty pointless bothering at all IMO.

Cheers, Alf
 
Got my shooting board finished.

normal_107-0799_IMG.JPG


Its held together by 6xM6 threaded bars cut to size and bolts. There is a hidden pair of bolts between the hook and the bottom board and the fence is inset into the top board to give it more stability. This is loosley based on the design of the SB at my college and Alf's write-up. No glue cause I will probably want to make adjustments later. I put a tiny chamfer along the business edge of the top board as suggested to collect waste. The fence leans ever so slightly back, probably by a few degrees, so I'm not sure if that will have any adverse effects. Seems to work great so far.

Cheers for all the help!
 
ok silly thought, whats the point of a shooting board if it is only
20 or so inches long???

do we only use it for trimming ends, or do people also use them
for "jointing" as it were???

i can see the value for mitres, but unless you make small items,
then why so short??

paul, being pickie as usual :lol: :lol:
 

Latest posts

Back
Top