Sedgwick pt255 dust extraction hood

UKworkshop.co.uk

Help Support UKworkshop.co.uk:

This site may earn a commission from merchant affiliate links, including eBay, Amazon, and others.

fraser

Established Member
Joined
8 Nov 2010
Messages
243
Reaction score
0
Location
Isle of Wight
Hi I have recently bought one of these machines without a exteaction hood and wondered if anyone has made one and if do how. I did email Sedgwick who quoted me £160 so if one can be made I would prefer that!
Thanks
 
Here's how I made one for a PT I restored

006.jpg


Cheers

Karl
 
Same as the original - wind down the thicknessing table, mount the collection hood underneath the cutterblock, wind up the table to trap the hood in place. Worked well (no longer got the machine).

Cheers

Karl
 
Just another thought Karl, when you say wind the table up so it is trapped-surely it cant be trapped as such as otherwise the sides of the box would hit the cutter block. Do you mean just wind it up so it is close enough to the cutter to grab everything? Or did you make it so it fitted just either side of the cutters and just under the shaft?

Thanks
 
If you look (very closely) at the pic above, you'll see that the ends are slightly taller than the sides. This gave the sides enough clearance so that they didn't hit the cutterblock when the hood was either resting on the surface tables or trapped underneath them.

Cheers

Karl
 
Hi just in case anyone else is in the same situation, I am just completing a rebuild of my own Sedgwick PT255 and was also missing an extractor hood. The route I took was to purchase a standard part from Charnwood (DH250) for £9 + postage and then make up a template of the rest of the hood using cardboard and parcel tape. Note: I think the DH250 part may also be available from other sources as well as Charnwood. I then took these along to my local ducting company who made the whole thing for £30. I was originally just going to buy the sheet from them and make it myself, but when they offered to make it for £30 I jumped at the chance and they made a better job than I would! I then cut up an old chopping board into 4 x 25mm wide strips and pop rivetted 2 of these to the top and 2 to the bottom (you could also use timber for this).
As regard the extractor sizes, using cardboard and pictures from the web along with the DH250 part allowed me to hopefully get fairly close to the £160+ item from Sedgwick for nearly a quarter of the price. Hope this helps anyone.

Top of finished extractor hood
Hood top.jpg


Bottom of finished extractor hood
Hood Bottom.jpg


DH250 part close up
Charnwood DH250.jpg


I screwed the plastic to the sheet metal part rather than pop riveting it as I was concerned it might crack. Tested so far and works really well
 

Attachments

  • Charnwood DH250.jpg
    Charnwood DH250.jpg
    140.3 KB · Views: 298
  • Hood top.jpg
    Hood top.jpg
    148.6 KB · Views: 304
  • Hood Bottom.jpg
    Hood Bottom.jpg
    182 KB · Views: 305
Nigel
Am probably being very thick, but what holds your hood in place when thicknessing? And what are the black circles in the sloping part, visible in one of the pics?( ah, just worked that out - holes!) Lastly, are the plastic strips essential or are they just to protect the tables?

Reason for asking is I've made a very similar thingy out of plywood for my Lurem, which is cramped to the fence when thicknessing and it's a bit of a faff putting it in place. Been trying to design something better, but ingenuity seems a bit limited at the moment :(
 
Hi,
In Karl's post at the beginning of the thread, if you look at the top of his extractor you can see he has slackened the Bridge guard height adjustment off and raised the bridge guard over the top of the extration hood. The fence moved to the back keeps it square and the bridge guard clamps it down onto the table.

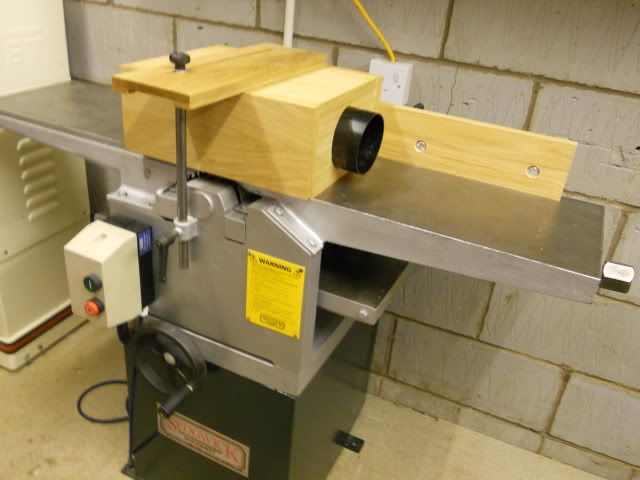
The plastic strips are not essential, I used them for two reasons, they allowed me to make the extractor hood a little wider than the thicknesser bed as the Sedgwick has steel roller supports that run down the side of the bed and it would not have fitted between them until I raised it up on two of these strips. Making it wider gives better clearance to the cutter block when fitted in planing mode. The second reason is exactly as you have said, it helps protect the cast bed with the galvanised steel resting on the cast iron bed.

Good luck with your Lurem, it's not easy coming up with these solutions. Mine was not too bad as i just copied Segwick's concept in photos from the web with a few tweeks (Time will tell if they are actually improvements)!

nigel
 
Thanks, Nigel. Hadn't thought of using the bridge guard; it wouldn't work with my current hood, which only just reaches over the cutterblock (length dictated by the offcuts of ply used - cheapskate!). Must get to making a better one.
One other question - is there any problem with the hood fouling the infeed table when it's pressed up by the thickness table? Or do the plastic strips press on something that is fixed?
 
Yes, the plastic strip at the front buts up against the infeed table adjusting screw housing and at the rear against the the thicknessing fingers. This stops it touching the underside of the cutter block. I would like to say that I thought this through and planned the position of these strips, but I was just lucky that these lined up with these parts! The part of the infeed adjuster mechanism that the hood touches does not move and affect the ability to adjust the infeed table when the hood is in place for surface planing, another piece of luck!

Nigel
 
Back
Top