Re-commissioning old planes, what's worth your time?

UKworkshop.co.uk

Help Support UKworkshop.co.uk:

This site may earn a commission from merchant affiliate links, including eBay, Amazon, and others.
Bm101":2x94t033 said:
If you were looking at wooden planes for the first time maybe as cheaper alternative to a 7/8 jointer plane which you can't really afford would anyone have any advice in what to look for? I realise Im probably opening up a whole new can of worms. I'm asking for a friend lol.

One of the advantages of wooden planes is that, because they're made of wood, the woodworker can correct most of the faults they might have. If the sole is a bit dirty and out of flat, a sharp, fine-set metal plane, a straightedge and a pair of winding sticks (fancy or improvised) will have it clean and flat in about ten minutes. If the blade and wedge fit tightly and the handle is firm and comfortable, and it's reasonably clean, you've about cracked it. A sharpen, fit the cap-iron, and off you go.

Learning to set the depth of cut takes a bit of fiddling, but if you know the basics it's just a matter of settling down to a nice, therapeutic pottering session for an afternoon, and you'll soon get the idea.

One thing to watch out for is a plane on which the iron pokes above the wedge. It indicates that there's plenty of life left in the iron, and it's easier to set if the iron's proud. Beyond that, just look for a nice, crisp-looking plane.

Just get one bought and get stuck in! Woodies are fun!
 
Wow. Thank you guys. (As always). I just bought a couple of bits and pieces so I won't rush too much on this one but any particular names/ makers to look for or avoid? Or just a case of using your common and looking for signs of good care and sensible price?
Thanks again, sorry if I've wandered off track a bit thread wise.
 
Most of my time goes into the blade's back and the fit of the capiron. I like the back of the blade to be flat, usually end up with something like 1" of flatness, and I like the corners not to be dubbed. i also don't like pitting in the back. When the back is flat, mating the capiron to it is much simpler too. This whole procedure can take up to an hour for me, luckilly it only needs to be done once.

Sole flattening is easy. i use a file to drawfile the high spots, check with 80 grit on a thick glassplate and/or a real straight edge. When the mouth, toe and heel of the plane are coplanar, I might do a few swipes on some 240 grit to smooth it out a little. This rarely takes more then 15 minutes, including setting up, and cleaning up. The frog rarely needs attention. Cleanming is with some mineral spirits and a bit of buffing with an oily rag. Sometimes the lateral adjuster rivet needs some tweaking.

All in all I can spend two hours on refurbishing a plane. But it is enjoyable work, as long as it is incidental. I wouldn't want to do this as a dayjob.
 
Thanks for the contributions so far gents.

My idea for this thread was mostly to give tyros a more realistic idea of what steps need to be done to put an old plane back into service, and perhaps help a few who aren't beginners take a step back and reassess their process. Again the theme here is Only What's Necessary,

Anyone new to planes generally, some of the following applies to putting a new non-premium plane into service as well. All such planes require fettling, but how much is the thing to not make assumptions on and blindly go ahead with an hour + of work that doesn't need to be done.

Here's a fairly conventional list of what you need to do with any old metal bench plane you buy:
  • Take the plane completely apart
  • Dust off and degrease
  • Remove all rust
  • Sharpen the iron
  • Fettle the leading edge of the cap iron
  • Fettle all mating surfaces in the castings
  • File the leading edge of the mouth
  • Lap the sole
  • Strip/sand/scrape the handles and refinish
  • Oil and wax as appropriate then put it back together and try it out

Many people who have bought planes in goodish nick will be looking at this list and going "Huh?".

Here's what you might actually need to do:
  • Clean the plane down as you prefer
  • Check the position of the frog and adjust as needed
  • Remove loose rust from the sole
  • Hone the iron
  • Check to see if the cap iron was previously fettled and then if it wasn't work on it if necessary
  • Oil or wax all show surfaces
  • Put the irons back in, adjust for a light cut and test how the plane works

All those missing steps (which represent the bulk of the time and effort) those are optional or conditional, not necessary.

Obviously many of us want our old planes to look nice and will do some or a lot of work to restore the looks, from just spruced up to like-new, but we all know that's additional work. In terms of just getting the plane in working order though, in a lot of cases you can get away with doing the absolute minimum. It's just that most people don't try, they forge ahead through the mental checklist of what 'needs' to be done without stopping to consider if step B or C needs to be done on the plane in front of them.

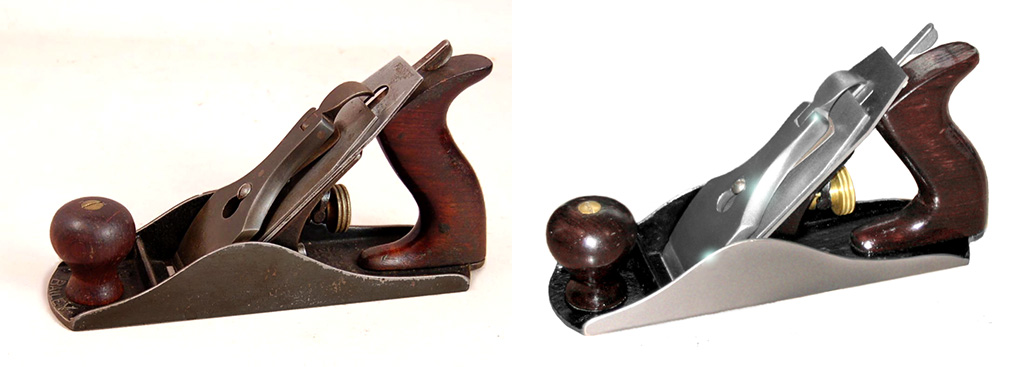
The most alarming omission here for some might be that all rust wasn't removed. Realistically it's nearly impossible to remove every last spec from all the nooks and crannies anyway and the simple fact is all traces of rust do not need to go. Any old tool with dark patina on the iron or steel? That's rust with oil or wax impregnated in it. Similarly the black in pits on tools that were once rusty, there's rust in there too, but it's perfectly stable and won't go deeper or spread as long as you keep up with your oiling or waxing routine. So remove the loose stuff, don't sweat the rest, because there's no reason to suppose the plane on the left won't perform just as well as the one on the right:

lrWBspj.jpg


Now about lapping the sole. We'll address this in more detail later on, but you've probably gained the impression from the specs on some new planes that emphasise how flat they are, ground to tolerances of microns or whatever, and from reading books or forum posts that state a plane needs a dead-flat sole to work as it should. Because these are secondhand planes they had at least one previous owner/user so the #1 reason not to blindly go lapping the sole is they might have been fettled before. The #2 reason is: if they're not dead flat they might still work fine. We should not be collectively assuming that every single plane out there has a sole that isn't flat enough to function well (same story with new cheaper planes). So check function first, then do some lapping if you find it's needed.

As for the iron, I say hone here instead of sharpen because often they don't need a complete resharpen. Most people do, but some of that is wanting to put our own stamp on it so to speak, but in keeping with the theme the sharpness of the edge is all that matters, and because of that a hone might be all that's required. I've seen many an old iron that still had some kind of edge, enough that you could use the plane as it was for rough work on softwoods. Plane irons in that sort of shape just need a quick hone to cut as well as they're capable of cutting.

Now, why if necessary with the cap iron? Surely that leading edge needs to be dead on if shavings aren't to jam undereath? Well sure, if you're working on a smoother. But with most jack planes, fores, and sometimes with a jointer, it won't ever be set very close to the cutting edge so the straight-from-the-factory leading edge of the cap iron (crude those it is) should work just fine.
 
A tale of two planes. I'm picky, I think things should be right or made right, so your results and time will be different. One plane $12 ,thanks to all the Stanley plane studies, was a Made in USA 1949 #4 . The sides weren't square nor was the bottom flat, which I fixed by hand. That was a few hours, I'm also stubborn. After all that work, I added a Vertas blade and chipbreaker, $100 . In the end I thought a new Vertas plane for $200 was quite inexpensive.The other plane a $20 Made In England #06 Record, about 1952 made, took three passes to polish the bottom and a blade sharpening. Not all Records are so sweet, a #05 1/2 had a date with a milling machine to true the frog beds.
 
I may be in the minority of users (not collectors, collectors always prefer original condition), but I like the look of the plane on the left better than the one on the right. If I can, I will always default to leaving uniform color like on the left on a plane, everywhere but the sole (which nobody will see, anyway).
 
I'd prefer whichever of them worked better - and there's nothing wrong with taking a bit of pride in your tools, if you want to.
 
Cheshirechappie":2p1w2btt said:
I'd prefer whichever of them worked better - and there's nothing wrong with taking a bit of pride in your tools, if you want to.

+1. Also I think sometimes a nicely cleaned up plane can just feel nicer to use. Not necessarily always but sometimes.
 
Guess what I've been doing today. :roll:

http://imgur.com/a/4yFGh

It's a 19 as far as I can tell using HyperKitten So '48-'62.
Did the drill trick for the tote. I'm now going to get some nitromors to do the rest of my planes handles..... That varnish was thick! :shock:
The last photo is with the 3 I got recently, that's the finish I'm aiming for, a happy medium maybe.

I have a question about the cap iron if anyone could oblige? Are the later ones 'coated' if you get what I mean? There's a couple of spots where it looks like the top layer has flaked away. Is it possible to bring it back to a smooth finish (like the number 3 in the last pic)? Or is it doomed to stay like that? I don't mind a dull finish on it as long as it's regular. If it's best to leave well alone, so be it.

Cheers
Chris
 
Cheshirechappie":2ug2gl5r said:
I'd prefer whichever of them worked better - and there's nothing wrong with taking a bit of pride in your tools, if you want to.

I can't imagine what there would be about the one on the left to not be proud of. Especially since the one on the right will rust at the first chance it has at most air.

Broken tote on the right side one notwithstanding.

Brownells sells products to recreate the look on the left - I'd hate to remove it.
 
bugbear":3b4yh3mh said:
Bm101":3b4yh3mh said:
Guess what I've been doing today. :roll:

http://imgur.com/a/4yFGh

It's a 19 as far as I can tell using HyperKitten So '48-'62.

The dating guide only applies to the American produced versions.

BugBear

Ah, ok. Thanks for that. Is there a way to try and date this one? I know it's not old but it would be nice to know.
 
The plane on the left looks like an honest tool,the other one looks like one of those Hollywood stars thats had a bit of "work" done.Your tools and your choice.
 
Bm101":1pu0tqcf said:
bugbear":1pu0tqcf said:
Bm101":1pu0tqcf said:
Guess what I've been doing today. :roll:

http://imgur.com/a/4yFGh

It's a 19 as far as I can tell using HyperKitten So '48-'62.

The dating guide only applies to the American produced versions.

BugBear

Ah, ok. Thanks for that. Is there a way to try and date this one? I know it's not old but it would be nice to know.

A picture of the frog would help although I have a pretty good idea what it will look like. Seems to be a '60's/70's plane to my eyes. The smaller plane (No.4 ?) may well be earlier, like 50's and earlier.
 
worn thumbs":3vdrmau8 said:
The plane on the left looks like an honest tool,the other one looks like one of those Hollywood stars thats had a bit of "work" done.Your tools and your choice.

It does but they don't stay looking that way for long. Couple of years of honest work and it will have that tired look again.
 
Bm101":kt07l112 said:
bugbear":kt07l112 said:
Bm101":kt07l112 said:
Guess what I've been doing today. :roll:

http://imgur.com/a/4yFGh

It's a 19 as far as I can tell using HyperKitten So '48-'62.

The dating guide only applies to the American produced versions.

BugBear

Ah, ok. Thanks for that. Is there a way to try and date this one? I know it's not old but it would be nice to know.
As bugbear says, the dating guides only apply to American Stanleys (possibly including Canadian Stanleys). UK Stanleys started about WW2 with clones of the USA type 16 (they bought out JA Chapman in Dec. 1936, and started producing planes shortly thereafter).

I agree with MIGNAL - probably 1960s or 70s - from the few pictures so far.

Cheers, Vann.
 
Canadian Stanleys stamped the build month and year on the blade. They used the "sweethart" on the blades all through the '30s. I even have #3 with 1 47 on it but no "sweethart". And as usual, they were better made.
 
D_W":ww1ez34t said:
I may be in the minority of users (not collectors, collectors always prefer original condition), but I like the look of the plane on the left better than the one on the right.
Broadly I agree. I do like a complete overhaul as well though, there is something about an old tool being brought back to like-new condition that appeals. I may be slightly biased by my interest in Japanese swords where original condition are dirty words :lol:

I have just, as of yesterday, gotten the chance to put what I posted above to the test as I got my first antique Stanley at the local car boot. It's not in pretty shape, although obviously with just a good clean it'll look a lot better. In fact I imagine it will look a lot like the one on the left. I won't get to the work soon but my plan is to do exactly what I've said and no more and then test it out. I've sighted down the sole but other than that I'm not going to check it for flatness, and consequently I won't remove the rust there by lapping.
 
Bm101":22uzint6 said:
Did the drill trick for the tote.
Front knob?

Bm101":22uzint6 said:
I'm now going to get some nitromors to do the rest of my planes handles..... That varnish was thick! :shock:
Man isn't it?

Old varnish like this is very brittle (part of the reason it's crazed and chipping off) and as a result I think you'd be very pleased with the results from scraping rather than sanding to remove it. I've taken every last flake of varnish off a hammer handle, a couple of brass-wire brushes I use as file cards and most recently an old chisel handle by scraping. Even when the varnish is not failing scraping can be very effective, and I find the varnish coming off in long pale shavings very therapeutic, certainly preferable to covering myself with white dust.

Bm101":22uzint6 said:
I have a question about the cap iron if anyone could oblige? Are the later ones 'coated' if you get what I mean? Is it possible to bring it back to a smooth finish (like the number 3 in the last pic)? Or is it doomed to stay like that? I don't mind a dull finish on it as long as it's regular.
Presume you mean the lever cap? These were commonly plated in nickel. Once plating has started to go there's no easy solution to getting a uniform appearance unfortunately.

Reminder: don't be tempted to lap the sole! A sole not needing to be completely flat is more and more applicable the longer the plane gets.
 
Back
Top