Planing knots

UKworkshop.co.uk

Help Support UKworkshop.co.uk:

This site may earn a commission from merchant affiliate links, including eBay, Amazon, and others.
Familiarity with the process will breed a less tight setting rather than more. When I wrote the original article, I tried to suggest that people never:
* try to measure the setting (check the shaving at the heaviest you'll use with a given set)
* create a jig that sets something at a certain setting

I've not seen a bunched up shaving in several years. 5? I don't know. I may have intentionally bunched one up in a video. Bunched up shavings lead to scarred surfaces.

98% of the time (or more) I use a setting that looks right to my eye for general work. Putting numbers to the setting is something that creates the idea that this is more precise than it is - it's by eye, or that you will have to take a plane apart and set the cap iron at different places (it is extremely uncommon for me to reset a plane without it being due to sharpening).

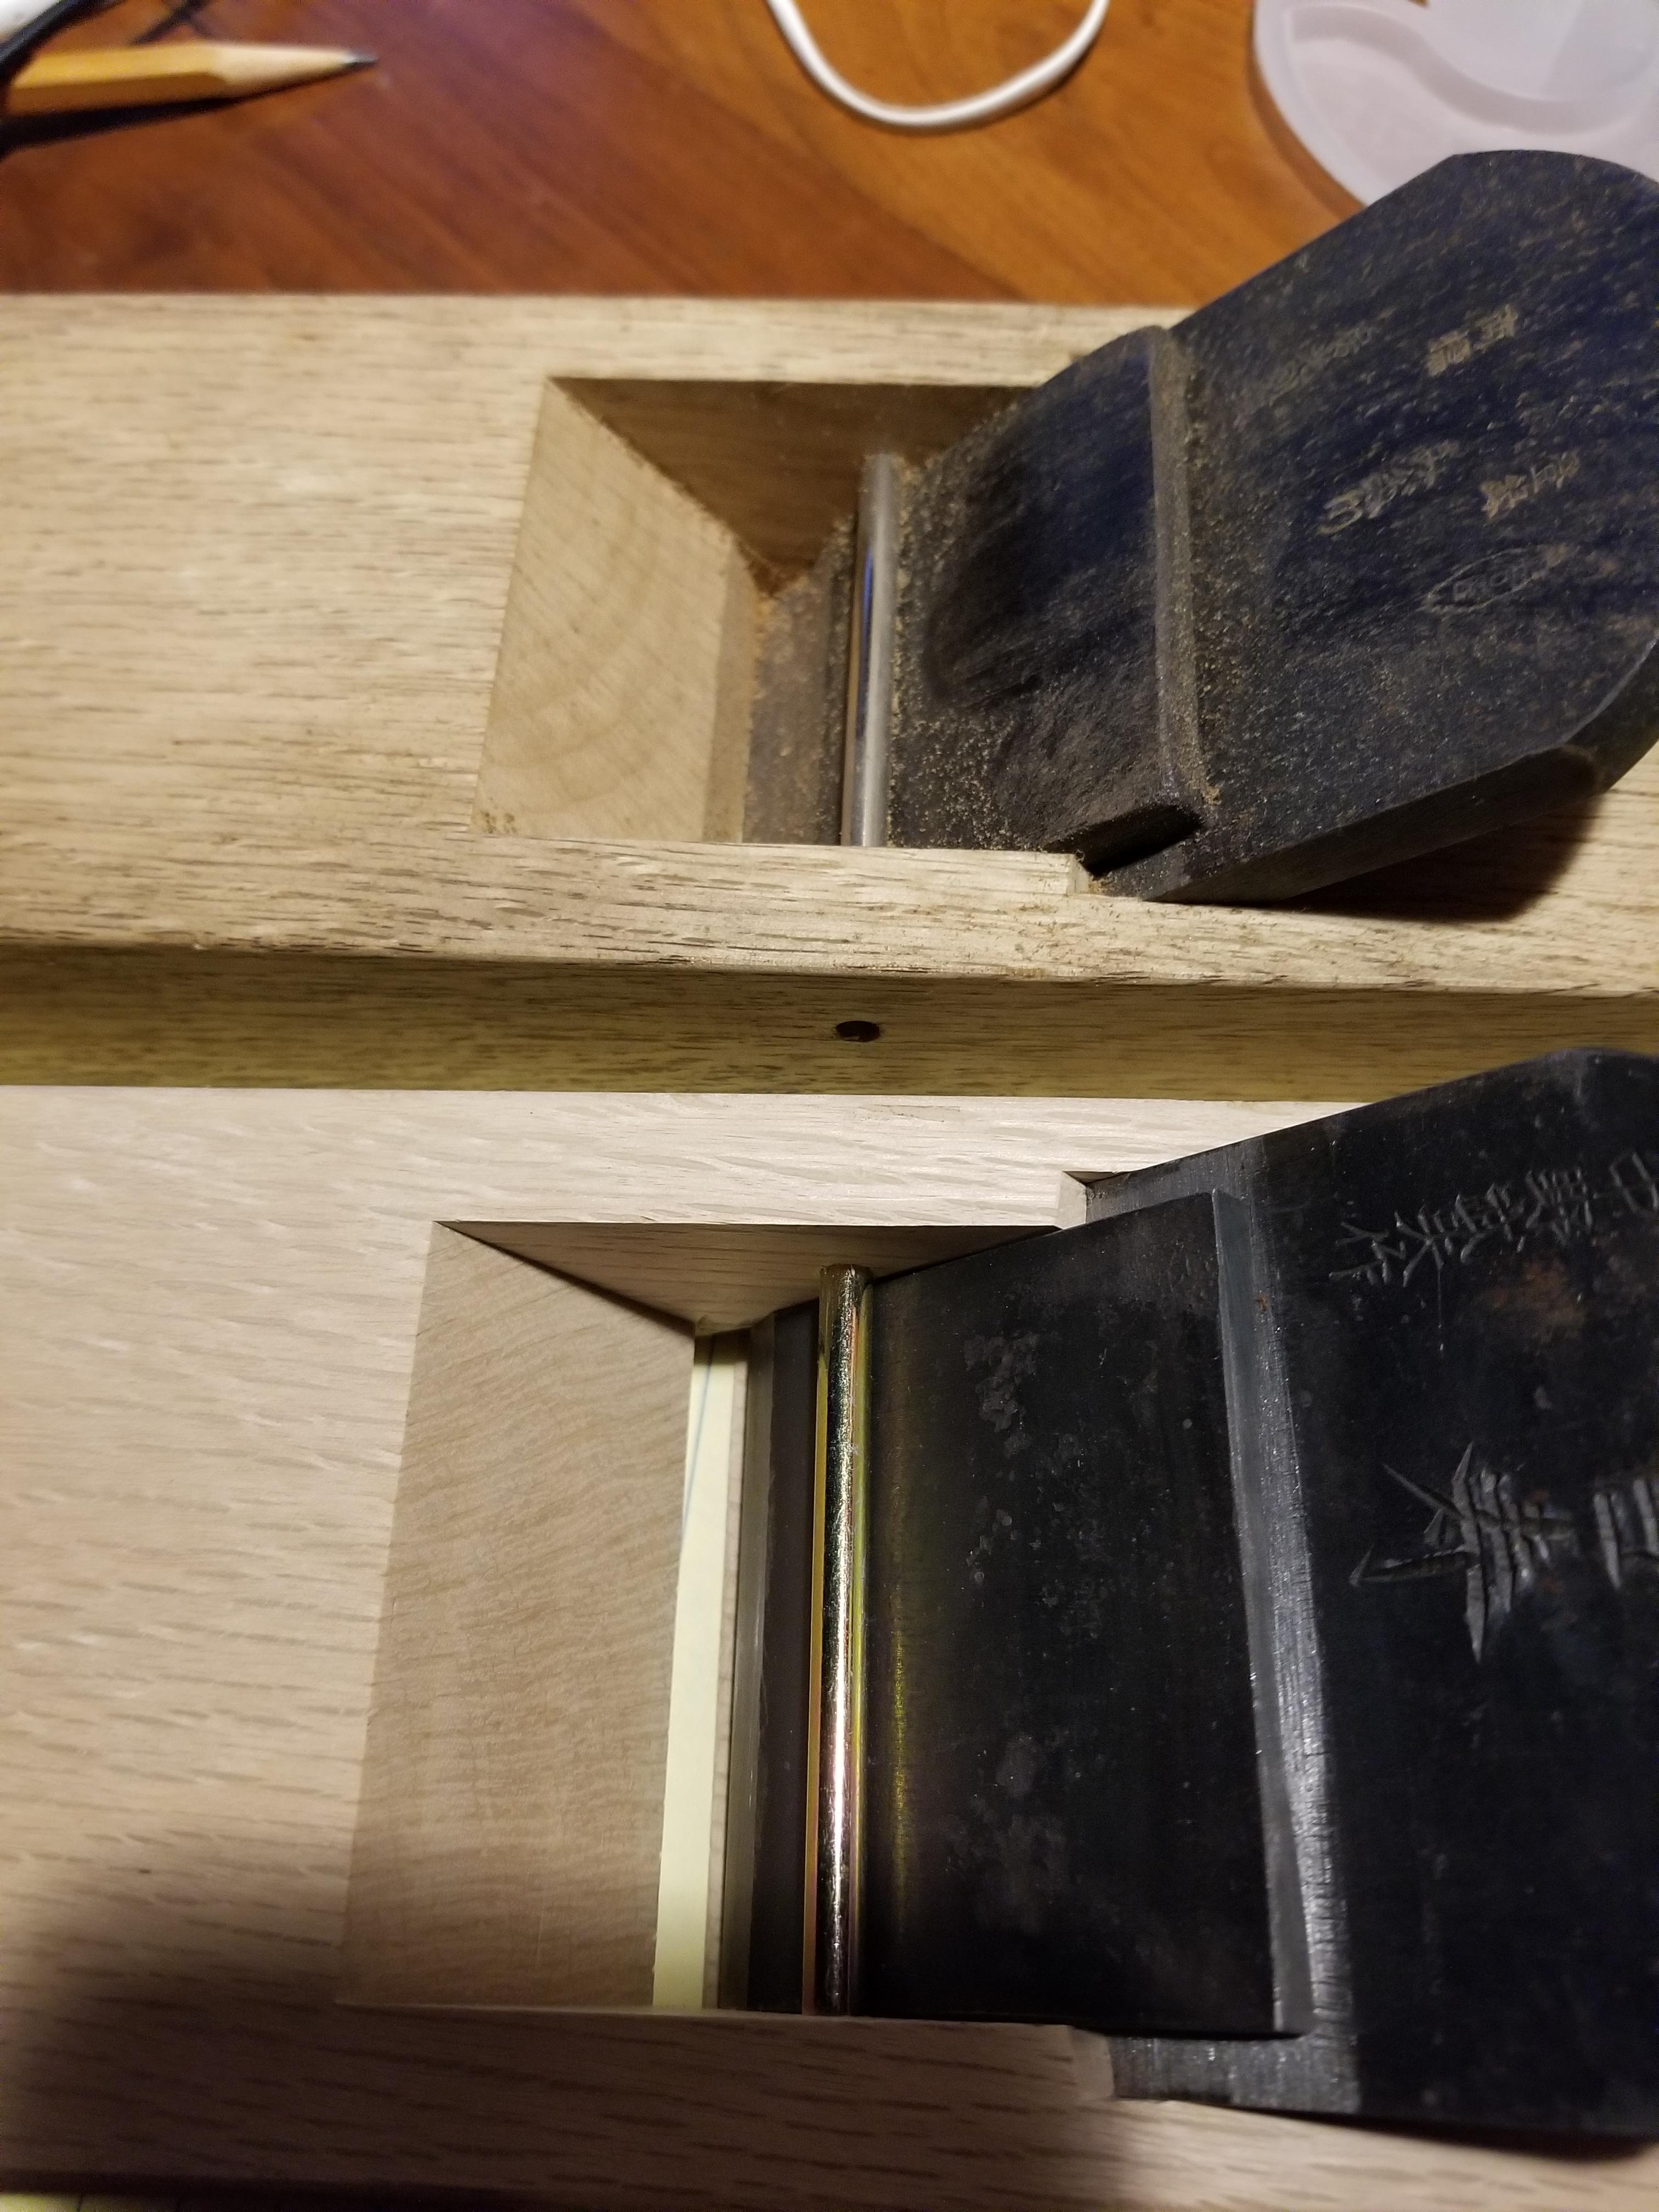
19 times out of 20 (guessing), if wood is difficult, it'll just be a little bit more hairy after the straight shaving set and you may need to make a couple of extra passes with a thin shaving to get a final surface. Setting the cap super close (like a couple of - 2 - thousandths) generally isn't helpful, chances mashing shavings under the cap iron, and is a faff.

The objective of the cap set is to hold a thicker shaving down. The objective of the follow up shavings is to plane wood thin enough that it can't lift in the first place. Keeping the cap set rather than using a single iron plane at that point is a good idea only because it prevents accidentally taking a thin shaving and spoiling a surface.
 
How are you Mike?

I've had plenty of concertina'd shavings in the past. If I set the cap iron as described by Richard Maguire for difficult wood I very rarely have a problem, even against the grain.

Nigel.
 
Nigel Burden":297h9jq9 said:
How are you Mike? ........

A bit rough today, thanks. Starting to cough. My eyeballs hurt like hell. My neighbours have got to hear the news and are starting to leave presents outside the front door. Some eggs have just arrived. Some homemade jam earlier.....
 
Mike Jordan":fyietlhk said:
This material was used for joists and rafters because it was, and still is, of poor quality. The hard glassy knots are an inescapable part of carcassing timber, you can't produce quality joinery or furniture with rubbish!
You might get away with recycling it as joist or rafters or even firewood , if you are capable of producing decent work don't waste time and effort on this, the resulting job will be worthless. To enjoy the work you must spend on unsorted grade pine, that's the best available at a decent timber merchants and not at the sheds. It's easier to work and the results are infinitely better.

I've got quite a lot, and the quality is variable, some lengths don't yield much, but I've got enough to be able to pick through it and select relatively knot free sections for visible face parts. There's still inevitably some knots on the other faces though.

It looks lovely when planed up, a rich deep colour quite unlike any pine I've ever bought. As for species - I think it's some sort of pine, I've never seen spruce this colour.

I've made the decision to attempt this project, and do it all by hand, just out of bloody mindedness really, and to see if I can do it. I'm spending a lot longer on stock preparation than joinery, but I want to be able to say I tried! Plus, resawing 12" purlins into 10mm thick pieces for my floating panels is good exercise!
 
you will build skill doing this that you wouldn't otherwise get a chance to build.

IF you're handsawing, too, you will build neurons and joinery will magically seem easier (controlling a saw, brain to hand). It's a strange thing the way doing a bunch of coarse work by hand makes you better at fine work. This was loosely the subject of a study some time ago - measuring neuron development in certain parts of the body, and it's widely known now that you'll build neural density in your hands and other parts of your body if you use them regularly. It's like being an athlete without having to be an athlete!!

The case that I showed a picture of is my first case using a load of #1 common cherry lumber. It costs 40% of FAS here in the states, but I've learned enough from it that if I'm going to make something nice on all faces (I do most of my dimensioning by hand, also) that I will spend the amount necessary for good lumber.
 
Best wishes for a speedy recovery and mild sickness, Mike. And full functionality through the whole thing.
 
I have a number of 130+ year-old purlins that came out of my roof when we had the loft done a few years ago. As far as I can tell, they are likely to be baltic pine (Scotts pine, Pinus sylvestris). Some of the timber is lovely, other bits are full of knots and a century worth of mortar dust and other lovely grime. All of it is slow grown with tight growth rings.
I recently used a couple of pieces of formerly discarded off cuts to make a coffee table. These pieces were full of knots and planing them was a nightmare, regardless of how often I sharpened or how I set the cap iron. The knots were rock-hard* and I had to resort to chiseling them out to get the top vaguely flat. As I was aiming for a rather rustic look, it was manageable. Just, and only with quite a of sanding at the end.

*this is not surprising as they are crystalised rosin, so quite different to the surrounding timber.
 
There are inexpensive asian high speed steel blades that would advertise that they have better toughness in things that aren't wood.

But I did a plane iron test several months ago and among them was one of these (it was approximately M2 steel and very hard). One of my test pieces was hard maple with some silica pockets, and the high speed steel iron fared no better in it. Everything that I used required immediate resharpening. In the very worst of wood, sometimes it's faster to plane some, tolerate the damage and *bend* the iron back in place quickly with the nicks still in it and get on with it a little bit before you do a full sharpening. It's crude, but in my testing, I noticed that when such damage occurred, quite often, the edge didn't completely break (even in 65 hardness chinese HSS), but rather it bent (and you could feel what seemed like a wire edge). Most of that can be bent back into place and brisk work carried on. To fully grind and hone out those nicks if you're planing over and over is arduous - and, of course, the situation isn't great to begin with.

There is a fellow near me who has a beach 3 drum sander. It's got about 20 electric horsepower combined, perhaps a little bit more, and can thickness wood like a planer. In order to get past the dust and filth on the surface, paying someone to use something like that may be in order. A friend and I thicknessed 8 large panels at this guy's shop (4 feet long, just shy of 2 feet wide) and his total charge was $38 for the both of us. It was a slightly different case (extremely unstable figured wood that I couldn't plane efficiently at the time, and the friend's giant stationary planer just tore it up). We should've had our heads examined for picking the "interesting" (high priced junk) timber in the first place.
 
Mike
I wouldn't say that Richard's video is not worth watching, its just that there are those who mightn't
be bothered to actually watch the video, so I suggested watching David's for more clarity
on the matter.
If you can get the cap iron as close as 1/32" then it will work well for about 80% of the time,

Richards cap iron looks to be further away from that in the video thumbnail (screenshot).
I've found it will cause tearout if further away than that, I really mean to say no more than 1/32".
A ruler is nice to have as some seem to think 1/32 " is pretty much 1mm.

If you still are experiencing tearout or too much resistance from those knots, (more on this underneath)
then have another plane or iron with a cambered profile so you can get the cap set at half that
distance for elimination of tearout.
Yes the cap set at 1/64" will be dependant on shaving thickness compared to 1/32"
There is much variability in planing timbers at the 1/32" setting , and its the wood that will dictate the thickness shaving you can take.
I go straight to the no.5 1/2 for everything now, it rarely isin't at the right setting, I have an auld no.4 for when that happens.

To clarify on what I was referring to above in relation to working knots and such
Take as much as you dare off, back off the cutter that will now be dull, as David mentioned.
You now can plane those knots with little dulling of your 1/64" setting because the shaving has little resistance and wont be as hard on the iron.

The camber that is as even as you can get it is what takes the practice, not in setting the cap iron.
The plane will only half work if you don't get this right.
It won't tear out at least, but it won't be nice to use.
It hasen't been uncommon for me to say to myself it'll be perfect after the next hone.
I think I'm getting closer to the stage of actually being able to do this in a reasonable time,
A reasonable time is not quick for me compared to David unless I get lucky, but compared to not using the cap iron, its super speedy even if I was having a bad day sharpening.

Its not worth bothering to assemble the plane if the profile is not right, too much camber will do if laminating boards together though.
Along with a bundle of other methods, I have tried to emulate the way David hones with little success, copying that technique for the whole sharpening duration.
I have been recently swapping hands to get the camber even with good success at last.
The way I have found works for me to get an even camber is trailing the right hand side of the iron
on the left of the stone, and swapping to my lesser hand to trail the edge on the left on the right of the hone.
I have a very fine diamond hone for finishing and make sure I get rid of that burr whilst I'm profiling the camber, as it is obtrusive to the eye.
I finish up the profile the way David does as there will be a spear point to get rid of
that won't work so well , that's no bother to do though.
Its getting the camber even that is the only challenge and this ensures this.


Tom
 
That's really quite impressive DW. I wouldn't even attempt that. I would also say that wood looks really nice! much more interesting than boring straight grained stuff people seem to like to use.

Out of interest, what difference would you say the mouth opening makes? or rather how important it is in these cases?
 
I don't believe I insulted Richard in the recent thread titled...
Camber vs Rounded Corners (plane blades)
all I said when I replied to the link you embedded in the thread was saying ...
"I suggest a look at Davids videos for anyone who wants more clarity on the subject"

In fairness though, I understand that you wouldn't get a good photo of the cap set closely in the thumbnail,
its hard to even get a decent full size photo of the double iron set close.
This seems possibly to have mislead some that just skip through these things.
Once you can get to 1/32" you will see the results, and know its worth it to persevere
if your not getting the results you are after.
As I said I don't think that will be all too often.

Tom
 
When the cap iron is set properly, the mouth needs to be out of the way if it interferes. On smoothers, it doesn't have a chipbreaking function (except in a single iron plane), but you don't want it to be so wide open that you can catch a plane on the end of a board. I think 1/16th is a nice setting.

As far as effectiveness of a mouth, it adds nothing with the cap set. By itself, it needs to be about double a chip shaving thickness (4 thousandth for a 2 thousandth shaving). When we have planes (I am a planemaker on the side, and the numbers I'm providing here, I've made in planes) like an infill panel plane with a mouth 1 hundredth large, the tearout will be less severe, but it can still be significant. The plane will also smooth less well and be harder to push (planing consistent small tearout is far more work). Using the cap iron isn't just a matter of tearout reduction, but also a normalizing of everything (shaving quality/feeding, amount of wood planed off of a board surface so that you can plane from end to end and overlapping from one side to the other and not take the board gradually out of flat, and of course, smoothness to the user). A tight mouth just cannot perform in a very wide range of things, and it doesn't do anything really great.

My second infill smoother had a mouth of 4 thousandths of an inch. You can't really get in any trouble with it (it's pitched at 55 degrees, too - I really thought I'd made the ultimate smoother when I made it a little more than 10 years ago). The trouble with it is that it pretty much works at one setting 1-2 thousandths. Anything thicker and resistance goes up very quickly. It's like driving a cadillac at 50 miles per hour. If that's what you're looking to do, it works well for hardwoods (but even at that, its tearout control is substandard compared to a common stanley bench plane with the cap set). If productivity is important more than luxury planing ,then it's out. The stanley beats it badly.

This is why vintage infill planes came with a double iron and modern ones come with a single iron (productivity isn't really the aim now).

long story short, once you learn to set the cap iron properly, make sure the mouth doesn't interfere with anything, but leave it close enough that you can't catch a plane on the end of a board.
 
Cool. I shall have a play with setting the cap iron closer as I have terrible trouble with the reverse grain around knots. I tend to use Japanese planes (for reasons) and setting the cap iron is more tricky as you can't really see what you're doing, but I'm sure it just takes practise.
 
transatlantic":3whk5vxj said:
Cool. I shall have a play with setting the cap iron closer as I have terrible trouble with the reverse grain around knots. I tend to use Japanese planes (for reasons) and setting the cap iron is more tricky as you can't really see what you're doing, but I'm sure it just takes practise.

you'll have to find the first set or two by feel - the guys who wrote the original paper and made the cap iron video also put out a small supplement for hand planes. They pretty much said "it's tricky, judge by the shaving". It's tricky for them because it's trickier to find the first setting on a japanese plane.

Here's what I'd advise. Once you find a good setting, scratch a mark on the side of the cap iron with one of those machinists scribers or anything that you can mar the cap with. You'll have a visual to know then when you're getting close. If you're thinning the dai quickly by flattening often (most people won't do this) then, the visual reference will change a little over time and you can redo it if it gets far off.

My experience with japanese planes is that some diaya will give their cap irons room to work, and some won't - the latter probably are making dais in volume and the cap irons may be added later. If you find yourself in that spot and none of your dais work properly, then designate one that you can file/chisel/rasp some of the wear away on the inside of the plane. you don't need to open the mouth, just increase the steepness of the wood above the front of it.

See the top plane in this picture, the "wear" being the wood in front of the iron. If you have issues, you don't need to do something as drastic as this - the more it's opened, the faster the mouth will open with subsequent dai work tuning, but I wanted to have a japanese plane where you could set the iron quickly, set the cap and do relatively heavy work so that the plane designated for final surfacing would have a good surface to work with and not too much to do. The better the wood is with a japanese plane (for final smoothing) the flatter and more visually appealing the final result will be.

zl8vVnf.jpg


On good planes I've had where the dai maker is known and the iron and subblade match, i've often needed to do nothing - and that's preferable visually.
 
I guess thats one of the issues with japanese planes, is that when you adjust the blade (in or out), you also then have to re-adjust the cap iron. I've seen some people that will tap the cap iron once for each time they tap the blade to try and keep them in sync. But as we're talking about such small distances, it's seems like it could easily go out of wack, and worst case, the cap iron get tapped in front of the blade and damage the edge.
 
MikeG.":lgfzf201 said:
One day some bored engineer will invent a screw adjuster for the cap-iron.

Ten pounds to a pinch of wotsit somebody already has. A trawl of 19th century patents would probably bring up several such 'ideas' in the UK, the US and across the continent.

Something that does come pretty damn close is the Record StaySet, much as some dislike them.
 

Latest posts

Back
Top