Piillar Drill Table Design - Bit of advice?

UKworkshop.co.uk

Help Support UKworkshop.co.uk:

This site may earn a commission from merchant affiliate links, including eBay, Amazon, and others.

Dissolve

Established Member
Joined
12 May 2011
Messages
350
Reaction score
0
Location
South West UK
Hello,

I've decided it's worth my while making a decent auxilary table for my pillar drill. It's a fobco star bench drill, should be big enough for all I'll ever need, but I would use a fence quite a bit and it's much easier to do this with a table like this:

drillpress_table06-b.jpg


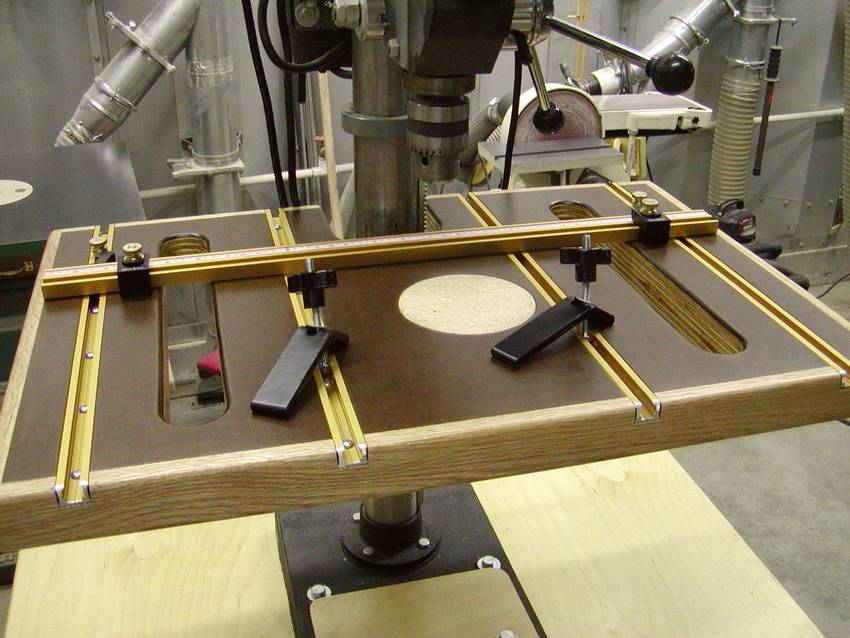
I have T-track, star knobs, M8 bolts and some spare formica laminate that will be the table face.

Would MDF be the best material for the job? I am currently thinking of using two 12mm sheets of MDF laminated together and countersink some drywall screws whilst sandwiched between two boards to hopefully obtain a flat surface after gluing!

I will be recessing M8 bolts through the table with wing nuts underneath and routing for T track to clamp a fence to.

Would I be better off laminating my MDF then applying the formica laminate before drilling/routing/recessing all my hardware? I suppose if I laminate the surface first then all my recessed bolts and t track channels can then be referenced from the finished surface?

Thanks!
 
how tall are the tracks?
the bottom layer could be solid and the top layer would be made in sections ...no routing required

just a thought

Steve
 
Hi

If your drill table does not tilt ensure you build this facility into your ancilliary table

Regards Mick
 
Spindle":3nfc4zve said:
Hi

If your drill table does not tilt ensure you build this facility into your ancilliary table

Regards Mick

I've seen pictures of the Fobco Star table tilted, hopwever mine seems to have two long pins that are wedged in tight (presumably to keep the table set) if you don't require the tilting option. I think I'll look into removing these pins soon and tilting the table but it might be quite an operation!

For now I'm sticking with the flat table. Gluing the top in pieces mght be a good idea, I don't suppose it'll be any less stable using this method?

Would anyone reccomend something other than MDF?
 
I don't much like the idea of having a DP table on which there are lots of nooks and crannies where residues may collect. So I made the fence on mine on the Biesemeyer principle - a T guided and blocked from one side. It has the added advantage that I can position and block the fence using only one hand. No T-tracks.

Although on a much smaller scale than yours - this is a very small DP, and the table is just 32 x 24 cm - here goes the general idea in case some of the ideas may be of help.

The table is 10mm MDF lined with pine strips. I first thought of making it thicker, but with this size table that would not be necessary and woul make me waste a some operating heigh.
The fence is likewise pine (2x12mm thick), faced with a 3mmx30mm thick strip of aluminium (the pine was way too soft), with a recess for the drill chuck for when I need to drill close to the edge of pieces and for any reason must lower it almost to the table level. The fence slides on and is blocked on an aluminium angle on the left side (Biesemeyer style), and slides on a steel angle on the right side. The reason for this steel rail on the right side is that I felt I might want to block the fence on the right side also (wich is done by means of the plastic knob on the right-hand side of the fence), in case I need to exert some extra pressure. Aluminium would not do for this rail, as the tightening screw riding on it is steel. The fence does not ride on the table, just on the metal rails on either side - the lower edge of the aluminium facing rides about 1mm above the surface of the table.
I "finished" the whole with floor varnish - wich is usually quite wear resistant - so the soft woods and the MDF do not generate to much dust along the time.
I'd better add some pictures, my explanations usually tend to be somewhat murky...
 

Attachments

  • Guia_01.JPG
    Guia_01.JPG
    104.8 KB · Views: 2,306
  • Guia_03.JPG
    Guia_03.JPG
    94.8 KB · Views: 2,306
  • Guia_04.JPG
    Guia_04.JPG
    88.8 KB · Views: 2,306
  • Diagrama.png
    Diagrama.png
    95.1 KB · Views: 2,306
  • IMG_5528.JPG
    IMG_5528.JPG
    29.1 KB · Views: 2,306
Without being critical, everyone seems to make these tables with 'T' track slots.
I wonder why? The fence isn't going to be moved back and forth for any great distance. So, why not make the fence as an 'L' shaped affair, with a wide 'foot', projecting to the rear. You could rout slots in the foot, which slip over upstanding bolts in the table, to each side of the column. The fence could then be moved back and forth and secured in place with Bristol Levers or similar. No tracks in the table to get choked with dust and chippings.

Come to think of it, all that is really required is a fence that swivels around a bolt at one end, and held firm by a cramp at the other end.

Nice work though, and I'm sure it serves you well.
John
 
Benchwayze":ml74lk3q said:
Come to think of it, all that is really required is a fence that swivels around a bolt at one end, and held firm by a cramp at the other end.

Nice work though, and I'm sure it serves you well.
John

Not really, at least not everytime. When the table is small, you waste precious table surface when using a swivelling fence. When your DP is located in a cramped space, you may not have the space to drill a longish piece, as the swivelling may direct you to an inconvenient location. Just two of the difficulties I have met with several times.
 
UPDATE: I maderthe drill table as follows. Two pieces of 12mm MDF laminated together using Titebond and had around 8 drywall screws drilled and countersuck into the underneath.

Both pieces of MDF were dead flat before strting and at this point when glued and screwd together they remained flat.

I used three pieces of scrap formica and used impact adhesive to glue the three pieces onto the board, I then trimmed this flush using my router table. I added the hardwood edging (using epoxy glue) and then routed out my T track slots over the joins in the formica.

It looks great, but it isn't particularly flat, when bolted to the drill table (which is dead flat) I'm seeing some bow across it's width and it's enough to pretty much ruin the function of it.

I can't sand the formica and the hardwood trim has been scraped slightly below the formica to remove this as a factor. I guess my options are to start again. and the only thing I can see which may not have helped is using three pieces of laminate over 2?

Can anyone think if better methods/materials to use perhaps? I know MDF isn't extremely tough, but I would have thought that two pieces of 12mm glued and screwed together (which stayed flat throughout this process) would have been up to the job!

Any ideas folks?
 
Hi

Laminate another layer of formica to the underside - that should equalise the forces.

Regards Mick
 
Benchwayze":2m2i93jj said:
Without being critical, everyone seems to make these tables with 'T' track slots.
I wonder why? The fence isn't going to be moved back and forth for any great distance. So, why not make the fence as an 'L' shaped affair, with a wide 'foot', projecting to the rear. You could rout slots in the foot, which slip over upstanding bolts in the table, to each side of the column. The fence could then be moved back and forth and secured in place with Bristol Levers or similar. No tracks in the table to get choked with dust and chippings.

Come to think of it, all that is really required is a fence that swivels around a bolt at one end, and held firm by a cramp at the other end.

Nice work though, and I'm sure it serves you well.
John

I prefer the sliding fence, as it allows you to increase the throat depth of the drill:

Work Table Fence Forward.JPG


The tracks allow you to position stops and holddowns without using big awkward clamps:

Work Table With Holddown.JPG


Although this pic doesn't show it, the rear fence can be replaced with two shorter fences which allow you to drill arcs in the edge of a workpiece, for instance.

Fobco Current Table.JPG


Cheers

Oz
 

Attachments

  • Work Table Fence Forward.JPG
    Work Table Fence Forward.JPG
    119.5 KB · Views: 2,202
  • Work Table With Holddown.JPG
    Work Table With Holddown.JPG
    104.4 KB · Views: 2,197
  • Fobco Current Table.JPG
    Fobco Current Table.JPG
    102.3 KB · Views: 2,197
I'm not with you Ossie.

How can a fore-aft sliding fence increase the depth of drilling?

The design I suggested can also be moved fore-aft but however you arrange the fence, you can't bring it too far forward or your work won't be under the drill, and if you take it back too far, you eventually foul the pillar, even if there's a cut-out section to go around the pillar. Even then there's a limit to the reach before the work itself hits the pillar. Or am I thinking lopsided? :?
 
Benchwayze.

I'm on about the throat (distance between the drill column and the centre of the chuck) not the depth of drilling. Anywho, I like my DP table (based on a design by bob9fingers).

Cheers

Oz
 
Benchwayze.

I'm on about the throat (distance between the drill column and the centre of the chuck) not the depth of drilling. Anywho, I like my DP table (based on a design by bob9fingers).

Cheers

Oz
 
I'm sorry Oz. I wasn't being dismissive. No intent. I see what you meant now, but I was just discussing options.

Thanks
all the best.
John
 
After checking the table this morning I don't think it'll be much use as is.

Does anyone have advice for materials/adhesives for the next MKII I'll be making soon?
 
Could you not pull it back to flat by screwing some wooden battens in strategic places underneath?
 
10mm Sheet aluminum or 15 mm sheet Tufnol. Epoxy will join those to timber if to don't wish to drill and countersink for large screws.

HTH
 
nanscombe":3o2dlp68 said:
Could you not pull it back to flat by screwing some wooden battens in strategic places underneath?

I have thought about that but it would require losing some of my drilling depth. I think the aluminum plate might be an idea, if I can get some at a reasonable price!
 
Benchwayze":onj7t3pd said:
10mm Sheet aluminum or 15 mm sheet Tufnol. Epoxy will join those to timber if to don't wish to drill and countersink for large screws.

HTH

I like the idea of this, but I would probably countersink holes and make the MDF top replaceable maybe. So the base would be re-usable.

How about acrylic/thick perspex? I'm not sure how well 12mm perspex would stand up to the job?
 
My DP table (see pics in earlier post) is made up of a 32mm "Wisa" birch ply base (dadoed to form the t tracks) with 12mm mdf simply screwed on to it. The mdf is therefore replaceable. 4 M10 coach bolts hold the whole thing to the Fobco table with penny washers and wing nuts underneath.

The centre retangular piece of mdf is sacrificial and is a simple sliding fit.

btw I use a small bottle jack (screw type) to move the table up and down; much easier than by hand.

Cheers

Oz
 

Latest posts

Back
Top