July Challenge " Decorated Platter " Upload you entry

UKworkshop.co.uk

Help Support UKworkshop.co.uk:

This site may earn a commission from merchant affiliate links, including eBay, Amazon, and others.

Blister

Established Member
UKW Supporter
Joined
10 Nov 2006
Messages
7,457
Reaction score
441
Location
Boston Lincs
July Challenge Decorated platter ( Rules /Requirements / Judges Criteria )

Our Judge for July will be Barry ( Thanks Barry )

Any wood type
Any size
Up to 3 different wood types will be allowed , but not multiple segmented work

The Judges requirements

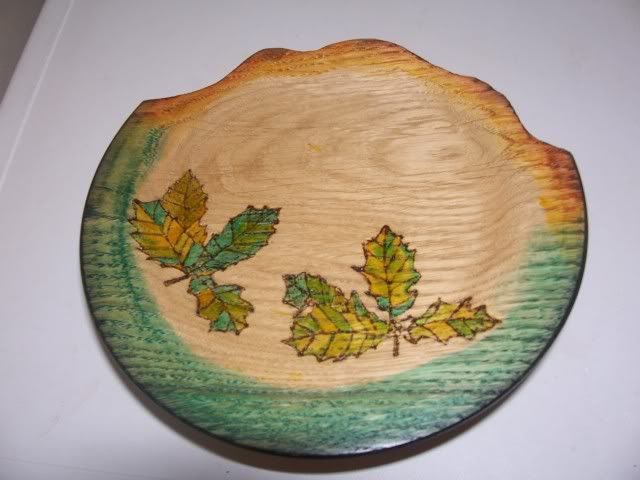
The platter must be lathe turned and must be decorated ( any undecorated entry's will not be judged )
The platter must be a Platter and not a bowl ( entry's that look more like bowls with raised rims will not be judged )
Decoration allowed in this challenge will be as listed below
1, Carving
2, Piercing
3, Colouring
4, Burning ( Including Pyro work )
5, Texturing

Hygiene will not be part of the Judging as the completed platter could be used purely as a decorative / artistic table center piece

I will be judging the artistic / design elements and quality of workmanship of the completed platter


NO Critique or comments on any work until August Please, After the Judging and results.
Please state item size, width and height and wood type used if known and a little about the techniques applied when producing the Platter (this helps the judge)
The Judges decision is final. ( I hope )

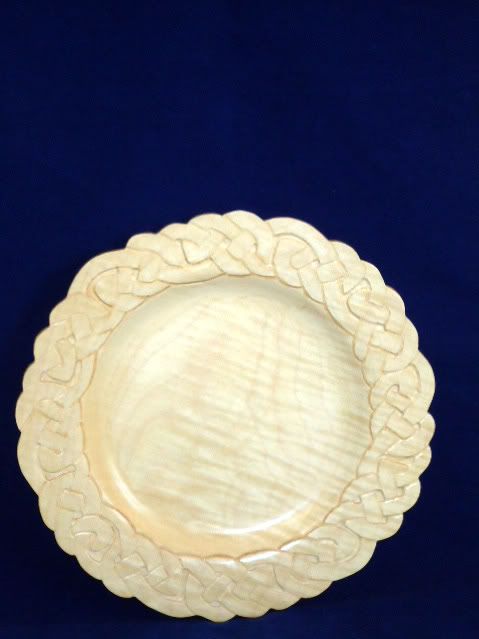
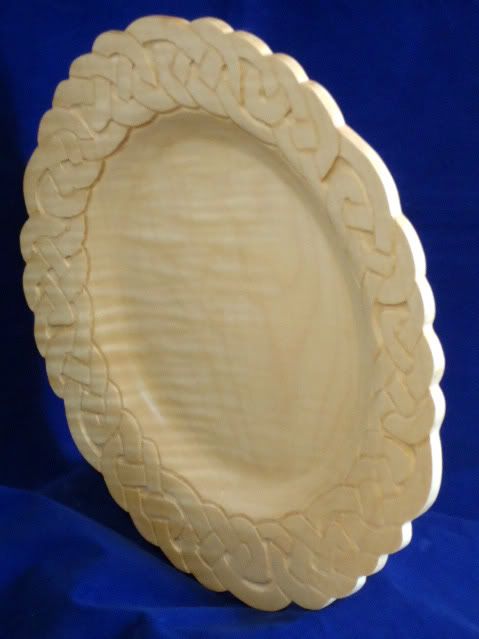
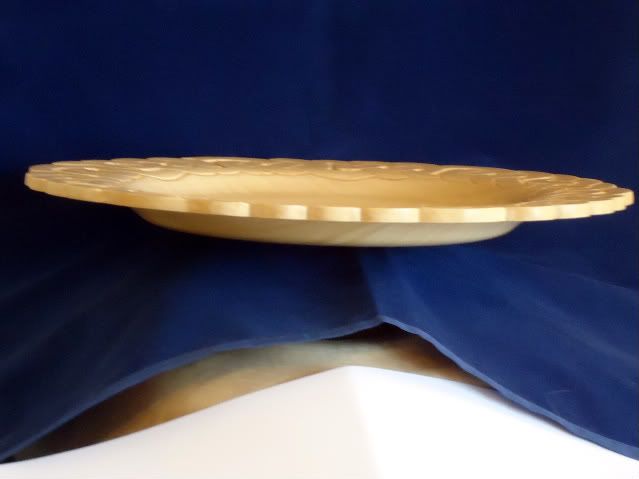
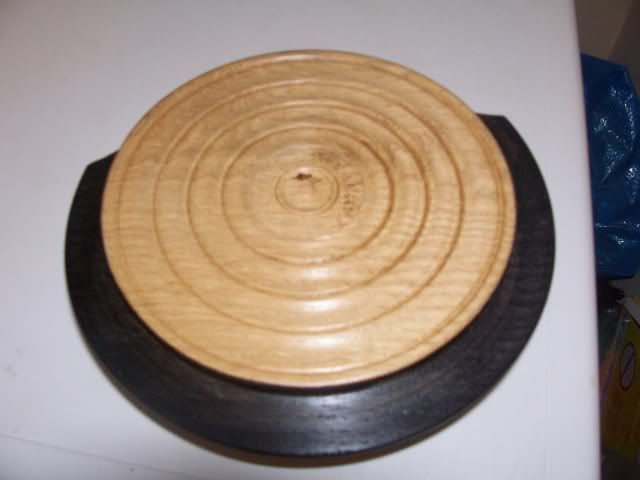
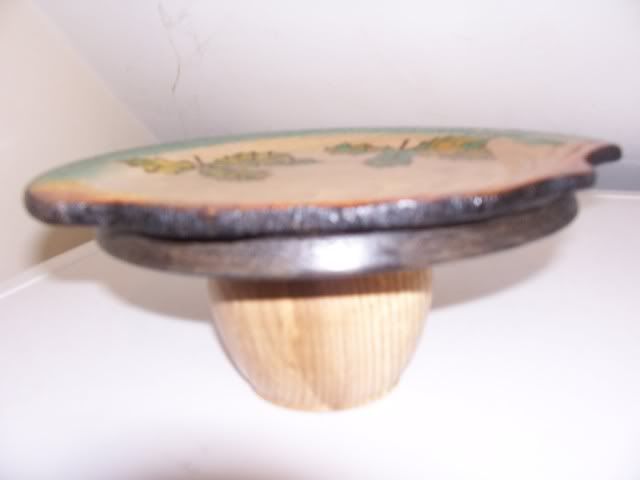
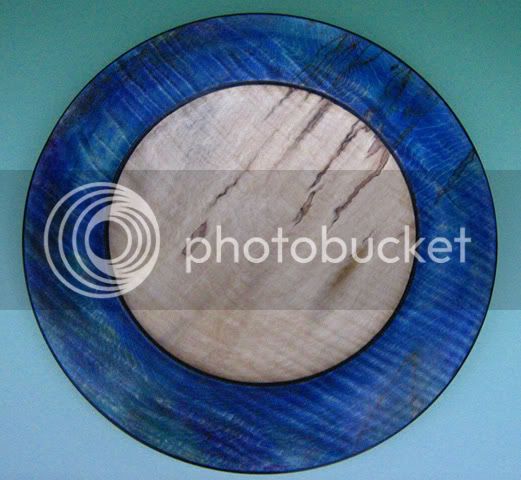
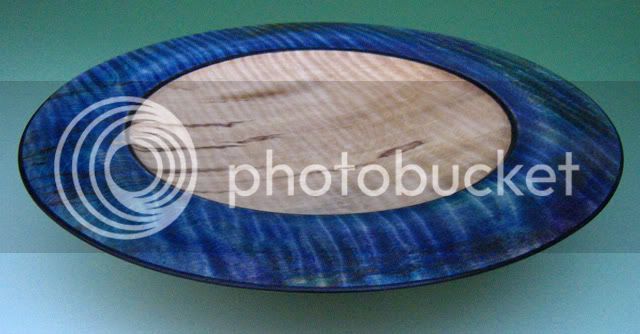
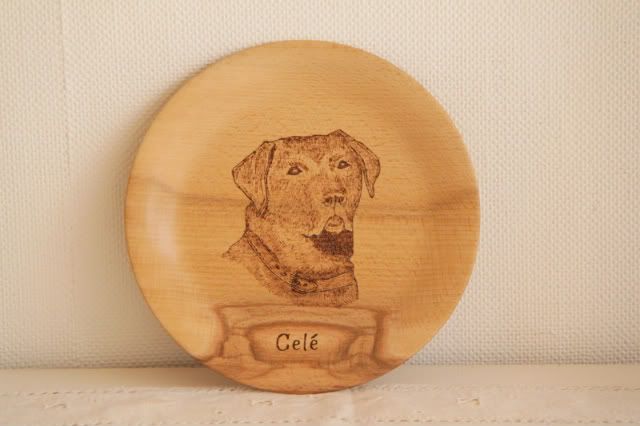
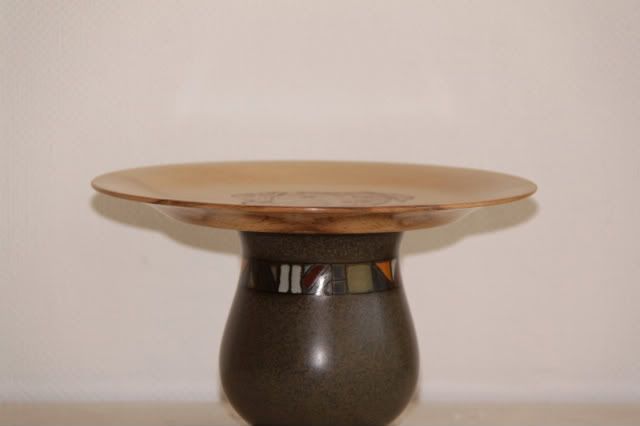
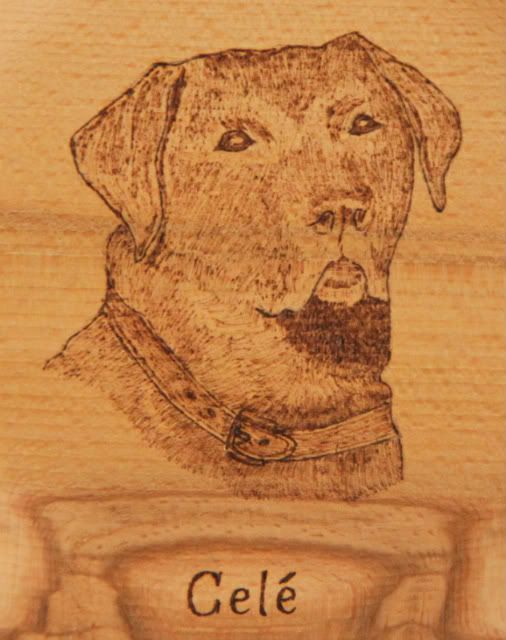
Please post 3 images of your work
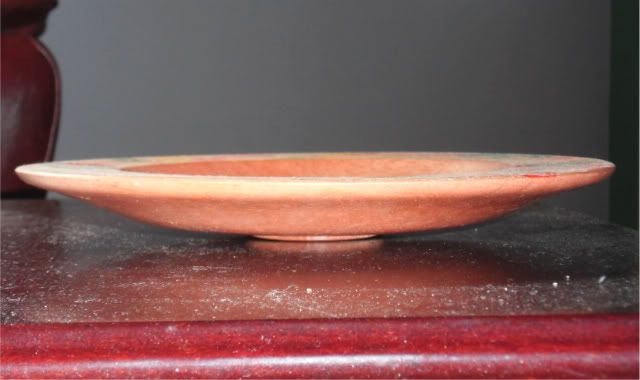
1 side profile
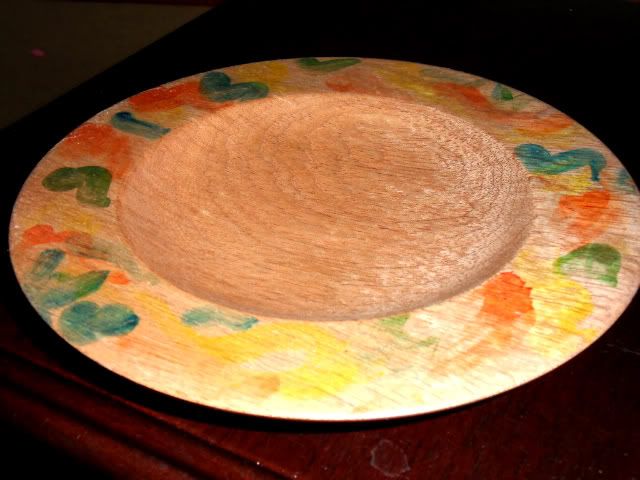
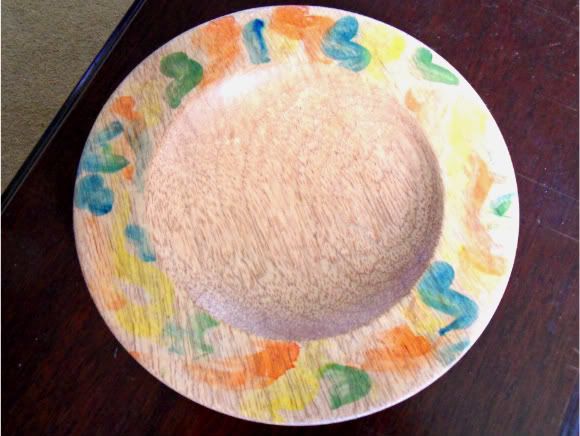
1 looking down from above
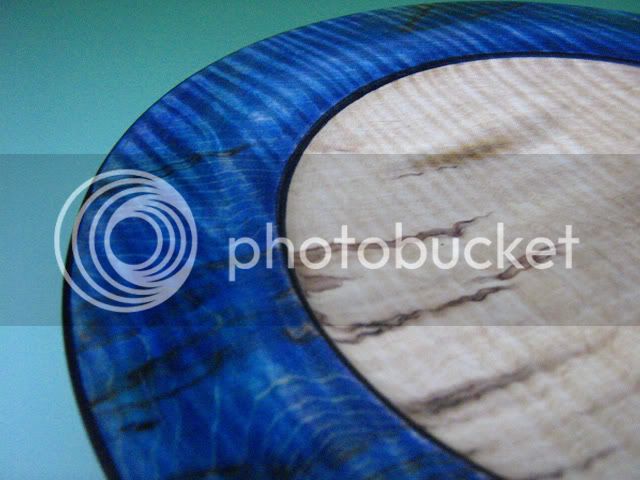
1 close up of a part / design element you are particularly proud of

Image size please use image size 640 x 480 0.3 mp, same as previous months

Please notify me your entries are ready by 10 pm on the 27th July after this time the thread will be locked

Entry’s to be uploaded from 10pm on 27th July up until 10pm on the 29th July after this time the thread will be locked for Judging

Results will be given on or before 31st July

Holidays

If you are going to be away when its time to post up your entries please either send them to me or Chas and we will upload for you so you don’t miss out on judging

Have fun and think safety. Allen

PS , I hope this meets with everyone's approval , if not please PM me ASAP
 
My entry is a simple plater with a portrait of our chocolat labrador Celé. 7 1/2" diameter in beech and the small patch of colour difference was perfect for her name. Almost all done with a 3/8" spindle gouge and sanded down to 400 followed by 0000 steel wool and buffed with shavings. Celulose sanding sealer and malamine laquer buffed on my Beal system. The pyrography was done on the bare wood and taken from a photo (I'm not that good an artist!)

Celplatea.jpg


Celplatec.jpg


Celplatee.jpg
 
one slightly decorated platter :) (dont really have the tools or imagination for anything more :oops: )
made from beech (thankyou spasm)
about 12" x 1.5"
finished with mr findlays new abrasives and a few coats of cellulose sanding sealer, and decorated with the middle string from my nephews guitar :mrgreen:
decplatterside.JPG


decplatterdetail.jpg


decplattertop.JPG
 

Attachments

  • decplattertop.JPG
    decplattertop.JPG
    229.1 KB · Views: 3,201
  • decplatterdetail.jpg
    decplatterdetail.jpg
    197.4 KB · Views: 3,201
  • decplatterside.JPG
    decplatterside.JPG
    136.6 KB · Views: 3,201
Here is my platter.

3rd time lucky! The first platter in lacewood twisted horribly (currently in "Traction" to see if it can be recovered), the second in Pear, was stolen by my wife who loved it before I could "ruin it" with my "decoration". So as I Say my 3rd effort in rippled sycamore. To be fair, i didn't appreciate it was rippled until I opened it up and found what "lurked" within.

Having turned the 12" platter I set about the decoration as shown using my foredom carving tools. I had visions of motif in the centre but having done the rim I felt less was more, especially as the sycamore had the natural beauty bit going on and I loved the delicacy of the rippling coming "out" of the rim. Sorry maybe I am on the verge of needing to read poetry!

Sanded to 600. decorated then buffed to a finish.

DSC01265.jpg


DSC01304.jpg


DSC01280.jpg
 
These images are posted for LOZ as he is unable to upload

Details :- Sycamore i think, lidl acrylic spray, and carnuba finish, 9 inches , Thanks
 

Attachments

  • loz1.jpg
    loz1.jpg
    76.6 KB · Views: 3,142
  • LOZ2.jpg
    LOZ2.jpg
    57.1 KB · Views: 3,142
  • LOZ3.jpg
    LOZ3.jpg
    22.7 KB · Views: 3,141
My Entry for July

Is a 17" Elm platter , stands 1 1/2" high

I have included the following in this piece

Lathe turned ,
Hand carving ,
Textured with a ball end rotary bur in a high speed Dremel ,
Burning ,
Colouring completed with red Chestnut Spirit stain , each hole was coloured individually by hand , Silver and Gold gilt cream
The rim was designed so that finger can grip the rim and rotate it a bit like a lazy Susan but it does not have a bearing fitted
I wanted to achieve a mix of enhancement and natural wood working together :wink:
.
.
.
 

Attachments

  • IMG_1213.JPG
    IMG_1213.JPG
    52.9 KB · Views: 3,137
  • IMG_1212.JPG
    IMG_1212.JPG
    104.8 KB · Views: 3,138
  • IMG_1214.jpg
    IMG_1214.jpg
    178.3 KB · Views: 3,137
Mine is elm inlaid with ebony dots which came from a pen blank.

It has a very shallow curve for most of the top which then dips a bit steeper towards the middle.

Took ages to make all those dots, they were cut from a rod on the bandsaw and being so small and light as soon as they parted they jumped all over the place which meant scrabbling about trying to find them, I never recovered a few of them.

wn_01.JPG


wn_02.JPG


wn_23.JPG
 

Attachments

  • wn_01.JPG
    wn_01.JPG
    57.2 KB · Views: 3,127
  • wn_02.JPG
    wn_02.JPG
    8.8 KB · Views: 3,126
  • wn_23.JPG
    wn_23.JPG
    24.1 KB · Views: 3,126
Here is my platter

It is Oak 12" X 1" diameter
It is stained with chestnut spirit stain and pyrography with Oak leaf's

100_3289.jpg


100_3287.jpg


100_3291.jpg
 
Ill save you heavy hard to read post I normally post and just say that this was my 5th attempt and idea after either shattering on the lathe or me messing it up, although I had the time, it ran out.

Its made from Iroko, measures 160mm in diameter and 20mm high. The decoration is the inlay band around the side which was made with the parting tool and then paint.

ukplatter1.jpg

ukplatter2.jpg

ukplatter3.jpg
 

Attachments

  • ukplatter1.jpg
    ukplatter1.jpg
    138.2 KB · Views: 3,106
  • ukplatter2.jpg
    ukplatter2.jpg
    121.7 KB · Views: 3,104
  • ukplatter3.jpg
    ukplatter3.jpg
    146.2 KB · Views: 3,104
This is my entry for July. The design was influenced by two things. Firstly, the need to spend about an hour on it at the most as a demanding gallery has been demanding and I have to have enough stuff for an exhibition this coming weekend.

The second influence was a local speciality called a Cornuelle. This is a triangular shaped biscuit/cake that is eaten out here around Palm sunday.

The following as I'm sure you will all be interested is a quote from the net.

"For two months, around the time of Palm Sunday, nearly 10,000 Cornuelles are made and sold to delight the taste-buds of Cornuelle fans and gourmets.
Cornuelles are slipped in with the boxwood branches for the blessing of the palm leaves – its triangular shape recalling voluptuousness. From a heathen standpoint, it celebrated the return of better days and love … we can each believe what we like.
In Villebois-Lavalette, a fête is organized on Palm Sunday just for the Cornuelles. Two giant Cornuelles (1.80m x 1.45m) are made and eaten under the infamous “halles” - markets – at the end of the day. "

So there you go, we live just outside Villebois.

The platter is made from oak as the planned for walnut did not arrive. The need for speed meant that everything had to be done on the lathe. I just managed to get a triangle out of my last piece of oak by cutting in between all the cracks. Each side is 27cm, its 2cm thick and the flat bit is 15cm diameter.

So its a platter for serving up Cornuelles. Not much else to say about it other than its finished in lacquer and groovey - man.
 

Attachments

  • Top view.jpg
    Top view.jpg
    57 KB · Views: 3,068
  • another view.jpg
    another view.jpg
    34 KB · Views: 3,068
  • Side view.jpg
    Side view.jpg
    24.6 KB · Views: 3,068
Hi All

Rippled and slightly spalted sycamore platter 11" dia, chestnut wood stain (blue, green and yellow ) applied to rim finished in chestnut hard wax oil and buffed with burnishing cream.

CompPlatter013.jpg


CompPlatter022.jpg


CompPlatter019.jpg


Dave
 
Platter made of cherry. A piece 14" x 14" that I had to clip the corners off of so it would fit on the "BL 150". Glued a block to the face/top and screwed the faceplate to that, Turned the bottom and finished with lacquer and then Danish oil friction polished. Mounted on chuck and turned the top, trying to leave some of the natural edges on the two sides. Did the rings with a spear point scraper, and the heiroglyphics were done with a Razortip pen. They are just a bunch of crosshatching and x's and drivel and some smiley faces and my initials. The platter sits on the four corners with the central thingy about 1/4" off the table. This is the first time for the heiro stuff as I have just used the pen to sign the bottoms of my previous pieces. Might have to do more. Thanks
 

Attachments

  • P1010722.JPG
    P1010722.JPG
    159.4 KB · Views: 3,015
  • P1010724.JPG
    P1010724.JPG
    157.7 KB · Views: 3,015
  • P1010714.JPG
    P1010714.JPG
    148.6 KB · Views: 3,015
This is my entry for July,

I started with a piece of ash approx 10" dia and 1.5" thick. Mounted it on a screw chuck and turned the bottom to shape, creating a recess for the chuck jaw.
After reversing and flattening the face, I made an indexing wheel so that I could lock off the piece to carve out each of the segments. I then clamped a 2 way engineers vice to the bedways and mounted a dremmel tool onto the vice. Then, using the dremmel with a fine bit I carved each of the segment lines to a depth of 3mm.
I then used a spindle gouge to define the inner and outer edge of the segments before removing the piece from the lathe and spraying it with Chestnut's ebonising lacquer.
The piece was then remounted on the lathe where I then used a bowl gouge to cut away approx 1mm from the face of the segments to expose the wood. At this point I also turned the centre of the platter.
Each segment was sanded by hand and painted with undiluted Chestnut Spirit Stains. I tried to keep the colour scheme random.
Finally the coloured segments were masked up whilst the bottom of the platter was given a coat of ebonising lacquer.
 

Attachments

  • PICT0619.JPG
    PICT0619.JPG
    171.3 KB · Views: 3,000
  • PICT0620.JPG
    PICT0620.JPG
    170.9 KB · Views: 3,000
  • PICT0617.JPG
    PICT0617.JPG
    150 KB · Views: 3,000
After several ideas and test pieces I cam up with this...

Wood: from the shed, unknown species
Pytography using Peter Child burner and home-made coiled tips
Finish: Chestnut finishing oil
Dimentions: 35cm square x 2cm deep

The off-centre turning was done using a system based on the design presented by Terry Scott in a recent Woodturner magazine using a faceplate, a base plate and as much lead as I could lay my hands on to counter-balance the off-centre wood. Turning speed was up to about 450 rpm without any vibration.
Time to make jigs was about half a day, time to turn and finish was about half a day and time to pyrography was several afternoons and evenings watching the Tour de France (luckily I live alone and can do pyrography sitting in the lounge with fans to set up to extract the fumes).

I'm not showing the back as it's simply flat with the same border as the top.
It's difficult to capture the rippling and wavy grain in a photo, which is a shame.

I have some WIP photos but am away on holiday from tomorrow so won't be able to post for a couple of weeks.
 

Attachments

  • platter_detail.jpg
    platter_detail.jpg
    142.8 KB · Views: 2,989
  • platter_side.jpg
    platter_side.jpg
    72.5 KB · Views: 2,989
  • platter_top.jpg
    platter_top.jpg
    168.9 KB · Views: 2,989
this is my entry for this month, i'm not sure what the wood is but the platter measures approximately 2x20cm. It has been finished with danish oil, and i have used chestnut paints to decorate the wood. The platter has orange, green , blue and yellow colours on it which were painted on with my finger in random patters.
colouredplatterside.jpg

colouredplatter.jpg

colouredplattertop.jpg
 
Hi, here`s my platter:

Made from sycamore, recycled from an old school chair seat.
Diameter approx. 11 1/2 inches, height 1 1/8 inches.
The rim, foot and dark grooves were coloured with acrylic artists` paint.
Holes made with a Dremel-type tool and surrounding area dyed with Chestnut wood dye.
Grooves carved with a Proxxon carving tool.
Finished with acrylic sealer and Renaissance Wax.

Ian
 

Attachments

  • top.jpg
    top.jpg
    49 KB · Views: 601
  • side2.jpg
    side2.jpg
    120.9 KB · Views: 601
  • detail.jpg
    detail.jpg
    60.4 KB · Views: 601
Here's mine, beech, 12" diameter.

The coloured surface is many coats of black polyeurathane sprayed on over sanding sealer. The central gold spot is from a gold marker pen 'milked' until the spot was filled. The rest is just sanding sealer lightly buffed.
The holes were made with a dremmel type tool, the grooves with a skew.

The design represents the planets around the sun, the spacing of the orbits is 'aesthetically adjusted', but the angular position of the planets accurately represents the positions of the real planets on our wedding anniversary in three months time [providing there's no cosmic disaster between now and then!].
P1070592k.jpg

P1070590k.jpg

P1070584k.jpg
 

Attachments

  • P1070584k.jpg
    P1070584k.jpg
    84.4 KB · Views: 622
  • P1070590k.jpg
    P1070590k.jpg
    91.8 KB · Views: 622
  • P1070592k.jpg
    P1070592k.jpg
    93.9 KB · Views: 623
after the misunderstanding of the decorated bowl entry I grabbed the dulex and wallpaper sample book first, then looked around for some wood........

30 minutes later I had a drawing, a piece of sycamore cut from a sheet acquired for a canceled chair commission and part of a very old oak coat stand - what a difference 30 mins makes

the oak was cut into 2 lengths (as I wasn't confident I could get an accurate diameter with the potential flex in the full length) and 'skewed' to 3/4" - having established I had a 3/4" forsner bit. A few minutes with a protractor, pencil and drill press and I had 8 holes to fill with the oak.

at 30mm the sycamore needed a glue chuck so a disc of 1" scrap was drilled and centered to blank then the oak and chuck were all yellow glued up and left to dry (with clamps on the chuck bit).

base turned and a bit of texture work to match the planned surface work. finished. reversed etc

5988054549_71a5a548a8_o.jpg


decided on a flat top to show off the discreet texture work and inlays.

5988618344_f918395fa2_o.jpg


5988618468_e38b5b63fa_o.jpg


finish was sanding sealer and clear acrylic - it's destined as a cheese board. dimensions ended up at 350 x 28mm - 8mm at edge.

thank you for looking
 
Back
Top