January Challenge - Post your entries HERE!

UKworkshop.co.uk

Help Support UKworkshop.co.uk:

This site may earn a commission from merchant affiliate links, including eBay, Amazon, and others.
Status
Not open for further replies.

nev

Established Member
Joined
21 Jan 2011
Messages
4,860
Reaction score
16
Location
The green and wetter end of the M4.
January - An Acorn Box.

Please do not worry about signing up to the scoreboard for this month (WIP), just post your entries here :)


Please post your challenge entries in this thread.

Please state wood type if known, dimensions and a little about how you made it and what tools and finish you used ( this helps the judge ). Please post 3 or 4 images ( see link at top of page for how to ) of your work / entry as follows...

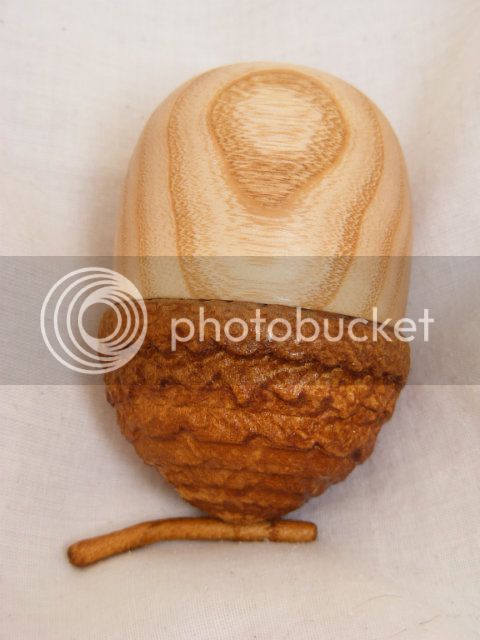
1 showing assembled box side view
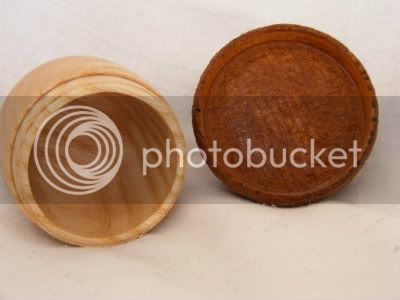
1 showing inside the box and lid
1 showing side view of the "male" spigot / thread section
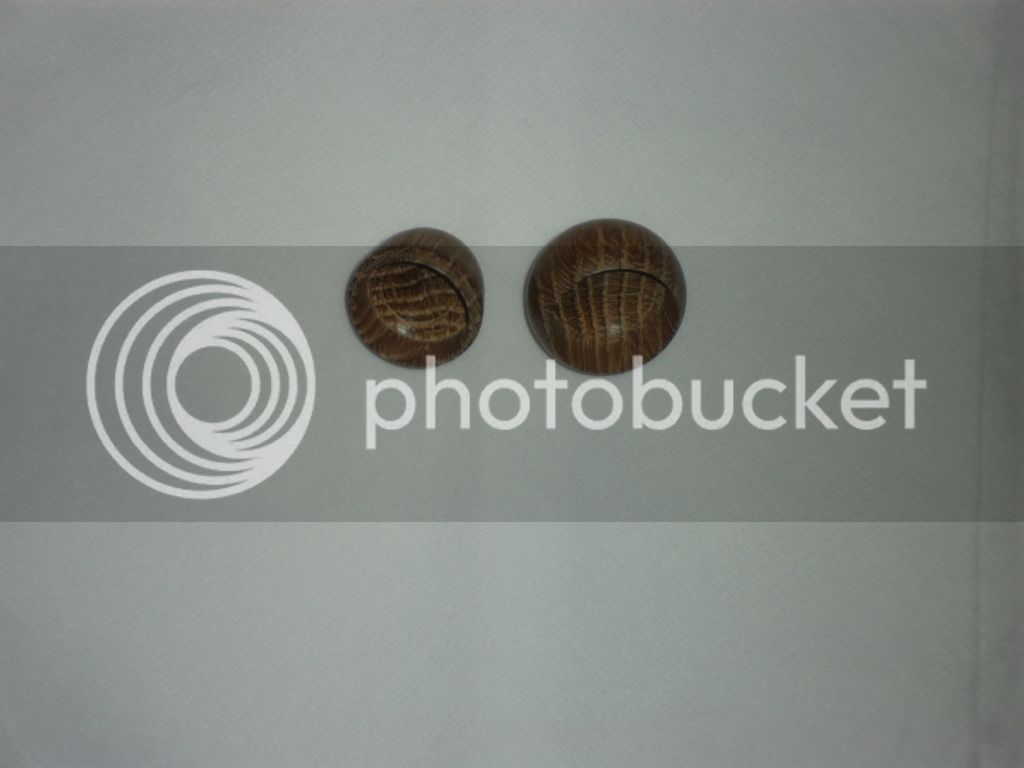
1 optional photo showing any other feature you think might be of interest

Image size please use image size 640 x 480 0.3 mp, same previous months

Entry’s to be uploaded from 10pm on 27th January up until 10pm on the 29th January.
After this time the thread will be locked for Judging
Results will be given on or before 31 January

Any entry's that are outside the rules and requirements will not be judged
The Judges decision is final ( Any negative comments re judging must be via PM only and not on the open forum )
NO Critique or comments on any work until February Please, After the Judging and results.

Good Luck, especially to the newcomers :D


ROUNDUP
 
No idea what the woods are (I have a box of odds and ends that I was given – mostly very old off-cuts with splits – I chose one dark and one light bit with no splits).

Size 82mm by 45mm (largest dimensions).

Tools
I have a random set of scrapers someone has lent me, plus a big roughing gouge. Lathe is a Jet Mini/1014 (Christmas present!)

Method
This was the first box I have turned, and the first piece where I worked on something specific (rather than seeing what emerged through my random playing with tools). I set out to do “simple and chunky” – nothing clever!


The order of doing things was:
Dark wood in chuck, turn inside of lid, shape and finish outside and inside, part off, reverse onto tenon on same bit of wood, finish lid.
Light wood in chuck, turn tenon to hold lid, hollow out, shape and finish outside and in (used lid to assess shape), part off, turn tenon on remaining wood, reverse box onto this, shape and finish bottom of box.
Finishing was sanding, Chestnut sanding sealer, another fine sand, Chestnut Microcrystalline Wax, very fine sand/polish.

Things I discovered: You can use big tools on the outside of little boxes, but you can’t do the insides! A small piece of a plastic bag can help to hold things on push-fit tenons so they stay square. Finishing is never finished – no matter how much you do, you will always see imperfections if you look hard enough. Acorn boxes are fun and not that difficult.

AcornBox1.jpg


AcornBox2.jpg


AcornBox3.jpg
 

Attachments

  • AcornBox1.jpg
    AcornBox1.jpg
    47.7 KB · Views: 2,258
  • AcornBox2.jpg
    AcornBox2.jpg
    59.7 KB · Views: 2,258
  • AcornBox3.jpg
    AcornBox3.jpg
    95.5 KB · Views: 2,258
An Acorn Box.
never heard of one til George suggested it, so yet another new thing for me to try my hand at :)

Made from grown up acorn, approx 4" tall plus the stalk.

Started with the lid, cross grain block on a glue chuck. turned the inside of the lid first with a two step recess and shaped the outside and about 3/4 of the topside. finished the inside, parted off and turned a tenon to fit on the remaining timber. press fit the lid on the tenon and finish shaping etc the top of the lid, drilling a hole for the stalk.
Mounted the nut timber in the chuck, rounded to a cylinder and sized /cut the tenon to a too tight fit with the lid, hollowed with a spindle gouge and finished with a round scraper, sanded to 400, red and yellow nyweb and cellulose sanding sealer.
then shaped the outside to about 3/4 again, sanded and parted off. A fresh tenon cut on the scrap to fit the box over and the bottom pointy bit of the nut turned and finished.
Stalk picked, microwaved, sprayed black and lacquered and poked in the lid. long branch left on stalk to prevent it rolling off the table :idea:
The two step tenon/ lid fit is so that a small gap is seen between cup and nut, just cos i thought it looked nicer.
Mostly done with spindle gouges, round and square scraper. finished in CSS and fiddes soft wax.
I couldnt for the life of me think of a clever way of mounting or supporting it, hence the long stalk.

acorn.jpg


acorn lid and box.jpg


acorn spigot and lid.jpg


acorn lid undercut.jpg
 

Attachments

  • acorn.jpg
    acorn.jpg
    216.8 KB · Views: 2,233
  • acorn lid and box.jpg
    acorn lid and box.jpg
    215 KB · Views: 2,233
  • acorn spigot and lid.jpg
    acorn spigot and lid.jpg
    226 KB · Views: 2,233
  • acorn lid undercut.jpg
    acorn lid undercut.jpg
    198.2 KB · Views: 2,233
Here's my first effort at a box of any sort - trickier than might have been expected

Oak, 3 cm long.

Rough-shaped in a set of O'Donnell jaws. Parted off 'cup' and hollowed inside of the seed bit. Sanded with abranet down to 500.

Chucked cup and repeated operation, using trial and error to achieve snug fit. I had wanted the cup to be rough like a real acorn, but couldn't work out how to do it without it just looking rubbish!

Tools used: spindle gouge with fingernail profile for shaping and hollowing and parting tool for spigot and parting off.

side.jpg


inside.jpg


spigot.jpg
 
Acorn box is new to me as well.

Acorn made form Ash, Cupula from Plane, both from the odds bin at Yandles, which is just down the road.

Size
55mm wide
70mm tall inc. stalk

Tools
Lathe is a Axi 1416avs, a new years present, using 3/4 roughing, 3/8 spindle spindle and 1/4" spindle and 1/2" skew pen making gouges.


The order of work was:

Capula
Chunk of Plane 120mm long turned between centres to round out, made a spigot to go in the jaws of Axi K10. Mount into jaws, remove tail stock completely and make tenon on capula with parting tool, hollow out with gouges. Start shaping outside part of capula, roughly thin down to make stalk. Finish with grits to 600, sanding sealer, nyweb and Rennaisance wax. Part off leaving enough to make stalk. Reverse onto a tenon on a piece of pine, turn stalk and lid top, finish to Rennaisance wax.

Nut
Ash block 120mm turned between centres to round out, made a spigot, pop in chuck. Made mortice to match capula tenon, gouge out with 3/8 and 1/4 gouges, finish with angled scraper. Shape 3/4 of nut exterior, drawing shape from capula attatched. Finish internals to 600, seal, nylex and wax, sand to 600 on nut. Reverse onto jam chuck and finish top shape of nut, sand, seal and Renaissance wax to finish.

A lot more involved than I thought when starting this little project, but thoroughly enjoyable.
 

Attachments

  • Dscf1642.jpg
    Dscf1642.jpg
    92.8 KB · Views: 2,182
  • Dscf1643.jpg
    Dscf1643.jpg
    94.9 KB · Views: 2,182
  • Dscf1646.jpg
    Dscf1646.jpg
    74.5 KB · Views: 2,182
Acorn turned from a very old oak fence post - tricky as there were a few cracks to repair with CA clue.

Usual box making procedure - turn whole length, put a dovetail on each end, separate 2 sections. Turn the lid first with a recess and sand the inside.
Turn the longer section of the box, hollowing out the middle before doing the spigot. Leave for several days for the wood to settle down after the middle has been removed. Turn the spigot so the lid is a tight fit, mount the lid and finish turning it. Texture the lid with the Sorby tool. Lightly sand the texture and then apply wax.
Turn top and middle of the longer section to final shape.
Mount bottom section on a jam chuck and turn it's base.
Sand to 600 and use a spray lacquer, cutting back with 600 to use it like a sanding sealer. Apply a couple more coats.

The top of the lid is fairly flat so the the box can be stored resting on it and it's left thicker walled than the rest so that there's weight at the base and it won't fall over..

Total length/height 15cm
Max diameter 8.5
R0013486.jpg

R0013482.jpg

R0013484.jpg

R0013485.jpg
 

Attachments

  • R0013486.jpg
    R0013486.jpg
    42.5 KB · Views: 2,153
  • R0013482.jpg
    R0013482.jpg
    63.9 KB · Views: 2,153
  • R0013484.jpg
    R0013484.jpg
    51.2 KB · Views: 2,153
  • R0013485.jpg
    R0013485.jpg
    65.1 KB · Views: 2,153
Hi
Here is my acorn box. Made from oak, 100mm x 65mm overall.
The box was hollowed and shaped with a 3/8" spindle gouge.The top was left with a section of spigot which was carved to shape to represent a stalk. The rest of the top was textured with a carbide burr in a Dremel, then coloured with mahogany spirit stain. The interior and bottom sections were finished with melamine lacquer and Renaissance wax, the top section with acrylic lacquer spray.

Ian
box1.jpg

box2.jpg

box3.jpg
 

Attachments

  • box1.jpg
    box1.jpg
    173.9 KB · Views: 2,120
  • box2.jpg
    box2.jpg
    241.4 KB · Views: 2,119
  • box3.jpg
    box3.jpg
    144.3 KB · Views: 2,119
my first ever entry in the monthly challenge

the acorn is made from one piece of spalted beech which is approx 100mm high and 70mm wide

the main tools used were a roughing gouge, bowl gouge and a variety of scrapers

I mounted the piece between centers and rounded the piece before cutting the tenon - once it was mounted in the chuck I
created the tenon at the other end for the lid part and, using the 2/3rd and 1/3 principle, used a parting tool to split the box and
lid. When the inside of the box was shaped it was sanded to 400 grit, sealed with sanding sealer and buffed with wood wax
- the box was then reverse checked and then shaped and finished the same way.

The lid was mounted on the chuck so that the inside could be hollowed and shaped to fit the box. I then reverse chucked the
lid to shape the outer but forgot to properly grit and finish the inside of the lid before mounting and shaping. When the
outside was shaped I used my rotary tool with an aluminium oxide bit to create the dimples on the outside of the lid which
also burnt the wood to cover the dark effect. The lid was then remounted to buff the outside. During the buffing I
accidentally broke the finial part of the lid and didn't have the time to repair/replace it
 

Attachments

  • acorn1.JPG
    acorn1.JPG
    166.3 KB · Views: 2,116
  • acorn2.JPG
    acorn2.JPG
    151.2 KB · Views: 2,116
  • acorn3.JPG
    acorn3.JPG
    150.6 KB · Views: 2,116
Acorn box, turned from Oak, 120mm high plus 10mm stem. Top 70mm dia. Base 67mm dia. Finished with Acrylic Sanding sealer and Microcrystaline wax.
Because it cannot stand up on it's own a little stand was turned for it, this is to prevent it rolling off tables etc.
Tools: Axminster mini lathe, Roughing gouge then parted off lid and hollowed lid with 1/4 inch Parting tool (yeh I know) and finished with scrapers, sealer and wax.
Half hollowed base then jam chucked the lid to turn the outside: 1inch skew and spindle gouge, finished hollowing base and correcting the right fit for lid, parting tool and scrapers again (still learning how to hollow with a spindle gouge) turned most of the outside then reversed it and jam chucked it to finish the base, Skew and spindle gouge again then sanded, sealed and waxed.

Acorn B.jpg


Acorn C.jpg


Acorn box F.jpg


Acorn box G.JPG
 

Attachments

  • Acorn B.jpg
    Acorn B.jpg
    171.2 KB · Views: 2,100
  • Acorn C.jpg
    Acorn C.jpg
    229.3 KB · Views: 2,100
  • Acorn box F.jpg
    Acorn box F.jpg
    235 KB · Views: 2,100
  • Acorn box G.JPG
    Acorn box G.JPG
    41.2 KB · Views: 2,100
After some teething problems with the VFD, the first project done with the new Titan! Done in black walnut and quilted maple, 2 blanks roughed out to round in between centers with a spigot on one end of each. Lid hollowed out and cut nearly to size at top , then sanded and textured with my homemade tool and two coats of DO and then parted off. Same with the nut ,and then carved the stem and the bottom pointy bit, DO on that , let it dry and then buffed it up on the ONeway buffing wheel system. I used brown and wax on the lid( didnt want any white diamond getting into the texturing) and used all 3 wheels on the nut. I used a roughing gouge, 1/4" bowl gouge, scraper, spindle gouge and parting tool. Total length is 4 3/4" and diameter of the lid in 3 1/4". Brother in law has laid claim to it .
 

Attachments

  • P1020086.JPG
    P1020086.JPG
    161 KB · Views: 2,088
  • P1020087.JPG
    P1020087.JPG
    147.5 KB · Views: 2,088
  • P1020089.JPG
    P1020089.JPG
    158 KB · Views: 2,088
  • P1020088.JPG
    P1020088.JPG
    153.9 KB · Views: 2,088
OK here we have my 1st entry of the year

A quaint one this it measures 90mm in height and 50mm in diametre... just right to fit in the hand

The Nut is made from Ash. It was turned using a small spindle gouge and a multi head scraper. The lip of the Male part has a small bead on for decoration.
I hollowed first, then shaped the outside and finished 3/4's, then reversed on a jam chuck to finish the rest. Finished with friction polish.

The Cup is made from Sycamore. I did the inside hollowing and got the fit right first and textured, then I did the shaping of the rest of the cup (I shaped into ledges that gradually got smaller towards the bottom of the cup) then parted off.....
I then reversed on another jam chuck to finish the bottom of the cup, and texture. I did this using a dremel drill which has a broken bit so the tip kept coming out... it was not fun!!
I coloured the cup with coffee and and finished inside and out with spray polyurethane varnish.
The twig was also turned from Sycamore, left very rough, steam bent, coloured again with coffee, sprayed with polyurethane varnish and attached with CA glue.

I'm really pleased with it and so is it's new owner!!! it sits in the study/library with everything else that is to do with nature and trees!

DSCF6010_zpsed9359c2.jpg

DSCF6013_zpsef030db6.jpg

DSCF6011_zps339579f3.jpg


(Mr mod, please feel free to adjust if sizes are not right, camera doesn't let me change size... and 2.5hrs fighting to resize on photobucket was well enough for me!)
 
Here is my entry for the January Challenge – An acorn box.

The box is made of (what else) oak and stands 60mm high to the top of the stalk. The box is 40mm in diameter.

It was turned between centres to round off the blank spigots made at each end of the blank to suit the chuck jaws. The piece was then mounted in the chuck jaws and the lid was then parted off from the body, leaving the body piece mounted in the chuck. The inside of the box was turned using a spindle gouge and round scraper; the spigot made with a ¼” parting tool and the outside shaped with a spindle gouge. The body was then sanded from 120 to 400, sealed with cellulose sealer and sanded at 600. It was then finished with microcrystalline wax. The body piece was removed from the chuck without parting it from its mounting spigot.

The lid piece was the mounted in the chuck jaws and the inside of the lid turned using a spindle gouge and a ¼” parting tool to make the rebate to receive the spigot on the body. The inside of the lid was then sanded and finished as per the body.

The body was remounted in the chuck and the lid attached (using the body as a jam chuck with tailstock support; a piece of kitchen towel was used to ensure a tight grip between body and lid). The outside of the lid and the stalk were turned with a spindle gouge and sanded as above. Two v-grooves made using a pointy tool and the section between the two grooves was textured using a Decorating Elf. The lid and stalk were then finished with sanding sealer and wax as before. The lid and stalk were then parted off using a thin parting tool and the top of the stalk was sanded and finished by hand. The body was then parted from its mounting spigot with the thin parting tool and sanded and finished by hand.

The completed box was buffed using a Chestnut buffing system.
 

Attachments

  • 3 - view of male spigot.JPG
    3 - view of male spigot.JPG
    99.6 KB · Views: 2,063
  • 2 - Inside of box and lid.JPG
    2 - Inside of box and lid.JPG
    95.9 KB · Views: 2,063
  • 1 - Side view of box.JPG
    1 - Side view of box.JPG
    99.5 KB · Views: 2,063
Well here is my entry for this month’s Acorn Box challenge.

Finished dimensions are approximately 90mm in overall length, diameter of the nut about 45mm and the cupule (lid) about 55mm. Wood is oak.

Not knowing anyway that I could decorate the cupule I decided that the answer was to use contrasting woods – but which woods. I have some walnut and some sycamore which would have given me a good contrast but decided to try ebonising some oak (it is an oak seed we’re making after all isn’t it).

So what you see below came from a single piece of oak, the cupule (and the extra little ring to stand the whole thing on) were ebonised by dissolving some wire wool in vinegar.

I say a single piece of wood, but I didn’t have a piece thick enough so cut a length in half and glued the two halves together to make a single thicker piece.

After turning to a cylinder, I put a chuck spigot on each end. I then parted off the two parts of the acorn, the nut and the cupule. I shaped the top half of the nut first and hollowed it out using a forstner bit (I hope that’s not cheating). I then set this piece aside while I worked on the cupule.

I hollowed out the cupule to fit over the male spigot of the nut by first using a forstner bit to get close and then gently taking tiny bits off with a scraper until I had a good tight fit. (I had to keep stopping the lathe during this procedure so I could check the nut for fit).

I then put the nut part back in the chuck and jammed the lid in place to finish shaping it and also to drill a small (approx 8-10mm dia) hole for the stalk. The lid was then removed and a separate jam chuck created to fit the nut on so I could finish the bottom of it.

I cut the small ring that the acorn sits in from a leftover piece. I figured that an acorn is a daft shape for a box so it had to have something to keep it upright.

The ebonising was done next and when dry the whole lot was finished with some Chestnut sanding sealer followed by a couple of coats of Chestnut melamine lacquer with light sanding between coats.

Tools used were roughing gouge, small (spindle, I think, gouge), a small scraper, skew and parting tool.

Found a twig in the field next to my shop and cut a bit off for the stalk (no idea what wood this is).

acorn01.jpg


acorn02.jpg


acorn03.jpg


acorn04.jpg


regards

Brian
 
This is my first box as well, and the piece of wood i was using got shorter and shorter......and haven't I learnt a lot!

Hunting around the workshop for a piece of wood the only piece that was thick enough was a bit of olive. Well, there was some sapele as well, but i don't like sapele. The olive turned out to have a split and some woodworm, but by that time it was too late to go back. Roughed it out to a cylinder and hummed and haaed a bit. Turned a spigot and put it in the spigot jaws that just happened to come with the chuck. After a lot of digins I decided that the only safe tools were the roughing gouge and the scrapers if i was ever going to finish this piece, and occasionally i used a spindle gouge, but I couldn't figure out how to hollow with it at all. i was more or less sure about the shape I wanted, turned the cup first and then a spigot to hold the cup which was going to be the end of the nut until I turned it off by mistake. Grrrr. Hollowed out nut as far as possible, which was quite far in the end, though I know it should be the same thickness wall all round, but at that point I wasn't sure how long the nut was going to be.

I started off finishing with Danish oil, I like the matte look, but in the end I decided to soak it with a thinned solution of sanding sealer and, when this had dried I took it all the way down to 12000 as if it were a pen. it does feel lovely and silky to touch. Oh yes, it measures about 7cm by 12cm. It doesn't look the same in the photos, but I've run out of time and I've taken the photos 4 times until I found a memory card that at least one of the 2 computers in the house can see. About 3.5 hours for photos. I wanted to take them in daylight because of the shine in artificial light, but it was too late by then. Sorry they look so dark, I put the bits on my woodturning fleece so they wouldn't roll about so there's a bit of a sawdust background.
Really enjoyed this anyway. I still haven't been able to sign up for this, though, the scoreboard still says unavailable for me. Apart from that i think i followed all the rules.

acorn1.jpg


acorn2.jpg


acorn3.jpg


acorn4.jpg
 

Attachments

  • acorn1.jpg
    acorn1.jpg
    10.3 KB · Views: 2,018
  • acorn2.jpg
    acorn2.jpg
    12.3 KB · Views: 2,018
  • acorn3.jpg
    acorn3.jpg
    12.7 KB · Views: 2,018
  • acorn4.jpg
    acorn4.jpg
    13.3 KB · Views: 2,018
Here is my effort for this month, made of Oak and it finished 3" x 1 1/2". I started with a 2" x 5" blank mounted between centre's and turned it to a cylinder, a spigot was turned on each end and the magic 1/3 - 2/3 measurement was then parted off. The base was hollowed using a spindle gouge and most of the outer shape was turned using the same gouge. The base was left on the mounting spigot but the inside was finished with sanding sealer and friction polish. The base was put to one side and the top was mounted in the chuck and hollowed out in the same manner, once a tight fit with the base was achieved the top was parted off and the base remounted in the chuck. The two parts were joined and as added security the tailstock was initially used as well as cling film which I use to hold the parts together whilst the top is finish turned and sanded.
Once the top was finished the base was then mounted on a sacrificial blank and turned to a finish, it was then stained with a wire wool and vinegar solution and once dry all parts were buffed using the chestnut buffing wheels.

Tools used were two sizes of spindle gouge (1/4 & 3/8), a parting tool and a small scraper to refine the inside. A fun project which I enjoyed turning as I don't do too many boxes and I was happy that I managed a snug enough fit to give that 'pop' when the parts are separated.

Regards

Steve
 

Attachments

  • DSCN2708 (2).JPG
    DSCN2708 (2).JPG
    193.9 KB · Views: 1,930
  • DSCN2710.JPG
    DSCN2710.JPG
    194.6 KB · Views: 1,930
  • DSCN2713.JPG
    DSCN2713.JPG
    230.3 KB · Views: 1,930
  • DSCN2711.JPG
    DSCN2711.JPG
    207.9 KB · Views: 1,930
Hi, here's my first ever entry to the challenge, hope to continue throughout the year. Been lurking in the background long enough.

My acorn is made from what I think is whats called bird cherry.

Size is 95mm x 52mm.

I have turned one box before, but nothing this shape. It is turned from a single piece of wood. My model was a Spanish acorn gathered on a recent visit, they seem to be longer than English ones and tried to use these proportions for mine.

Rough turned to a cylinder mounted in chuck jaws with tailstock up for support. Parted at approx 1/3 of length. Began by turning the cup inside first, part turned outside, parted off, mounted on spigot and outside finished. Same sequence for the acorn.

Tools used, roughing gouge, 3/8 spindle gouge with wings ground back, small half round scraper. Sanded to 600 grit and finished with wax.

Acorn-side-view.jpg


Acorn-spigot-and-lid.jpg


Inside-box-and-lid.jpg
 

Attachments

  • Acorn-side-view.jpg
    Acorn-side-view.jpg
    52.3 KB · Views: 507
  • Acorn-spigot-and-lid.jpg
    Acorn-spigot-and-lid.jpg
    48.8 KB · Views: 507
  • Inside-box-and-lid.jpg
    Inside-box-and-lid.jpg
    50 KB · Views: 508
Status
Not open for further replies.
Back
Top