House build

UKworkshop.co.uk

Help Support UKworkshop.co.uk:

This site may earn a commission from merchant affiliate links, including eBay, Amazon, and others.

murdoch

Established Member
Joined
4 Mar 2013
Messages
186
Reaction score
7
Location
suffolk
Hi, I started a house build in my spare time a year ago to this day and thought I’d show some progress pics. I’ve got a bit of time as works slowed a bit so plan to finish over the next six weeks but thought I’d start by showing the build up to now.

Hope this is of interest to people who enjoy seeing this kind of stuff.


Here’s us digging the footings a year ago, took a day with the concrete pour the next day.
7B3C302A-3BF6-4788-B80F-326FA376FB2B.jpeg


Then had my dad and friends help pour and level the slab
5A30F1D0-09B1-448A-9E13-BA89A302E7B1.jpeg


Frame going up, this was built by me and my mate who’s a chippy, all 6x2 at 400 centres clad in 11mm osb
F818DBFD-938F-4E8D-A3A1-0574A9AC5836.jpeg


Here are the easy joists with create the first floor
12E6C589-BD42-47F7-BDD1-26B11535025E.jpeg

49AF6B62-281A-42B2-90D0-FC423B702F31.jpeg


Luckily health and safety weren’t here this day!
944E2491-D1FF-4C0D-ACAC-0261D8646062.jpeg


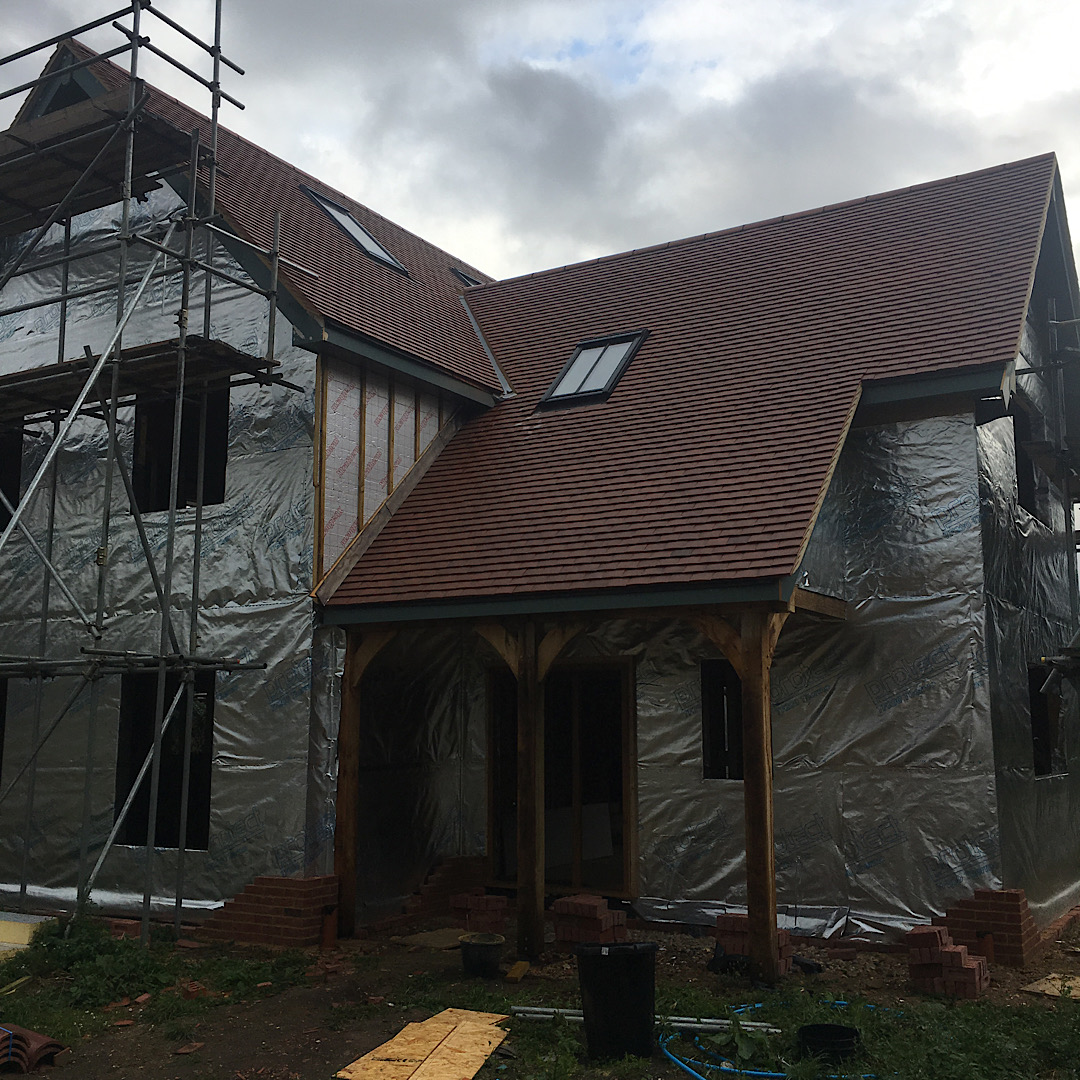
Frame up, took about 3 months to get this far
16F787C2-F5B6-4E2A-B425-758B315D0886.jpeg

Accoya arrives to make all windows and doors, this stuff is great but expensive
7A5ECF6A-1035-4A15-B423-4BA669A0DDD1.jpeg


I’ll add more later if anyone’s interested
 

Attachments

  • 7B3C302A-3BF6-4788-B80F-326FA376FB2B.jpeg
    7B3C302A-3BF6-4788-B80F-326FA376FB2B.jpeg
    668.7 KB · Views: 935
  • 5A30F1D0-09B1-448A-9E13-BA89A302E7B1.jpeg
    5A30F1D0-09B1-448A-9E13-BA89A302E7B1.jpeg
    636.5 KB · Views: 911
  • F818DBFD-938F-4E8D-A3A1-0574A9AC5836.jpeg
    F818DBFD-938F-4E8D-A3A1-0574A9AC5836.jpeg
    516.1 KB · Views: 933
  • 12E6C589-BD42-47F7-BDD1-26B11535025E.jpeg
    12E6C589-BD42-47F7-BDD1-26B11535025E.jpeg
    635.1 KB · Views: 911
  • 49AF6B62-281A-42B2-90D0-FC423B702F31.jpeg
    49AF6B62-281A-42B2-90D0-FC423B702F31.jpeg
    515.6 KB · Views: 959
  • 944E2491-D1FF-4C0D-ACAC-0261D8646062.jpeg
    944E2491-D1FF-4C0D-ACAC-0261D8646062.jpeg
    560.3 KB · Views: 914
  • 16F787C2-F5B6-4E2A-B425-758B315D0886.jpeg
    16F787C2-F5B6-4E2A-B425-758B315D0886.jpeg
    465.4 KB · Views: 911
  • 7A5ECF6A-1035-4A15-B423-4BA669A0DDD1.jpeg
    7A5ECF6A-1035-4A15-B423-4BA669A0DDD1.jpeg
    515.2 KB · Views: 931
Next job was to make the oak frames to support the entrance porch and the outdoor patio area veranda, I bought a second hand chain morticer, read a quick book on oak timber frame and had a go, turned out pretty good and was quite quick and easy to do.

Here it is layed our on trestles
BB2E4ECB-17F9-4D06-BCA3-40F82395BD33.jpeg


D55D59A6-5CB4-4F9F-AD19-035BC82525A1.jpeg


Here’s the porch frame up
547EFBA4-DBF2-4FB0-87AC-B7F2D7F4E935.jpeg


And here’s how there fixed to the ground, bolted to stainless brackets which are fixed down to the foundations
E426587C-E5E8-4033-9B66-E74DEF65D815.jpeg
 

Attachments

  • BB2E4ECB-17F9-4D06-BCA3-40F82395BD33.jpeg
    BB2E4ECB-17F9-4D06-BCA3-40F82395BD33.jpeg
    473.2 KB · Views: 736
  • D55D59A6-5CB4-4F9F-AD19-035BC82525A1.jpeg
    D55D59A6-5CB4-4F9F-AD19-035BC82525A1.jpeg
    441.4 KB · Views: 754
  • 547EFBA4-DBF2-4FB0-87AC-B7F2D7F4E935.jpeg
    547EFBA4-DBF2-4FB0-87AC-B7F2D7F4E935.jpeg
    601.3 KB · Views: 736
  • E426587C-E5E8-4033-9B66-E74DEF65D815.jpeg
    E426587C-E5E8-4033-9B66-E74DEF65D815.jpeg
    587.9 KB · Views: 778
Here are the plans, should really have started with these first!
09B6ECA4-9F60-4041-8EFE-CCF8101CC146.jpeg

60D2D6A0-82C4-4FA5-B1AB-1664931D4842.jpeg

72CBA9E3-57B5-459B-A059-5ED9EB796E3F.jpeg

21BE672A-2EFA-4579-B1C3-EE9FF78CFD23.jpeg

89A703E5-7B72-4D98-B450-5076F6B15CA7.jpeg
 

Attachments

  • 09B6ECA4-9F60-4041-8EFE-CCF8101CC146.jpeg
    09B6ECA4-9F60-4041-8EFE-CCF8101CC146.jpeg
    279.4 KB · Views: 669
  • 60D2D6A0-82C4-4FA5-B1AB-1664931D4842.jpeg
    60D2D6A0-82C4-4FA5-B1AB-1664931D4842.jpeg
    291.5 KB · Views: 669
  • 72CBA9E3-57B5-459B-A059-5ED9EB796E3F.jpeg
    72CBA9E3-57B5-459B-A059-5ED9EB796E3F.jpeg
    499.6 KB · Views: 669
  • 21BE672A-2EFA-4579-B1C3-EE9FF78CFD23.jpeg
    21BE672A-2EFA-4579-B1C3-EE9FF78CFD23.jpeg
    595.3 KB · Views: 669
  • 89A703E5-7B72-4D98-B450-5076F6B15CA7.jpeg
    89A703E5-7B72-4D98-B450-5076F6B15CA7.jpeg
    474.7 KB · Views: 668
I shall not be watching this post any further for fear of being sick with envy. Looks like a beautiful house to me.
 
So, next up we had a roofer felt and batten the roof
1EBC7B41-65E1-49ED-9EA7-57C2C9B46009.jpeg


While he got on with the roof I wrapped the whole building in a breathable membrane
F8C6FB92-AAD5-4FAB-BC44-78570EB326E3.jpeg


Roof finished in plain tiles
F8C6FB92-AAD5-4FAB-BC44-78570EB326E3.jpeg


While the roof was being finished I then cracked on with making all the windows and doors which I’ll show next.
 

Attachments

  • 1EBC7B41-65E1-49ED-9EA7-57C2C9B46009.jpeg
    1EBC7B41-65E1-49ED-9EA7-57C2C9B46009.jpeg
    494.3 KB · Views: 374
  • F8C6FB92-AAD5-4FAB-BC44-78570EB326E3.jpeg
    F8C6FB92-AAD5-4FAB-BC44-78570EB326E3.jpeg
    673.4 KB · Views: 355
  • A8C6CEB6-A20F-4DBD-BA6E-F23893CF06B6.jpeg
    A8C6CEB6-A20F-4DBD-BA6E-F23893CF06B6.jpeg
    427.4 KB · Views: 318
Perhaps I’m being obtuse here, but if that is OSB cladding the frame, it is basically vapour impermeable, so why use breathable membrane outside it?
 
Looking good, as you know I've been there, well worth the effort when all done.
 
Deadeye":3eskpqfa said:
Lovely work - and quick too!
I'm curius why you didn't go for one further shower room or ensuite?

Simply because the kids would have all fought over it!!! We did add an extra shower in the downstairs loo though just so when there all teenagers there’s another shower to use
 
Marineboy":3udxbjex said:
Perhaps I’m being obtuse here, but if that is OSB cladding the frame, it is basically vapour impermeable, so why use breathable membrane outside it?

To tell you the truth I’m not really sure how the membranes work ect, this was how the architect and building control specified it so I just went along with it. The full build up is 6x2 with rock wool between studs, 11mm osb, breathable membrane, 50mm celotex, 25mm batten with cedar cladding on top.
 
doctor Bob":3l1s4eo6 said:
Looking good, as you know I've been there, well worth the effort when all done.
Thanks bob, really enjoyed seeing your build thread but your right, it’s knackering running a business and a self build together! Cheers
 
murdoch":2nq276gr said:
doctor Bob":2nq276gr said:
Looking good, as you know I've been there, well worth the effort when all done.
Thanks bob, really enjoyed seeing your build thread but your right, it’s knackering running a business and a self build together! Cheers

and in the middle of a pandemic ............... how are supplies being affected for the build?
 
doctor Bob":2llt8rxr said:
murdoch":2llt8rxr said:
doctor Bob":2llt8rxr said:
Looking good, as you know I've been there, well worth the effort when all done.
Thanks bob, really enjoyed seeing your build thread but your right, it’s knackering running a business and a self build together! Cheers

and in the middle of a pandemic ............... how are supplies being affected for the build?

Nearing the end of the build, maybe 6 weeks left while I build the kitchen, stairs, utility etc. pictures so far are of the build over the last year leading up to now.

I bought everything I would need the week before everything was shut down so should be ok to finish.
 
Here’s a few photos of the windows/doors being made, all constructed from accoya and made to current regs.
E2E8B348-14B8-4943-B480-83DEC9E9508C.jpeg

ECF7D8DE-8A5A-4540-9CFF-A246001C78A0.jpeg

5B3717D6-235D-42F9-8ADF-86747FF6FD57.jpeg


Diminishing rail on the glazed door.
9D0468B9-56C0-4304-9467-708BD9F7684E.jpeg


Everything was sprayed in the spray shop before being installed and glazed.
5CC7CF18-F703-4A83-969C-012B96E0578A.jpeg

40BA40AE-4D29-46D3-AB03-2285AB3F06B7.jpeg


For the main door I used oak
28708B66-DEEE-4F6D-B64D-4DF971AF404A.jpeg
 

Attachments

  • E2E8B348-14B8-4943-B480-83DEC9E9508C.jpeg
    E2E8B348-14B8-4943-B480-83DEC9E9508C.jpeg
    432.9 KB · Views: 184
  • ECF7D8DE-8A5A-4540-9CFF-A246001C78A0.jpeg
    ECF7D8DE-8A5A-4540-9CFF-A246001C78A0.jpeg
    229 KB · Views: 161
  • 5B3717D6-235D-42F9-8ADF-86747FF6FD57.jpeg
    5B3717D6-235D-42F9-8ADF-86747FF6FD57.jpeg
    432.7 KB · Views: 161
  • 9D0468B9-56C0-4304-9467-708BD9F7684E.jpeg
    9D0468B9-56C0-4304-9467-708BD9F7684E.jpeg
    292.1 KB · Views: 162
  • 5CC7CF18-F703-4A83-969C-012B96E0578A.jpeg
    5CC7CF18-F703-4A83-969C-012B96E0578A.jpeg
    390.5 KB · Views: 161
  • 40BA40AE-4D29-46D3-AB03-2285AB3F06B7.jpeg
    40BA40AE-4D29-46D3-AB03-2285AB3F06B7.jpeg
    326.2 KB · Views: 160
  • 28708B66-DEEE-4F6D-B64D-4DF971AF404A.jpeg
    28708B66-DEEE-4F6D-B64D-4DF971AF404A.jpeg
    346.8 KB · Views: 161

Latest posts

Back
Top