Holtzapffel Workbench

UKworkshop.co.uk

Help Support UKworkshop.co.uk:

This site may earn a commission from merchant affiliate links, including eBay, Amazon, and others.

neilc

Established Member
Joined
17 Nov 2005
Messages
264
Reaction score
1
Location
Ireland
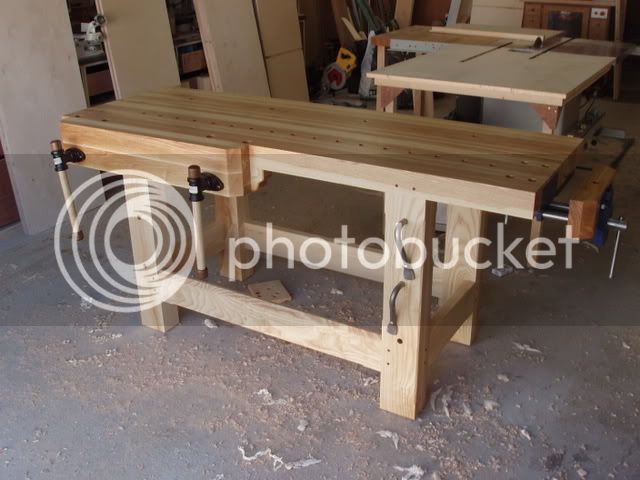
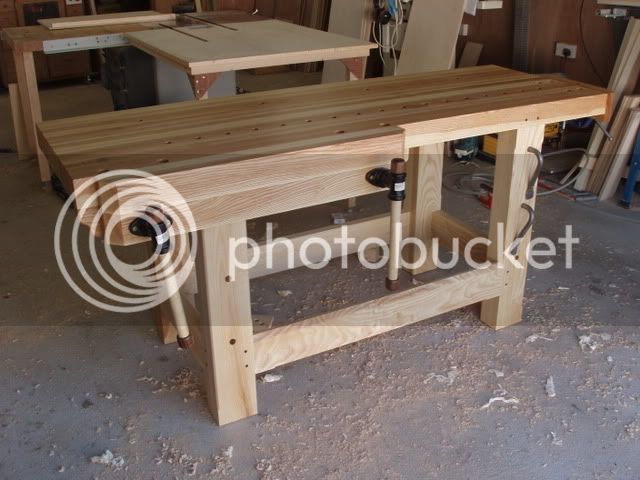
For quite a while I been meaning to build a workbench. When I seen the Holtzapffel Workbench in Woodworking Magazine I decided to go for it. It's quite a simple design but easily covers my needs and hopefully more that I haven't acquired yet. It's made from ash. I started with the top. I made this in sections, gluing three lengths together at a time to form individual pieces appox 6" x 3" x 74". I then joined these together one at a time till I came to full width. On the last section I planed it down till I got 24" full width. I was as careful as I could keeping it as flat as possible as I went but I knew it would still need flattening when finished. This is where I chickened out. I got the guy who built my stairs recently to pass it through his industrial drum sander. He also trimmed it to length 72". When it comes time to flatten it for the first time I hope to have built up enough hand plane skill to have the confidence to do it myself.
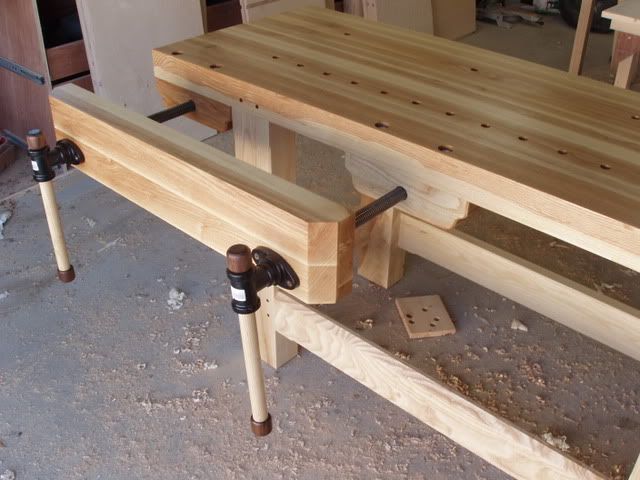
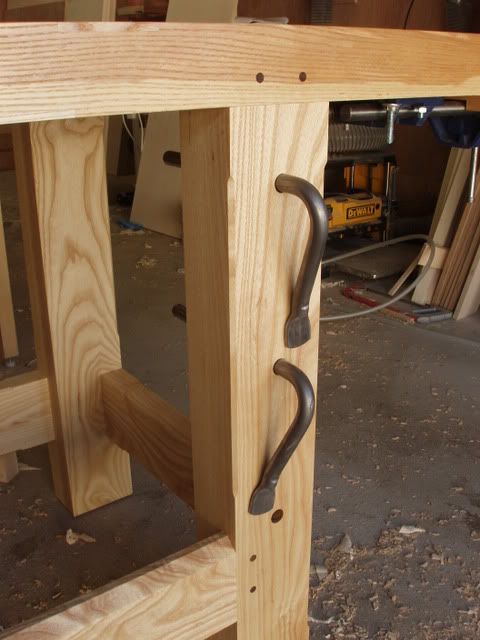
I really enjoyed making the base. The legs are made up of two pieces laminated together and the stretchers individual pieces. I cut all the tennons on the tablesaw using the dado blade. For the mortices I used my router to start. I only felt comfortable bringing this so deep and finished them off with a hammer and chisel. I used the drawboring technique described by Christopher Schwarz on all the mortice and tennons. I got a bit of a fright after offsetting all the holes and actually seeing the distance between them when I assembled the base. I needn't have worried, I used walnut dowels made with the veritas 3/8" dowel cutter. It's a brilliant technique and would highly recommend it for heavy joinery like this. I turned the handles on an old lathe my uncle gave me, also from ash with walnut ends.
Finally, I also purchased Chris' book 'Workbenches from Design & Theory to Construction & Use' from his website www.lostartpress.com. If you get it from here you also get a CD with an electronic version and the main man also signs the book. It's brilliant I can't recommend it highly enough. As the title says it covers everything.
Anyway on to some pictures (sorry no WIP). For the eagle eyed among you spot the patch.


P1010035.jpg


P1010037.jpg


P1010032.jpg


P1010034.jpg


P1010040.jpg


Neil

PS a sketchup drawing of the bench can be downloaded from here.
 
blimey riley! :shock: , that's lovely. I like the added touch of fresh shavings around it on the floor. Make it look 'settled' ;)
 
Super looking piece of work, and it should give you years of pleasure also the knowledge that no one can walk off with it on there shoulder.
 
Very nice one!

What is the reasoning behind your dog hole locations?
 
Thanks to everyone for the kind comments. This was a very enjoyable project and I'm quite proud of the way it turned out.

Tnimble
The dog hole locations are explained best in Chris' own words. Here's a direct cut and paste from the article in Woodworking Magazine.

The chop offers a lot of support for your work below, though I admit it’s not as unerring as a tail vise. But what makes up for that is that I’ve spaced the dog holes in the benchtop less than 4" apart, so there’s always less than 4" of open space below your work between the chop and the benchtop. And your work isn’t going to sag or bow over that short a span.
There are also a few well-placed holes for holdfasts in the top to round out the workholding for the Holtzapffel workbench.

Tiddles
Everything about the bench is rock solid. Its very heavy. The patch I mentioned in the first post happened as a result of me stupidly tying to turn it upside down on my own it to do some work underneath the top. Anyway that's given it some character, right.

Neil
 
Neil

Can you tell me what components you used to make the front vice and how much it cost?

I am currently looking to buy two of these vices for a workbench I am building and wondered about the price difference.

Thanks

D
 
That looks like an incredibley sturdy bench Neil, very well done!! :)

You mention that you used the "Veritas dowel maker" - is this the same as a dowel plate where you hammer it through, or am I missing something?

Did you also turn and make the handles for the front vice?
 
Dudester
I'm using a Record 52 which I have for quite a while. It's only 7" and not quick release. As I already had it I couldn't bring myself to get another one. I know I paid more for it than your link though, so that looks very good value.

OPJ
The veritas dowel cutter is a great bit of kit, no hammering required. This is the link to it. To use it, just fix it to your vice, cut your offcut slightly over size and drill it through the cutter. Simple as that. Also the great thing about it is you can slightly adjust the size by altering the blade position.
I turned the handles out of ash with walnut ends.

Neil.
 
ooh, nice. I had a go at something after the Roubo Bench article. I've not quite the space for a long bench, so mine is a bit stocky at 6' and I made the top an extra inch thick at 5" to compensate for euro-pine. The Crochet is impressive - worth trying just to see how effective hilariously simple technology can be. The leg vice works ok too; and their in lies a problem - you don't need two things doing the same job at one end and nothing at the other. Sliding end-vice and a twin screw on the front modifications followed soon after, so I've ended up with a sort of mish mash of yours and the roubo. The combination of long, thin and chunky is a winner.

A word on dog holes. The row along the front allows you to pinch work between a dog and the sliding end vice. I lined my row up nice and central with the vice - which means that for the last couple of holes a hold down bumps into the vice workings under the table unless the vice is all the way out. If I had my time again (I'd also have forked out the extra for hardwood rather than pine) I'd put my holes slightly off the centre line so that a hold down tail slips neatly between the vice gubbins.

I'm sure the dowel maker is lovely, but the strongest pegs are split down the grain. Not so pretty perhaps, but probably more effective and not needing any more of those infernal fancy tools.
 
Tony
Having seen your bench thread that means a lot thanks.

Tony (Escudo)
It really is a great resource. If you get it from www.lostartpress.com it will have the Woodworking Magazine article on the CD version.

MrJay
Your right about the dog holes, but it only affects the first two. It certainly makes them a little awkward but by no means unusable.

Neil
 
Neil

I got to wondering, how much crabbing do you get from the front vice? I like the idae of the wide face with twin screws
 
As a record vice modder yourself, Tony, you ought to try this if you want a long vice with pretty much no racking to speak of.
 
Thanks Jake :shock: is that Jake you Jake?

How does it perform after a bit of use?
 
Yes, it's me, blowing my own trumpet.

It works very well indeed, couldn't ask for more.
 
Back
Top