Gauge box participation and assistance hoped for.

UKworkshop.co.uk

Help Support UKworkshop.co.uk:

This site may earn a commission from merchant affiliate links, including eBay, Amazon, and others.

devonwoody

Established Member
Joined
11 Apr 2004
Messages
13,493
Reaction score
25
Location
Paignton Devon
Two members this week did a swap with me and I now have a selection of gauges.

4w.jpg


I want to make a tool box to hold all of those gauges in one box.
I have calculated that the box will need outside measurements of 410mm long x 295mm x 90mm deep. Using timber that as finished 7.5mm thick.

I sorted this piece of beech, (was bananna shaped.)

5w.jpg


And prepared the four pieces, plus a piece of oak faced ply uncut (4mm thick).

6w.jpg


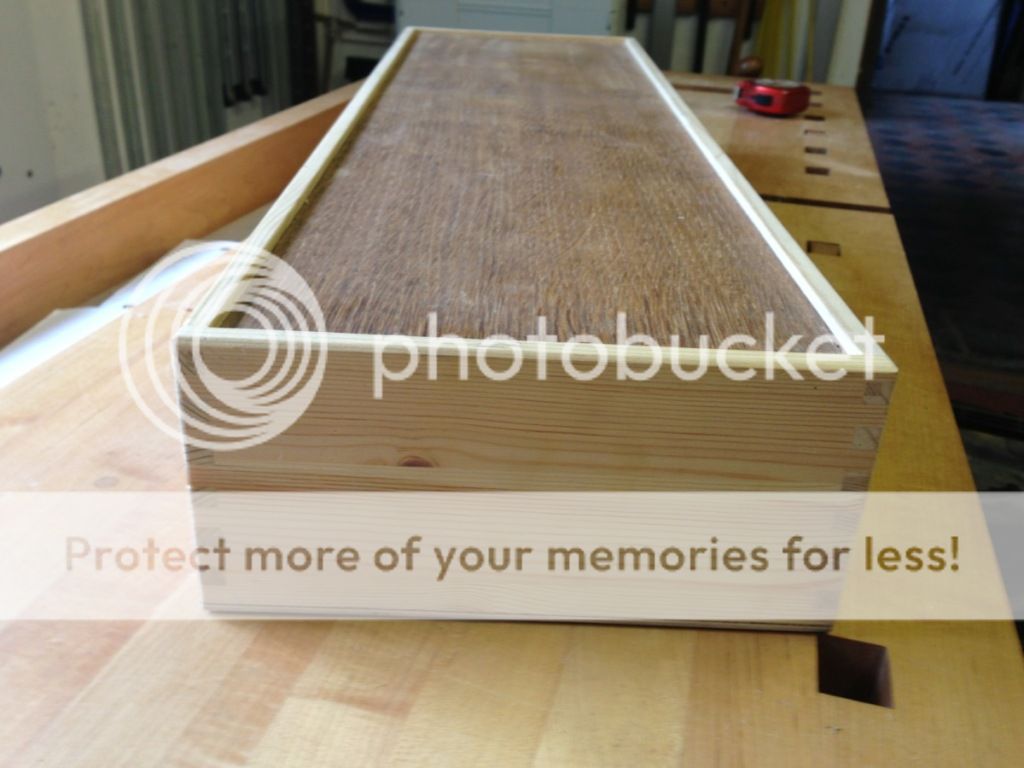
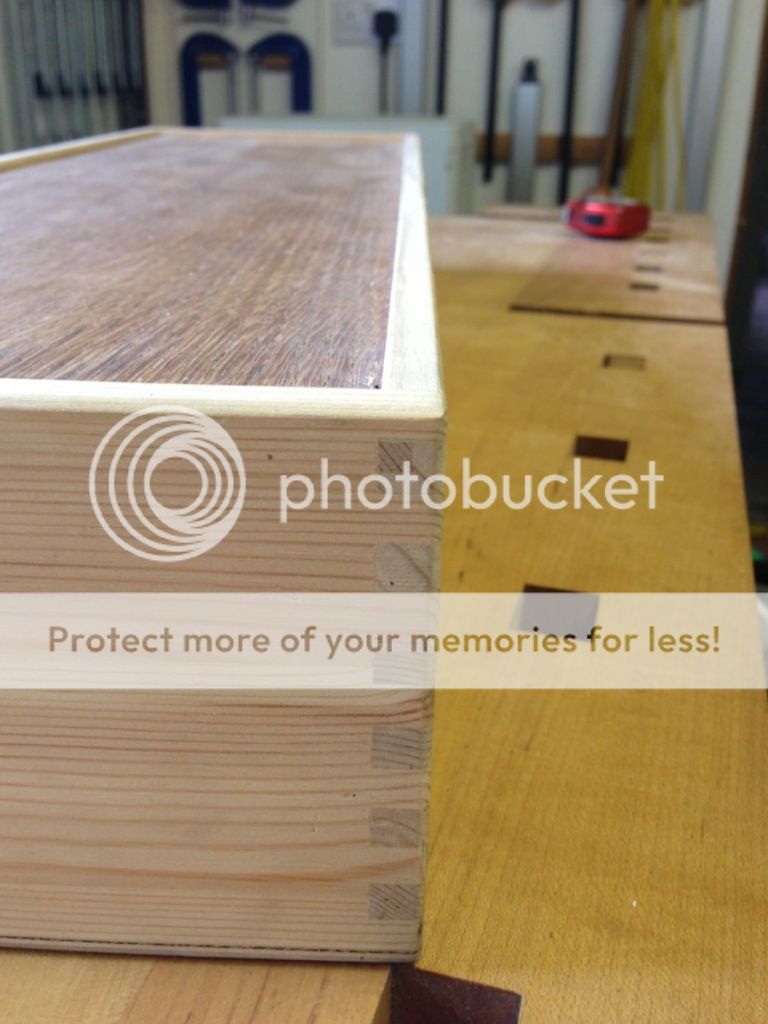
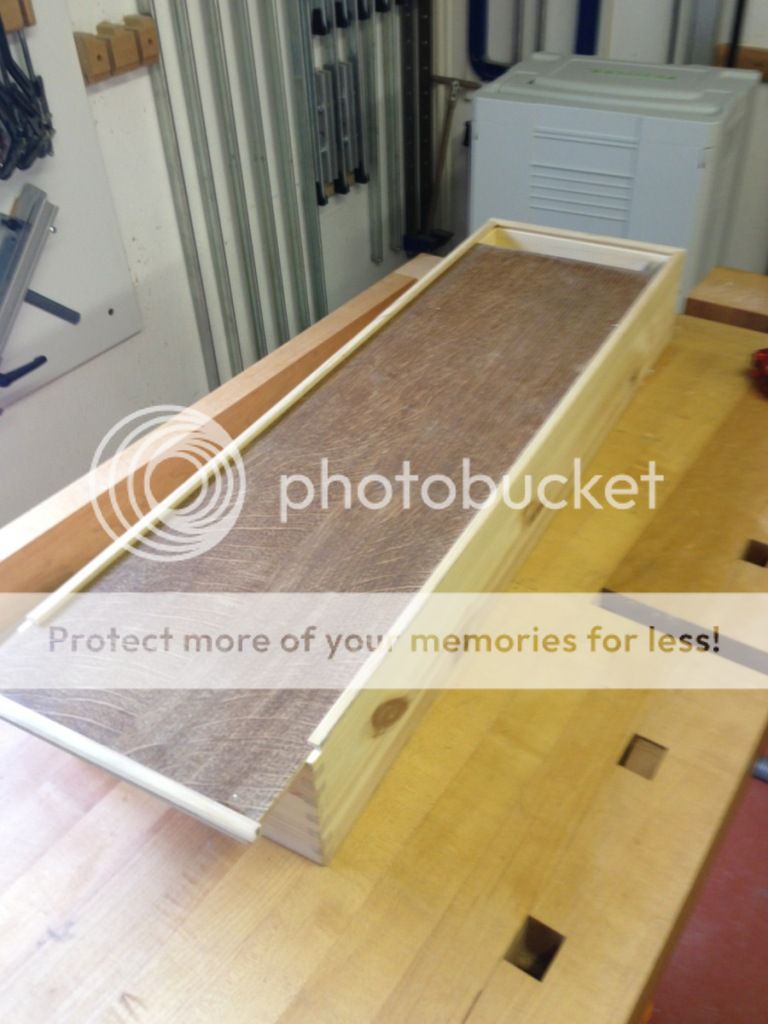
I intend to make the box one piece and then cut off its lid.

The corners are to be dovetailed and this is where I request assistance. I have not done any dovetailing for a while and I know the joints need to accommodate rebates for that ply but have forgotten the technique of allowing for its rebate and to be prepared so the slot does not show eternally.
Can anyone give me the setting up details of the joints so this rebate does not show, using above measurement details?

Edit typo
 

Attachments

  • 4w.jpg
    4w.jpg
    79.5 KB · Views: 1,268
  • 5w.jpg
    5w.jpg
    79.7 KB · Views: 1,268
  • 6w.jpg
    6w.jpg
    77.9 KB · Views: 1,268
I think that you measure the internal opening of the lid and then add on the depth of the rebate (both edges that are opposit) as well position of where you want the lid to be.....I hope you can undestand what I mea?????
 
I think you will need to mitre the corners where the rebate is and dovetail the middle part.
 
or you could work out the measurement of the dovetails and take off from the internal dimention including the rebate and then cut and shape insert to fit. I think it would work, maybe time consuming, but there is no reason why it wont work. Failing that +1 for crispy's suggestion.
 
Hi Devonwoody

If you do stopped grooves in the tail sides you won't have a problem.

Pete
 
I think when you say 'rebates for the ply' you mean 'grooves for the ply' and what you want to do is make a groove at top and bottom for the 4mm ply to fit in. You want to make the grooves all the way along the wood, but have the dovetails hide the open ends of the grooves.

The commonest place where you find through grooves for a box bottom that don't show is on a drawer. But that is different - the front dovetails are lap-dovetails so the ends of the grooves on the sides are hidden by the uncut part of the front. (On the sides, the grooves run in a wide-enough tail.) At the back of the drawer you don't have a groove; the end board sits on top of the bottom board. So that won't work for you. You can't use that technique on a box with all four sides through-dovetailed.

The other way you can hide a groove is to put a mitre at top and bottom, as Chris says. That would be fiddly in such thin wood but you do have lots of experience of making mitred boxes!

The best diagram I could find easily is on Jeff Gorman's excellent site here:

http://www.amgron.clara.net/hingedboddtail34.html

but really I think your answer is either to stick with plain mitres on the corners (with the ply glued in all round as reinforcement) or make stopped grooves using your router.
 
I make various toolboxes for stuff like spindle moulder blocks etc.

I normally use comb joints made on the Woodrat and cut the grooves for the top on the tablesaw. I run the grooves all the way through and glue the box up - this leaves little gaps at the ends which I then plug with little end grain off cuts to match. These are utility boxes and the alternative as already suggested is to make stopped grooves on the router table (or woodrat).

I find it quickest to make sliding tops as in a wooden pencil case, rather than hinged tops - the top section of the front is then cut off and glued to the sliding top to make a handle to open it. One refinement I have used more recently is to cut the handle section off and reglue it with paper in between before cutting the comb joints - then I separate the handle piece and rebate to glue to the plywood top - that way you do not see the end of the plywood at the front.

Here is a box I made for my Festool parallel guides that, despite their ridiculous price, annoyingly came without any storage box; (in this case the handle was not rebated so you can see the front edge of the plywood top. I should add that I normally just glue the base on to the bottom of the sides as I think a flush base is best for shoving around the workshop; you could rebate this which would be a bit tidier).

null.jpg


null-2.jpg


null-1.jpg


Cheers
 
Scholar, thanks for your input, I would have gone down your route if I had read before commencing the joints this afternoon.

I went out to the w/s after lunch today and prepared the timber for setting and cutting out dovetails.
Drew up a full size cutting plan as per picture. (this was necessary for me having not done any dovetails for perhaps three years, these days anything more than a short period ago can be like starting anew)

8w.jpg


Marked up and remembered I could cut the tails (I think they are the tails) in pairs.

8a.jpg


I sorted out my shoulder jig I have used in the past for getting parallel cuts across a board using the chisel which is controlled by the cross piece on the board.

9w.jpg


10w.jpg


chopped out the tails.

11w.jpg


followed by the pins on one end and finished so far for the day, another day tomorrow,

12w.jpg
 

Attachments

  • 8w.jpg
    8w.jpg
    79.3 KB · Views: 1,084
  • 8a.jpg
    8a.jpg
    87.9 KB · Views: 1,084
  • 9w.jpg
    9w.jpg
    88.8 KB · Views: 1,084
  • 10w.jpg
    10w.jpg
    85.1 KB · Views: 1,084
  • 11w.jpg
    11w.jpg
    78.8 KB · Views: 1,084
  • 12w.jpg
    12w.jpg
    77.2 KB · Views: 1,084
Saw your post a little late but the simple answer is to cut the pins and tails first (as you have done) then rout the rebates into the pins and tails approximately 5mm, the width of your base is then the distance between the pins / tails plus 10mm.

Andy
 
did the tails first btw, seems to be a habbit for me doing it that way. Setting up and cutting the pins I remembered I had made a former to hold the pieces in place whilst pins are marked out.

13w.jpg


I got all the joints cut and did a dry run.

14w.jpg


Went to my router table and screwed down a stop at each side to restrict grove cut on both the pieces that had the pins, (the tails I put the groove all the way along) Also decided to only do this for the lid, the base is going to be different.

15w.jpg


16w.jpg


Got the sheet of oak faced ply (3.5mm thick) which does not have a true edge, it was a gift from a neighbour some years ago.

17w.jpg


Did a reasonable freehand cut on the bandsaw.

18w.jpg


Then fixed the ply piece to the bench with a screw at waste piece plus a clamp

19w.jpg


Got a decent edge to a straight line using the block plane, the blade angle is lower.

20w.jpg


Did another dry run with the ply set in lid, had to nibble some ply at the corners to fit the grooves on beech, glad I had decided not to fit base the same way at the same time, it was very very fiddly getting the top in.

21w.jpg


went ahead and glued up ( I am concerned that cutting off lid is not going to go smoothly)

Dont know why the router photograph has come up again, must be a bug somewhere.
 

Attachments

  • 13w.jpg
    13w.jpg
    72.6 KB · Views: 992
  • 14w.jpg
    14w.jpg
    73 KB · Views: 992
  • 15w.jpg
    15w.jpg
    91 KB · Views: 991
  • 15w.jpg
    15w.jpg
    91 KB · Views: 992
  • 16w.jpg
    16w.jpg
    86.9 KB · Views: 992
  • 17w.jpg
    17w.jpg
    71.6 KB · Views: 992
  • 18w.jpg
    18w.jpg
    79.1 KB · Views: 992
  • 19w.jpg
    19w.jpg
    89.7 KB · Views: 992
  • 20w.jpg
    20w.jpg
    86 KB · Views: 992
  • 21w.jpg
    21w.jpg
    85.7 KB · Views: 992
Cleaned up the dovetails this morning with a non kerf saw and then rough sanded with orbital hand sander, took picture in the garden .

24w.jpg


to show the strawberries :)

25w.jpg


26w.jpg


Spent some time setting up the bandsaw to cut off lid, screwed on an extra board to the fence so box would have plenty of support

27w.jpg


Then disaster struck when I commenced the cut. Before fitting up high fence I thought the box would just go through the saw, but alas the guides fouled the box, I took off the guides as the cut had already started before the jam up and continued the cut but this failed, the blade started wandering as per picture below.

28w.jpg


29w.jpg


I was in the proverbial, didn't fancy the tablesaw nor router table to finish off. However settled on my old plough plane.

30w.jpg


It worked well, covered the blade wander and using an 1/8th blade together with some beeswax on the plane surfaces I was able to cope with the exercise.

31w.jpg


Coming back tomorrow with the outcome.
 

Attachments

  • 24w.jpg
    24w.jpg
    82 KB · Views: 956
  • 25w.jpg
    25w.jpg
    86.9 KB · Views: 956
  • 26w.jpg
    26w.jpg
    87.9 KB · Views: 956
  • 27w.jpg
    27w.jpg
    75.8 KB · Views: 956
  • 28w.jpg
    28w.jpg
    93.4 KB · Views: 956
  • 29w.jpg
    29w.jpg
    82.5 KB · Views: 956
  • 30w.jpg
    30w.jpg
    84.5 KB · Views: 956
  • 31w.jpg
    31w.jpg
    74.9 KB · Views: 956
Racers":3q6e70r2 said:
Very nice recovery.

Seconded - ingenious indeed!


As it goes:

devonwoody":3q6e70r2 said:
Dont know why the router photograph has come up again, must be a bug somewhere.

It's because you apparently uploaded it twice by accident. If you attach a photo and then don't use it inline in your post, the forum will just show it at the bottom of your post after everything that you wrote. (If you click both the identical photos and look at the URLs, they actually have different Ids.)

Also I'm curious, what is it that's written on your router table fence? I can't quite make it out from the photo...
 
JakeS":7eworwxr said:
Racers":7eworwxr said:
Very nice recovery.

Seconded - ingenious indeed!


As it goes:

devonwoody":7eworwxr said:
Dont know why the router photograph has come up again, must be a bug somewhere.

It's because you apparently uploaded it twice by accident. If you attach a photo and then don't use it inline in your post, the forum will just show it at the bottom of your post after everything that you wrote. (If you click both the identical photos and look at the URLs, they actually have different Ids.)

Also I'm curious, what is it that's written on your router table fence? I can't quite make it out from the photo...

Jake I have written on both ends of the fence which direction to undo the collet when using a spanner at the table so I do not tighten more when I actually wish to release. Or is it that word scr ew ed the one you are having difficulty with. :)
 
BTW the reason the bandsaw cut went wrong has now been solved I think.

I raised the bearing carrier to its highest extent and the box went through the gap OK, then I tightened the bearing carrier and that sets its final and correct orientation. The cut was started then hit a bearing (fouled only by 1mm). I removed the bearings hoping wishfully that I would get away with a true cut with no bearings, but hopeless on a ten inch deep cut really.

Cutting the dovetails earlier by hand was difficult at first, I was thinking that my old dovetail saw (around 40 years old) was blunt, however after wiping the blade with beeswax there was no problem it cut perfectly and does not need resharpenning (not that that would be practical these days) Also using the plough plane was heavy going the first side and then I thought beeswax again, 50% less energy needed. Good old bees!
 
devonwoody":3gknjf4w said:
Jake I have written on both ends of the fence which direction to undo the collet when using a spanner at the table so I do not tighten more when I actually wish to release.

Aha! Fair enough - I think it was just that I've seen lots of pictures where people have written the direction of travel on their fences, so my brain was trying to match 'tighten' and (I presume) 'release' to words to do with directions!

I've used candle wax to ease saws and so on, but it does seem to make them cling to sawdust a lot more than usual, and need more regular wiping-down. Still, I guess there's a net benefit there!
 
Progress, Clamped the lid and carcass together as per picture using some wide waste timber and going to use a piano hinge on the shortest edge of lid.
33w.jpg


Clamped it into the vice with that extend end of holding system so making it very easy to work on and keep lid position stable.
34w.jpg


Hinge screwed on, did have to use longer brass screws than needed but clipped off threads inside box with pincers.
35w.jpg


Added stop blocks to rear of hinge, this enables the lid to remain fixed open by law of gravity, also fitted guides to front so that when lid is closed it should never strain the situation.
36w.jpg


Brought indoors this morning to do a portrait photograph, not to jewellery box standard but I am satisfied.
37w.jpg
 

Attachments

  • 33w.jpg
    33w.jpg
    88.7 KB · Views: 552
  • 34w.jpg
    34w.jpg
    78.9 KB · Views: 552
  • 35w.jpg
    35w.jpg
    72.3 KB · Views: 552
  • 36w.jpg
    36w.jpg
    90.9 KB · Views: 552
  • 37w.jpg
    37w.jpg
    88.2 KB · Views: 552
devonwoody":12qufg7t said:
Also using the plough plane was heavy going the first side and then I thought beeswax again, 50% less energy needed.

Something's really quite wrong - a 1/8" groove should have no appreciable resistance to cutting, even if the blade is a little blunt.

BugBear
 
Back
Top