Fancy Dovetails

UKworkshop.co.uk

Help Support UKworkshop.co.uk:

This site may earn a commission from merchant affiliate links, including eBay, Amazon, and others.

matthewwh

Established Member
Joined
5 Jul 2006
Messages
1,507
Reaction score
6
Location
North Oxfordshire
I was having a chat with Rob Stoakley last week about dovetails, specifically the beautiful aluminium sided drawers in the L'Orchidee desk by Marc Fish:

1389787_455977131207244_1066528622_a.jpg


Rob reckoned that you couldn't teach someone how to cut this joint in one weekend, I disagreed, and the obvious outcome prevailed. Details and photos of my efforts can be found on the WSH blog.

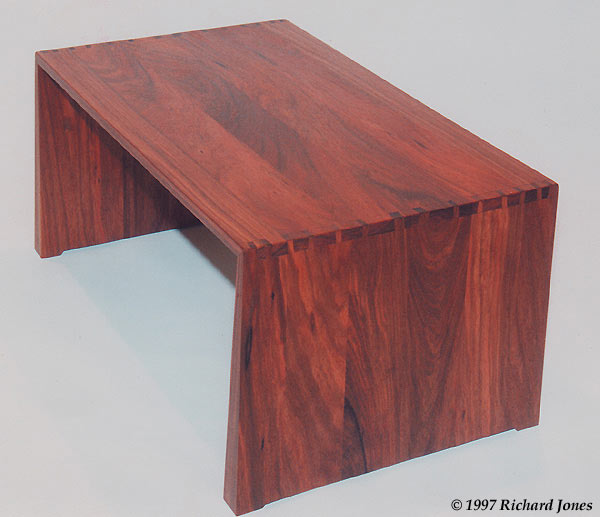
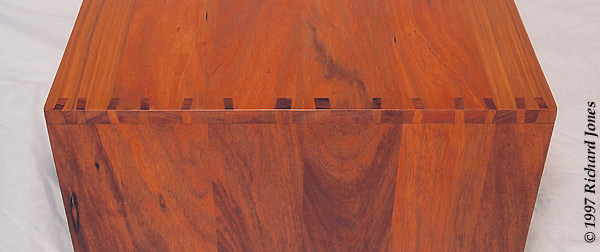
So, my question is, has anyone else ventured beyond joining two flat boards at 90 degrees? If so, how did you get on, and can we see some photos please?
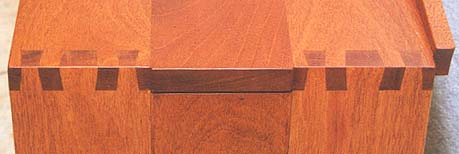
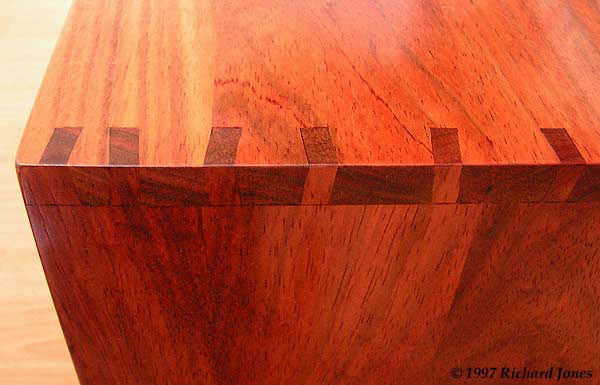
 
I've been told that the rule of thumb taught at Parnham was that if a rectilinear piece of furniture takes x hours to make, then introducing just one curved face will extend the build time to 3x hours, and introducing a second or compound curve will extend that still further to 10x hours!

Give or take, it's been my experience this rule is about right. But many makers struggle to accept it, consequently curved furniture is almost always under priced.

Compound angles are the norm with chairs, and it's no coincidence that a number of makers wonder why it's extremely difficult to make a profit on a jointed chair!

Here's a chair I made in rippled black Walnut, there isn't a 90 degree angle anywhere,

Walnut-Chair-1.jpg


The trickiest joint (and from an engineering point of view the most important) is where the side rails join the back legs.

Walnut-Chair-2.jpg


It's hard to see in this rubbish phone photo, but the side rail slopes down toward the back, slopes inwards towards the back, and most difficult of all it's plumb at the front but the back leg is slightly angled (the distance between the legs is wider at the base than at the top) so effectively the side rail has to be "in wind". However, the "wind" is shaped into the side rail only after jointing, so the tenon has to be cut on a triple compound angle, and it has to be a precise fit in the mortice or the joint will quickly fail. Despite being jigged up to the eyeballs I can't make that chair in under 80 hours...and in the chair making world it's not even considered a particularly complicated design. Ho hum.
 

Attachments

  • Walnut-Chair-1.jpg
    Walnut-Chair-1.jpg
    59.1 KB · Views: 1,855
  • Walnut-Chair-2.jpg
    Walnut-Chair-2.jpg
    64.8 KB · Views: 1,855
Wow Custard, those are beautiful chairs .. wonderful work!

Matthew, the chest I am building comprises 8 drawers, each with a bow front and angled sides. There are half-blind dovetails at the front and through dovetails at the rear. All of these involve compound angles. The drawer bottoms connect via slips, and the slips require compound angles so that the grooves are on the horizontal.

The carcase (boring ... I've posted it here before a few times) ...

LCAStageCompleted_html_m560a5a19.jpg


A drawer plan ...

DesigningTheDrawers_html_61fb2f0.jpg


And 8 completed drawers ..

AllTheDrawersAreDone_html_m2bb88984.jpg


Regards from Perth

Derek
 
Outstanding work Derek, that's the first time I've seen a drawer construction plan for your piece and it is indeed a complicated job. Furthermore, it's doubly impressive given that you've basically taught yourself. That really is something special, not just the work but more significantly figuring out the methodology behind the work and then having the chutzpa to give it a go when you've never made anything like it before.

=D>

To Mathew's point about non-rectilinear jointing, here's another chair that shows more clearly the complexity of most side rail to rear leg joints,

Pear-Chair-1.jpg


Pear-Chair-2.jpg


The eagle eyed will spot it's the same leather upholstery as the previous Walnut chair. Like Henry Ford, I work on the basis you can have any chair you like as long as it has a blue/grey drop in seat!

This goes with a desk I made from the same Swiss Pear that has a laminated and curved front, so the drawers have to conform to that curve,

Pear-Desk-Drawer.jpg
 

Attachments

  • Pear-Chair-1.jpg
    Pear-Chair-1.jpg
    51.5 KB · Views: 1,730
  • Pear-Chair-2.jpg
    Pear-Chair-2.jpg
    54.5 KB · Views: 1,730
  • Pear-Desk-Drawer.jpg
    Pear-Desk-Drawer.jpg
    62.3 KB · Views: 1,730
Thanks for the kind words Custard. One day I hope to produce as nice a work as yours. It really appeals to me.

My previous project was a copy of Hans Wegner's "The Chair" in Fiddleback Jarrah using handtools. This also provided plenty of practice for compound joints ... mortice and tenons. Not a straight line anywhere.

TheChairEndofPhaseOne_html_m2aa207d8.jpg


Even the curves were compound curves ...

TheChairEndofPhaseOne_html_4d94d327.jpg


The rear and arms are joined by the most difficult "dovetails" (Wegner's term - I'd call them tapered fingers)I have ever made. The joint had to be sawn with absolute accuracy as, when the shaping was completed, the dovetails emerged from their inside.

It turned out OK ...

WeavingSeatCompletingTheChair_html_m4441928f.jpg


WeavingSeatCompletingTheChair_html_2ebf780e.jpg


After this build there was little to scare me.

Regards from Perth

Derek
 
Hello Matthew, the first chair is cut from the solid, the second chair is mainly laminated. I wouldn't use steam bent components for jointed chairs like these because steam bending works best with wet timbers, so you never know how the timber will then move as it subsequently dries. Another technique I've used for making curved components is the "bricklaying" method, where you build a curved ground for veneering using small blocks of timber glued together in the manner of a curved brick wall. I'd previously classed that technique under the heading "things you see in books but that'll never work in real life", however I have to say, it does actually produce very strong and stable components!
 
I admit this is just "two flat boards at 90 degrees" Matthew, but I think you'll agree the dovetails executed aren't quite standard, ha ha.

The time allowance I give is six hours per foot length (300 mm) or part foot (300 mm) length. So 200 mm is allowed 6 hours, and 400 mm is allowed 12 hours.

Mahog-Crotch-Joint.jpg


How to execute them can be found here.

And here's an example that's about 500 mm long on a coffee table. Slainte.
boire-table-3-600.jpg


boire-table-600.jpg


boire-table-2-600.jpg
 
matthewwh":1zkzlc56 said:
They definitely still qualify Richard, awesome craftsmanship!
It's mostly just down to things like careful wood preparation, accurate setting out and careful execution Matthew, plus a good amount of patience I suppose. Finding willing paying clients is probably a greater challenge, hence the rarity of such oddball joinery, ha ha. Slainte.
 
Back
Top