Cutting comb joints

UKworkshop.co.uk

Help Support UKworkshop.co.uk:

This site may earn a commission from merchant affiliate links, including eBay, Amazon, and others.

Archimedes

Member
Joined
16 May 2011
Messages
18
Reaction score
0
All

I have a question regarding cutting comb joints/finger joints/box joints or whatever you want to call them :D .

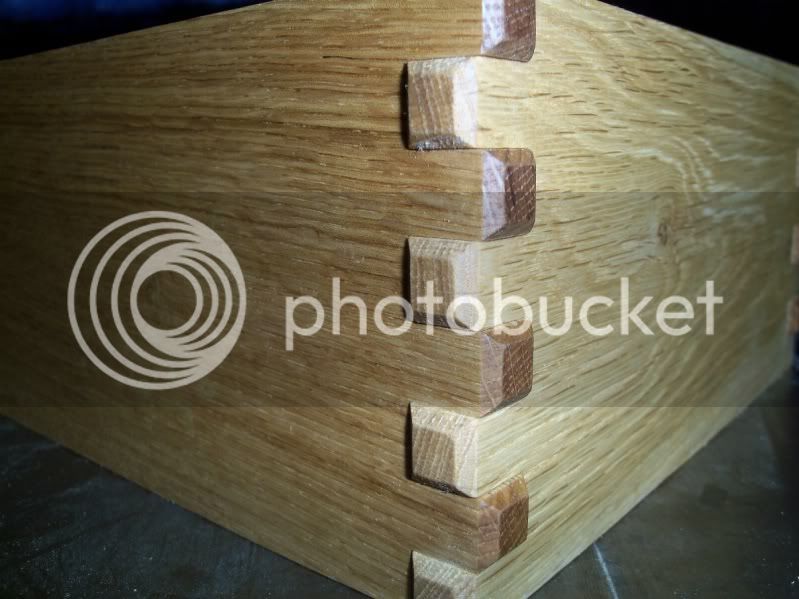
I am new to this woodworking shenanigins and I am making a 8" x 6" x 4" wooden box in walnut. I have been using offcuts to complete comb joints (by hand) as practice pieces before going ahead with the box. I am producing 'sort of' neat jointing (but not great - Evel Knievel offered to jump one of the gaps - at least he didn't decline :mrgreen: ).

I am using a marking knife to mark the lines (not a pencil) and using a dovetail saw to cut the pins (6 mm wide) and a 6 mm wide bevel edge chisel coming in from either side to chop out waste. My chisels Narex, the dovetail saw is a Lie Nielsen straight handled Dovetail saw and I have a Mitutoyo square for making sure that everything is all squared up. I use Veritas wheel marker across the piece to ensure the base of my cut does not wander off.

My question is: I am producing 'alright' joints but not super neat. I can't blame the tools (damn... :roll: ) and I don't rush. Any gems of wisdom to make my joints better or is it, as I suspect, just lots of practice until I can judge the feel of the saw, how hard to tap the chisel etc...

All thoughts appreciated.

Kind regards to all,
A
 
You haven`t said what thickness your walnut is so without pictures i would suggest making the joints wider than the chisel to save any overcutting. Walnut can be difficult to chop if your tools aren`t sharp due to its relative softness. And like everything else practice practice practice and sometimes you will still get it not right. I think it was Alan Peters who said that even in the best workshops in the world mistakes still happen. Good luck. HTH
all the best
rob
 
A tip that Roy Underhiil sometimes uses is to saw just to the waste side of the marked lines and then pare up to them with the chisel. Sort of a sneak up on it approach. Also , since my hands are not as steady as a younguns , I use a block of MDF as a paring guide to maintain a right angle to guide my chisel. Just clamp the factory edge at your line and pare away using the edge to steady and guide your stroke.
 
Box joints are really machine joints made using a dado saw blade or router with a jig. Fast and automatically accurate. Doing it by hand is as time consuming and difficult as dovetailing.
 
You are cutting along the grain and the saw wants to wander. So I would set blocks behind and in front of main piece if cutting using a vice and saw. That might help getting true cuts.

If you are using the workmate as the vice it probably is not supportive enough. Then you need a workbench and vice?
 
RogerP":27gh2diu said:
Box joints are really machine joints made using a dado saw blade or router with a jig. Fast and automatically accurate. Doing it by hand is as time consuming and difficult as dovetailing.
I'd agree here, if box joints are cut by hand you're as well doing dovetails anyway. However, there's a cunning way to cut box joints by hand to ensure that (all things being equal) the joints fit. Difficult to describe in words but easy enough to do.
Cut each corner as a pair held in the vice, but offset the rear one by the thickness of the saw kerf, so that as each cut is made, both pieces are cut, but the saw passes through the waste in each piece for each corresponding 'peg' and in theory, if the sawing is reasonably accurate, you ought to end up with a fairly decent joint.
If there's any interest in this technique, I'll post a few pics tonite showing how it's done...can't at the mo' :wink: - Rob
 
There seems to be enough interest, so I'll sort out some oddments on the 'morrow and take a few snaps of the process. Look out for a new thread in the Jigs forum - Rob
 
I find it easier to hand-cut dovetails than finger joints. The only time I tried it was when I cut a knuckle joint for a swing-leg on a table.
If you have a router, use that and a jig There's no end of shopmade jigs on YouTube.

John :)
 
I have never made a finger joint by hand. Dovetails seemed a better option. Then I bought an Incra Ultra jig. 3 router bits later, and I am producing stunning finger joints and boxes. It took a while to get a router bit to match the jig. An "Incra " bit from MLCS was too sloppy. One Trend was too tight, another was just right.
 
Mike Wingate":3hso19ov said:
I have never made a finger joint by hand. Dovetails seemed a better option. Then I bought an Incra Ultra jig. 3 router bits later, and I am producing stunning finger joints and boxes. It took a while to get a router bit to match the jig. An "Incra " bit from MLCS was too sloppy. One Trend was too tight, another was just right.

I am fascinated by Incra equipment as it just looks so technically stunning!

Do you think the jig was worth the money and what was the name of the bit that fitted? Daddy bear bits? :mrgreen:

Jim
 
The fence system is really nice. It is flawless, and I have made improvements by replacing the ply runners on the right-angle device ith slippy nylon blocks, so it glides. The Fence, like most accessories is not worth the money, what is? But combined with a 3' x 2' table top, and a Jessem router lift, it is a joy to use. Once set-up (2-3 mins) it takes about 4 mins to cut the corners of the 4 pieces. I ended up using the Goldilocks 1/4" shanked Trend bit.
 
jimi43":beh8oxh2 said:
Mike Wingate":beh8oxh2 said:
I have never made a finger joint by hand. Dovetails seemed a better option. Then I bought an Incra Ultra jig. 3 router bits later, and I am producing stunning finger joints and boxes. It took a while to get a router bit to match the jig. An "Incra " bit from MLCS was too sloppy. One Trend was too tight, another was just right.

I am fascinated by Incra equipment as it just looks so technically stunning!

Do you think the jig was worth the money and what was the name of the bit that fitted? Daddy bear bits? :mrgreen:

Jim
I use the Incra jig to do most of my work, especially box joints and most of my boxes have these in one form or another, I can't fault it, here is a pic of some joints to show how accurate it is.
wip1.jpg

Steve's jig would do exactly the same thing but with the Incra, if the joint is too tight you can cut a thou or 2 off whithout setting it all up again.
I use a spiral upcut, it slices through like a hot knife through butter.
 
Nice work. what spiral upcut bit do you use and what size, what supplier. I am getting some MLCS carbide upcuts. What is the process for the chamfers on the ends, not simply running across the fence or using a bearing follower chamfer bit?
 
Mike Wingate":26dqm07f said:
Nice work. what spiral upcut bit do you use and what size, what supplier. I am getting some MLCS carbide upcuts. What is the process for the chamfers on the ends, not simply running across the fence or using a bearing follower chamfer bit?
Hi Mike
I used a 3/8 spiral upcut from Wealden, the chamfers were a bit worrying, I used the jig again for inbetween the fingers and the fence for the outside chamfers with another board with cut fingers to give each cut some backing.
It was worrying because of the breakout, I always make extra rather than do them again.
Thinking about it, if you have a good sander that can be set up it would be best to sand the outside chamfers.
 
I find comb-jointing dead easy.

Mind you, I do have a Woodrat! :mrgreen:

I once cut eight box sides in one go and then using one of those as a template, I cut the eight matching ends.
I could have done more, but I only needed four boxes! :lol:
 
Back
Top