corner joint

UKworkshop.co.uk

Help Support UKworkshop.co.uk:

This site may earn a commission from merchant affiliate links, including eBay, Amazon, and others.
Joined
13 Jul 2015
Messages
2,924
Reaction score
148
Location
Wales
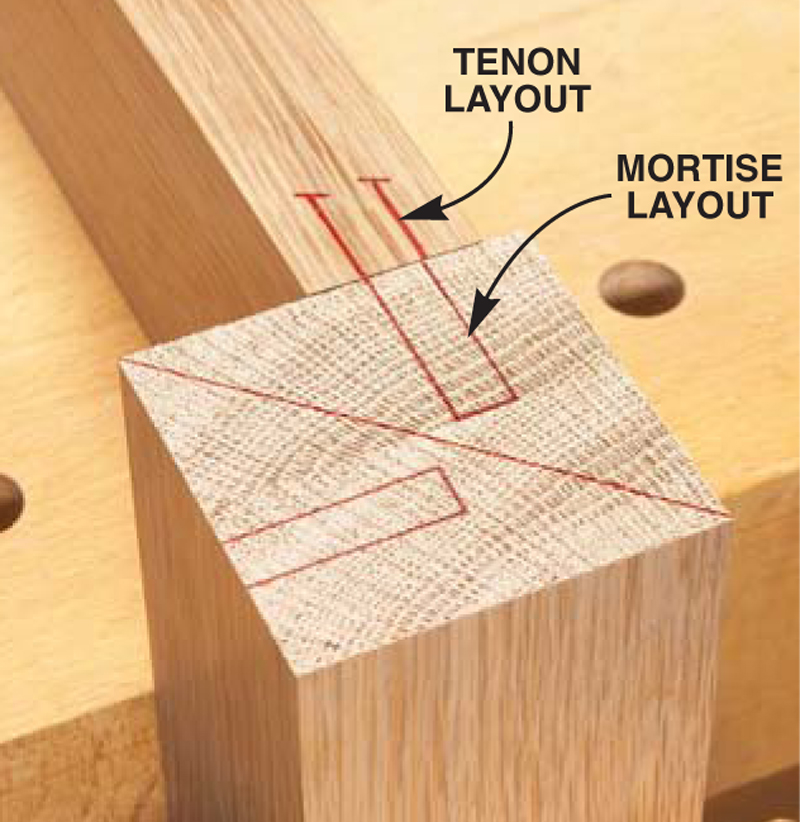
What technique do you guys use to layout the pieces when you have a mortise and tenon on two sides of a joint perpendicular to one another, to stop them intersecting?

There are a load of complicated ways out there, but for beginners?

I think this is the simplest one I've come across.

Criss-Cross-Corner-Joint.jpg


I guess the most obvious way is to just offset them like below, but in the case where the timber is all the same thickness and width, would it still be acceptable? or would it be considered weak?

Haunched-tenon_5F00_14.jpg


Also - it doesn't really need to be a mortise and tenon. For example, here is another way

300ef696ce197721efba1fb7d44fb1f8.jpg
 
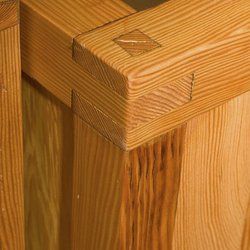
There are quite a few options where the ends of tenons meet inside a leg. If there's enough material you can just let them meet in a mitre. Or there is as in your top picture, or you can go one step further and make one a twin tenon and one a single - or in the extreme make the tenon ends meet in a box/finger joint, which should be pretty strong.
 
Do you have a specific problem in mind, where you need to use four similar sections, all coming together?

I think it's pretty rare to find such a requirement. In most situations, the pieces will be quite different sizes - that's true of table frames and general frame+panel construction. Also in timber framing with a corner post meeting a sill.

Traditional construction has a good record of solving this sort of problem. So maybe it's only a problem in theory, not in practice?
 
Personally I dislike it when two mortices on adjacent faces meet in a stile or a leg, sometimes it's unavoidable but if at all possible I'll design it out.

It weakens the component for one thing, but also I generally prefer to glue up in stages, and if two mortices meet then the glue from one gets squeezed into the other, and once it has hardened it then makes things more complicated for the next stage of the glue up.
 
AndyT":3zljgh88 said:
Do you have a specific problem in mind, where you need to use four similar sections, all coming together?

I think it's pretty rare to find such a requirement. In most situations, the pieces will be quite different sizes - that's true of table frames and general frame+panel construction. Also in timber framing with a corner post meeting a sill.

Traditional construction has a good record of solving this sort of problem. So maybe it's only a problem in theory, not in practice?

I didn't really have anything in mind, it's just that when I see a table with very thin legs, I wonder how the rails are joined, as there is very little space for the tenons. I know that shaker tables often get around it by having very thin tenons, but it doesn't look very strong. But then I guess it's a fine table - it shouldn't need to be strong.
 
transatlantic":o8ocpbp5 said:
I didn't really have anything in mind, it's just that when I see a table with very thin legs, I wonder how the rails are joined, as there is very little space for the tenons. I know that shaker tables often get around it by having very thin tenons, but it doesn't look very strong. But then I guess it's a fine table - it shouldn't need to be strong.

I regularly make these, or items like this. The leg dimensions at the top are pretty critical, I normally aim for 32mm x 32mm, and you can get away with 30mm x 30mm, but if you try and go smaller you're skating on thin ice in terms of joint integrity. It helps if the tenons are very wide and almost the full width of the aprons. Incidentally, this side table is perfectly capable of supporting a large man standing or sitting on it, it's got all the integrity it needs for a 200+ year life expectancy.

Shaker-Side-Table.jpg


Actually this thread also illustrates the limitations of Domino joinery. You'd think a Domino would allow you bang out Shaker style side tables in double quick time, in reality to do a good job pretty much every joint in this project needs to be individually tailored. Another joint worth reflecting on is how you would connect the two rails running horizontally above and below the drawer into the legs?

I don't have a side table on the go at the moment, but I am currently building something fairly similar,

Small-Shaker-Cab-01.jpg


On this the legs are about 40mm x 40mm and the side and back aprons are pretty wide at about 105mm, so it's plenty big enough to use Domino joinery for these components,

Small-Shaker-Cab-02.jpg


But, as with the Shaker Side Table, the two rails that run across the front need very different joinery,

Small-Shaker-Cab-03.jpg


The bottom rail has twin tusk tenons,

Small-Shaker-Cab-04.jpg


And the top rail is dovetailed into the legs,

Small-Shaker-Cab-05.jpg


I'm about to start making the panelled door, and that won't be suitable for Domino construction either because a decent quality job with this scale components demands haunched M&T's, and a Domino can't do haunches.

I suspect a large part of the joinery problems faced by woodworking newcomers is down to the fact that they tend to learn from books and videos that teach joinery in abstract isolation, rather than in the context of real world projects. If instead learning was project based it would be easier to grasp that joinery like dovetailed rails or twin tusk tenons is used over and over again in practical furniture making. Another important learning is that it's often useful to draw out your joinery life size or twice life size in plan and elevation before you begin, even after over thirty years of furniture making I still do this and it's never time wasted.
 

Attachments

  • Shaker-Side-Table.jpg
    Shaker-Side-Table.jpg
    44.3 KB
  • Small-Shaker-Cab-01.jpg
    Small-Shaker-Cab-01.jpg
    73.3 KB
  • Small-Shaker-Cab-02.jpg
    Small-Shaker-Cab-02.jpg
    93.8 KB
  • Small-Shaker-Cab-03.jpg
    Small-Shaker-Cab-03.jpg
    81.9 KB
  • Small-Shaker-Cab-04.jpg
    Small-Shaker-Cab-04.jpg
    93.6 KB
  • Small-Shaker-Cab-05.jpg
    Small-Shaker-Cab-05.jpg
    74.1 KB
Tenon full width of the apron but haunched top 1/3. Either into stopped mortice or if the legs are very thin then mortices meet - ends of the tenons trimmed at 45% . This gives greater glue area on the tenon faces.
 
transatlantic said:
Haunched-tenon_5F00_14.jpg


I would do it a bit like that, but instead of having the tenons in the center of the rails, I would keep them the same size but position them closer to the outside faces. That way I can make them longer, and therefore stronger, or keep them the same size and maintain the integrity of the leg. Or a bit of both.
 
Custard - can you explain why you chose to use the different joints? for example why the top and bottom rails need different joinery?
 
transatlantic":1j9c4u2m said:
Custard - can you explain why you chose to use the different joints? for example why the top and bottom rails need different joinery?

I guess the first thing to emphasise is that in a very real sense I didn't choose those particular joints, they've been the standard joinery for case furniture for well over two hundred years. So all I'm doing is implementing the solutions of some very smart Georgian cabinet makers.

But in terms of why a twin tusk tenon and a dovetail are the optimum choices it comes down to three things,

-maximising long grain to long grain glue surfaces
-maximising the internal volume of case furniture
-minimising racking when looked at from all three aspects (i.e. looking at the piece from the front, side and top)

I don't have the time on my lunch break to discuss it all exhaustively, but just take the example of the twin tusk tenon in the lower rail. If you had just used a regular tenon then you'd have been cutting across the grain in the leg (which is why a Domino is useless for this application, but if you're unwilling to cut joints without machine assistance then a pair of dowels would be a decent second choice). If you twisted that rail through 90 degrees so that a normal tenon would be acceptable then you'd have to raise the level of the cabinet floor or drawer, therefore reducing the furniture's useable capacity, plus you'd have less resistance to racking when seen in plan view (from above).

There's nothing esoteric or clever about this joinery, this is just the way that good quality furniture has been made for generations, and should be made today.
 
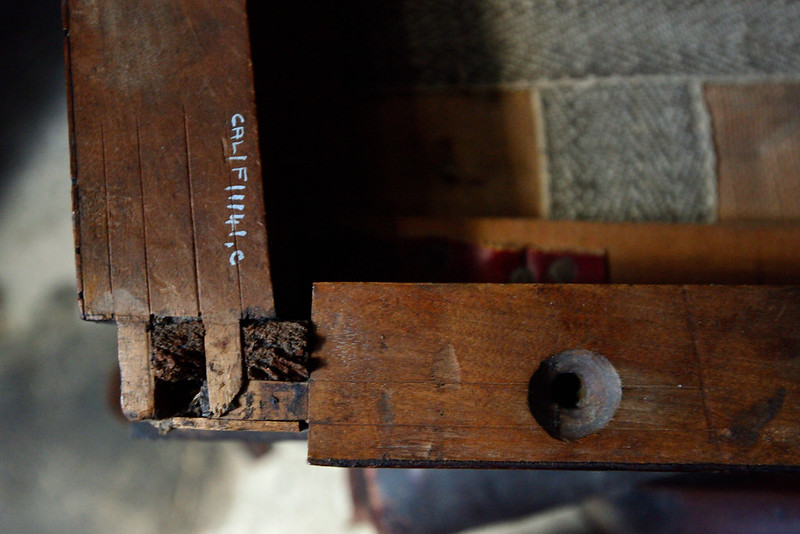
Hers a picture of a failed rear chair rail joint.

Chair leg joint by Pete Maddex, on Flickr

Easy to see why it failed, their is not much wood left, they left the layout lines as well.

Pete
 
Pete's example of a chair is an interesting one, and shows how the wrong joinery decision can fail catastrophically.

The most highly stressed joint a furniture maker is likely to ever make is where the side rails join the back legs of a chair. By about 1750 the optimum joinery solution had been arrived at and it's never really been improved upon since. Priority is given to the tenon on the side rail, which leaves very little meat on the bone for the back rail. The back rail therefore has a very thick but very shallow stub tenon (usually only about 6mm long) plus two or three dowels to stop it pulling free. I've seen plenty of 18th century chairs with dowels used in this way. That shouldn't come as a surprise as furniture makers were well used to pinning joints long before that, so it's been familiar technology for many hundreds of years, it's also fairly straightforward to make up your own doweling jig for this operation so you can produce a very precise joint even with basic tools.

Here's a typical doweling jig I make to reinforce the stub tenons on the back rail to chair leg joint, you can see how it plugs straight into the mortice and the reverse is shaped to receive the tenon. I've no doubt 18th century cabinet makers did exactly the same thing, less of course the power drill!

Dowel-Jig-sml.jpg
 

Attachments

  • Dowel-Jig-sml.jpg
    Dowel-Jig-sml.jpg
    78.8 KB
Obviously I cannot improve on the advice given before, but I always thought it might be an idea to dovetail the tenons together in the mortice. Treat the joint in the first picture of the original post as a finger joint, add more fingers, then angle them to form a dovetail.

You would probably have to mark it up outside the mortice , or maybe paint the end grain of the pins and impression the tails, or paint the end grain of the tails to impression the pin sides and use an accurate bevel to cut the pin angles. I would probably put the tails on the side rails to stop them pulling out when people rock on the chair. Of course it would make assembly slightly more of a pain, also disassembly if you have a bad memory and have to come back to it in 20 years.

Might be a fun idea to try one day, and I doubt it would be weaker than just mitering the ends of the tenons.
 
I've seen the finger joint used, but not dovetails. I guess that it doesn't avoid the failure in Pete's photo, where the leg has broken.

On greenwood chairs which are to have a woven seat, the seat rails have round turned tenons going into bored holes in the leg. The holes have to be bored centrally in the round leg, normally I use 5/8 tenons into a 1 1/2" to 1 3/4 diameter leg. The side rails are set about half a tenon thickness above the lateral ones, the second hole being bored after assembling the first joint. In that way the tenons interlock. It would seem that quite a lot of the leg has been bored away, but despite them being assembled without glue (the drying shrinkage is enough to hold it together) the result seems strong enough. It may be that the legs being of straight grained riven ash helps. Or that the chair designs have usually plenty of rails between the legs lower down. I wonder if the round tenon/ mortice doesn't help avoid concentrating stress at the corners of the mortice. Or the re education anyone who swings on the back legs of one of my chairs quickly receives :evil:
 
I don't really understand why a domino could not have been used for the tusk tenons, custard? .. can you explain?
 
transatlantic":igokxh5w said:
I don't really understand why a domino could not have been used for the tusk tenons, custard? .. can you explain?

Visualise it in your mind, you'd be cutting the mortice across the long grain fibres of the leg so there would be zero long grain to long grain glue surface (plus you'd weaken the leg unnecessarily). A Domino is much worse than a pair of dowels in this respect because Festool manufacture their Domino loose tenons with a shallow fin that runs along the edge (in order to allow an escape route for air and excess glue, this means you don't even pick up a bit of long grain to long grain glue surface along the tenon edges. If you look at the top cross rail the situation is even worse, a Domino there would have all the same glue problems plus there would be just a few mill of short grain on the leg above the mortice, so it would be almost guaranteed to break out at some time, that's why you need a well shouldered dovetail at the top.

When it comes to solid wood furniture that follows broadly traditional forms there's rarely any need to invent ingenious joinery solutions. Ikea had to invent new joinery methods, but if you work in solid wood the optimum solutions were all arrived at by the middle of the 18th century. All you have to know is a handful of these well rehearsed basic joints and bob's your uncle, you can confidently produce virtually any rectilinear piece of furniture you want. It's really not that difficult.
 
custard":3esn07wo said:
transatlantic":3esn07wo said:
I don't really understand why a domino could not have been used for the tusk tenons, custard? .. can you explain?

Visualise it in your mind, you'd be cutting the mortice across the long grain fibres of the leg so there would be zero long grain to long grain glue surface (plus you'd weaken the leg unnecessarily). A Domino is much worse than a pair of dowels in this respect because Festool manufacture their Domino loose tenons with a shallow fin that runs along the edge (in order to allow an escape route for air and excess glue, this means you don't even pick up a bit of long grain to long grain glue surface along the tenon edges. If you look at the top cross rail the situation is even worse, a Domino there would have all the same glue problems plus there would be just a few mill of short grain on the leg above the mortice, so it would be almost guaranteed to break out at some time, that's why you need a well shouldered dovetail at the top.

When it comes to solid wood furniture that follows broadly traditional forms there's rarely any need to invent ingenious joinery solutions. Ikea had to invent new joinery methods, but if you work in solid wood the optimum solutions were all arrived at by the middle of the 18th century. All you have to know is a handful of these well rehearsed basic joints and bob's your uncle, you can confidently produce virtually any rectilinear piece of furniture you want. It's really not that difficult.

I see. Just goes to show how much I have to learn. I would not even have thought of that issue .... I just assummed - it's a mortise and tenon - so has to be strong.
 
Something came up on another post which had a bearing on this. The legs on this occasional table are 30mm x 30mm, furthermore they're angled which adds a bit of complexity to the joinery. To be absolutely sure of the integrity they have Oak corner blocks added,

Tiger-Oak-Table-3.jpg


It's a bit of a pipper on this design because the splayed legs (with full length taper) and splayed aprons mean the blocks have to be carefully scribed in order to get a really strong glue/screw bond, but on a more normal plumb legged design corner blocks are a good and quick option if the mortice and tenons are getting a bit on the dainty side. Going back to chairs, their highly stressed joinery means I fit fully scribed corner blocks as standard,

Corner-Blocks.jpg
 

Attachments

  • Tiger-Oak-Table-3.jpg
    Tiger-Oak-Table-3.jpg
    129.5 KB
  • Corner-Blocks.jpg
    Corner-Blocks.jpg
    84.5 KB
Back
Top