Compound cutting is fun and can produce items which look striking but are relatively simple to make. The first (and most critical) step of the technique is to check your saw table for squareness against the blade before you begin. If it is not square, you will find cuts which meet up when you follow your pattern do not meet up on the bottom of your wood. I like to use a good, large skip-tooth blade for compound cuts because I find it clears swarf efficiently. However, others suggest a plain blade and it is probably best for a beginner to follow this advice. A number 5 or a number 7 will probably suit most projects but there is no reason why coarser or finer blades cannot be used. Use too fine a blade, though, and the project will take ages to cut; use too coarse a blade and you will not be able to change direction efficiently.
This is what a compound cutting pattern looks like:

(I have doctored the photograph to make it more difficult for anyone to snaffle the pattern – I do not hold the copyright.)
The dotted line down the centre of the pattern is key. The pattern must be folded precisely at 90º along this dotted line so it can be glued to the workpiece with half of the pattern on one face of the block and half on the adjacent block. Your workpiece must be cut perfectly square.

I have lined the workpiece with blue low-tack masking tape because I find this helps to lubricate the blade as it cuts. Unfortunately, I later found it resisted the adhesive I used to glue the pattern to the workpiece; hence the clear sticky tape which appears in subsequent photographs.
Pilot holes were drilled in both faces, one for each of the internal cuts and one for the outside.

Next, all four internal cuts were made. Making the internal cuts first helps to preserve the structural integrity of the workpiece for as long as possible. Some scrollers like to save their offcuts and pack them back in to the workpiece, claiming it helps to maintain the block’s structural integrity. I have never found this to be the case, so I discard them.

Working on one face of the block only and starting from the remaining pilot hole, cut the outside of pattern. This should be cut cleanly with as little deviation from the pattern as possible. However, sometimes it is practically impossible to turn sharply enough to create crisp edges. When this happens, there is no harm in cutting into wastewood to create a turning circle for your blade, as in the photograph below:

Resist any temptation to cut into the workpiece from any starting point other than a pilot hole!
Once you have finished cutting one face in its entirety, the centre of the block will drop out. It should be able to pass through both the bottom and the top of the workpiece; if it cannot, your saw table is not square to your blade.

Re-assemble the workpiece and rotate it through 90º. Of course, you now need to stop the internal block that you have just cut from moving within your workpiece, or you will end up with inaccuracies. There are a number of ways to do this; some scrollers just use sticky tape but I prefer to use a home made clamp instead. Do not clamp the workpiece too tightly; the aim is to stop movement and too much pressure will make it difficult for your blade to cut.

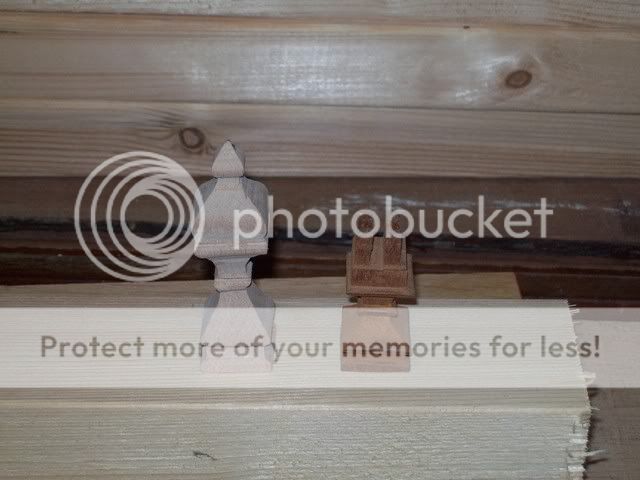
Cut the outside of the pattern and remove the clamp. This is where you get the pleasure of seeing your project emerge from within the workpiece:

Give your project a light sanding and file away any residual excess there might be.

One final thought: if you smell burning at any time, reduce the cutting stroke speed of your saw. Trying to cut too quickly can generate a lot of heat along the blade which not only dulls the blade but also burns the wood.
This is what a compound cutting pattern looks like:
(I have doctored the photograph to make it more difficult for anyone to snaffle the pattern – I do not hold the copyright.)
The dotted line down the centre of the pattern is key. The pattern must be folded precisely at 90º along this dotted line so it can be glued to the workpiece with half of the pattern on one face of the block and half on the adjacent block. Your workpiece must be cut perfectly square.
I have lined the workpiece with blue low-tack masking tape because I find this helps to lubricate the blade as it cuts. Unfortunately, I later found it resisted the adhesive I used to glue the pattern to the workpiece; hence the clear sticky tape which appears in subsequent photographs.
Pilot holes were drilled in both faces, one for each of the internal cuts and one for the outside.
Next, all four internal cuts were made. Making the internal cuts first helps to preserve the structural integrity of the workpiece for as long as possible. Some scrollers like to save their offcuts and pack them back in to the workpiece, claiming it helps to maintain the block’s structural integrity. I have never found this to be the case, so I discard them.
Working on one face of the block only and starting from the remaining pilot hole, cut the outside of pattern. This should be cut cleanly with as little deviation from the pattern as possible. However, sometimes it is practically impossible to turn sharply enough to create crisp edges. When this happens, there is no harm in cutting into wastewood to create a turning circle for your blade, as in the photograph below:
Resist any temptation to cut into the workpiece from any starting point other than a pilot hole!
Once you have finished cutting one face in its entirety, the centre of the block will drop out. It should be able to pass through both the bottom and the top of the workpiece; if it cannot, your saw table is not square to your blade.
Re-assemble the workpiece and rotate it through 90º. Of course, you now need to stop the internal block that you have just cut from moving within your workpiece, or you will end up with inaccuracies. There are a number of ways to do this; some scrollers just use sticky tape but I prefer to use a home made clamp instead. Do not clamp the workpiece too tightly; the aim is to stop movement and too much pressure will make it difficult for your blade to cut.
Cut the outside of the pattern and remove the clamp. This is where you get the pleasure of seeing your project emerge from within the workpiece:
Give your project a light sanding and file away any residual excess there might be.
One final thought: if you smell burning at any time, reduce the cutting stroke speed of your saw. Trying to cut too quickly can generate a lot of heat along the blade which not only dulls the blade but also burns the wood.