Collection of 3d printing files relevant for woodworking

UKworkshop.co.uk

Help Support UKworkshop.co.uk:

This site may earn a commission from merchant affiliate links, including eBay, Amazon, and others.
Quite intrigued by all these and considering getting a printer myself. Any recommendations for a decent 3D printer for occasional use? Also, do they need to be vented outside or can they be used in an office environment?
If you only use PLA or PETG filament it does not need to be vented. I have mine set up in a spare room and have no problem with smell either. If you intend to put this outside in a garage or similar you need to be aware of condensation on the filament.
 
If you only use PLA or PETG filament it does not need to be vented. I have mine set up in a spare room and have no problem with smell either. If you intend to put this outside in a garage or similar you need to be aware of condensation on the filament.
+1. My 3D printer sits in the dining room next to where I work when working from home. PLA has a bit of a smell to it (although it's fairly faint) so I don't like to run a PLA job when I'm likely to be spending much time in the same room. I can't detect any smell from PETG and 99% of what I print is PETG, so it isn't an issue.
 
+1. My 3D printer sits in the dining room next to where I work when working from home. PLA has a bit of a smell to it (although it's fairly faint) so I don't like to run a PLA job when I'm likely to be spending much time in the same room. I can't detect any smell from PETG and 99% of what I print is PETG, so it isn't an issue.
Yeah will agree on that but the smell is not offensive really. About to try TPU this week as it another filament that's not toxic. PETG is excellent once dialled in. And now I have micro-swiss d/d and belted z axis it's excellent.
 
Oh that joyous feeling of spending 5 hours on a print of two halves only to try and fit them together only for the tolerances to be too tight. Never mind, it still has use as a prototype.

My design is basically done and functional. Just finalising joining the two halves together.
 
Yeah know what you mean about tolerance. Nearly all mine are functional in the work shop. Producing 2 the same can be a problem. Tolerances are better now I have the micro-swiss and belted z axis.
 
If you only use PLA or PETG filament it does not need to be vented. I have mine set up in a spare room and have no problem with smell either. If you intend to put this outside in a garage or similar you need to be aware of condensation on the filament.
If you use your printer in a garage or somewhere similar, you may need to watch the temperature carefully. The filament needs to be at the right temperature to lay the print down, a garage may be a lot colder and may have droughts cooling the bed.

Depending on how cold it is, you may have issues with first layer adhesion and subsequent warping.

An enclosure may help but then you have to be careful with the PSU as they normally don’t like being kept hot for hours at a time.

Nothings easy 🙁

Rob
 
Square of Thales

I designed this in my very early days on Fusion 360 when I really had no idea what I was doing. Looking back at the design, it's a complete mess but it works and has been very useful for reminding me that I can rarely get joints absolutely square! 🙄

I printed it in lurid green so that I couldn't lose it in the mess on my workbench (it's all I had at the time too)

I have just posted the gcode and STL files on Thingiverse if anyone else wants to remind themselves how hard it is to get completely square boxes!


rsz_20221030_103302.jpg
 
There you go (I'm currently being too lazy to do a proper upload/submission to Thingiverse, so a zip is attached here).

The #71 holder parts and the top part for the Veritas can print front face down - no supports required, but would suggest a reasonable number of perimeters and fill density for strength.

The bottom part for the Veritas is better printed back face down, with supports for where the plane will eventually go. You could print it front face down but it'd likely need support for the notch for the handle, and so might look messy once removed. I suppose some printers may bridge that gap OK without supports, but I haven't tried.
 

Attachments

  • router plane holders.zip
    50.8 KB · Views: 0
I made a wall holder for the denewills remote control holder I use for remote switching of various devices in the workshop. It was always going walk about, but now it doesn’t even get removed from the holder to use it.
E5A4AFE7-DFB7-41E4-8150-EA461B282E2F.jpeg
E168C9A9-5734-41FC-9E6F-93A01711B0C5.jpeg
4AFB85A4-C239-4936-A743-9F6B3F313293.jpeg
 
Phil have you tried one with holes in to get a bit more airflow though for collection? Or is it not plumbed up?
 
Phil have you tried one with holes in to get a bit more airflow though for collection? Or is it not plumbed up?
Yes, it is plumbed in for 4” collection below. It seems to take all the dust through the blade slot. I think cos there’s very little clearance, dust doesn’t drag under the piece, more stays in the blade slot.
table gets none on it. Not that it would take much to add hives to the design before printing.
 
For anyone that might be interested, I have now changed over to running my Ender 3 Pro via a 2014 Raspberry Pi 2 (donated by a friend) and using Klipper so I can take advantage of input shaping (less ringing on the sides) and pressure advance (actual corners and not bulges).

Strange that it took until 2023 for me to stop loading files onto an SD card for my printer!
I'd be very interested to hear how well that works. It's been on my "todo" list for ages for my Ender 3 v2. I have a Pi3 connected to it already for OctoPrint, so I guess I have all the hardware I need ready.

The printer's running really well with the Jyer's version of Marlin, but I do wonder if Klipper would improve the speed without sacrificing the quality.
 
A short (Ha) writeup of my experience moving from an Ender 3 Pro with a BTT SKR Mini E3 V2 and a BTT TFT35 screen, to using a Pi, Mainsail and Klipper.

After noticing an unexplainable and apparently unsolveable Y axis banding on my Ender 3 Pro I decided that it was time to look at the famed "Octoprint" and "Klipper". Usually things like this make me dread the days ahead as I try and navigate my way through the process when it inevitably doesn't work like they say it will. That was certainly my experience getting a few things running on a Pi early in 2022 and Home Assistant, docker etc.

A friend had a spare Raspberry Pi 2 kicking around and I duly went home and had a little read up on what I needed to do with it to just get started. A little reading suggested that Mainsail and another option were a bit lighter on the hardware than Octoprint, and given that I only had a Pi2 I thought I'd try Mainsail. Fortunately using the Pi Imager on my PC, in short work I could select the right image and have it all put onto an SD card. Ethernet cable in, BT keyboard in and off we sail. That all went and worked exactly as it said it would!

Next I would have to build a printer config suited to my not at all stock Ender 3 Pro, and then actually get one thing talking to the other. A little hunting around and googling and the generally good Klipper documentation had me away fairly fast and then I was left needing to buy a USB to USB mini cable because it's 2022 and I want to feel like its 2005 again. It was the only way to connect to my SKR Mini board. With that and a fancy USB wifi adapter installed (Sum cost £8.50) I was able to get the Pi talking to the printer and homing using the endstops. From my computer. Jolly exciting.

Before I got printing I needed to add the necessary to the printer config for the BL Touch, sort out the offsets, get the "rotation distance" set for the extruder (a Biqu H2) and then get it level. Once that was done and I was satisfied with the first layer prints, I set about ordering a £6 accelerometer, connecting it to the Pi using a length of Cat5 and getting the machine to do it's funky Input Shaper dance. It vibrates the pineapple out of the machine and measures things, and then tells you what your max acceleration should be and what setting it should use to minimise ringing or ghosting on the sides of the print. Then I had to move the accelerometer to the bed to do the same for the Y axis.

With that done and then Pressure Advance sorted, I have to say I'm happy with the result, for the £14 it's cost me. Had I been able to get one, a Pi Zero would have worked and those are ~£11 or so but are made from unobtanium.

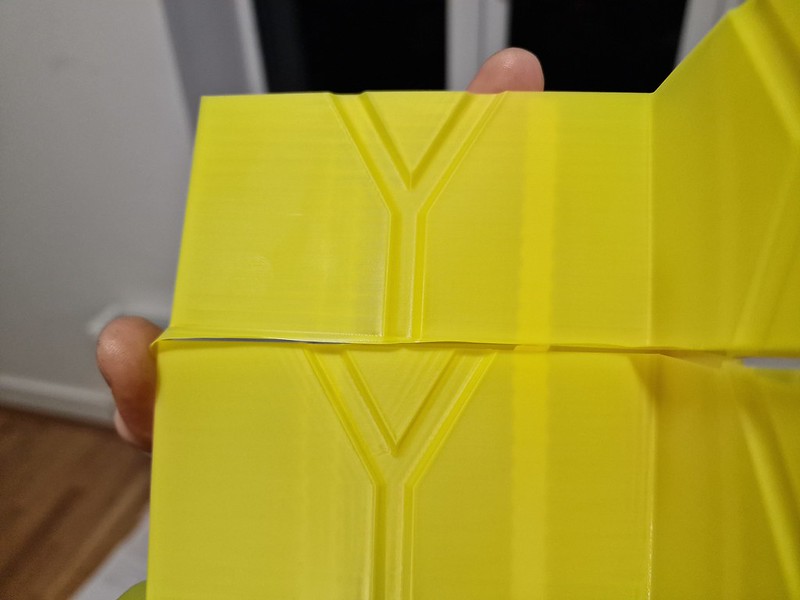
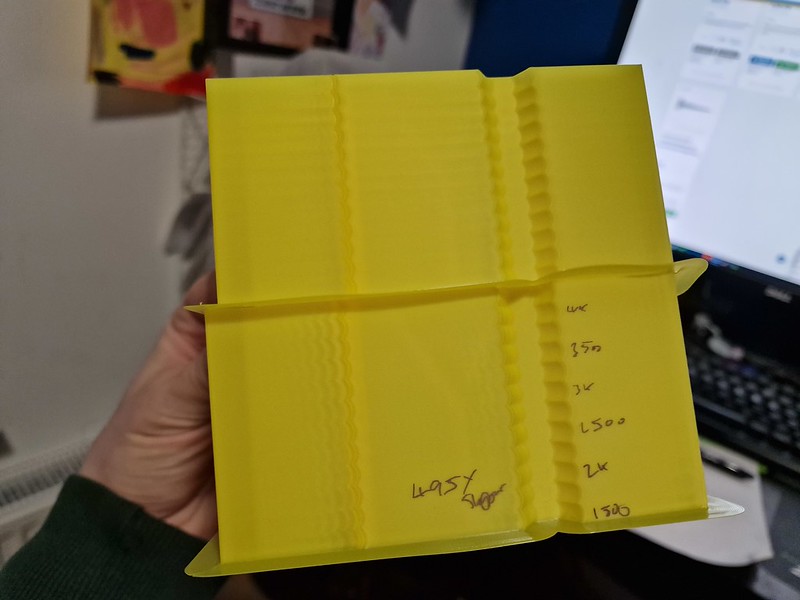
Here are some pics of the tuning towers. One tower is no Input Shaping and variable acceleration every 5mm, the other is IS on with the same variable acceleration every 5mm, with input shaping just set at whatever result it spat out (there are 5 options and it suggests one it thinks will be best). I was actually shocked to see it look that good.


I no longer have to put files on an SD card, I no longer have bulging corners, I can now print at 150mm/s+ with upto 3000mm/s acceleration. Print times are down, print quality is up.

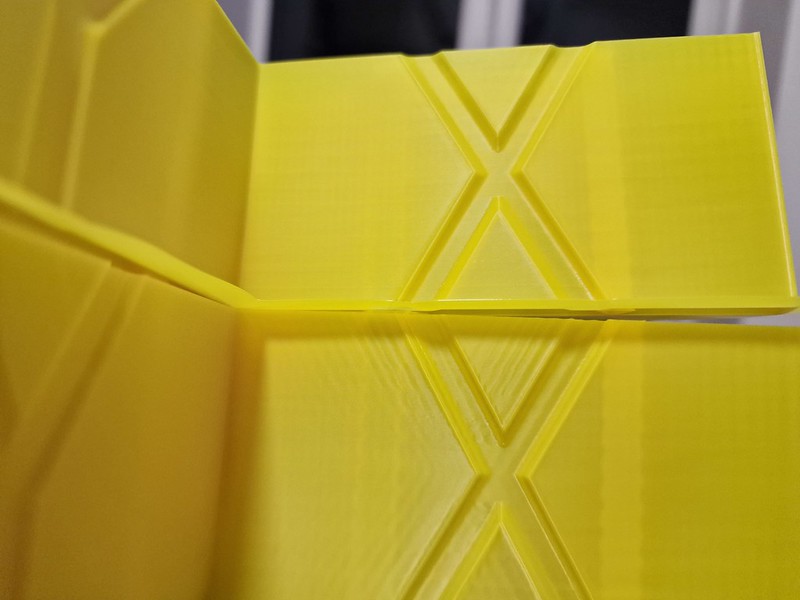
Next I'd love to get this banding figured out, you can see it in the pics. That big X is actually showing you the Y axis printing direction (the bed moving under the stationary head).

The photo below is of the X axis printing (head moving over a stationary bed) and as you can see, the same banding is not as evident, if at all.
 
Back
Top