Cherry and Lacewood humidor

UKworkshop.co.uk

Help Support UKworkshop.co.uk:

This site may earn a commission from merchant affiliate links, including eBay, Amazon, and others.

PaulO

Established Member
Joined
31 Jan 2007
Messages
318
Reaction score
0
Location
West Country
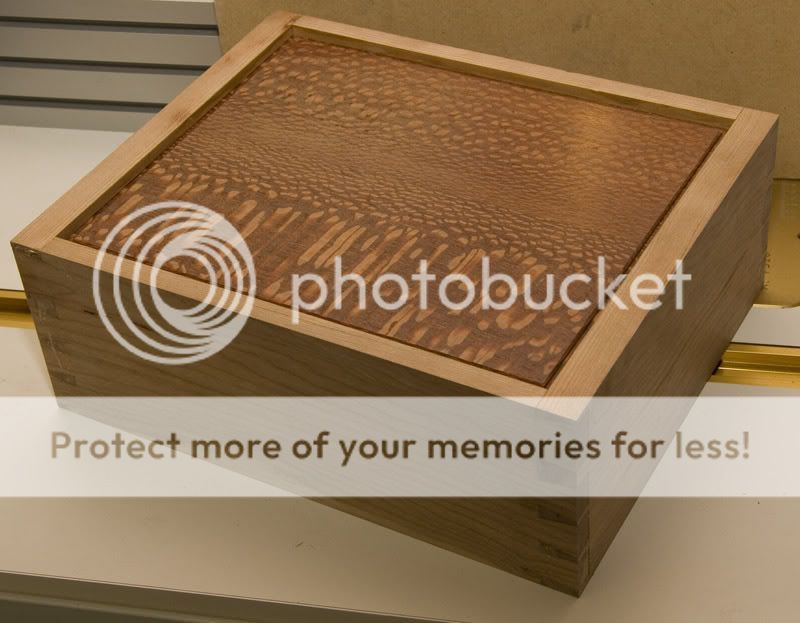
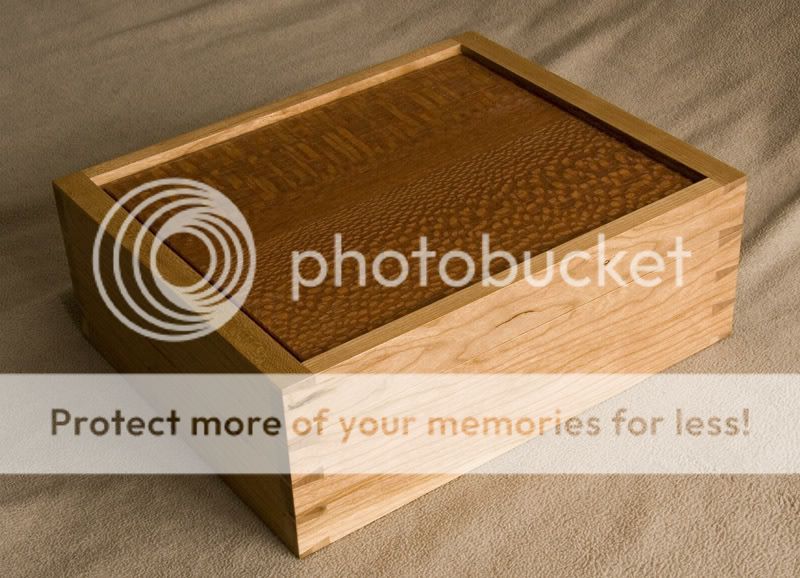
I recently made this humidor for a friend, it is the second I have made. The first was made using american black walnut and maple, this one uses american cherry and roupala lacewood.

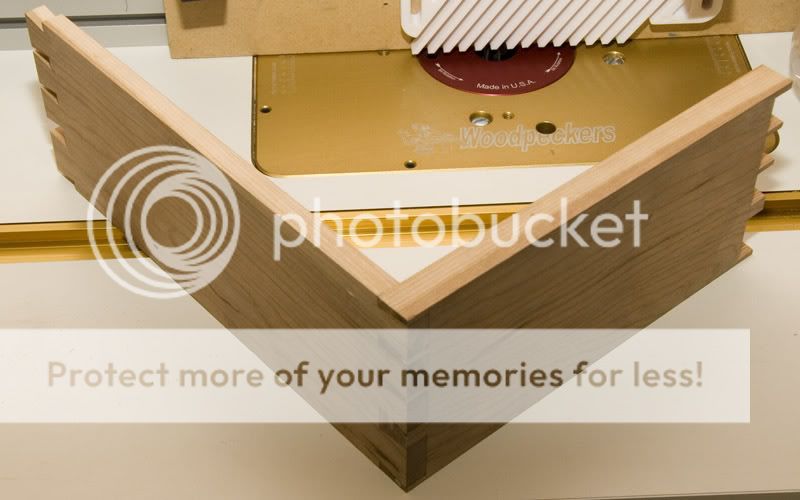
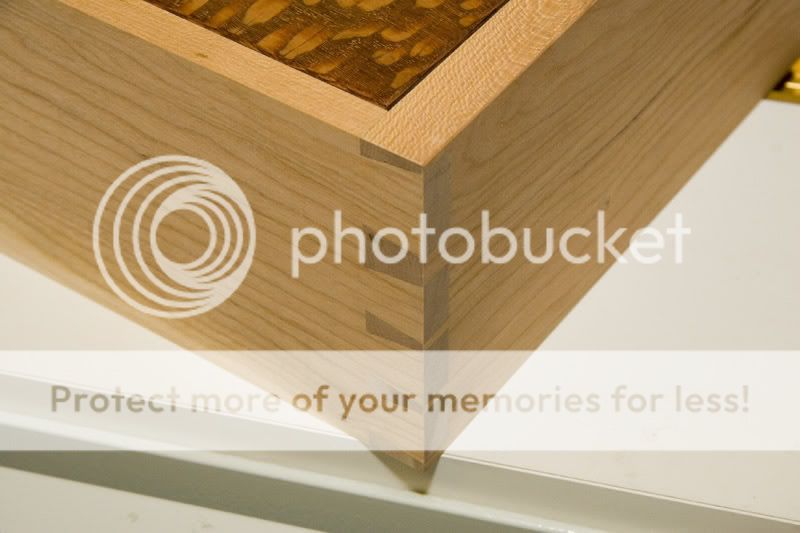
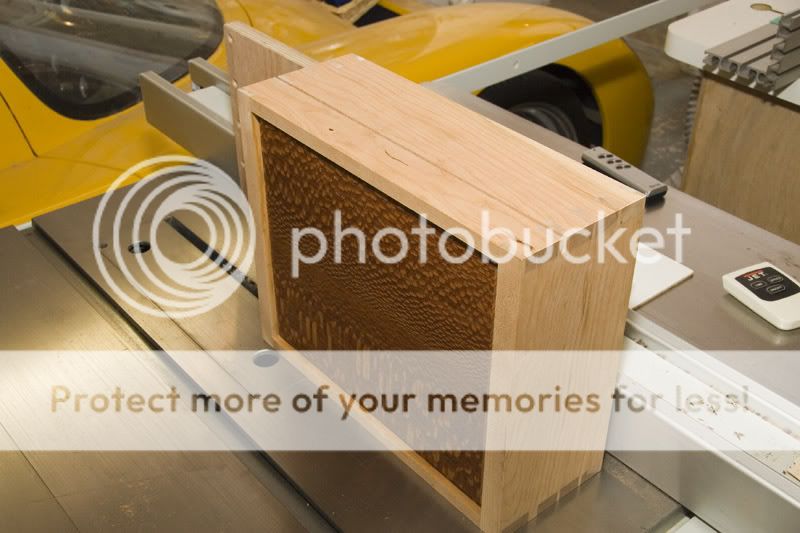
The construction is based on a single box made with through dovetails, with the top and bottom floating. The box is then cut in two, and the bottom half lined with spanish cedar.

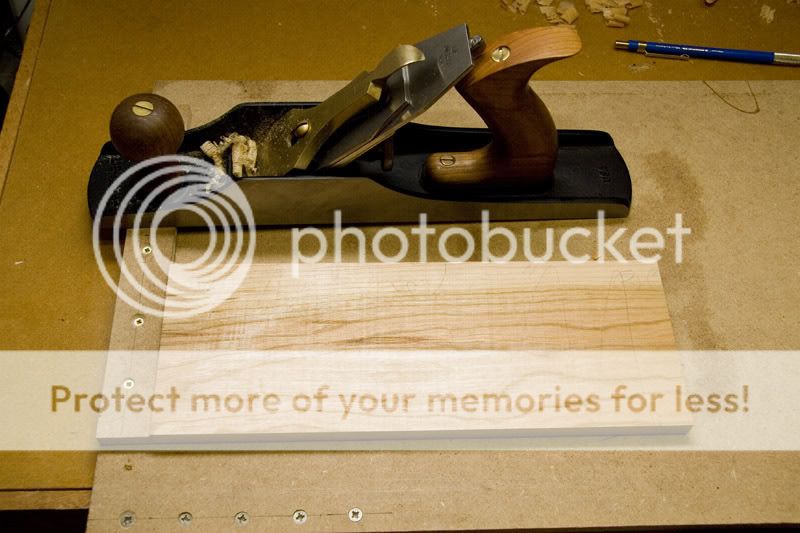
Started with a rough sawn american cherry plank 1" thick, marked up the positions of the cuts for the four sides.
Humidor01.jpg


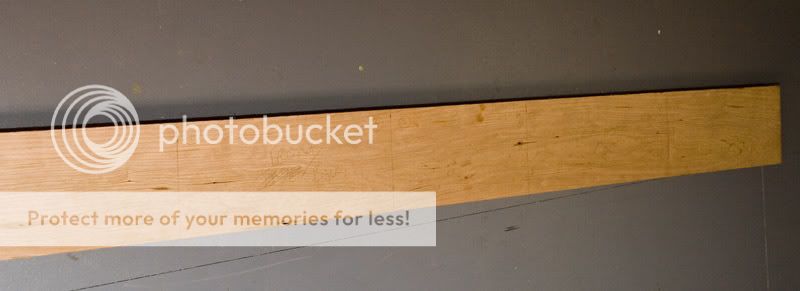
The stock was planed and thicknessed then ripped to length. Faces sides, edges and grain direction marked.
Humidor02.jpg


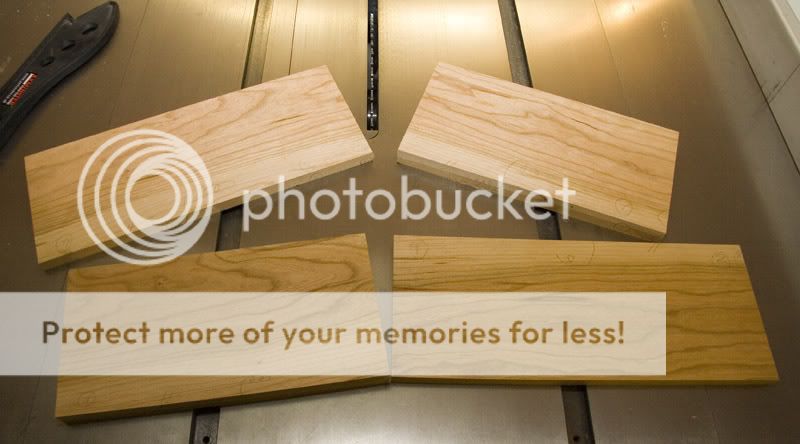
The sides will be 18mm thick (pins) and the front and back 12mm thick (tails)

The ends were shot square, this only took a few shavings as the tablesaw had got close. At this stage I also made sure that the sides and front/back where equal length.
Humidor03.jpg


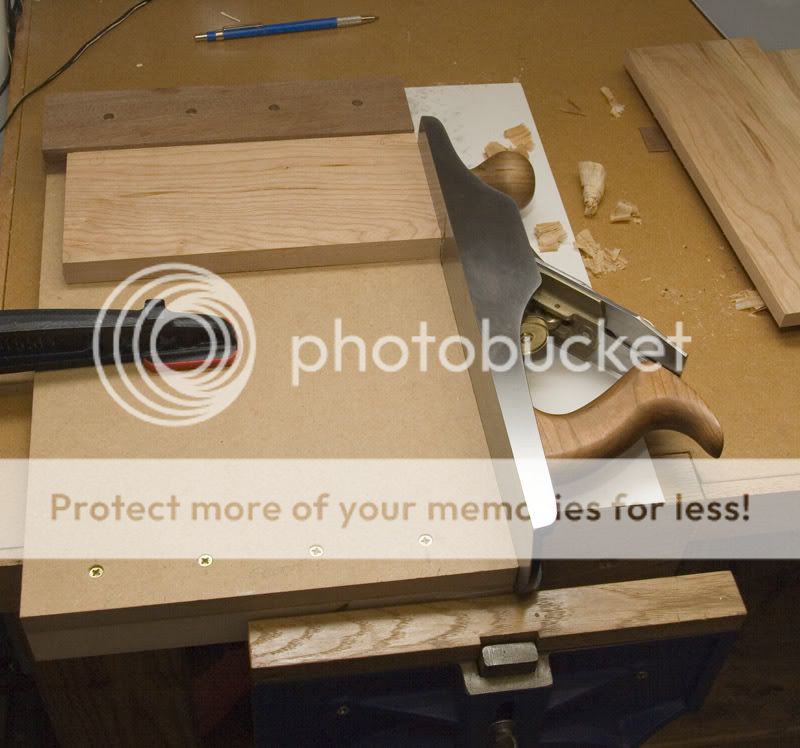
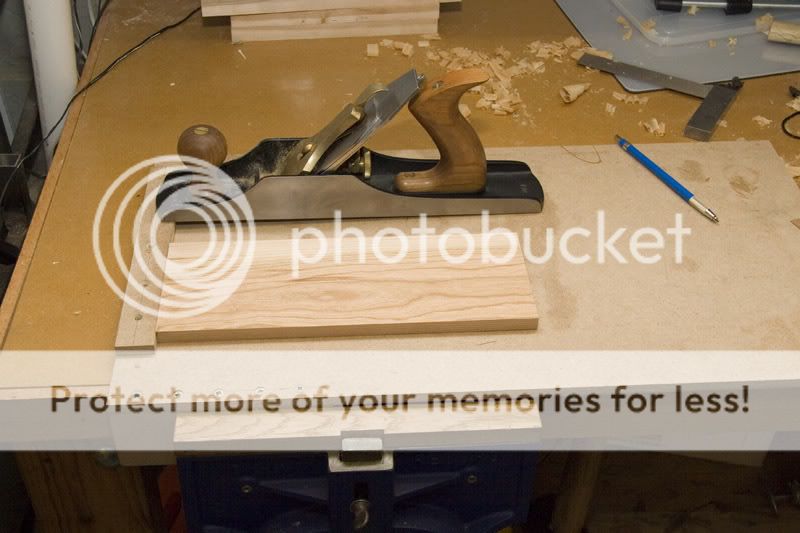
I also planed the face side. This first picture shows some of the ripples left by the planer. You can also see my pencil squiggles used to check the progress of my sets of shavings
Humidor04.jpg


All ripples gone after a couple of sets of shavings.
Humidor05.jpg


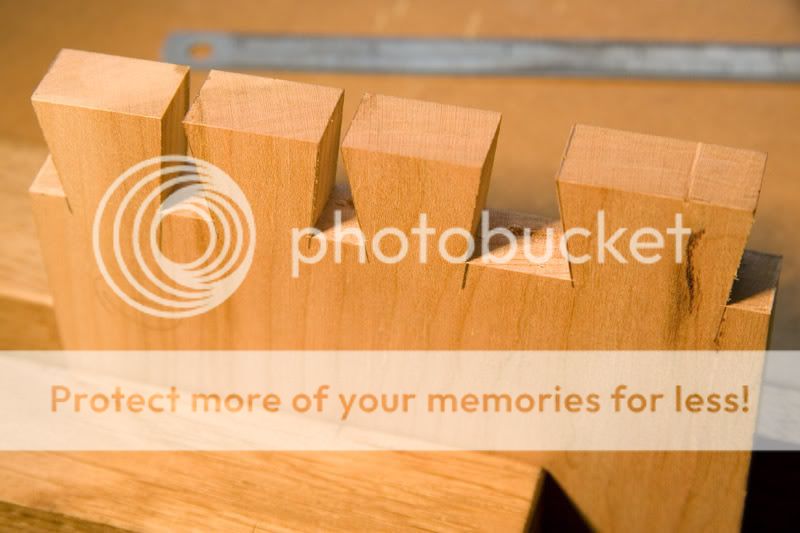
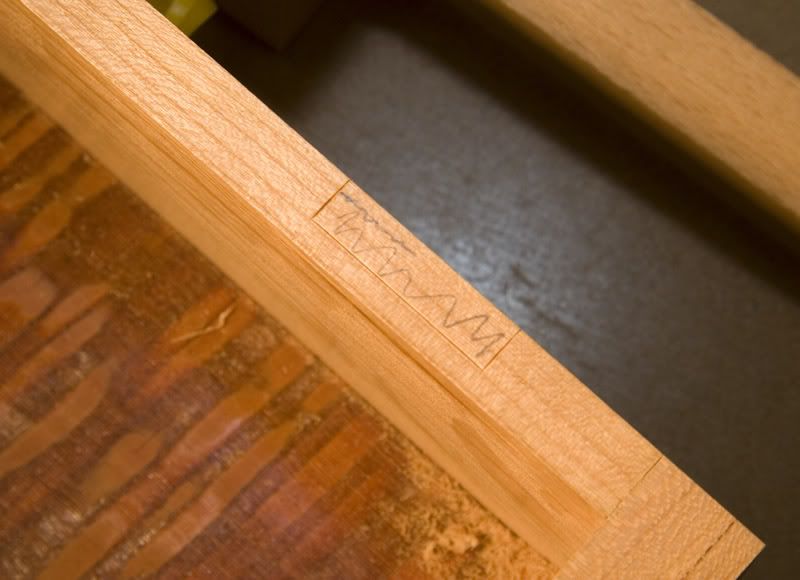
I marked up the tail pattern on the front and back together. I do the design on a spreadsheet on my PC to make sure that I am going to leave enough room for a chisel to clear the waste, as well as aesthetics. You can see a particularly wide pin, which includes an allowance for my table saw kerf when I split it. I am not using super skinny pins, you will see why later.
Humidor06.jpg


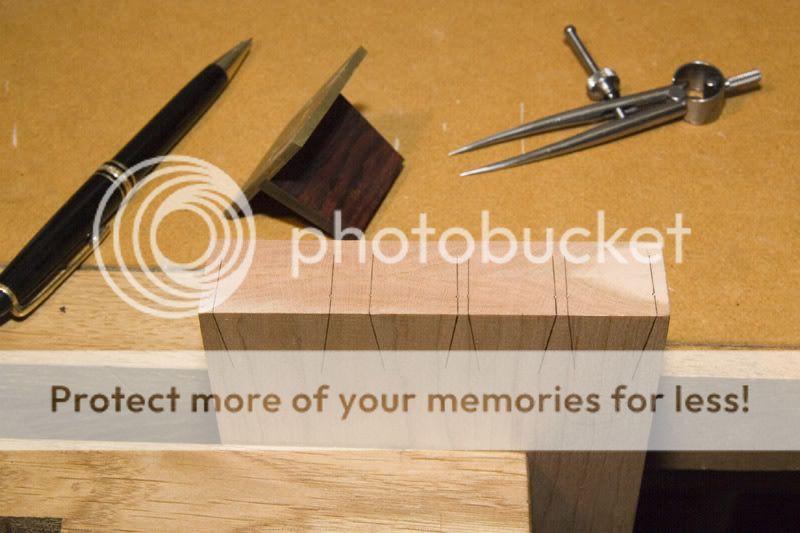
Here I am scribing the shoulder line, about 0.1mm thinner than the tail stock thickness. This 0.1mm reduction makes them slightly tighter thanks to the way I mark pins. As this is the show side I am only scribing the shoulder between tails.
Humidor07.jpg


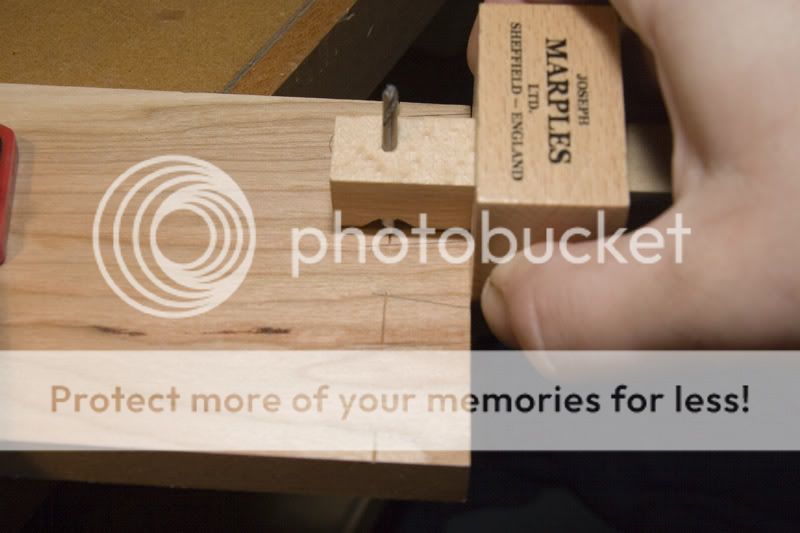
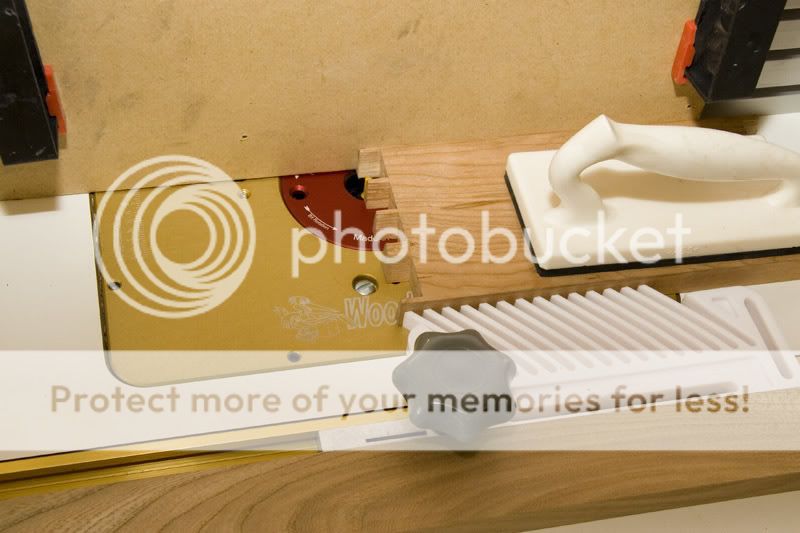
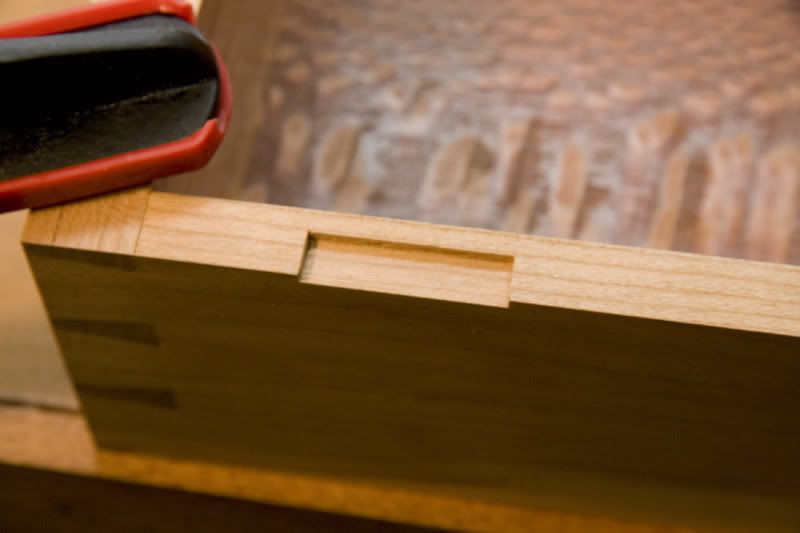
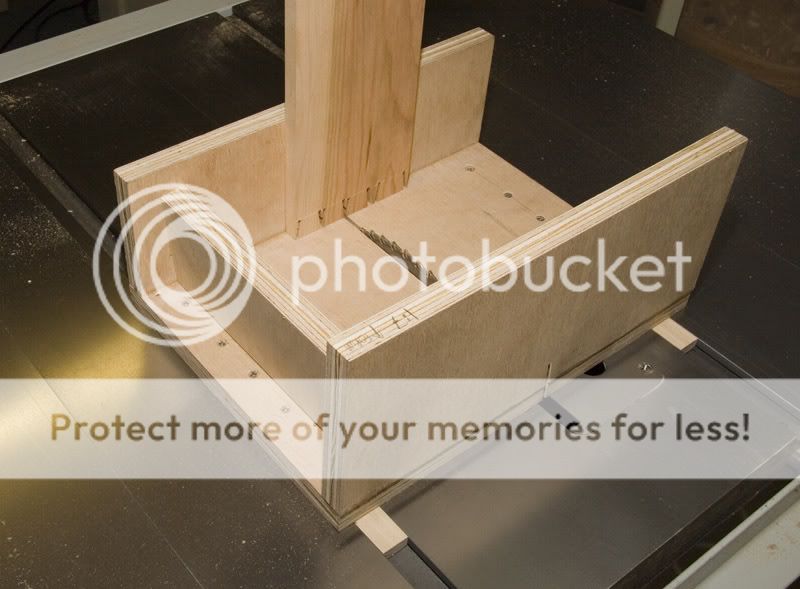
Here is the reason for not having super skinny pins, I decided to try using my tablesaw to cut the tails instead of my L-N dovetail saw. This should guarantee squareness, and reduce the amount of paring at the shoulder. The depth of cut was set to be a few tenths of a mm shy of the shoulder. The jig is set up for 1:7 tails, and as long as that is all it cuts, the jig prevents tearout at the back.
Humidor08.jpg


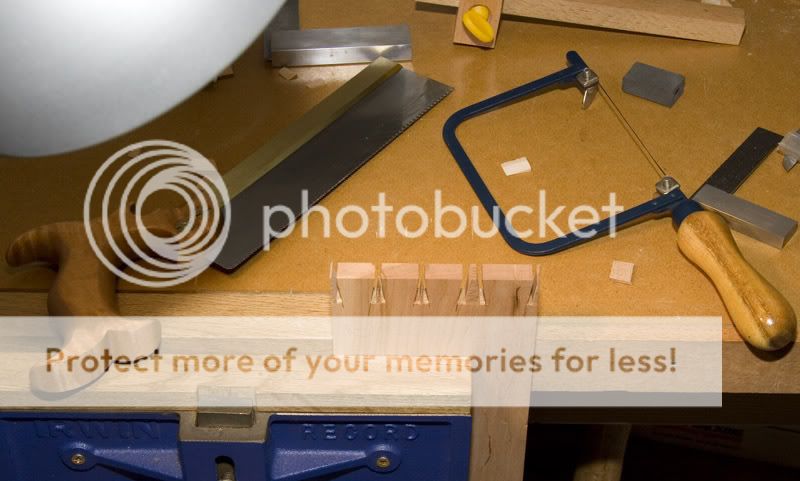
Don't worry, there is still plenty of handwork required.Remove the bulk of the waste with a fret saw, a jewellers saw is unnecessary thanks to the wide kerf.
Humidor09.jpg


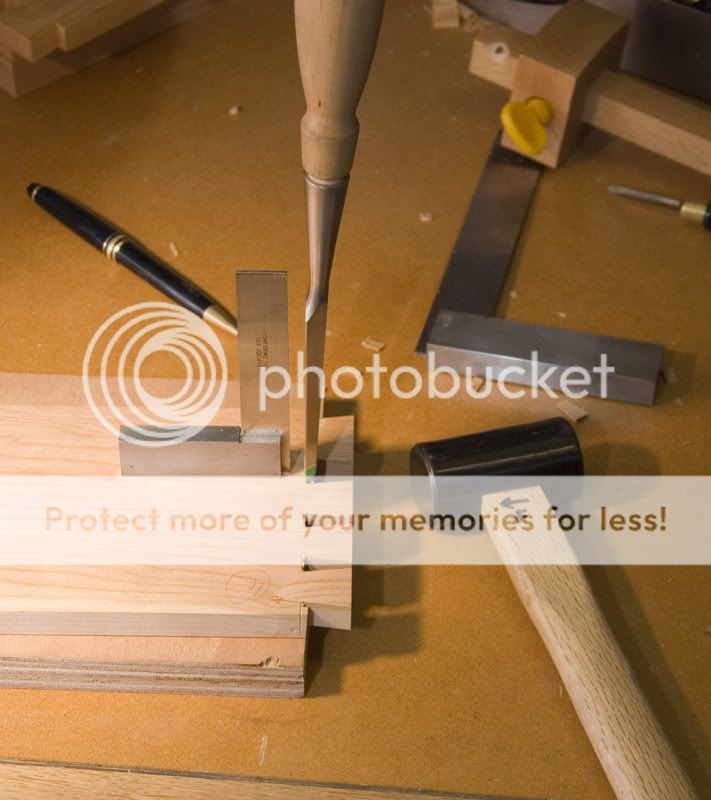
Then chisel back to the line. For the final cut the chisel is registered in the shoulder line then tapped in square or 1 or 2 degrees of undercut. You can see that I have placed tape on the chisel at just over 1/2 thickness. I chop to 1/2 depth from both sides.
Humidor10.jpg
 
Having chopped to the shoulder line, there are still some lumps that need removing in the corner of the pins. First I have made a release cut along the grain, with a wide chisel held against the tail, pushed until the chisel intersects the shoulder line. I then pare in the vice to remove the lumps. The release cut is visible in this picture
Humidor11.jpg


After the lumps are removed
Humidor12.jpg


I have also paired down the outer shoulders for the half pins. At this point I check the shoulders with a 6" rule to make sure there are no bumps. You may be able to see the polished track of the shoulder marks. The cherry was a bit of a pipper to pare, it felt a bit over dried and crumbly.

Next comes my most hated part, as I always feel there is plenty of room for a cock up. The pin board is clamped vertically in a square jig, flush with the top surface (using the stock of a square). The tail board is then clamped on top with the outer face references to the pin board, again using the stock of a square. This is where the 0.1mm reduction in the shoulder marking should lead to a tighter joint. With both pieces firmly clamps I transfer the tails to the pin board. I am using a Hock marking knife blank here, as you can see it doesn't have a nice handle yet.
Humidor13.jpg


I transfer the end lines down the face, but moved a fraction in, as I will use them as a reference when paring the pins. In theory all of the end marks are in the material you want to keep. The shoulders are marked a bit thinner than the tail stock thickness, this time to make the assembly easier, as it should allow you to tap the pin board all the way home without the pins coming through the other side and bottoming out on the bench.
Humidor14.jpg


A bit of cutting and chopping later:
Humidor16.jpg


At this point I test fit, and mark any pins that seem particularly tight, I try and pare them just a gnat's whisker.
Humidor17.jpg


I made grooves for the top and bottom at the router table. These were through grooves on the sides, but stopped grooves on the front and back. The grooves are 5mm wide.
Humidor18.jpg


At this point I resawed some 2" roupala lacewood to give me a top and a bottom. These where hand jointed then glued, and left to distort for a few days before final thicknessing.
Humidor15.jpg


After thicknessing they were cut to size on the tablesaw. The piece of paper is there to ensure perfectly square top / bottom.
Humidor19.jpg


The top is thicker than the bottom, and needs a rebate to fit in the groove, this was cut at the router table.
Humidor20.jpg
 
Looking forward to seeing this completed! Great shots, thanks.
Have you been on Mr C's courses by any chance? :wink:
Cheers
Philly :D
 
Excellent work :D
And thanks for all the pictures.(Hope we don't have to wait long to see the finished article)

Andrew
 
The edges of the rebate were then chamfered with a shoulder plane
Humidor21.jpg


Before the box can be assembled all the interior faces need to be finished. I hand sanded though 240, 400, 600, 1000. Probably overkill, but the fine grades are easy. I applied about 12 coats of shellac to the inside surfaces.
Humidor22.jpg


Time for a bit of glue up. I like to do it one corner at a time, (except the last two that have to be done together). I apply the glue using a wooden coffee stirrer pinched from a coffee shop. I put the glue I'll need in a small porcelain dish, as I find it easier than squirting it out from a bottle. Glue is applied to only the long grain surfaces. You might also be able to see that I have cut a slight chamfer on the inside edges of the tails to ease entry and hold any excess glue.
Humidor23.jpg


Then the joint it tapped together on the bench with a square for reference. The sheet of card under the piece protects the bench from glue. This one needs a couple more taps.
Humidor25.jpg


Came out OK, but will look much better after a quick plane.
Humidor24.jpg


The whole box after glue up, but before being cleaned up.
Humidor26.jpg


I then run micro bevels along all edges to protect me against breakout when planing the end grain in the next step.
I take sets of fine shavings along each side, until the joints are flush and the sides are flush. Sometimes the micro bevel needs to be topped up as shavings are taken.
Humidor27.jpg


The top and bottom are also planed flat. I try to plane in one continuous circle, skewing the plane at the joints. You can see I have placed card on the jaws of the vice to protect the box.
Humidor28.jpg


Here's the final shaving coming out full width and length.
Humidor29.jpg


Here is a joint after planing.
Humidor30.jpg
 
Looks like it's coming along superbly! Thanks for sharing, especially your approach to dovetailing. :)
 
Scary part number two, splitting the box. I must get myself a bandsaw. For now I have a high fence, and cut each side in turn on the tablesaw.

Humidor31.jpg


It went ok, then I planed the joining surfaces as I did the top and bottom. But this time checking how I was doing with a straight edge, so that I could get a neat fit (at least in the workshop before any further movement).
Humidor32.jpg


I decided to fix the hinges next. I am using a Brusso 95 degree stop hinge. Traditionally humidors have quadrant hinges, but these seem to offer a similar solution without such complicated fitting. The only downside is the price. I marked for the hinges with three gauges, set for depth, position and width.
Humidor33.jpg

Humidor34.jpg


The bulk of the waste is routed out, then tidied up with chisels.
Humidor34a.jpg

Humidor34b.jpg


The interior of the humidor is going to be lined with spanish cedar, also known as cigar box cedar. I bought mine from timberline http://www.exotichardwoods.co.uk. I bought it resawed down to 6mm from them, bear in mind their website is not up to date, and the prices have changed a bit. I bought rather more than I needed and now have enough for eight more humidors.

The purpose of the lining is several fold:
- To impart a pleasant aroma to the cigars.
- To retain moisture and stabilise the humidity.
- To provide a seal between the top and bottom of the box.

The aim isn't to get the box airtight, as some oxygen exchange is desirable.

I edge jointed a couple of pieces for the bottom of the box, makes the workshop smell lovely.
Humidor35.jpg


After the board had dried it was planed, sanded and sized. It was glued to the bottom with a thin line of glue, to allow for expansion and contraction. The lining was cut undersize on width to allow this movement.
Humidor36.jpg


The side linings are fitted with a mitre at the corners, and the top rounded over with a block plane. The sides extend about 3mm above the bottom to seal into the top.
Humidor37.jpg


Before the side linings are fitted, I decided to finish the outside and the edges, as it would be difficult to sand once the linings were fitted.

First in my finishing process was steaming out any knocks / dents that had been picked up along the way. I just use an iron set on very hot with a damp cotton rag. This always seems to work miraculously for pulling out dents, as long as the fibres haven't been severed.
Humidor38.jpg


After steaming, some hand sanding down to 1000 grit
Humidor39.jpg


Then apply shellac layers until you get bored, with the occasional de nibbing in between coats.
 
Having finished the outside, I can fit the rest of the lining. The little bits of folded card are to provide a bit of protection to the exterior finish. The lining is left unfinished.

Humidor40.jpg


Then the hinges are fitted. They are quite fussy to get the right depth. If the mortise isn't deep enough, the gap will be wider at the back than the front, and vice versa. I always seem to end up removing a bit more, then slipping a cigarette paper under the hinge.

Here are some completed pictures. (well except for fitting the humidifier and hygrometer, which I have yet to source).
Humidor41.jpg

Humidor42.jpg

Humidor43.jpg

Humidor44.jpg

Humidor45.jpg


A few final thoughts:

Doing dovetails this way can give fine results, but it certainly isn't fast.

Remember not to undercut the shoulders of the tails too much for the pin where you are going to split the box. For my next one I may try to get the split over a mitre faced dovetail.

Don't attempt to plane roupala lacewood with a standard pitch plane, no matter how sharp. It easily tears out between the medullary rays (of which there are lots). Stick to scraping or sanding.

Fitting hinges is a tricky and an exacting business.

Resawing and splitting boxes on a tablesaw is scary and probably very dangerous, buy a bandsaw, or a very very long push stick.

If making the same box again, I might be a bit more picky about removing sapwood / stock selection.

Careful with planning direction when joining two boards for a top. They reflect the light in a different way.
 
Philly":2xh25c4k said:
Have you been on Mr C's courses by any chance? :wink:

Yes, tool tuning and dovetailing. Both excellent courses, highly recommended for those with an interest in the science behind craftsmanship
 
Good looking humidor.
Hinges - agree...and then some :x
Resawing - agree, or do it by hand with a tenon saw
Sapwood - I never include any sap in any work I do
Planing direction - joining two boards can be tricky to get the best match, trouble is when they're bookmatched the grain on each then runs in the oppostite direction...which don't help - Rob
 
Totally in awe. This is the kind of woodworking standard I know I'll never reach.

Thanks for posting such an in-depth and interesting WIP.
 
You must be delighted with the end result, well done! :D

You don't actually need a bandsaw to split a box. If you don't fancy using the table saw or doing it by hand then I see you have a router table. Got any slot cutters? You can use those to cut most of the way through (not all the way, or else it might drop on to the cutter with the final cut), cut the rest out by hand and finish with a smoothing plane. :)
 
Screws :shock: ...work of this quality should always (IMHO) have good brass slotted screws. Polish the heads with 320g paper and then onto a leather impregnated strop to finish. A small detail, but it'll make a really big difference :wink: Align the slots with the long axis of the hinge - Rob
 
woodbloke":5oz2a19x said:
Screws :shock: ...work of this quality should always (IMHO) have good brass slotted screws... Align the slots with the long axis of the hinge

These are the screws that come with the Brusso hinges, they are nicely polished. Can you recommend a supplier of a good slotted alternative? Preferably with an identical steel cousin to run in first.

In the past I have polished my own slotted screws, I do the polishing by holding the screw in some soft jaws, and use a set of polishing mops with finer and finer compound. The problem is finding a screw that fits the hinge countersink correctly.

I have also been considering making my own on my lathe.
 
Back
Top