Carlb40 - Board thingy comp - WIP

UKworkshop.co.uk

Help Support UKworkshop.co.uk:

This site may earn a commission from merchant affiliate links, including eBay, Amazon, and others.

carlb40

Established Member
Joined
17 Dec 2012
Messages
2,347
Reaction score
0
Location
birmingham
So i'm in and here is my board


Started life as a decorative lintel 5ft x 8'' x 3''. Then i attacked it and blunted 2 saws ripping 1'' off for the comp.


After 2hrs :shock: i was left with 2 boards.


Then it was sent through the thicknesser to get it all niceee and smooth and is currently at 1'' thick, until i decide exactly what i'm making. :-k


Plan of object/ item TBA (hammer)


Ooooo another wip for the comp. Cool. :D

Did you use just a normal rip saw for the splitting? ...did you do it just by marking and by eye?
 
Melinda_dd":2q4xefei said:
Ooooo another wip for the comp. Cool. :D

Did you use just a normal rip saw for the splitting? ...did you do it just by marking and by eye?


Yes and No marking i just used my eyes. :mrgreen: :---)
 
So my design is now available for laughing at. :mrgreen:
After it was announced my initial thoughts were to make a Krenov style wall cabinet without the door. However with the timber available i couldn't make it work at a reasonable size. So then a brain wave hit me, boy did that hurt :mrgreen:

A corner cupboard, i have wanted to make one for years so now i am. :) Although while laying it out on the timber i almost decided on a miniature table. However being so small i wasn't sure how much use it would get anywhere. :-k So i stuck with plan B the corner cupboard.
 
Peter Sefton":1a91vhuh said:
And a lot of elbow grease
Sorry didn't see this yesterday. :oops:

Yep a lot of elbow grease and a hoooge cuppa got me through it. :mrgreen:
 
Very true Richard, not sure i wish to repeat that any time soon :shock:


I guess i should confess. I never ripped the whole thing by hand :oops: I used my cordless circular saw with a new blade and ripped from both sides as deep as the blade allowed - 54mm
Which left me about 85mm in the centre to rip by hand. I think the first part took 15 minutes, the rest of the 2 hrs was spent dulling 2 new handsaws :lol:
 
Ever time I do any real labour intensive hand work, ripping or a lot of hand planing in timber prep it's just so humbling to consider the amount of handwork that our past masters undertook. It just makes me appreciate my machines even more :!: and reminds me of how fortunate I am.
Cheers Peter
 
I thought that same thing when ripping. I couldn't imagine doing that all day and for weeks on end by hand. :shock:

That bit was bad enough, although getting a decent bandsaw and dumping the TS is climbing higher on my to do list. :)
 
So yesterday i started on some design issues.


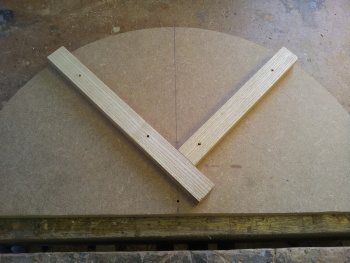
I layed it using 2 outer points and a centre point, then used my jack saw to create the curve. Then used some 15mm Ash from another project for the temporary sides to see how things looked.

Then this morning i cut and sanded the mdf template, but something didn't feel right. So i traced round the template, flipped it and compared it to the lines. It was out. After making another one the same way, and checking. This one was worse. The curve was unequal and flatter the one side.


So both were binned and i used my circle cutting jig on the router and cut a big half circle.
I then used a bit of ash off cut to form a fence and screwed it onto the mdf.


This way i was able to rough cut the timber to size, then pop into the jig and route it to get my curve. :)

After cutting the timber, i thicknessed one piece for the sides / shelf to 15mm and the other piece to 18mm for the base/ top.
Then i used the jig to route out the base/top


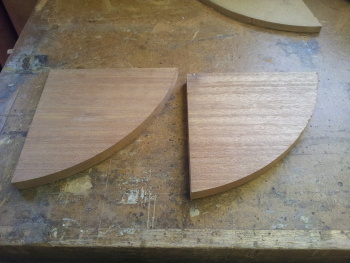
The plan was to make the base/top/sides/ shelf look thinner than they are. So starting the the top/ base it used a thumb mould cutter for the top section.


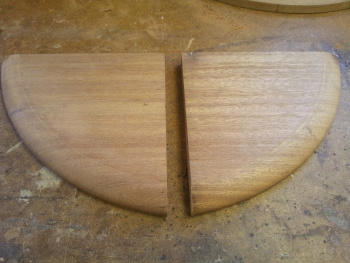
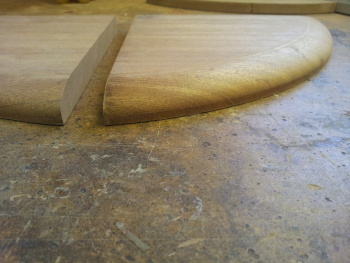
I then switched bits for a round over for the underneath.


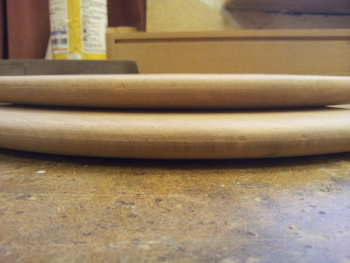
Still a load of sanding to do. I was very nervous routing the curved section as i was worried about tear out. :shock: However i think it helped making 0.5mm passes at a time. Yes it took ages, but at least i still have 2 pieces of timber intact. :lol:

Then i squared up the ends on the boards for the sides. Not shown here but you will see later, one board was ripped down to allow jointing at the rear.


I then went on to start working out the dovetails, my first ever dovetails. :shock: A bit chunky, but i have limited small chisels. #-o


After finally deciding on sizes, i started cutting.


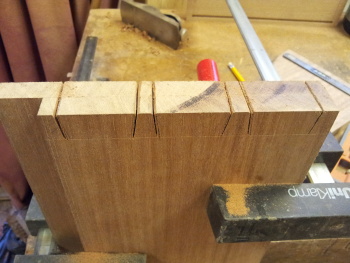
This was done with my recently restored DT saw, cuts quite nicely and feels better than hard point tenon saws. :)

I then cut the waste out with a coping saw, and tried a few of my smaller chisels. Both my 6mm jap and Narex mortice chisels :lol: But a bit bulky for this.


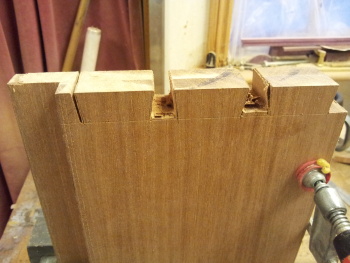
So i have left it for now, until the 6/12mm chisels that i ordered earlier arrive from WSH later this week . . :D


Just one thing bugging me, for the size of this i'm thinking 18mm is a tad thick for the base / top? Wondering if 15mm would be better and then 12mm for the sides and 10mm for the shelf?
 
Difficult to know with the thicknesses. I always struggle with this and am sat now with my fingers apart trying to picture it.

To be honest, I would sketch it out full size on a smallish project, and see what you think. Even if you simplify the sketch and make it 2 straights I staid of the curve, you should see the idea.
 
marcros":1edva3og said:
Difficult to know with the thicknesses. I always struggle with this and am sat now with my fingers apart trying to picture it.

To be honest, I would sketch it out full size on a smallish project, and see what you think. Even if you simplify the sketch and make it 2 straights I staid of the curve, you should see the idea.

Yeah i will probably do that on the piece of mdf i have. I will also round over the shelf as per the base/ top as that is 15mm so will give me a working model to look at. :)
 
Back
Top