You are using an out of date browser. It may not display this or other websites correctly.
You should upgrade or use an alternative browser.
You should upgrade or use an alternative browser.
Baby Wadkin Bursgreen in California: Advice on an AGS10
- Thread starter KT_NorCal
- Start date


Help Support UKworkshop.co.uk:
This site may earn a commission from merchant affiliate
links, including eBay, Amazon, and others.


KT_NorCal
Established Member
That's it I think... The PO of my saw said it looked like HVAC ducting and he didn't even think about it when it tossed it.. Also the slightly staggered screw holes are the same as on mine. Bit complicated shape given my metal working skills so might have to make something a bit different.
Also, what is that metal bar bit bolted to the side of your table? Something for the fence to rest on? Looks like a good idea actually as I think my table extension is already drilled for that bit...
Thanks for the pics!
Kevin
Also, what is that metal bar bit bolted to the side of your table? Something for the fence to rest on? Looks like a good idea actually as I think my table extension is already drilled for that bit...
Thanks for the pics!
Kevin
KT_NorCal
Established Member
MusicMan":q136hth8 said:I am not sure that there ever was a Wadkin dust port for the cabinet! All the ones I have seen have been user made. Mine has a motor cover that is clearly user made and I am working towards putting a port beneath it and a ramp inside the saw to guid the dust down to it.
Axminster do ports in various sizes and shapes that should be usable.
Keith
There is definitely one in the manual with a part number and everything... it is combined with a completely pathetic drawing of it, but I'm 99% sure the one Merlin posted is the part.. I'm guessing it was optional and was not ordered often as well as what happened with the one on mine... eventually got tossed when someone wasn't paying attention for looking like slightly rumpled HVAC fitting....
KT_NorCal
Established Member
merlin":2ix42c9l said:This is the one on mine.
Merlin
Hi Merlin,
Do you have a thread on your saw? If not I wouldn't mind seeing some more pictues of it...
Is that second "line" running inside your AGS a grease tube for the motor bearings?
Thanks!
Kevin
misterfish
Established Member
KT_NorCal":2666ws7t said:Also, what is that metal bar bit bolted to the side of your table? Something for the fence to rest on? Looks like a good idea actually as I think my table extension is already drilled for that bit...
Yes, you can also see it in my picture of my saw with the home made plywood dust port. It allows the full width of the travel of the fence beyond the edge of the right hand wing.
Jeff
merlin
Established Member
Hello Kevin,
The second line with the grease nipple is a hand brake cable, it looks like an original fitting and is useful.
It would be easy to rig up if a handle could be found as it’s mot very complicated.
I will take some more photos later and post them up.
Jeff,
I don’t think ours can be far apart by the look of them, I’ll put the numbers on the photos.
Cheers, Merlin
merlin
Established Member
Here's a few more photos.
Hopefully of some use.
Cheers, Merlin
Hopefully of some use.
Cheers, Merlin
Attachments


KT_NorCal
Established Member
Hi Merlin,
Very, cool. Didn't realize yours was a rolling table as well. That hand brake looks very nicely done actually and would be helpful with heavy things like dado stacks especially. Was it a user mod or factory? I'm guessing that the rolling table BRTs had slightly longer fence guide bars as standard hence the table extension to support the fence. The short guide bars on mine are nice given my space issues, but the right side of the fence falls off the bar before the fence edge gets to the side of the table, which I think might end up being a bit of a pain (eventually).
It looks like your fence has the original "sight glass" in the fence attachment... mine has gone missing which creates a slight problem... you know if these can be had as spares?
Also, the inside of your saw looks very similar, but with some slight differences (the end of the arbor where the nut is attached, the bar running across the motor plate under it... also the pivot pin looks to be bronze on yours... seems to be steel in mine.. but then again haven't cleaned it up, so will see).
Kevin
Edit: It just occurred to me that the different end on the end of your arbor and that bar underneath might be part of the brake... which would make sense. Seems a very nicely done braking solution...
Attachments


merlin
Established Member
Hello Kevin,
Going back a few years I did a post on the sight glass as mine was also missing, it was quite easy to make another one and from memory Mr fish helped me with the dims.
I’ll dig out the photos later.
Merlin
Going back a few years I did a post on the sight glass as mine was also missing, it was quite easy to make another one and from memory Mr fish helped me with the dims.
I’ll dig out the photos later.
Merlin
merlin
Established Member
Just seen your photos, I thought the whole thing was missing - I used an eye loupe lens and painted a red line in the middle.
KT_NorCal
Established Member
misterfish":2ybk7u0a said:Yes, you can also see it in my picture of my saw with the home made plywood dust port. It allows the full width of the travel of the fence beyond the edge of the right hand wing.
Jeff
Duh on my part! Sorry... that was staring at me in plain sight and I totally missed it.
") I do think a slightly longer guide rail would be a nice to have as it would let me deal with slightly larger bits of ply, so will have to keep an eye out for some parts... I was wondering what the slightly odd spacing of the holes in the side of the table extension were about, so that answers that.
I do think a slightly longer guide rail would be a nice to have as it would let me deal with slightly larger bits of ply, so will have to keep an eye out for some parts... I was wondering what the slightly odd spacing of the holes in the side of the table extension were about, so that answers that.Kevin
KT_NorCal
Established Member
That is an awesome idea... hadn't even thought about that. Was thinking along the lines of butchering one of the square plastic biesemeyer ones without messing it up too badly. Thanks for the idea!
KT_NorCal
Established Member
MusicMan":xjuxktlt said:It is worth checking the zero on the mitre gauge. It's adjustable;e and mine was significant out when it came.
Keith
So, here is the mitre gauge de-rusted and cleaned up. Was this the version of it that you were thinking? It seems relatively square, but it is hard for me to really be sure as I don't have a machinists square... My woodworking square is a piece of hardware I'm always a bit suspicious about. That said it doesn't look grossly out of square... it is also hard to be sure because the face is most definitely not flat. I will need to flat that off first and then take another look at it...
Kevin
.jpg")
Attachments
misterfish
Established Member
merlin":1gyxpitn said:I don’t think ours can be far apart by the look of them, I’ll put the numbers on the photos.
Cheers, Merlin
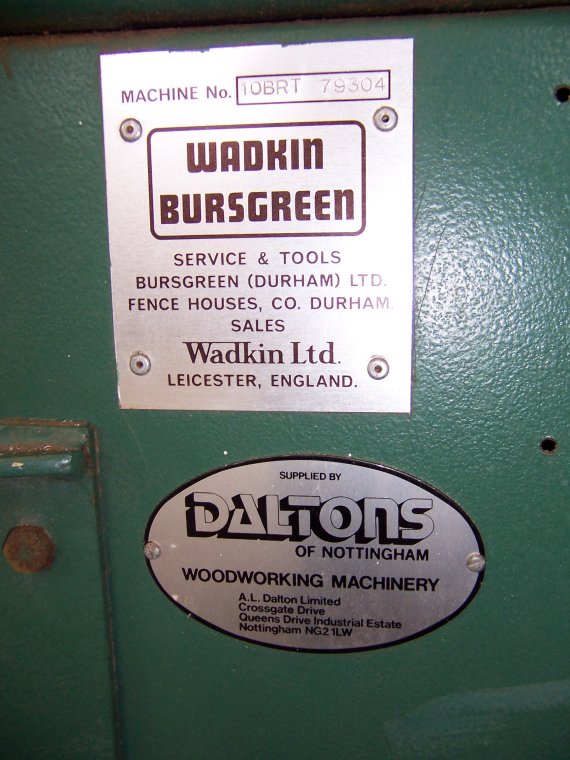
My machine plate states 10BRT 79304 so probably just a bit earlier than yours.
Years ago when I got the saw I asked about its age and was told the 79 did not mean 1979. I got a reply from Scrit with the following info
"I've had a chat with a friend who used to work for Wadkin about the BRT. He tells me that they were manufactured in the 1950s and 1970s and always (to his knowledge) had the sliding table, whereas the AGS did not. The rip fence and handles are later (mid-1970s onwatds) versions, as is the badge, whilst the machine number points to an early/mid 1970s machine and the MEM switch box is an earlier type box (they went to greay square plastic switch gear boxes in the larte 1970s. Perhaps Dalton's in Nottingham (who still exist) would be abl; to give you chapter and verse on the machine.
Wadkin re-engineered the AGS range of saws in 1980 or thereabouts and the designs all became much boxier. At that time they rationalised they small saw range and dropped the AGS-derived BGS and BGP in favour of the AGSP and SP12. They still made three sizes of AGS saws (10, 12 and 14in with an option of a sliding table - although late AGS10s are probably rarer than hens teeth)."
I think Wallace has a lot of info about wadkin serial numbers and dates.
Jeff
merlin
Established Member
Thanks Jeff - interesting stuff, mine came from a school in Rotherham.
Merlin
Merlin
KT_NorCal":1nrvm2ue said:MusicMan":1nrvm2ue said:It is worth checking the zero on the mitre gauge. It's adjustable;e and mine was significant out when it came.
Keith
So, here is the mitre gauge de-rusted and cleaned up. Was this the version of it that you were thinking? It seems relatively square, but it is hard for me to really be sure as I don't have a machinists square... My woodworking square is a piece of hardware I'm always a bit suspicious about. That said it doesn't look grossly out of square... it is also hard to be sure because the face is most definitely not flat. I will need to flat that off first and then take another look at it...
Kevin
View attachment 20181126
Yes that is the version. The zero can be adjusted by removing that box cover at the bottom.
You don't need a square to check a square, since 4 x 90 = 360, a perfect circle. You can take a piece of plywood and make five cuts using the mitre gauge, rotating the piece one "right angle" clockwise each time. If your gauge is true, you will have a perfect square with all sides equal. If not, the width of the edge at either end of the fifth cut will show you how much it is out.
If you google "five-cut method for square' you will find plenty of detailed descriptions.
When it is all set, you can use your test square to set your woodworkers' square. Or you can build a jig to check your square, as I described in this thread:
high-accuracy-square-setting-jig-t93871.html?hilit=%20square
Keith
memzey
Established Member
Very happy 1963 BGS10 owner here. I did a full resto thread on the Canadian site a few years ago. A bit daunting at first but all fairly straight forward once you’re into it. They are very similar machines I think although yours is later than mine. I do think yours is configured for a proper riving knife but you seem to have lost the parallelogram bracket which makes it rise and fall with the blade. Watching this thread with interest.
KT_NorCal
Established Member
memzey":3qvyvo0p said:Very happy 1963 BGS10 owner here. I did a full resto thread on the Canadian site a few years ago. A bit daunting at first but all fairly straight forward once you’re into it. They are very similar machines I think although yours is later than mine. I do think yours is configured for a proper riving knife but you seem to have lost the parallelogram bracket which makes it rise and fall with the blade. Watching this thread with interest.
Hi there,
I'm pretty sure I've read that thread two or three times actually as I have been looking for a BGS10 for a long time, but had given up finding one here in the States. Pretty sure they were never imported for whatever reason or if they were it was in minisucle numbers... Net, net I have some saw envy related to your BGS! When the AGS10 came up I grabbed it as I know they are good saws as well. Will definitely post my progress (and many questions) as I go along. If that is your BGS over at the Canadian forum I actually was planning on PMing you to see what that light gold color paint was that you used under the table... I thought it looked pretty good and was going to steal the idea for the some of the guts of this thing!
I've sort of come to the conclusion that this machine could support the proper riving knife set up as well. I think these US market ones (not sure about Canada) all had the US spec blade guard which is of a design that would not have worked with that riving knife and the crown guard that was used in the UK market so I'm pretty sure they were never attached. I'll post pictures of the guard as soon as I get it cleaned up. From what the PO said they found it useless and just removed it, so I don't think it has been used much. Just sat there rusting over time. I defintely would like to swap it out at some point if I can find the parts as I like the UK crown guard better as well as for a riving knife to really be useful you should have one for each blade thickness that you use, so think it is a much safer set up as well.
Kevin
KT_NorCal
Established Member
MusicMan":2b0u5827 said:Yes that is the version. The zero can be adjusted by removing that box cover at the bottom.
Hi Keith,
I actually had that bit apart and there is no adjustment built into it... I can see possibly wallowing out the screw holes in the bottom of it a bit to give me a little movement, but otherwise this one at least doesn't seem to allow for anything as is. Will take it apart and post a pic.
MusicMan":2b0u5827 said:You don't need a square to check a square, since 4 x 90 = 360, a perfect circle. You can take a piece of plywood and make five cuts using the mitre gauge, rotating the piece one "right angle" clockwise each time. If your gauge is true, you will have a perfect square with all sides equal. If not, the width of the edge at either end of the fifth cut will show you how much it is out.
If you google "five-cut method for square' you will find plenty of detailed descriptions.
When it is all set, you can use your test square to set your woodworkers' square. Or you can build a jig to check your square, as I described in this thread:
high-accuracy-square-setting-jig-t93871.html?hilit=%20square
Keith
Thanks for the link... that is actually pretty nice thing to know. Only challenge is that I'm not currently set up to run a 3HP phase converter/VFD in my garage, so until I can swap the motor out for a 1hp I have I won't be able to run the thing... once I get the electrical in my garage sorted I'll swap the old motor back in and get it running on a proper VFD.
There is always something...KT_NorCal
Established Member
misterfish":1cmkuj1b said:merlin":1cmkuj1b said:I don’t think ours can be far apart by the look of them, I’ll put the numbers on the photos.
Cheers, Merlin
My machine plate states 10BRT 79304 so probably just a bit earlier than yours.
Jeff
Here is the number plate on mine... I would have a hard time believing the 79, 80 or other designations are not indicative of the year though. The PO of mine said they bought it for sure in late 79 or early 80, since that is when they acquired most of their machinery, so that would track to this being a late 79 or so saw for sure.
Attachments


Similar threads
- Replies
- 6
- Views
- 1K