Any ideas for fixing this library chair?

UKworkshop.co.uk

Help Support UKworkshop.co.uk:

This site may earn a commission from merchant affiliate links, including eBay, Amazon, and others.

JakeS

Established Member
Joined
25 Oct 2011
Messages
947
Reaction score
1
Location
Grantham
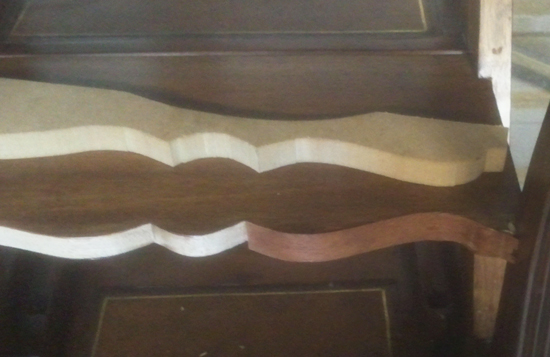
I've been asked if I can try and fix this library chair that my parents own. It's one of those ones where the back folds down and it turns into a little set of steps. The bottom step on this one is held in place by four housing joints and - thanks to the arguably kind of thoughtless decorative cut on the front edge, right next to the shortest ones, it's snapped along the grain:

chair-break-1.png

chair-break-2.png


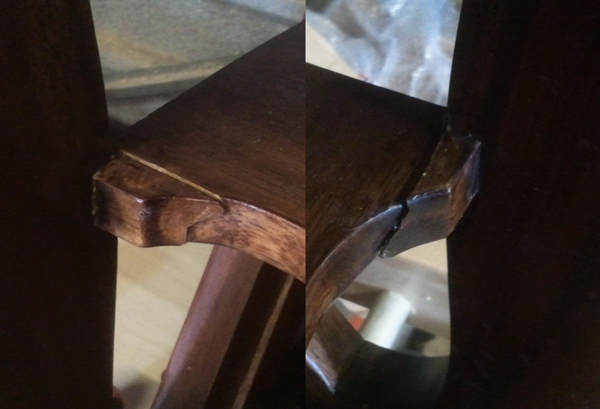
My first thought was to try and hold the breaks apart, apply glue to the inside, then clamp them shut and clamp blocks to the top and bottom of them to keep them in line. Which all worked spectacularly well until 24 hours later when I took the clamps off and both joints broke instantly! It seems that there's some stress in the frame somewhere that pulls these breaks out of alignment - as you can see in the second photo, without any clamps on them the joins move out of plane by about a millimetre - in different directions.

My best plan right now involves re-gluing, maybe with a gap-filling epoxy, then while it's still in clamps drill through the broken-off bits into the main board of the step and insert screws to hold it all together permanently. I'm a bit concerned that drilling through the small broken-off bits may weaken them further, but the only other thing I can think of would be to replace the entire thing and cut the decorative part less aggressively, but I have little idea how to go about disassembling it!

(I'm also concerned about being able to match the finish, but so far as I can tell it's just generic-mahogany-woodstain slopped on by the bucketload, so hopefully that won't be too problematic. I figure that if I can get it structurally sound I can just strip off the finish from the front edge of that step, glue a layer of veneer along it and then stain it to match as best as I can. There's a chip missing from the top side of one of the breaks as well, so I'll need to carve a patch to fit that and try and match the stain anyway.)

Anyone got any better ideas? Other than throwing it away and building an entire replacement chair, which I'm sure would be incredibly fun but is a little more of an investment than I was hoping to put into this one!
 
Jake, from your pictures and with your comments there has been some movement. The main part (large section holding the legs) needs to be clamped under tension past the level of the small part. Then using a hot air gun warm up the large area on both sides. If you can't touch it it's too hot and will damage the finish. Once done leave to cool over night. Take the clamps off and see if it now sits level with the smaller part. If not repeat above and over tension more than before. You may have to do the same with the leg that is holding the small section as well. It's easier to do than describe. All the best.

One question what glue are you using?
 
maltrout512":356tuzsq said:
Then using a hot air gun warm up the large area on both sides. If you can't touch it it's too hot and will damage the finish. Once done leave to cool over night. Take the clamps off and see if it now sits level with the smaller part.

I will definitely be giving this a go - cheers!

maltrout512":356tuzsq said:
One question what glue are you using?

PVA - Titebond 3, since it's what I had to hand. I did make sure to leave it to cure in a warm enough place, I made that mistake over the winter once...! The broken-off part on the left had come out of the housing as well, that glued back in with no problems, it's just the cracks themselves which have broken.
 
Ok, I normally use hide glue as a restorer, but TB should do the job. You will have to try and remove as much of the glue off the surface as possible. Then try again.

All the best
 
maltrout512":i28qd35i said:
Ok, I normally use hide glue as a restorer, but TB should do the job.

Does hide glue offer any particular advantages specific to repairs over the fact that it's more authentic for antique furniture? I guess this probably does just about count as 'restoration' since I'm trying to restore the chair from 'broken' to 'working', but since it's a modern reproduction I suspect it was probably assembled with PVA in the first place!

I had a go with the heat-gun after work this evening, and it worked wonders, thanks - I'll leave the old-glue-removal 'til tomorrow, to work in better light and make sure I get as much of it off as possible.
 
You would not need to clean the glue from the joint, just apply more Hide glue. In fact if anything reapplying more Hide would make for a stronger joint because you would have effectively sized the joint.
Much depends on how long that break has been there. It's much easier to glue fresh breaks than it is to glue ones that have been collecting dust/dirt and oxidising for years.
 
MIGNAL":28gu9254 said:
Much depends on how long that break has been there. It's much easier to glue fresh breaks than it is to glue ones that have been collecting dust/dirt and oxidising for years.

No longer than a couple of weeks; my parents use it semi-regularly for reaching tall things (for some reason their consumer unit is inside a cupboard level with the top of a tall-ceilinged room, for example) and it apparently broke in use.
 
MIGNAL":1p9o39pv said:
You would not need to clean the glue from the joint, just apply more Hide glue. In fact if anything reapplying more Hide would make for a stronger joint because you would have effectively sized the joint.
Much depends on how long that break has been there. It's much easier to glue fresh breaks than it is to glue ones that have been collecting dust/dirt and oxidising for years.

If its had TB on the joint then you do need to clean off if using hide glue.
 
If repair has broken straight away on removing clamps then sounds like the whole panel has shrunk. If this is the case then no amount of gluing will fix this alone. Ideally you need to remove the small broken segments from the legs then pack where they join the leg then reglue the break, screw and plug it.
 
Matt@":3nclewog said:
If repair has broken straight away on removing clamps then sounds like the whole panel has shrunk. If this is the case then no amount of gluing will fix this alone.

I don't think it's shrunk - I think Mal is on the money, the board seems to have cupped. It broke when I removed the clamps holding the board and the broken-off bits co-planar, not the clamps holding the joint closed. (Which were only really necessary for clamping pressure.)

I've stretched and applied heat and picked out the old glue, and re-glued, clamped and screwed... but not before removing the top millimetre of the broken-off bits, so I can glue them back on over the top of the countersunk screws... I'll take all the clamps off and see how it all holds in the morning; I know I should be able to now since it's screwed, but I don't want to push my luck!

I'm still expecting to have to apply some veneer or something to the front edge to tidy it up, though...
 
If it's cupped it's effectively shrunk. If you can't flatten the cup it remain shrunk and need packing at the front. If it hasn't shrunk by way of shrinkage or cupping the break would not have happened...that's whats my money's on :)
 
Matt@":x1amikx5 said:
If it hasn't shrunk by way of shrinkage or cupping the break would not have happened...that's whats my money's on :)

I suppose, but put it this way: when I pushed on the top/bottom face of the board to bend it back into the correct position, the gap of the break closed; the legs do flex a bit, so maybe there's some of that, but the problem is that the broken surfaces were out of lateral alignment, not that they're too far apart.


(And I still think that the shape and depth of the decorative cut on the front edge of that board has to have been a contributing factor.)


Hopefully the current fix will hold fine; I'm giving it a full 24 hours before I take the clamps off just in case, the glue should definitely have cured by then, and I can see if I can stand on it without breaking it again. ;-)
 
Thanks again for the advice, guys - between the heat-bending and the screws it seems to be nice and secure again; I can stand on it and whack it with a fist and there's no sign of problems.

To tie off the thread, a few pics:

Clamped the joins in both axes (there's a sash clamp running from front to back legs just off the right-hand side of the shot) while gluing, then - with the clamps still on - drilled, countersunk and screwed the joint. Originally I'd chiselled off the first millimetre of the finished front here, intending to glue it over the top again to hide the screw - since this is the front of the chair!
step2.jpg


After gluing it became more obvious that the damage that occurred to the join - including missing bits and scraped-off fibres, which may have happened during the original damage or after the fact - made it look pretty damaged still even if I replaced the 'caps' I'd taken off the sides. So I scraped off the lacquer/stain/whatever-it-was over the entire front edge ready to apply a clean veneer to the entire front surface to clean it all up.
step3.jpg


I did each curved section separately - first I cut a clamping caul to match the traced profile of the front edge, steamed the cut-to-length strips of veneer in the kettle*, quickly glued it on and clamped up with the caul. Then trimmed it down to fit with a sharp chisel and some careful sanding.
step4.jpg


At this point my father opined that he'd actually rather keep the scuffs and damage along the top of the front edge, even if some of them occurred during the repair, because "old furniture should have some scrapes" or something**. I fixed up the giant chip that was missing from one edge with some sawdust-packed glue and a trimmed bit of veneer for the top edge so there wasn't a gaping hole, at least, but then oiled the veneer to finish it off.
step5.jpg


I probably ought to put a coat of lacquer over the front as well, since the rest of the chair has it, but other than that it's all done. There's annoyingly a couple of streaks in the veneer that didn't take the stain quite so well as the rest - I assume glue leeching through the fibres more there or something! - but my father didn't notice it on the photos, and it stands out a lot more in the photos than in life, so I'm just a bit annoyed rather than thinking that I'll have to start again. It's in a particularly twisty section in the grain of the veneer, it's almost 45 degrees from the plane in places, I probably should have picked a different piece to use. I know for next time!


* It turns out that quite a bit of the colour of the wood managed to leech out into the water in the kettle, my next cup of tea was tea-coloured before it hit the mug! Maybe I should use a second kettle...

** To the best of my understanding, the chair is about ten. But hey, I guess it has some scrapes and knocks elsewhere upon its person as well, maybe a pristine-looking front step edge would have looked out of place, I don't know.
 

Latest posts

Back
Top