Another Paul Sellers Workbench... With A Twist

UKworkshop.co.uk

Help Support UKworkshop.co.uk:

This site may earn a commission from merchant affiliate links, including eBay, Amazon, and others.
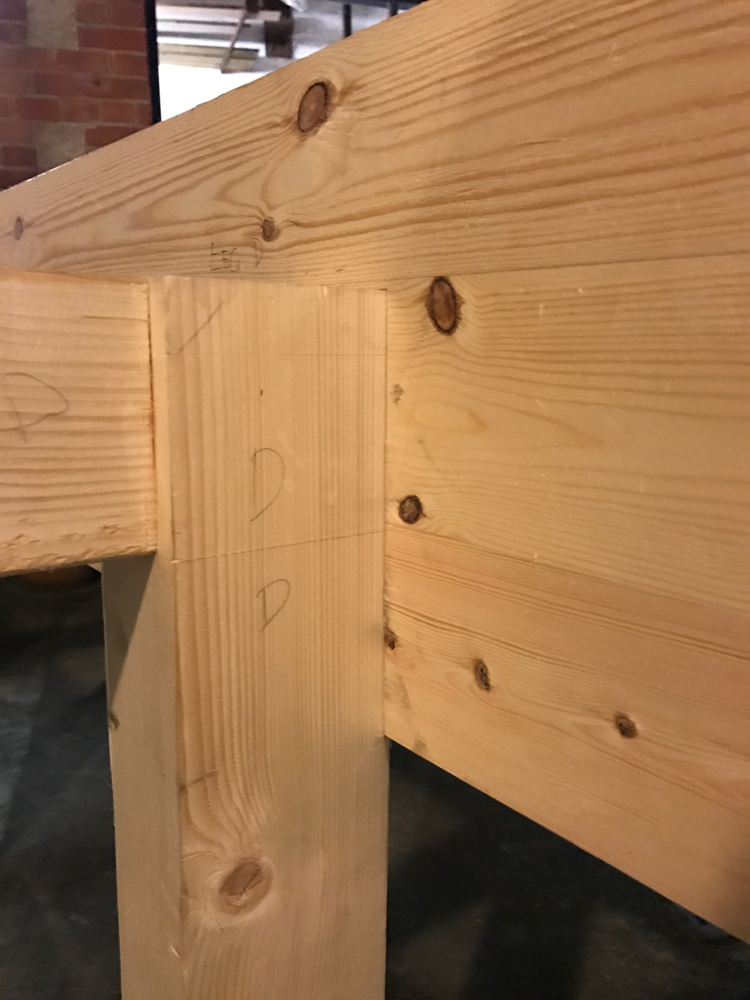
More progress today. The dadoes have now been cut to house the leg frames and it's beginning to take shape. The legs fit snugly into their housings which I'm pretty pleased with, except one that is just a fraction looser than I'd like. Not really a big deal. The dadoes are mostly clean cut which I'm also happy with - couple of small bruises and one knot which made a bit of a mess but for the most part all good. I offset one of them by a millimetre to compensate for the slightly narrower leg frame.

The surfaces need to be planed smooth but that can wait.

Dw3mgfv.jpg

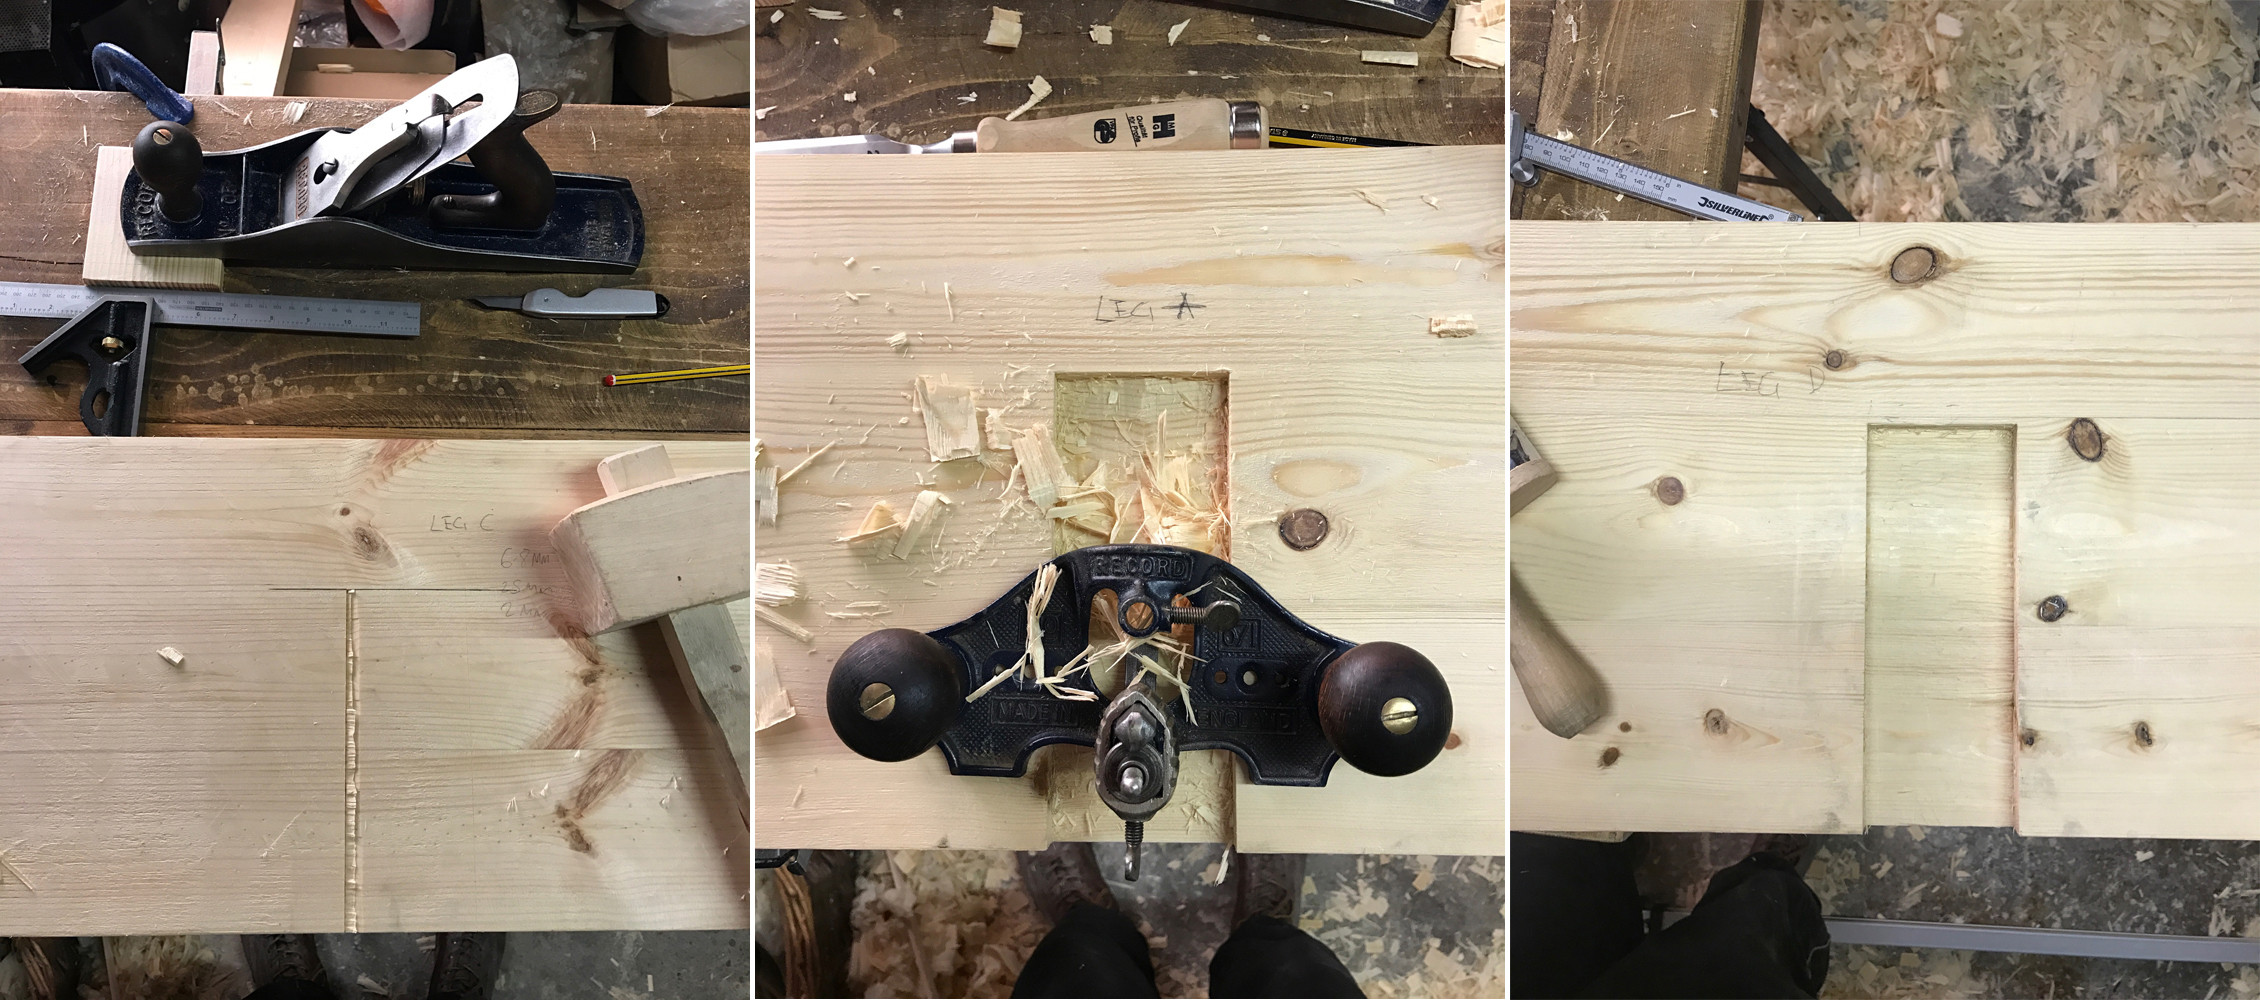
The housing dado on the right looks out of shape - it's just the camera angle. :roll: :twisted:

vE9RUzg.jpg


Csp0982.jpg


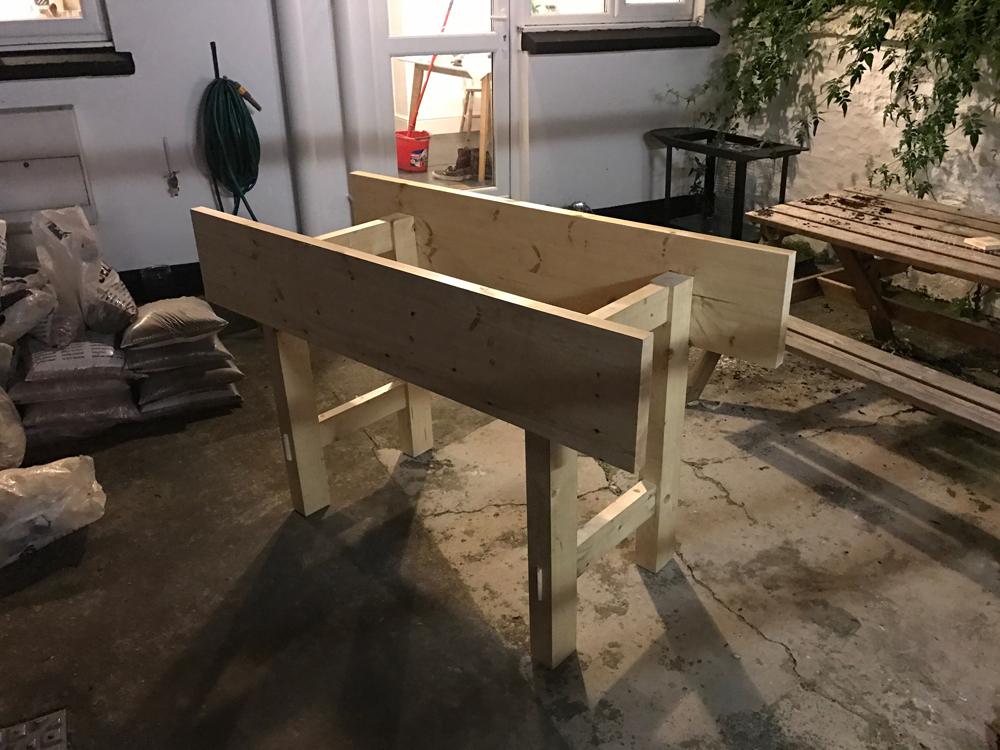
That's about it for the next few days as I'm going to be away from home, but I'm happy to have got to this point knowing I can come back and the majority is done.
 
Beautifully done elbarto! That's looks like it's going to be a great bench when you're finished!
 
El Barto":516zkzdo said:

Looks first rate, it really does!

Great to see someone using a router plane by the way. My list of core hand tools isn't very long, but it certainly includes a router plane.

=D>
 
custard":1x5rs395 said:
El Barto":1x5rs395 said:

Looks first rate, it really does!

Great to see someone using a router plane by the way. My list of core hand tools isn't very long, but it certainly includes a router plane.

=D>

Thanks Custard! Appreciate it. And yes I really like the router plane. There's something so satisfying about its design and the way it works. Can't put my finger on it.
 
Got home today and after a quick nap and some lunch I decided it was high time to continue work on the bench. It feels good at the moment because at this stage things move along quite quickly, although that comes with its own difficulties.

As the pictures show, the aprons and bench top have been glued on. This was a pretty long process but it went reasonably smoothly. One thing I am slightly embarrassed about is that I'd measured everything to allow for the benchtop to be about 2mm higher than the apron it sits against to allow for flattening and removing the staggered edges of the lamination. As you can see, this is not what I ended up with and unfortunately it was too last to go back and correct it. I'm not at all sure where the error occurred because I was pretty meticulous with marking and cutting the apron housings, extra meticulous in fact. The aprons are the same size and the same gauge was used for each housing dado. I've gone back and double checked my measurements and it seems to add up, yet I still have this 3mm gap. I haven't planed the end grain yet for those eagle eyed amongst you that can still see the gauge marks. Hmm what else. The bench is about 2mm wider at one end than at the other, not ideal but I can live with it.

6781a3bb15.jpeg


678199daba.jpeg


This isn't a catastrophe, the apron can simply be planed down to meet the benchtop, but it's frustrating that it wasn't right off the bat. C'est la vie.

On a positive note, the benchtop glued up perfectly against the apron and the bearers it sits on - no gaps or areas that needed to be planed to get it flush, and there's no twist. Hurrah. Actually that's not completely accurate, you can see in the photo that there is a very slight gap between the inside of the benchtop and the bearer, it's only a millimetre or so (its shadow exacerbates it in the photo).

6781ab471b.jpeg


678192b180.jpeg

Something so satisfying about countersunk screws.

Not much left to do now. If anyone wants to chime in with tips or issues I might experience from the negatives/mistakes posted here I'd love to hear 'em.
 
don't worry about the 2mm difference, you can plane the wellboard to fit, from what I'm seeing it looks really good! now you can see how important having that 5 1/2 is hopefully, it's definitely the most useful all-round hand plane for me, I can't wait to see your finished bench

well done El Barto =D>
 
Nowt negative about any of that in my opinion.
Looks like a job well done =D>
 
phil.p":5l2fhpe0 said:
I don't see the point of the deep aprons. I like the accessibility of not having them at all.

The deep aprons stop racking. Furthermore, because they're so good at stopping racking you don't need lateral stretchers lower down, which actually then liberates more under bench storage, for example it means you could slide a toolbox straight into the gap between the legs.

As a design the Nicholson bench was perfect for pre-B&D Workmate carpenters or shop fitters, they'd turn up to the job just with the bench legs, nail on some floorboards or similar stuff from the job itself, and you're up and running with a functioning bench.

If there's a failing with the Nicholson design of deep aprons it's not storage, it's that they prevent cramping a workpiece to the top.

Imagine, in a modern workshop, if you want to do some power router work on the edge of a workpiece. On any other bench you'd fasten it down to the bench top (but with the edge overhanging) with four or five F or G cramps, run the router up to the first cramp, remove that cramp and re-position it behind the router, and progress that way through even quite a complex copy routing job, no need for a router table. But with a Nicholson bench you'd be scuppered. The solution is a gap down the centre of the Nicholson bench and use deep F cramps from the gap reaching forward, instead of from the front edge reaching back.
 
I'd just like to say how much I am enjoying this. It's always nice to see a real-life build, with all the little puzzles, difficulties and bloodstains. Proof that a practical approach will always get you through.

As for the question of racking, there is an extra option that seems to seldom get mentioned - fixing the bench to the floor. My own bench (recently upgraded to have a top made of glued-together studding softwood) does not have deep aprons or even heavy square legs, but it is fixed down to the concrete floor. Conseqently, the top does not move at all in use, whether for planing, mortising or anything else.

But keep up the good work El Barto, and thanks for taking us along for the ride.
 
AndyT":39k22qd2 said:
I'd just like to say how much I am enjoying this. It's always nice to see a real-life build, with all the little puzzles, difficulties and bloodstains. Proof that a practical approach will always get you through.

As for the question of racking, there is an extra option that seems to seldom get mentioned - fixing the bench to the floor. My own bench (recently upgraded to have a top made of glued-together studding softwood) does not have deep aprons or even heavy square legs, but it is fixed down to the concrete floor. Conseqently, the top does not move at all in use, whether for planing, mortising or anything else.

But keep up the good work El Barto, and thanks for taking us along for the ride.

That's a very good idea Andy and one easily overlooked I suspect, perhaps due to its simplicity. How did you go about fixing it to the floor? Thanks for the kind words!
 
thetyreman":32ggum2v said:
don't worry about the 2mm difference, you can plane the wellboard to fit, from what I'm seeing it looks really good! now you can see how important having that 5 1/2 is hopefully, it's definitely the most useful all-round hand plane for me, I can't wait to see your finished bench

well done El Barto =D>

Thank you! And yes the 5 1/2 is great. Much more confidence inspiring and better overall for this kind of job. I find the added weight useful too.
 
El Barto":3kq6hqfl said:
AndyT":3kq6hqfl said:
I'd just like to say how much I am enjoying this. It's always nice to see a real-life build, with all the little puzzles, difficulties and bloodstains. Proof that a practical approach will always get you through.

As for the question of racking, there is an extra option that seems to seldom get mentioned - fixing the bench to the floor. My own bench (recently upgraded to have a top made of glued-together studding softwood) does not have deep aprons or even heavy square legs, but it is fixed down to the concrete floor. Conseqently, the top does not move at all in use, whether for planing, mortising or anything else.

But keep up the good work El Barto, and thanks for taking us along for the ride.

That's a very good idea Andy and one easily overlooked I suspect, perhaps due to its simplicity. How did you go about fixing it to the floor? Thanks for the kind words!

I just used some metal brackets, a batten or two, screws and rawlplugs. There's a few pictures here my-old-cheap-easy-bench-t82290.html
 
AndyT":2itel8u2 said:
El Barto":2itel8u2 said:
AndyT":2itel8u2 said:
I'd just like to say how much I am enjoying this. It's always nice to see a real-life build, with all the little puzzles, difficulties and bloodstains. Proof that a practical approach will always get you through.

As for the question of racking, there is an extra option that seems to seldom get mentioned - fixing the bench to the floor. My own bench (recently upgraded to have a top made of glued-together studding softwood) does not have deep aprons or even heavy square legs, but it is fixed down to the concrete floor. Conseqently, the top does not move at all in use, whether for planing, mortising or anything else.

But keep up the good work El Barto, and thanks for taking us along for the ride.

That's a very good idea Andy and one easily overlooked I suspect, perhaps due to its simplicity. How did you go about fixing it to the floor? Thanks for the kind words!

I just used some metal brackets, a batten or two, screws and rawlplugs. There's a few pictures here my-old-cheap-easy-bench-t82290.html

That is great. Excellent way of maximising space/working with what you have and adding things as they become necessary etc.
 
Working on getting the well board fitted and top planed today.

Can anyone advise me on how best to plane the top? I initially thought to plane it across the grain to get a uniform flatness before then surface planing. The only problem I can foresee with this is tearing chunks out at the far edge (disclaimer: this did actually happen, even after I chamfered the edges). #-o Any suggestions? Would it be suitable to plane up to the edge then come back from the other side and flatten that way (still planing across the grain)?

7884a6ad11.jpeg

Well board nice and snug

7884b1689e.jpeg
 
for the bench top, I found that diagonal strokes, worked well, with the plane set to very fine so it's only taking off high spots, go in an X pattern always with the grain, check it after every 5-10 strokes, then go straight with the grain, it may not need much to get it flat, the key is keep checking it with a straight edge.
 
Back
Top