Advice/Suggestons on Cabinet:

UKworkshop.co.uk

Help Support UKworkshop.co.uk:

This site may earn a commission from merchant affiliate links, including eBay, Amazon, and others.

Scrums

Established Member
Joined
26 Feb 2006
Messages
758
Reaction score
0
Location
oop norf
Not just to to demonstrate that the so called 'pros' don't know it all ](*,) ..or very much at all in my case,
I thought I'd put this up for debate.
IrelandCabinet.jpg


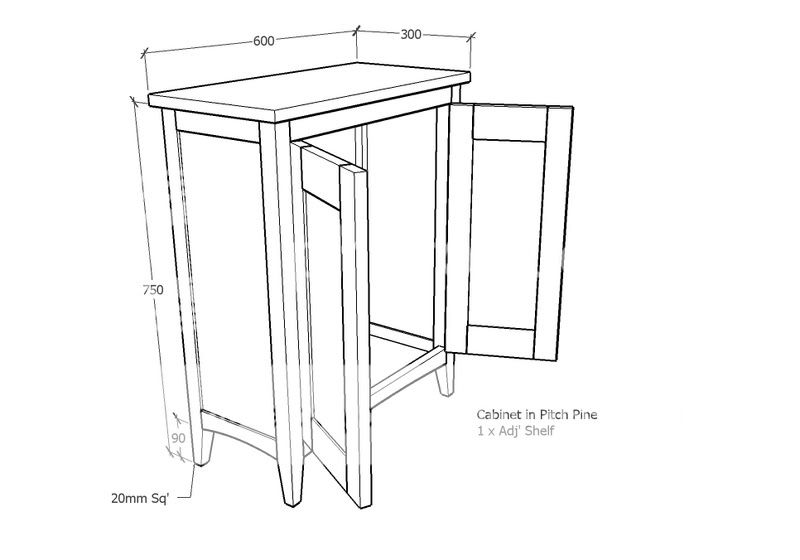
It's a cabinet I'm building for an Artist who's exhibiting at Chelsea Flower Show (...typical Artist, no money involved - just the possible kudos of my having made something that's exhibited there!)....anyway, I want the rails to be flush with the legs and all materials to be solid wood.I may embarass myself here, but I just can't figure out a good way of fitting the base. Below is a sectional view from inside the cabinet, last time I made something similar I cut the base to go round the legs, but that was a lot smaller.

Leg_BaseQuery-1.jpg


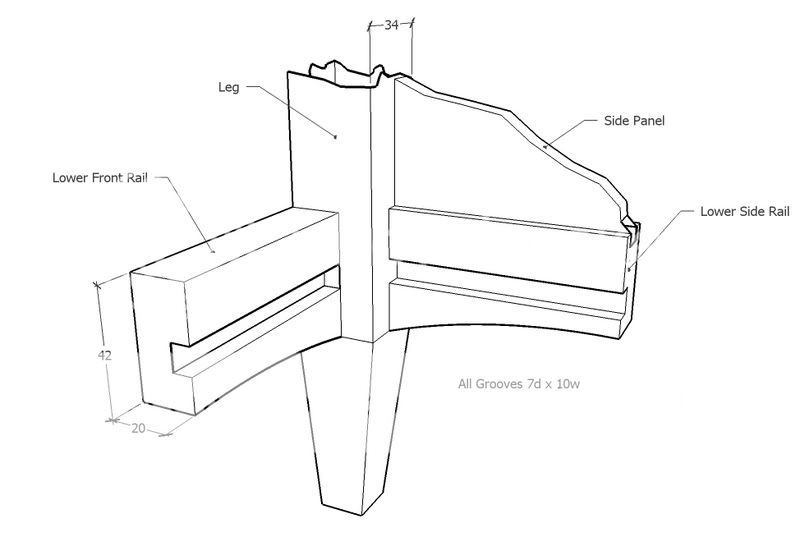
If I cut the groove into the legs as well that's going to make the legs weak, if I chop a square out of the corners of the base then, if it contracts it'll show a gap and if it it expands it will foul the legs and something will have to give eventually.

I have a feeling that I've over designed myself here. Go on guys - do a bit of lateral thinking and tell me what I'm missing!

Chris.
 
Chris, I think I would cut a diagonal slot across the corner of the leg and lop the corner of the bottom panel. I don't believe you'll lose that much strength in the leg.

Another thing you might want to consider is how you'll assemble the cabinet. As you've drawn it, the bottom, back and front would need to be assembled at the same time. I think you could make sub assemblies of the sides but there's still a lot going on when you get to assembling the case.

You might consider eliminating the grooves for the bottom panel. Then make the bottom panel so it can be slipped in from above to rest on inner rails. since you are planning to use solid wood and there needs to be allowance for expansion of the bottom panel, you might consider making the bottom in three separate pieces. You could insert the back piece, the front piece and finally the center piece.

If you want pictures to clarify all this, let me know. If you want me to modify your drawing to show it, send me the SKP.

I really like the way you drew the cut away view. Great job.

Dave
 
Hi Dave

Your first idea of cutting a diagonal slot across the leg is good, much easier to 'mitre' the corners of the base too. I would normally glue up these in at least two operations anyway - I work on my own and much to fiddly otherwise. Sides including panels first then front and back rails + back and any muntin in the back.

Not quite sure what you mean in the second idea - emailed you the files.

Chris.
 
Chris, lets see if these help.

First, the angled notch in the leg which you already figured out.
Version2.jpg


Second, the cleats to support a drop in bottom.
Version1.jpg


Next, the three piece bottom. First, no groove on the ends
scrums3.jpg


And the three pieces for the bottom panel.
scrums4.jpg


I did something like this some years ago when I was living in an old rented apartment. I was standing in the bathroom brushing my teeth. The built-in medicine cabinet had duct tape applied around the inside. Between the back panel and the sides, top and bottom. It had been there long before I moved in. Out of curiosity, I pulled the tape off. To my surprise the back panel fell off and dropped down in the wall where I couldn't reach it.

The panel had originally been nailed on before the cainet was installed. I wasn't going to pull it out of the wall so I had to find another way to repair it. I ended up building a frame and panel sort of thing. I cut the groove in the top rail about twice as deep as the one in the bottom rail. I installed the frame into the cabinet without the panel. I used screws driven through holes in the bottom of the grooves so the screws were hidden.

The panel was made of three pieces. I slipped the left hand piece into the frame pushing it up until the panel could be dropped into the lower rail. Then I slid it over into the groove in the left stile. I trepeated that for the right panel and then slipped the center panel into it.

I didn't need to do it but I ended up gluing the three panels together in situ so that someday, if someone ever takes the medicine cabinet out, they would be puzzled about how the back was put in.
 
Daves 1st idea it is then - good bit of lateral thinking, on those lines I was originally going to put the groove square into the legs - that would've weakend it a lot, but with the 45 degree cut it only needs to be 3 or 4 mm deep just enough to allow shrinkage/expansion.

Sorry, don't like the loose boards idea.

+ thanks Shultzy, the grooves are actually 10 wide - but I see where you're going.

Gotta crack on with this one, there's another artist wanting something wierd, but at least they're paying......

Cheers mates,

Chris.
 
Back
Top