A Krenov-inspired cocktail cabinet

UKworkshop.co.uk

Help Support UKworkshop.co.uk:

This site may earn a commission from merchant affiliate links, including eBay, Amazon, and others.
Some more bits and pieces done over the weekend. I actually can't do long days any more as I have developed worsening back pain over the last year and have discovered I have quite a big scoliosis - curved spine to the side. Apparently I may need surgery in a year or more??
Anyway, I can certainly do a few hours at a time - especially with a new orthotic support which is great
So, on with progress:
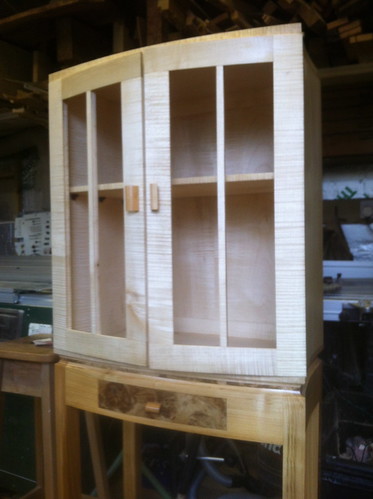
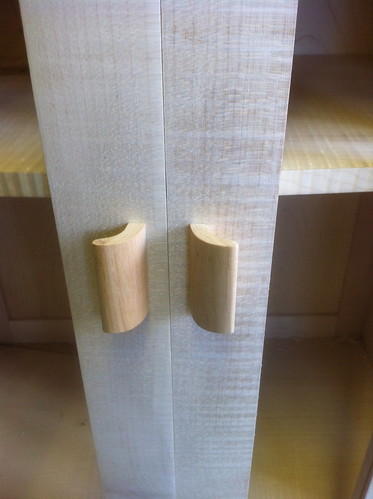
I added the handles and carefully pegged and glued them in place from behind.
6889481012_74ef30cf6f.jpg

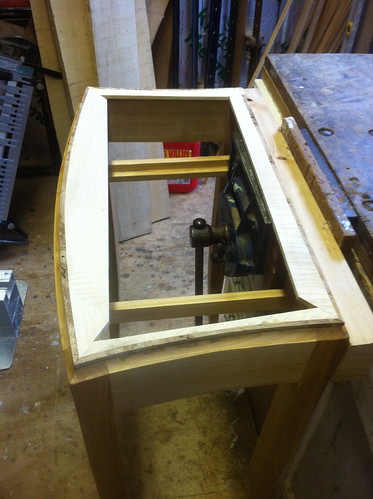
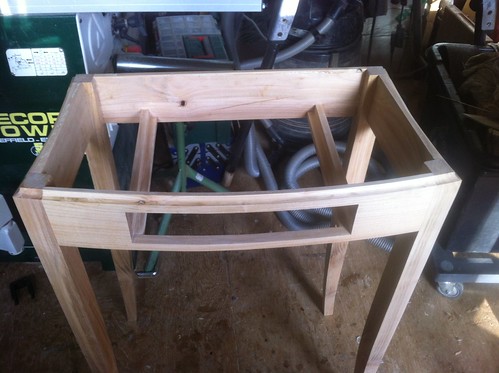
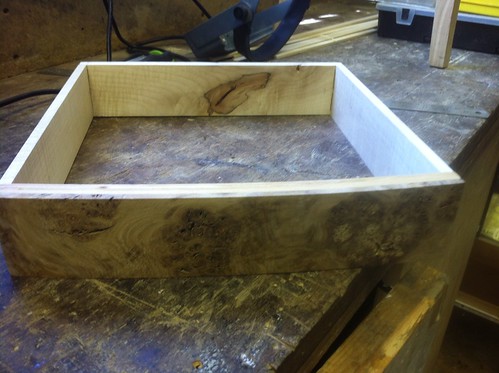
Then a few days ago I decided I absolutely was going to have a drawer after all in the base - so first I had to remake the base with 100mm wide rails rather than the 80 mm it was. I bit fiddly - and sorry phone was down whilst I did that so no photos - but it was fine to cut off the old ones, redo the domino-ing and reglue up. Then I cut out a 62 x 300 square out of the front, added shelf supports to get to this:
6889507812_dea7382344.jpg

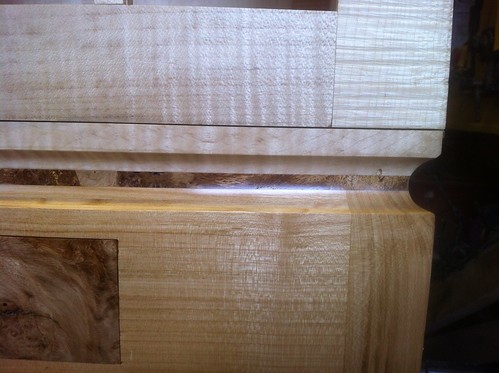
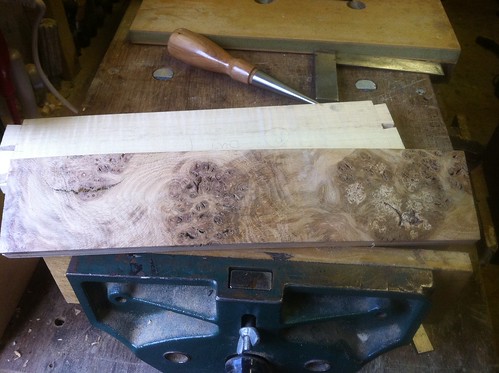
Then started on the drawer - and decided that some lovely oak burr would look great as discussed right back at the start - so I laminated 4 x 3mm cheery together with the 6mm thick oak burr I had carefully selected and cut
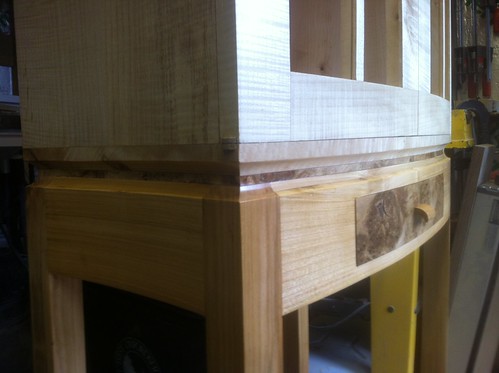
After glueing up it looked like this
6889478782_507c5d5ef1.jpg

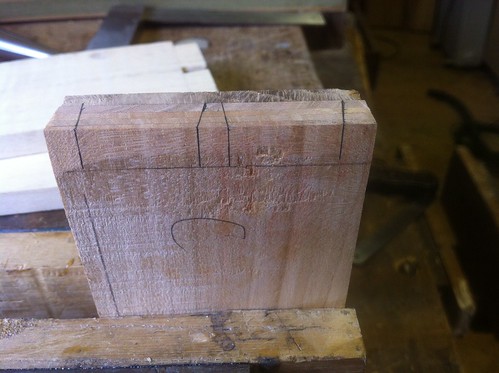
Here's the back with the dovetailing about to start
7035571663_a366a57f6b.jpg

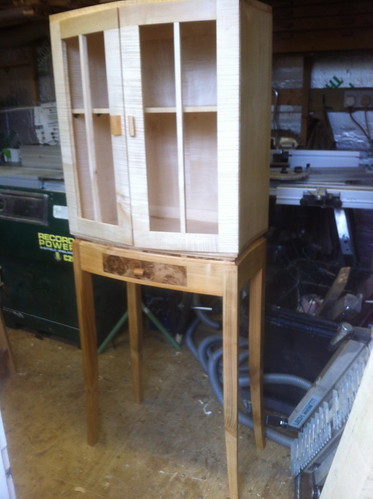
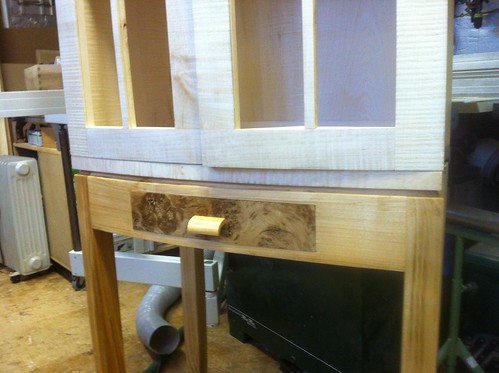
And here's the drawer dry fitted waiting for the base to dry and to have grooves cut
6889479918_b0c329c0af.jpg

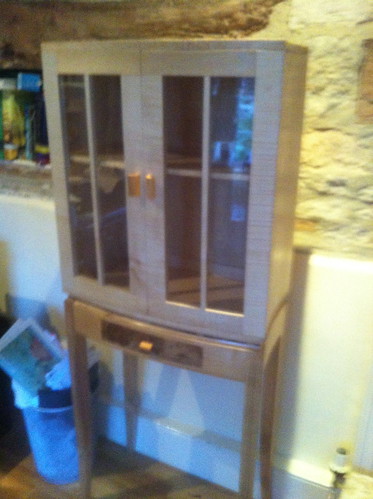
Definitely homebound slope now - should get it finished this week
Cheers
Mark
 
I'm going to reserve judgement (if that's the right word, apologies if it's not) about the drawer until it's fitted and complete in the stand. Visually, IMO you may have made a goof with the burr oak front. We shall await the outcome with some anticipation - Rob
 
Rob I take your point and I too am concerned about it... However, I definitely wanted it to have a drawer as did the boss i.e. my wife. I think the burr will look fine. Worst case scenario I can replace the burr front with a cherry one. We will see
Thanks again
Mark
 
I am almost frightened to post the pictures with the burr fronted drawer in case you lot don't like it!
However, now that I have tidied up the front, put on a handle to match the cabinet doors I am delighted with it - it is definitely going to stay like this. The only thing I might change is I might think about putting some kind of spacer between the base and the cabinet - might try that at the weekend
Anyway, here's the photos
6899563456_9460bf1e41.jpg


7045661575_15c2ce1aa2.jpg


6899563456_9460bf1e41.jpg


Thanks for looking. Sorry if the purists don't like it!
 
I love the cabinet, and I loved the stand as it was. In my view it was more elegant with the slimmer apron rail before the drawer was introduced.

I'm struggling with the drawer in a contrasting material - the grain of the timber in the rest of the rail has strong horizontal lines and I think it would have flowed beautifully into a closely fitted drawer, whereas the burr draws attention to itself which for me is not a good thing.

I think the handle works really well on the cabinet, but on the drawer it looks too heavy and the contrast to the burr draws attention again, where a more subtle visual composition would be a benefit.

I applaud this work as a piece of 'real' cabinetmaking, which is relatively rare on the forums, so all power to you.

Ed
 
Mr Ed":2bsiq528 said:
I love the cabinet, and I loved the stand as it was. In my view it was more elegant with the slimmer apron rail before the drawer was introduced.

I'm struggling with the drawer in a contrasting material - the grain of the timber in the rest of the rail has strong horizontal lines and I think it would have flowed beautifully into a closely fitted drawer, whereas the burr draws attention to itself which for me is not a good thing.

I think the handle works really well on the cabinet, but on the drawer it looks too heavy and the contrast to the burr draws attention again, where a more subtle visual composition would be a benefit.

I applaud this work as a piece of 'real' cabinetmaking, which is relatively rare on the forums, so all power to you.

Ed

I'll second everything that Ed has said about this one as he's summed it up exactly. Overall, I think it's to be heartily applauded...as Ed has alluded to, there are distinct issues which I think I would have done differently and which you may, in the fullness of time and having studied the outcome for a while come to regret somewhat. I usually adopt the view that once it's done, it's done for good or bad and that's an end to it...however, the drawer and it's handle is the main concern and that's relatively easy to remake, n'est pas? - Rob
 
I really like the cabinet and the stand and I enjoy reading your posts because you are always pushing the boundaries. The only thing that doesn't work for me is the variation in the colours of the cabinet, stand and handles and the burr on the drawer simply because they are all competing for attention. But as a piece of cabinetmaking, it's great.

Cheers :wink:

Paul
 
For what it's worth, here's my opinion. First of all, big pat on the back to you for getting this far I think it looks great.

I think that the piece is large enough to carry the drawer aesthetically speaking - however, it's the mix of materials that detracts, I think, from the finished look. I think that I would try a small dark knob on the drawer front, something inconspicuous, then possibly add some sycamore banding to the edge of the drawer to frame it. I think that this would also go some way to tying in the top part of the cabinet to the base/stand, also it will counter the effect of the strong linear grain of the rail contrasting with the burr. I'm no scholar of Krenovs work, so I'm not sure it that fits in with the general theme but that's what I would try.


Good luck!
 
gasman":3cf8l7zz said:
I've come back to this after a few hours (and a shared bottle of vino with SWIMBO :p ) and it's unquestionably the drawer. This is actually crying out for a 'secret' drawer and easily done if the front is laminated. Say your were to make up the front (again :lol: ) out of five laminations...the second one in you keep out of the bundle and so you laminate the front from Nos. 1,3,4 and 5. You then cut the rectangular orifice in the rail front (laminate No1 is at the front) and you then use the spare No2 laminate as the front of the drawer...see where I'm going? The grain will almost be an exact match (i.e. 'twixt No1 and No 2 leaves) so that if you're careful, the matching between the two slightly different grains ought [-o< to be almost indistinguishable.
The handle as shown on the current drawer is too big. In my view, handles, although small, are just about the most important feature on a project as it's where the individual first makes contact with the piece and it's where the eye is immediately drawn to. if you look at the handles on many JK pieces (though not all it has to be said) they're generally on the small, unobtrusive side and don't draw attention to themselves, but rather 'blend in' as part of the whole piece.
Mark, please accept these comments in the spirit in which they're given...this is a really good piece, but I think if you sit back and look objectively at it over the course of the next few days you'll see (I hope) that the drawer just doesn't sit well with the overall finished concept - Rob
 
gasman":1cpepue6 said:
I am almost frightened to post the pictures with the burr fronted drawer in case you lot don't like it!

Do it for yourself, if you like it that's all that really matters. I just like looking at the pictures of it being made and seeing the techniques used. The actual look of the piece doesn't bother me in my enjoyment of the thread.
 
Thanks so much gentlemen for the criticism / comments
I really have no problem with people making negative comments - that as I have said before is the only reason I post my work here - it is certainly not to get smoke blown up my a**e or otherwise! I make half a dozen pieces a year - almost all for us and friends - so I value your expert knowledge. When I can afford to retire from my job I might do it a bit more semi-professionally we will see
I am still struggling a bit with knowing what is 'right' here - and if anything it is the handle which stands out the most (only fixed through one 2mm hole thus far in the centre so easily changed. Up close and personal the burr front looks better than it does in the photos otherwise it would have gone already by now. I have no problem changing something if I don't like it.
I think I might try a 2/3 size handle for the drawer first - and if I still have concerns then as Rob says my fail safe option is to put matching drawer front in. Actually though Rob, rather than what you suggest, I think I can remove the outermost laminate carefully - then cut an oversized piece of 3mm thick cherry, cut it longitudinally in 2 places so I get 3 long pieces one the height of the drawer and one each the height of the pieces above and below the drawer. Then I cut accurately the middle piece to get the front of the drawer and 2 pieces for either side then carefully stick top and bottom lengths back onto the 2 pieces either side of the drawer - that way it will only be the longitudinal grain where there is a join. Not sure if that is clear the way I have said it but you may end up seeing it!!
Thanks again and best wishes
Mark
 
Firstly congratulations on a cracking job and having the bottle to do a live design thread in public. Your ability to change things on the fly and get away with it is amazing.

I love the cabinet but I have to go with those above whofeel that the burr drawer is a step too far and confuses the design with too many contrasts. I think the lighter rail looked better and, if it were me, which it is not, I would have put a concave curve on the bottom edge.

All strength to your arm and I hope it encourages others to get into design and making rather than yet more plane flattening et al.
 
gasman":1c8ngr80 said:
... is to put matching drawer front in. Actually though Rob, rather than what you suggest, I think I can remove the outermost laminate carefully - then cut an oversized piece of 3mm thick cherry, cut it longitudinally in 2 places so I get 3 long pieces one the height of the drawer and one each the height of the pieces above and below the drawer. Then I cut accurately the middle piece to get the front of the drawer and 2 pieces for either side then carefully stick top and bottom lengths back onto the 2 pieces either side of the drawer - that way it will only be the longitudinal grain where there is a join.
Mark
I can see what you're saying Mark and that would work as well, but there might also be a slight mis-match in joining the laminates back together again on the front rail. My method entails more work as the whole of the front rail would have to be re-made, but at the end of the jour, it's your piece and you the one that needs to ponder on how (if indeed you do) you're going to do any alterations to the drawer. Making a much smaller handle is a good start though, but whatever you do, be like an Ent...don't do anything in haste :lol: and if necessary make up a trial of the front using other veneers to see what the matching effects would be like - Rob
 
That's a really nice piece, the drawer and stand could be remade, maybe thay'd be better, maybe not. There's something about it which isn't quite right but overall it's excellent. There's no finish on yet right?

Aidan
 
Well done, first decent bit of cabinet making I've seen on here for a while. I actually like the burr oak drawer front, and wouldn't change it myself. I like the fact that it jars people, Krenov was more playful anyways, and used to mix up his drawer fronts with all manner of different timbers. Malmston his senior who Krenov copied/was inspired by, was more anal(arts & crafts) about things. The clunky handle looks a bit poo tbh, could you not return the ends a bit?
 
I think I am finished finally - it has taken longer than virtually anything I have ever done - mostly because of the indecision, remaking, undoing, vacillation, heart-searching etc etc
All that needs to be done is to put the glass in which I will do once it is totally dry and waxed
Off and on this week I have tried a couple of different things... I removed the handle from the drawer, made another about 2/3 size which looked much better also tried one in sycamore which looked awful so reverted to a 2/3 cherry version) - but then I also tried getting a spare piece of laminated 3mm cherry and sticking it with double-sided tape to the front of the drawer just to see how that would look.
Although it looked good (and obviously the grain did not match perfectly although it was close) I actually far prefer the burr-front to the drawer. I did not want the invisible drawer that Rob talked about - I have done that on other pieces of furniture and I wanted this one to stand out. So that was the decision definitely made - with the smaller handle
OK - next problem was how to 'join' the cabinet to the base. Somehow I have lost almost all the photos of this episode from my iPhone sorry about that. I tried ebony discs 1/4 inch thick and 20mm diameter on the corners but it looked just wrong - same for cherry. So then I had a brainwave although the anti-burr sceptics amongst you may disagree! I cut quite a few pieces of burr 10mm x 6.25mm and long enough to go along the front, sides and back of the cabinet. I used the old sycamore shelf which was too thin to get some 1/4 inch thick sycamore and shaped it exactly to the front, sides and back and then stuck the burr onto the sycamore pieces so that they were aligned with the inside of the cove cutter. Then I stuck these pieces onto the base as follows
7061290003_1bd9f1313e.jpg

Meanwhile I had also used the same bearing-guided cove cutter on the bottom of the base of the cabinet - so then, once these were all dry, I used these to put 6 screws from below up into the base of the cabinet with slotted holes for the screws. I know JK would probably not have used screws but this cabinet needs to be able to come apart and be transported so that was my excuse.
Once the cabinet was assembled I used a Clifton curved cabinet scraper which just fitted the semi-circular 'recess' around the whole thing. I sharpened it repeatedly and was patient and it took a long long time but went fine
So far it has had sanding sealer followed by 2 coats of Liberon finishing oil. I will finish the oiling tomorrow, wax, and then put the glass in.
6915199984_fa23722be8.jpg


7061291417_4494028c12.jpg


7061292273_8c1439a142.jpg


6915198346_7c1bed30bd.jpg

I think this thin 'sandwich of burr does 2 jobs - it joins together the cabinet and base and complements the drawer front making it look less out of place. However each to their own!
It has been a fascinating journey - and although several of you doubtless don't approve opt the final version, I think it has made me look at wood and its grain far more when making a piece - so that's got to be good hasn't it?
Thanks for your comments
Mark
 
I think that's a superb detail for the junction between cabinet and base - very nicely done

Ed
 
gasman":35yinpvw said:
6915198346_7c1bed30bd.jpg

I think this thin 'sandwich of burr does 2 jobs - it joins together the cabinet and base and complements the drawer front making it look less out of place. However each to their own!
It has been a fascinating journey - and although several of you doubtless don't approve opt the final version, I think it has made me look at wood and its grain far more when making a piece - so that's got to be good hasn't it?
Thanks for your comments
Mark
I agree about the burr joining piece Mark and it does compliment the drawer front. The handles though, to my eyes at least, still need altering. Looking at the timber and the way the grain patterns run is I think, one of the crucial things ('specially in a show piece like this) that you have to take into consideration. I've got a cabinet coming up later on this year where I've done exactly that...the material is in-stick at the moment just conditioning a little further, but it took quite a long time to ponder on how the stuff was going to be cut from the board(s) to get the right figuring, 'specially in the doors. I've just got the frame to sort out now, but as that's in teak and I've had it in the 'shop for the last 20 years I'm not too fussed - Rob
 
Thanks guys
Glass now fitted and awaiting the final wax polishing then some restocking of spirits etc might be called for!
6922399758_38dde118f7.jpg

Cheers
Mark
 
Back
Top